Vintage video effects, as the name suggests, allow you to transform your videos into nostalgic vintage videos. These effects simply make your recently taken video look as though it was taken in the previous era, like the 90s and 80s, using an old film camera.
Well, whether you are just doing it for fun or running a professional video editing task, getting the best tool to make a video look vintage will significantly transform your experience. In this article, we'll guide you on how to add vintage filters to videos using the best video maker.
In this article
What Is the Best Video Maker to Add a Vintage Effect?
While there are a number of video makers to add vintage effects to your videos on the market, not every tool can get you the quality results you're looking for. Talking of an easy way to do this, Wondershare Filmora is actually one of the best vintage video makers for the following reasons:
- A huge library of vintage and retro effects for videos from the 60s to 90s.
- Lots of ready-to-use vintage video templates.
- Millions of vintage filters and overlays.
- Preset luts to enhance visual quality with simple clicks.
- 100+ advanced editing features, such as motion tracking, video masking, smart cutout, and more.
- A wide stock of stickers, fonts, and music to make retro videos.
- AI-powered video editing tools to improve editing efficiency include AI object remover, TTS, smart BGM generation, video denoise, AI video enhancer, and more.
How to Make Videos Look Vintage?
Filmora provides two ways to make videos look vintage: you can either add vintage video effects and overlays or apply vintage and retro filters, which can be achieved on Windows, Mac, Android, and iOS. Here are the steps to apply the vintage effect to videos and photos on PCs and mobile separately.
Apply Vintage Video Effects on a PC
- First, download and install Filmora on your PC.
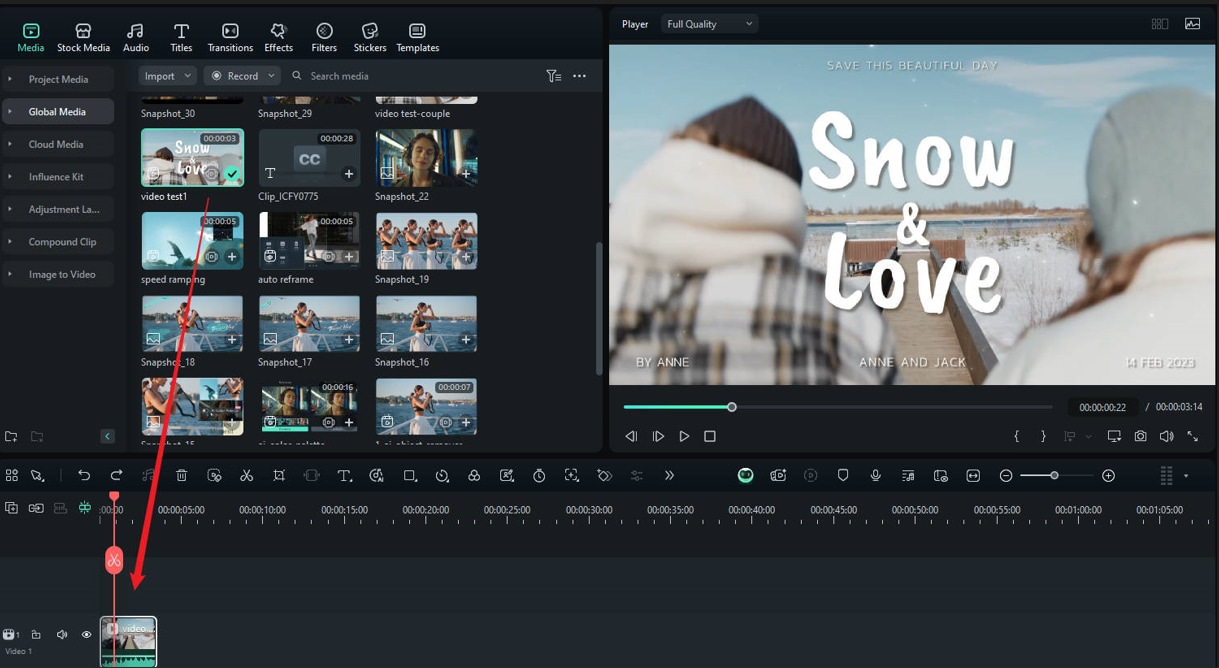
- Launch it, then go to the "New Project > Import Media" tab to upload your video. Next, drag the video to the timeline.
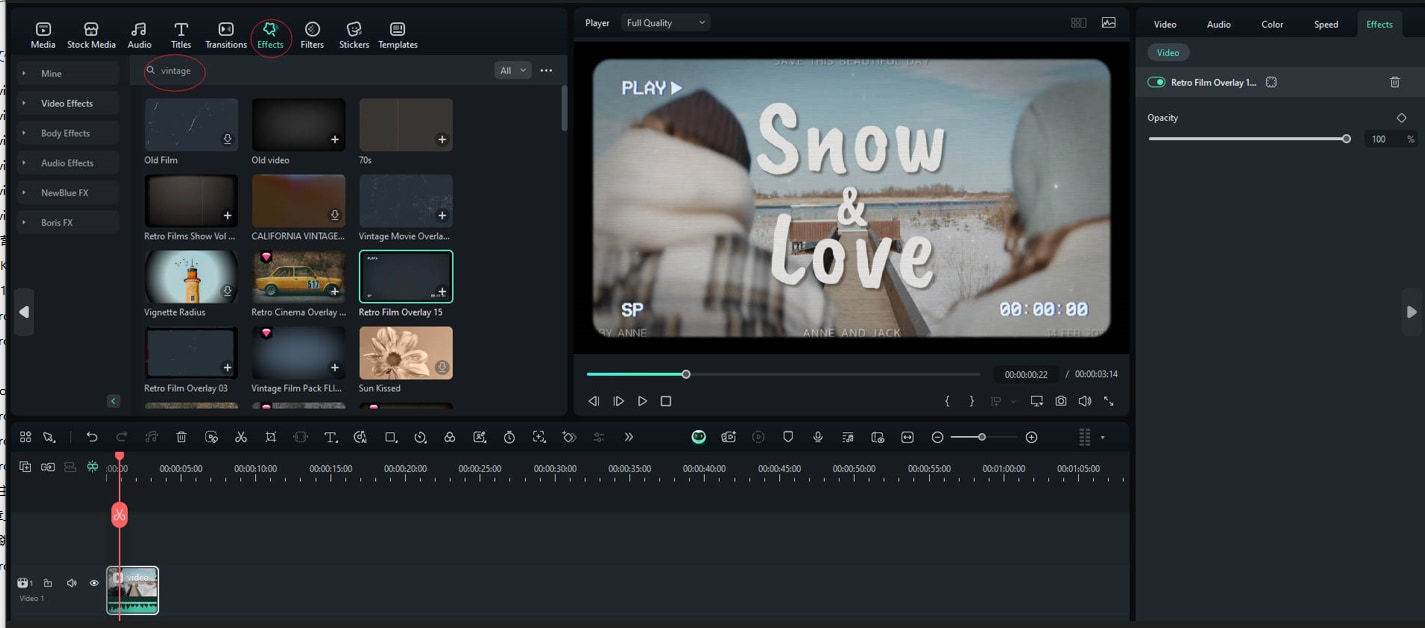
- Go to the "Effects" tab > type "Vintage" in the search bar > click the "+" icon to add and drag the vintage effect to your video.
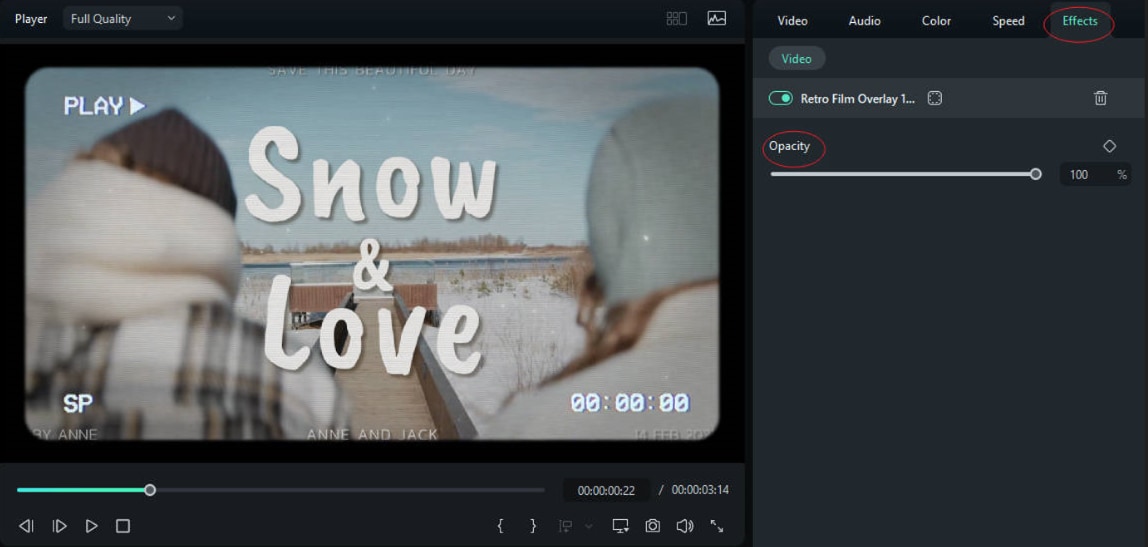
- You can also go to the right-side panel > effect > to customize the opacity of the vintage effect.
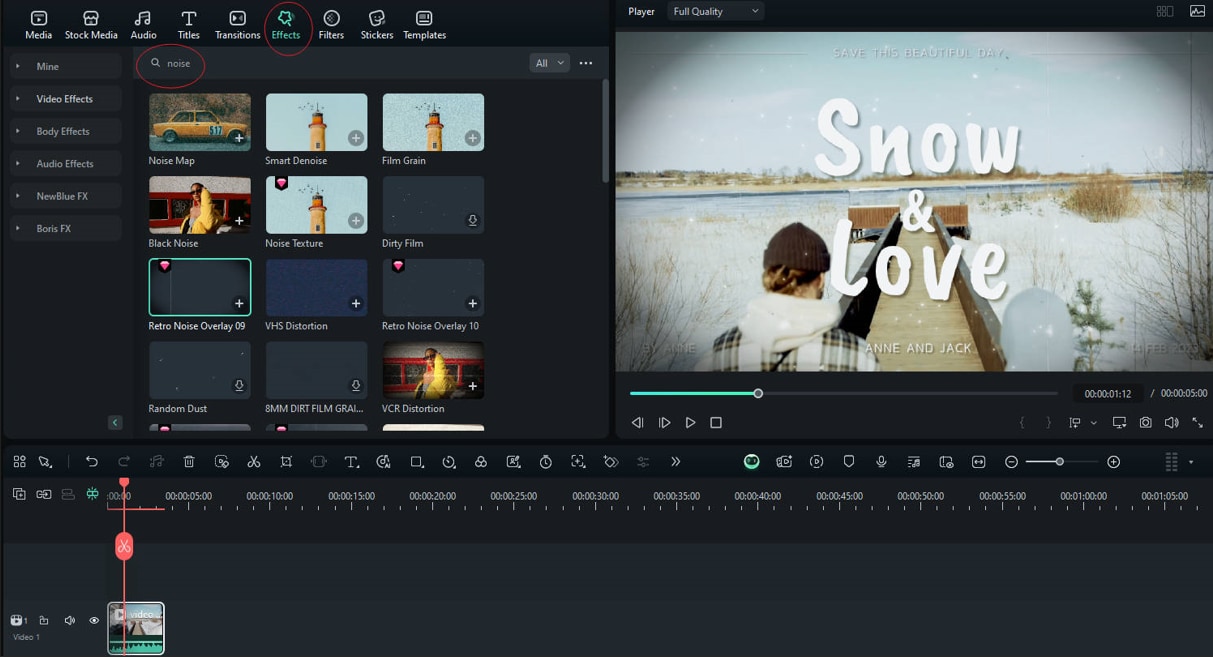
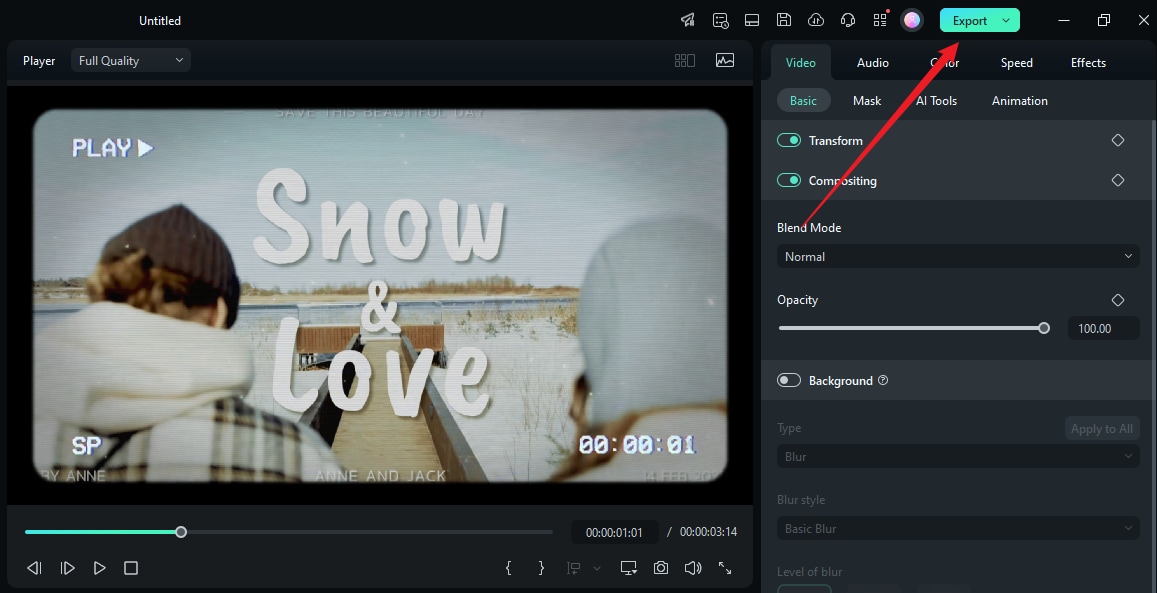
- Add a film grain or noise effect to make it more like a retro video.
- Alternatively, you can go to filter > search vintage or retro > select one filter to apply.
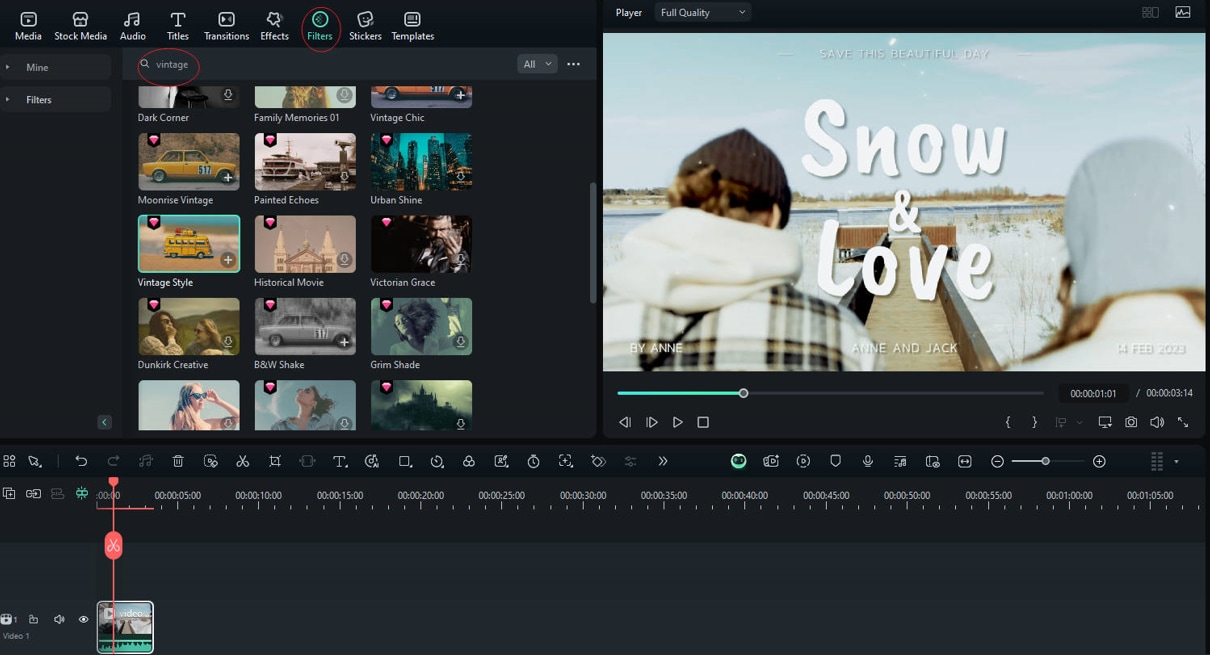
- Make other edits if you need, such as trimming, cropping, and adding transitions, animations, titles, stickers, and others.
- Export the video with a vintage effect and filter.
Add Vintage Video Filters on Mobile
If you want to add vintage video effect to your videos on a mobile, please check the following steps.
- Download and install Filmora app on your Android or iPhone.
Filmora for Mobile Filmora for Mobile Filmora for Mobile Filmora for Mobile Filmora for Mobile
Edit Videos on Your Mobile Phone with 1-Click!

- • Powerful Brand New AI Features.
- • User-friendly video editing for beginners.
- • Full-featured video editing for professionals.
4,085,556 people have downloaded it - Click New Project and upload your video to the timeline track.
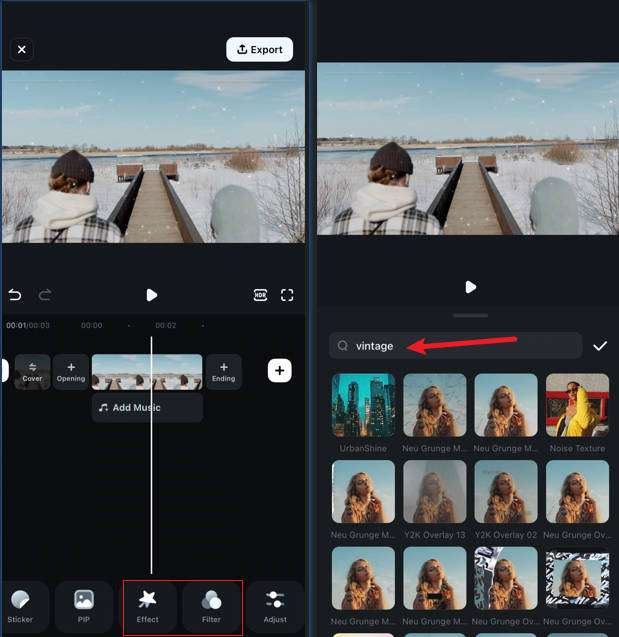
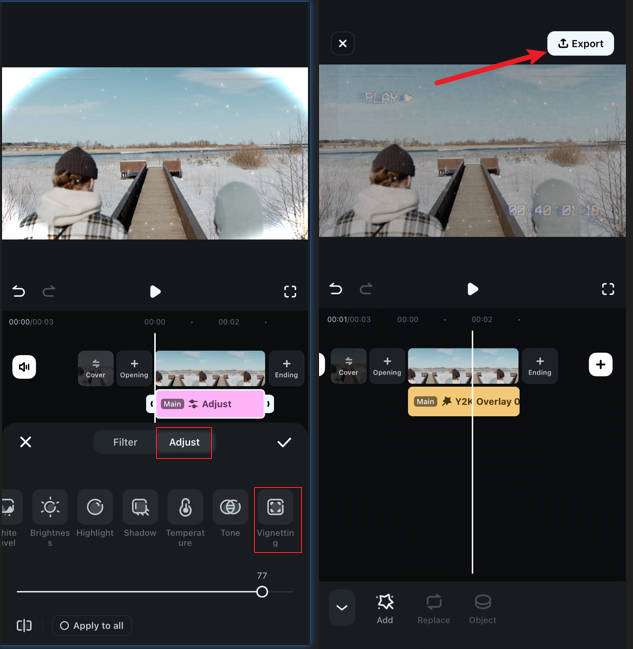
- Navigate to Effect > search vintage in the bar > select one to apply to the video.
- You can also go to filter > film > apply the vintage filter; If you want to explore more vintage filters, you can directly search in the box.
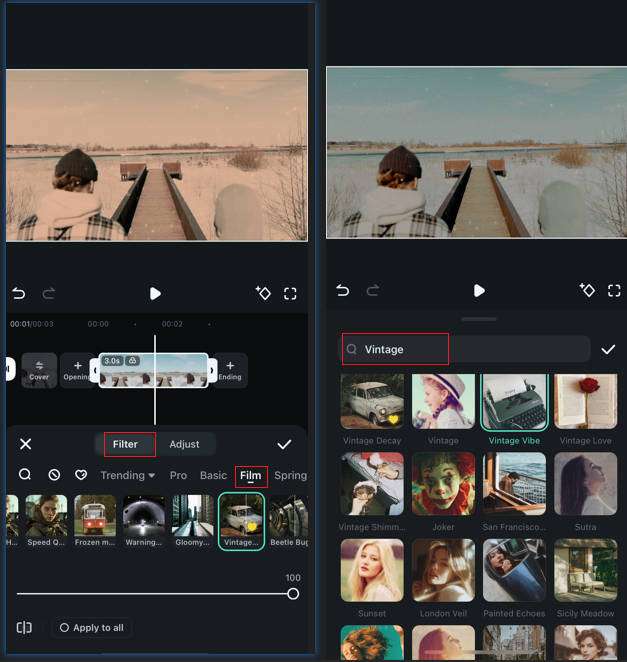
- Edit the vignetting area of the video for a more vintage like video, then export it if you are satisfied.
Tips for Making a Realistic Vintage Video
To enhance your experience, here are a few hacks to help you make stunning and realistic-looking vintage videos:
- Reduce saturation (-20% to -40%): use the color curve tool to slightly compress highlights to simulate film tolerance.
- Use a Suitable Vintage Video Maker- Choose a suitable tool like Filmora and be sure to get a good platform to create vintage videos for diverse needs.
- Make the Right Effects Adjustments- While using various retro effects and filters makes your video look more vintage, correctly adjusting elements such as color temperature and saturation can make your vintage video more realistic.
- Shoot your Video using Vintage Camera Lenses- If possible, you can use vintage camera lenses to capture vintage videos directly from your camera. While shooting, ensure that the saturation, contrast, and highlight settings are kept low.
- Add filters, effects, and overlays – Use filters and overlays such as grain, dust, and scratch to give a vintage texture to your videos.
Conclusion
Vintage videos bring a nostalgic effect, and many media lovers leverage them to attract more viewers to their channels. However, creating vintage videos is not always a walk in the park. You need a proper vintage video maker like Filmora to seamlessly and effectively add retro video effects to your videos. Let's download filmora today and see its magic!
FAQs
-
What app makes your videos look vintage?
Apps that provide vintage elements such as vintage effects, filters, overlays, and other assets can help make your videos look vintage. For example, Filmora gives you retro effects, filters, and overlays that suit your various vintage video needs. -
How to Make A Video Look Like A 90s Film?
Making a video look like a 90s film is super easy. Simply find a suitable vintage video maker tool such as Filmora and use the vintage effects that resemble the 90s. You can adjust the color temperature, saturation, and contrast to mimic those 90s film backgrounds. -
How do you make YouTube vintage videos?
Since YouTube does not provide a built-in feature to make a video vintage, you will have to use a third-party video vintage maker like Filmora. Simply download the YouTube video, upload it to Filmora, and add vintage effects, filters, overlays, and other elements. You can then export it directly to YouTube. -
Where do you get vintage filters?
Depending on the tool you are using, you can find vintage filters in the filters library. However, some tools have limited filters, while others have tons of them designed for different scenarios. For Filmora, for example, you can search for and download many vintage filters from the filters library. -
Can you convert a normal video to cinematic one?
Yes. You simply add cinematic effects to your normal video. However, you need a tool capable of adding cinematic effects to your video. You can try Filmora.


 100% Security Verified | No Subscription Required | No Malware


