Content creators and marketers alike have found dynamic ways to gain valuable information using Picture-in-picture (PIP) videos. PIP videos are very popular in tutorial videos, video reactions, walkthroughs of Gaming, and also in Corporate presentations, to provide viewers with an immersing, on screen experience of watching two video streams side by side. In this guide, we will dive deep into how to create picture in picture video, picking the right software, advanced editing techniques for PIP videos, and more with Filmora! By the time you are done, you will be in a position to create captivating and engaging PIP videos for your audience.
In this article
Part 1: Understanding Basic Elements of a PIP Video

With a Picture-in-picture video you can see two videos in the same frame. This usually entails a main video (background) and a second, smaller video (overlay) which appear in one corner of the screen. This is a good thing for videos in which viewers need to see both elements at the same time, as in tutorials with a webcam view, reaction videos, or product reviews. Here's a breakdown of the essential elements:
- The Main Video (Primary Content): The background, and, thereby, the prime focus of your content is this. This is a tutorial video, or gaming walkthrough, or product showcase. Most of the screen is taken up by the main video, which is the core visual of the page.
- The Secondary Video (PIP Window): This smaller window of content, usually placed in the corner, embeds supplementary content such as face cam or additional view. You can change its size and location so that you don't block important parts of the main video.
- Customization Options: PIP window can be customized in most of the PIP video editors. It is possible to change its size, position, add borders or shadows or apply transitions when it is possible to blend nicely into the video flow. And advanced editors build in creative frames or shapes to frames like round corners or circular.
The viewing experience in PIP videos is unique. They are very engaging and will complement the content by allowing viewers to actually see both the main and supplementary visuals together. Not only is this very useful in tutorials and online courses, it's also great for reaction videos, when viewing the content creator adds to the message you're trying to put across..
Part 2: Essential Preparations for Creating a Picture-in-picture Video
Planning ahead, selecting software and several steps required to merge the video elements is what goes into making a PIP video. Here's a step-by-step breakdown:
Choosing the Right Software
The capabilities of your video editor are what make the difference as far as the quality of your PIP video goes. Some essential features to look for include:
- Multi-layer support: Enables you to enter multiple video and audio layers for complicated editing.
- User-friendly interface: When editors design their UIs with intuitive tools and shortcuts, look for visuals, modeless workflows, and keyboard usage.
- Customization options: Make sure that the editor lets you resize, move and tweak the PIP window.
- Performance: The high quality videos should be supported without lag or crashes by a reliable editor.
Planning Your Video Content
Before diving into the editor, it's essential to define your video's purpose and plan the content accordingly:
- Purpose of the PIP Video: Find out if what you're making is a tutorial, reaction video, or instructional content. In other words, this will determine how you go about using the PIP effect.
- Video Clips: Before editing, you'll need to have your primary and secondary video clips prepared. Your main video can be a screencast, product demo or background video, and your PIP video can be your face cam, or extra visuals on the screen.
- File Compatibility: Make sure both of the videos that you have are compatible with the software you will be using to edit the videos. There are many accepted formats like MP4 and MOV for instance.
Part 3: Employing a PIP Video Editor for PIP Videos Creation & Editing
Creating Picture-in-picture (PIP) videos is made easier with the right video editor. In this section, we'll guide you through the basics of using a PIP video editor, like Filmora, to create professional-looking layered videos. Depending on what you want to accomplish – be it creating a reaction video, an instructional overlay, or a secondary camera view – PIP won't just enable you to stack visuals; it will also let you place, resize, and apply effects to them.
Filmora for PIP Editing
- Customizable PIP Features: PIP controls and customization capabilities can be extended with Filmora using borders and shapes and multi-screen modes.
- Built-in Effects and Transitions: Utilizing filters and transitions, Filmora has a list of effects that can be used in making PIP videos and these are animations, frames, and underscores.
- Color Correction and Filters: Filmora also comes equipped with fundamental tools for color correction as well as filters to make the PIP video compatible with the overall appearance of the main video.
- Multi-layer Support: Filmora allows for multiple videos and audio tracks, which is ideal for intricate PIP operations.
- Text Support: Add text on PIP windows to provide more information.
- Superb video stabilization with low distortion.
- Vast video/audio effects and creative assets.
- Powerful AI for effortless content creation.
- Intuitive, professional yet beginner-friendly.
- Works on Mac, Windows, iOS, and Android.

Step-by-Step Guide: How to Make a Picture In Picture Video Using Filmora
Step1Open Filmora and then click on "New Project"
Open Filmora on your PC and click New project to start a new project. Based on your specifications you may set the aspect ratio and projection type.
Step2Import Media Files
Choose to view and open files from the computer, camera or any other accessed device available.
Step3Insert the background Video to the Timeline
Observe that in the format of the posts that is the timeline format at the bottom of the screen, it is possible to use the Media Library to drag the main background video to the timeline itself. This video will process a base of the PIP effect out from which subsequent video processing will take place.
Step4Place the Overlay (PIP) video or image
Drag this video or image from the Media Library onto another video track which should be located above the background video within the timeline.
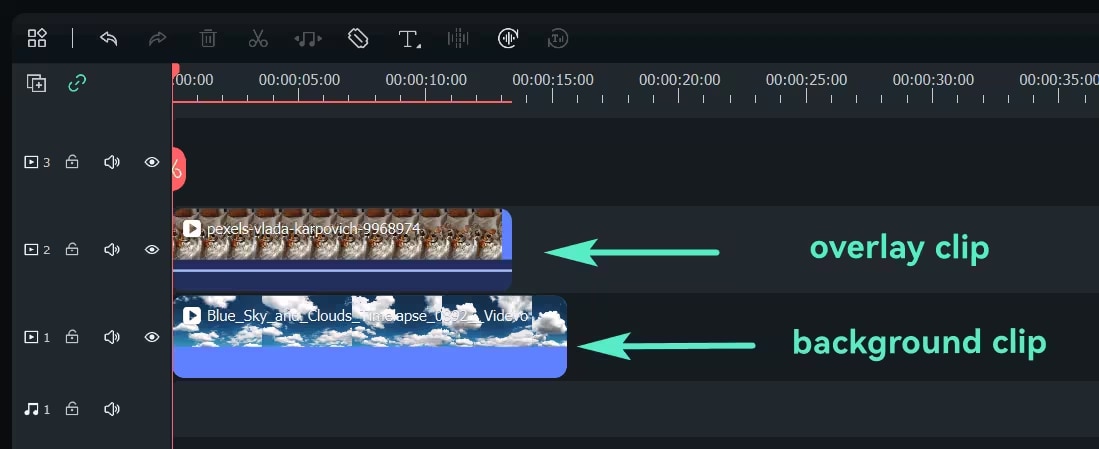
Step5Adjust the Size and Position of the PIP Overlay
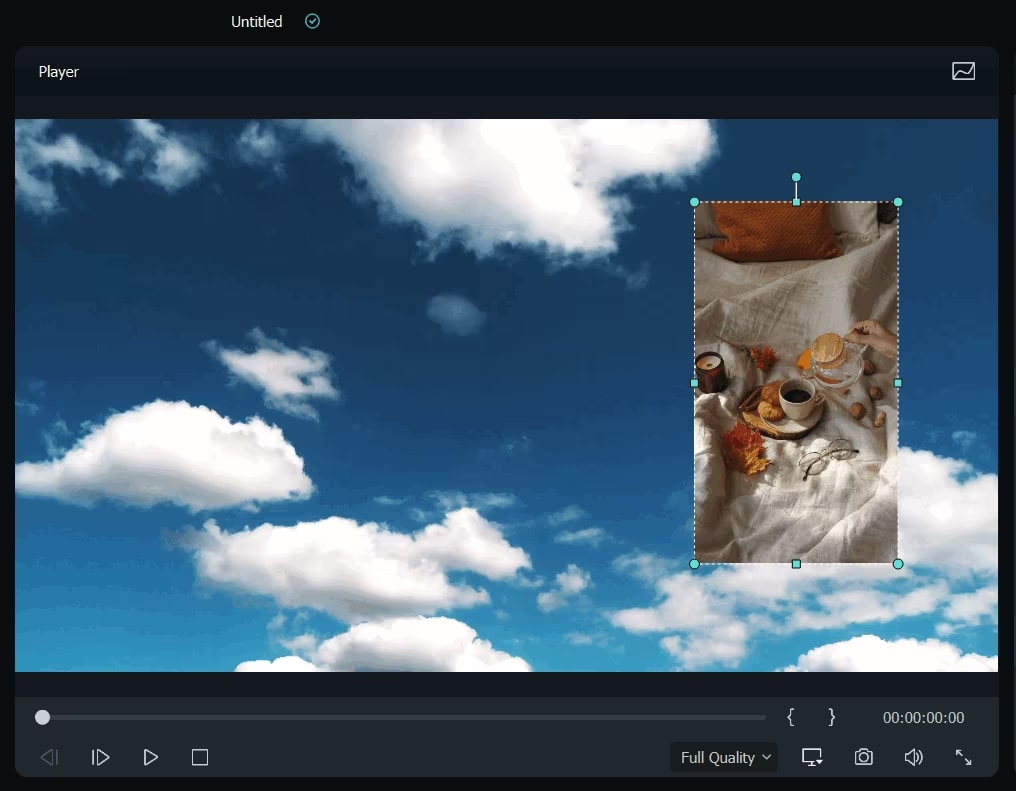
Click on the overlay clip in the timeline to select it. In the Preview Window, resize the overlay by dragging its corners and move it to your desired position on the screen (e.g., top-right corner).
Step6Adjust Blending Mode
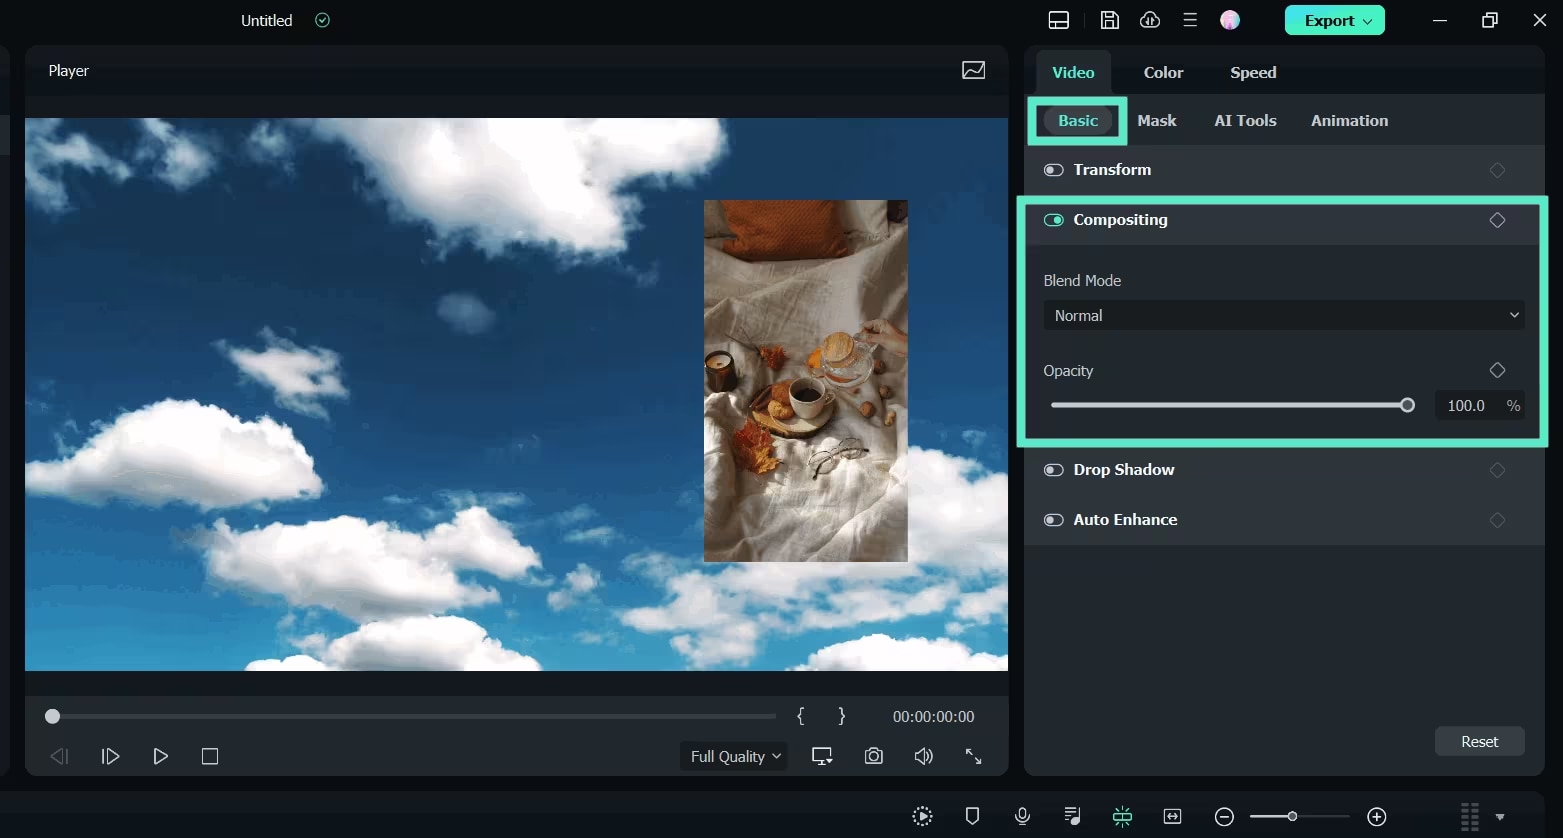
For advanced effects, select the PIP video, go to the Basic tab in the Video Edit Panel, and scroll down to the Compositing field. Choose a blend mode (e.g., multiply, screen) and adjust the opacity to get your desired look.
Step7Change PIP Shape with Mask
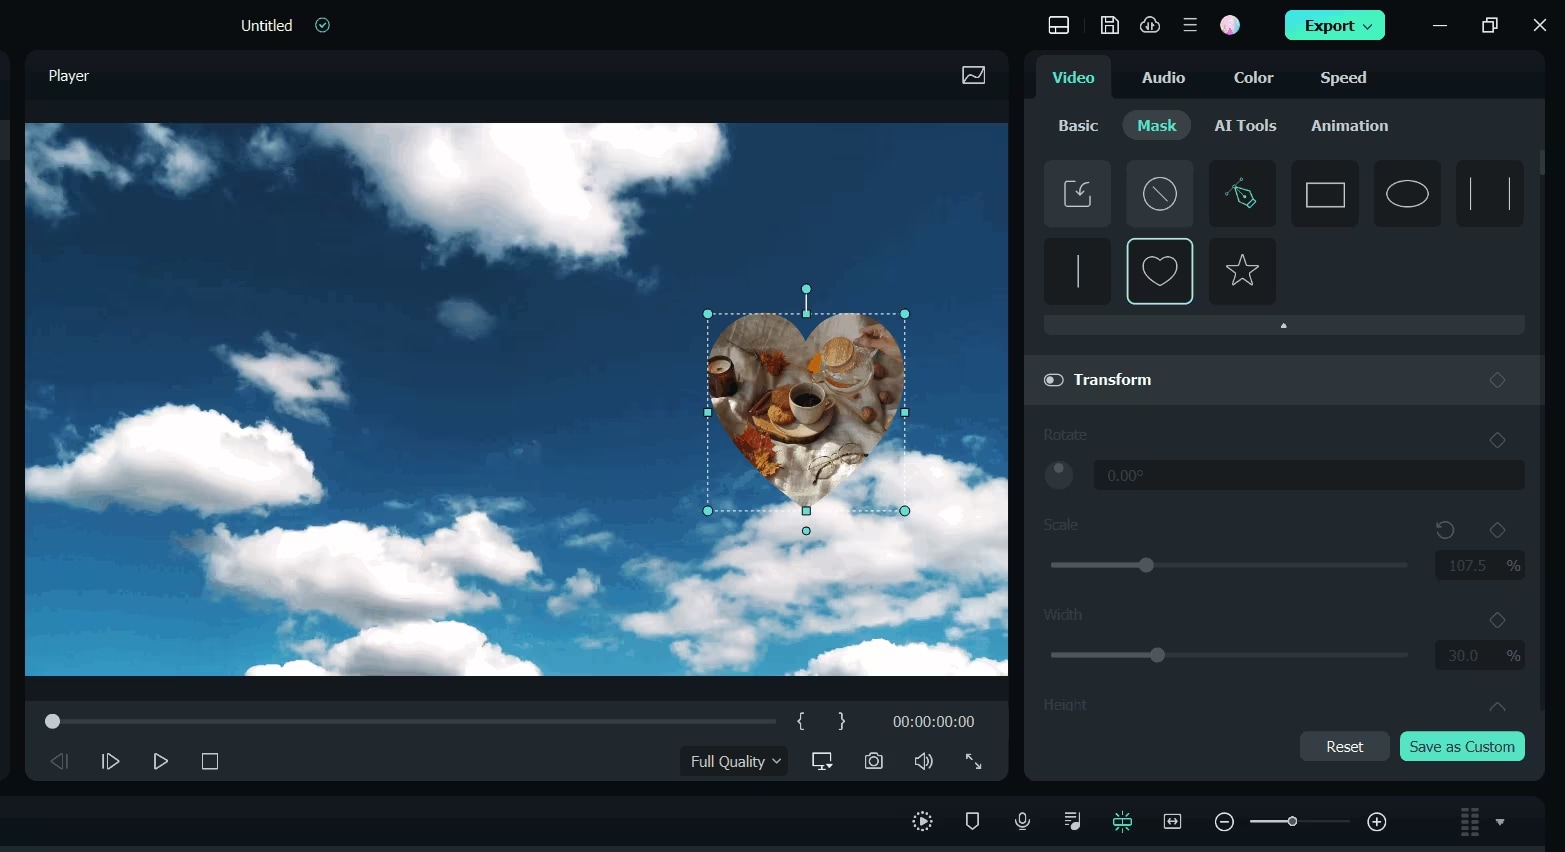
To change the shape of the PIP video, go to the Mask tab and apply a preset mask. You can also import custom masks or add keyframing for dynamic mask effects.
Step8Add Animation and Motion
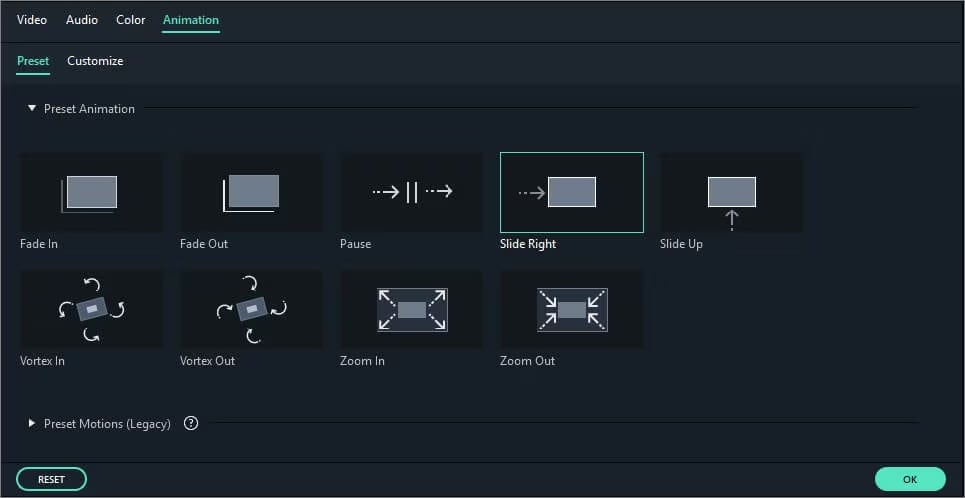
Double-click the PIP video in the timeline and switch to the Animation tab. Choose from Filmora's motion presets or animations, and apply them by double-clicking or right-clicking on the desired effect.
Step9Preview the PIP Video
Press the Play button in the Preview Window to see how the PIP effect looks. Adjust size, position and or timing of overlay as needed.
Step10Export the PIP Video
Click the Export button in the top toolbar when you're satisfied with the result. Select the format you want, decide the resolution, and select which location on your computer you want to save it to.
We have created a PIP effect successfully using Filmora on the PC.
Part 4: Mastering Advanced PIP Editing: Tips for Enhanced Video Impact

Customizing the PIP Frame: Consider adding effects like borders, shadows, and unique frame shapes to make the PIP window stand out without distracting from the main content. Filmora allows you to use rounded frames or custom shapes for a personalized look.
Using Transitions for Seamless PIP Integration: Transitions can also contribute towards the efficient completion of a PIP video. Easy transitions like fade-in/fade-out are applied for scrolling to make the appearance of the PIP window look natural.
Synchronizing Audio for a Balanced Experience: Regulate the sound volume so that neither of them actually drowns the other one. You can also use the audio sync feature of advanced video editors like Filmora.
Noise Reduction could be used to filter out background noise hence leaving the audio source very clean and professional.
Conclusion
At first, learning how to create Picture-in-picture video may seem tedious and complicated, but with the right tools and steps, it can be a seamless process that yields professional results. For instructional aims, business presentations, or as a filter for reaction content, PIP videos can turn your message into something more dynamic and inviting. Fortunately, thanks to tools like Filmora, the process of editing videos is available to everyone including even the beginners and the professionals. Gather your footage, fire up your video editor and get to creating your own powerful PIP videos today.


 100% Security Verified | No Subscription Required | No Malware

