
 100% Security Verified | No Subscription Required | No Malware

Truly, it is the video color that fills every scene with overflowing emotions. Sure. The acting and setting are also considered factors. However, we cannot deny the fact that video color is the final touch that turns raw footage into magical representations. That said, make sure that video color grading stays front and center during the creation process. Find the right tool and put it to good use. Don't worry. You can now perform color grading right from your mobile devices. Yes. This procedure has been simplified and made accessible to anyone who wishes to upgrade the quality of their visual content. Big thanks to modern video editing apps that bring this convenience to us.
In this article, we will delve into the power and process of video color grading. We will also help you choose the best video color grading app and provide how to use it. Lastly, we will talk about the role of artificial intelligence in this regard. Continue reading below to learn more.
In this article
What is Color Grading and AI Video Color Grading?
Color grading is a procedure that allows you to adjust the visual tone of your videos according to your liking. Video editors often modify the default color, contrast, and saturation settings of the content to achieve a certain look. For projects with more advanced requirements, others use curves and color wheels to apply a specific effect. Either way, the role of this procedure remains the same for both methods. Video color grading is initiated to establish specific mood, style, and visual consistency.
Naturally, video color affects our feelings and perceptions. Its specified settings have the power to evoke emotions and move the intended audiences to another world. In the same way, video color grading can also help you create and maintain a particular style. Yes. Configure one for vintage, futuristic, or simple video content and then reapply them accordingly as pre-defined effects. Of course. Such a coherent workflow can help you create and sustain visual consistency. Is it that important? Yes, indeed. A consistent look for your videos can help you retain attention, keep the mood intact, and support your brand identity.
The traditional way of facilitating color grading procedures is still being used today. However, we cannot deny that many video editors are starting to explore other feasible alternatives. With the continuous development of modern technology, artificial intelligence is now being integrated into the color grading process. That is right. AI video color grading is gradually becoming the industry standard in terms of efficiency and convenience. Should you give it a shot? Based on its current standing, we can say that you should.
The color grading process, assisted by artificial intelligence, is mostly automated. That means user intervention is kept to a minimum. Don't worry. AI color grading tools have sophisticated machine-learning technology that analyzes and adjusts color profiles. Generally, the machine learning of AI color grading is trained to detect significant patterns and styles of video colors. Based on this set of data, the tool then adjusts the brightness, hue, and tone curves to recreate certain looks. On your end, all you need to do is wait for the results and choose the perfect fit for you.
Benefits of AI Color Grading
You can still opt for the traditional method of video color grading. There is no problem with that. One way or another, it can truly help you make the outputs more personalized. However, don't forget that AI color grading offers this kind of luxury, too. Yes. Apart from efficiency and convenience, this technology offers a lot more. Do you want to know some of them? If so, then check out the list below.
- It provides smart color grading recommendations.
- It improves the video editing workflow.
- It saves a lot of time.
- It replicates complex styles in a snap.
- It creates consistent styles and designs.
- It shifts the focus of the video editor from technical complexity to creative expression.
Essential Features to Look For in a Video Color Grading App
We have learned earlier that video color grading is indeed a very important step in the content-creation process. That's why you should consider color grading a key element when editing your videos. Don't worry. There are lots of video color grading apps out there that can assist you well in this regard. In fact, you can actually download some of them on your mobile device and perform the procedure there. Just make sure that you choose the perfect option filled with features you need. To help you out, below is the list of important features you should consider when making a choice.
Intuitive Controls and Interface
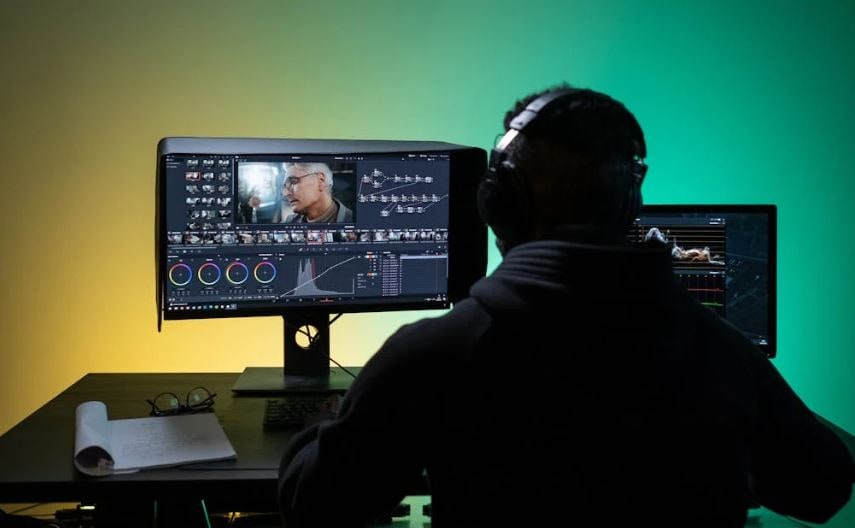
When choosing a video color grading app, choose the one that is very easy to use and navigate. Take note that its efficiency relies heavily on the controls and interface operate. Therefore, take this aspect into consideration to keep your workflow streamlined and effective. In this regard, Wondershare Filmora is one of the video color grading apps you can pick. It has a beginner-friendly and extremely responsive workspace that will make video color adjustments very convenient.
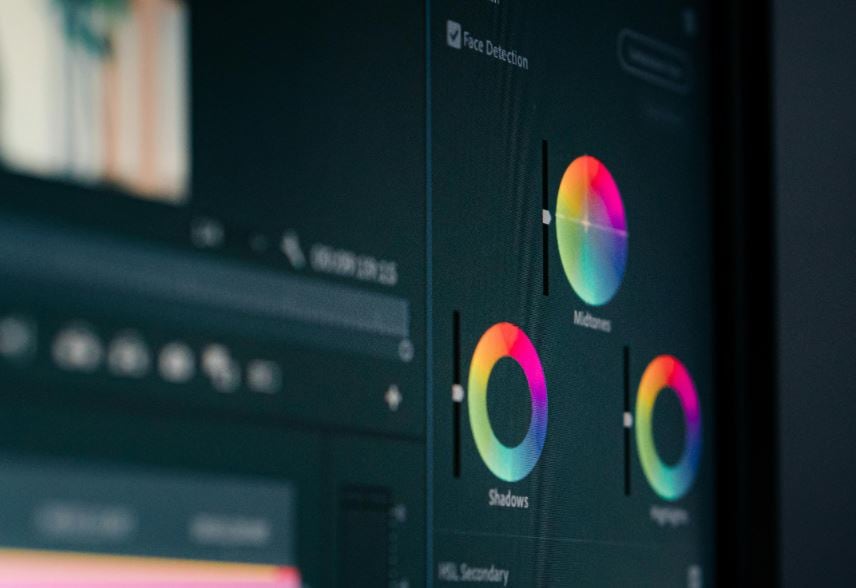
Comprehensive Color Adjustment Tools
Apart from ease of use, the functionality must also be considered well when selecting a video color grading app. For instance, the tool must have both primary and secondary color controls. You can use the former to initiate general color adjustments and the latter for targeted calibrations. On top of that, make sure that your preferred video color grading app offers enough monitoring panels. The curve monitors and vectorscopes are useful instruments in this regard. They can help you understand the chrominance of your color grading inputs and study their technical information. Having this powerful set of color grading tools will help you create high-quality videos going forward. Hence, choose the app with enough color adjustment features.
Preset and Library Customizations
Some video editors don't wish to start from scratch when performing video color grading. That's understandable. If you're one with the same preference, then choose a video color grading app that offers numerous presets. Yes. Choose one that reflects the style and design you want to apply to your video projects. Along with that, make sure that these presets are customizable on your end. This way, you can instantly apply the style to your videos while keeping some personal touches. To stay consistent, ensure your tool allows you to save custom configuration and reapply it to other projects.
Performance and Format Compatibility
It is very important that the color grading process goes seamless and smooth. Otherwise, the result might be affected significantly. In this respect, the performance of a video color grading app depends on several technical factors. Among them are file format, codec, color space, and GPU power. Make sure that your preferred software works well with these specifications. Furthermore, choose a video color grading application that allows you to export outputs in different formats. For sure, it will help you produce video content that is optimized for various delivery platforms.
AI-Powered Color Intelligence
Last but not least are the AI-powered features of your chosen software. As indicated previously, we have learned that artificial intelligence plays a game-changing role in this regard. Imagine automating the intricate process of color correction and visual modifications. Indeed, that's a whole new level of convenience. Having said that, choose the video color grading app that supports the use of this technology. You can take Wondershare Filmora into consideration. It has powerful AI tools that simplify color grading a lot.
What Makes Filmora's AI Color Features Revolutionary?
It is no secret that video color grading is a very complex process. In order to create a certain visual effect, you have to adjust certain parameters as accurately as possible. Sure. It might be a walk in the park for some video editors. However, others don't have adequate patience and knowledge to act the same way. That said, the AI Color features of Wondershare Filmora have become extremely useful nowadays. While Filmora still offers manual color grading tools, at least you have the choice to opt for automation.
The AI Color Palette feature of Wondershare Filmora offers the same benefits to users. You can definitely use it to do color grading and apply your desired effect to your video content. However, this method is a lot different from the traditional video color grading. Since this tool is powered by AI, the entire process is fully automated. Generally, AI Color Palette analyzes the reference clip or image, extracts color data and reclassifies it, and finally matches the generated palette. Yes. That's basically how this machine works.
Key Features of AI Color Palette
Filmora's AI Color Palette is filled with highly advanced features that set it apart from others. Do you want to know what those are? If so, check out the list below. Read the items very well and familiarize yourself with their functions.

- It automatically extracts the color profile from a reference clip and matches it to your video content.
- You're given the option to increase or tone down the strength of the color modification when applied to the videos.
- It allows you to keep the skin tones of the human subject while adding some color grading effect. You just have to set the dedicated slider to the perfect level.
- Lastly, it is integrated with the advanced video color settings of Wondershare Filmora. You can customize the results afterwards to enhance them further.
It's true to say that AI color grading has transformed video editing to a new benchmark. However, keep in mind that you shouldn't rely fully on its automation. While doing so is very efficient, you still have to maintain the right balance between automation and creative control. Otherwise, your outputs will become excessively generic offering little to no value to your intended viewers. Don't worry. As mentioned earlier, Wondershare Filmora has both AI-powered and manual color grading features.
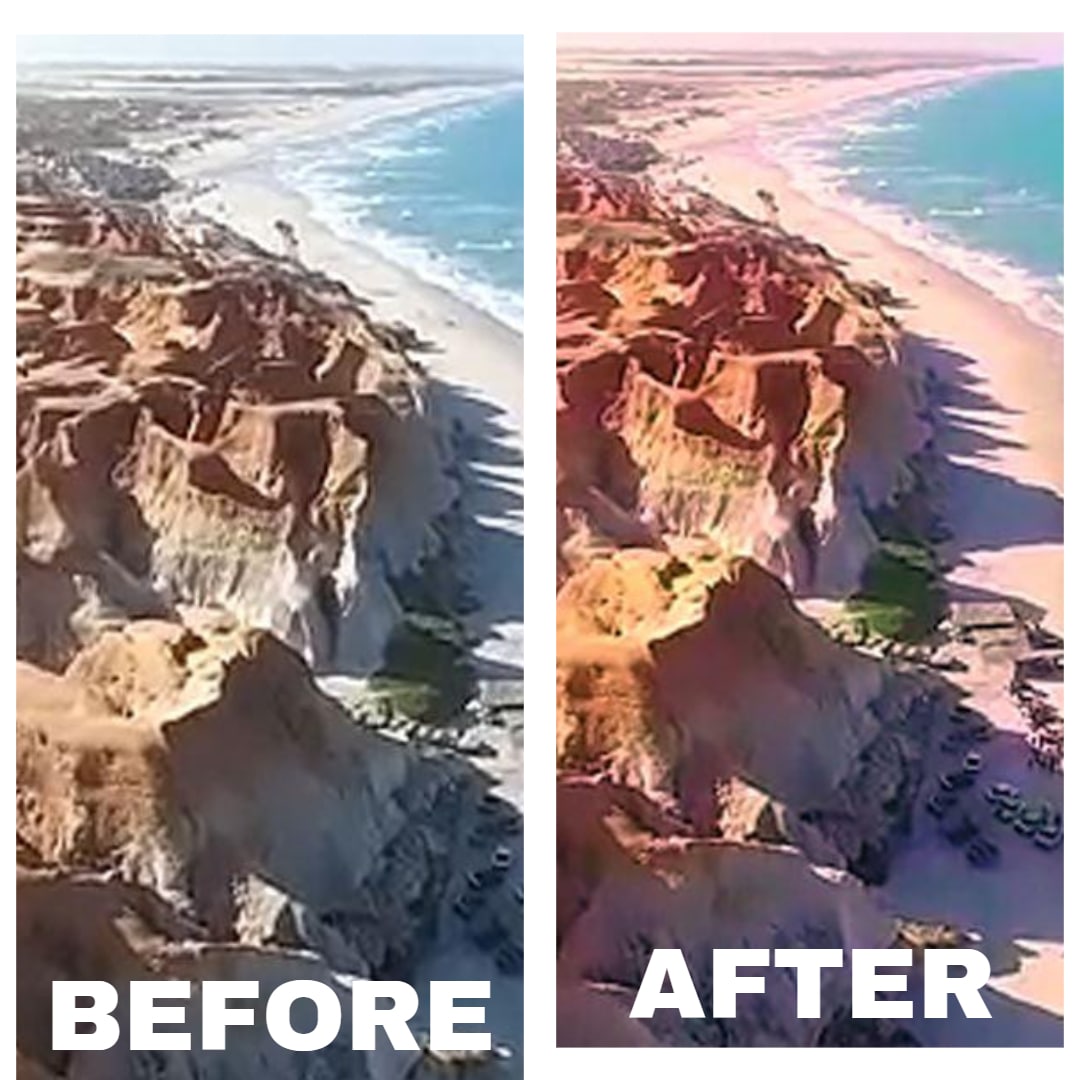
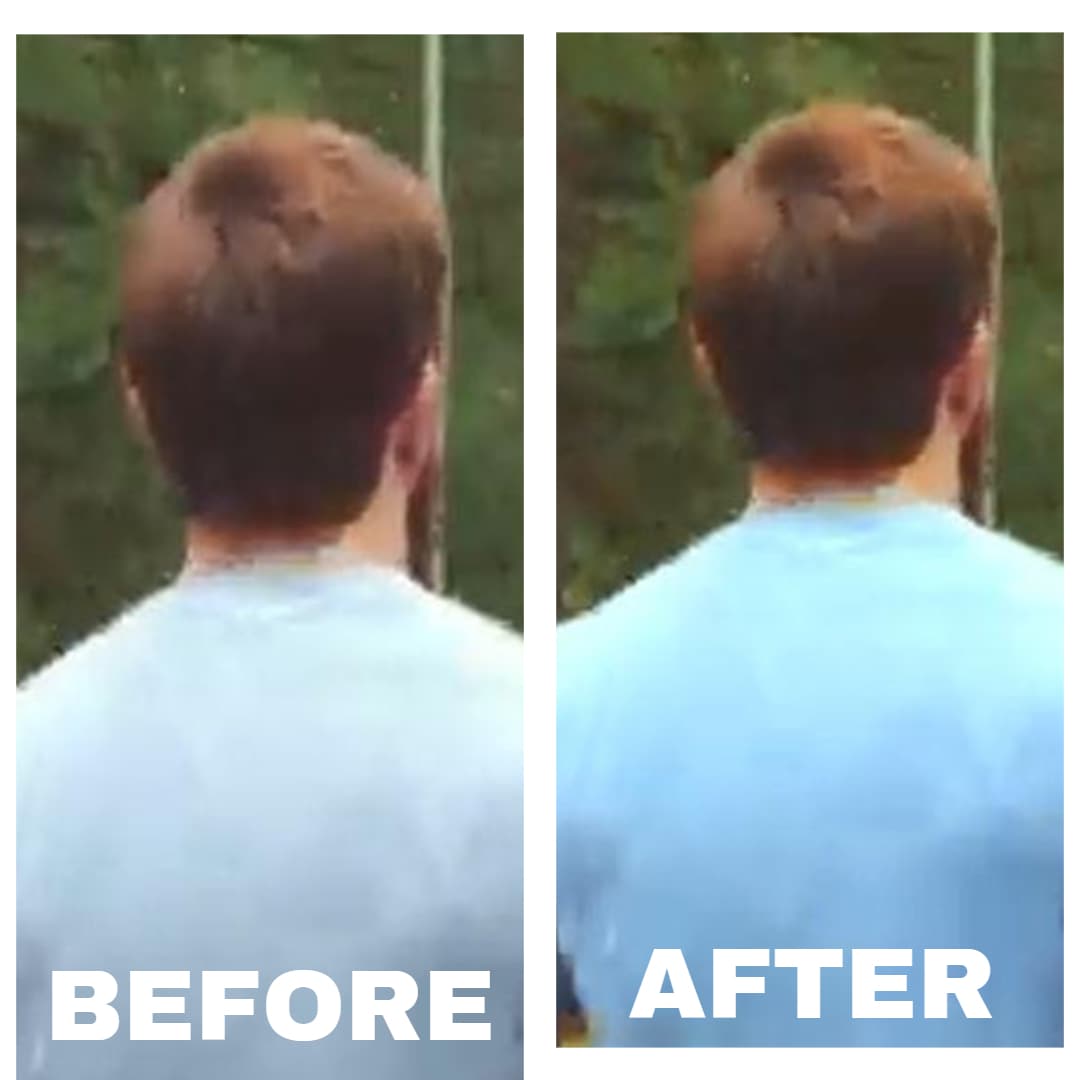
Real-World Examples of Filmora's Color Transformation Capabilities
The color transformation applied by Wondershare Filmora is clearly noticeable. You can instantly see the difference in just a snap. Still not convinced? Then, check out the outputs below and examine each of them very well.
Example 1

Example 2

Example 3

Is AI Color Palette Worthy of Consideration?
Video color grading alone is already a heavy workload. It is composed of various tasks that must be accomplished at the same time. Hence, the intervention of artificial intelligence indeed takes the weight off and makes everything easier. No need to make the adjustments manually. You just have to provide a reference clip and let the tool do the magic. Afterwards, you may apply a few adjustments if necessary. The supposedly demanding tasks have become a lot more manageable.
Traditionally, color grading requires enough technical knowledge and creative training to perform it properly. You'll find it hard to make adjustments if you're not fully familiar with the video color grading app. But that is not the case anymore. At present, you now have the choice to use AI Color Palette and do color grading like a pro. As indicated earlier, all you have to do is run a reference clip and wait for the results. It indeed makes color grading accessible to everyone, regardless of skill level.
What Can You Achieve With Filmora's Color Grading Tools?
The amazing AI Color Palette feature of Wondershare Filmora can be readily accessed from the desktop version. It will only take you a few taps to apply your desired color grading effect from a reference clip or image. As for the mobile version, you're given access to the fundamental color grading panel. Don't worry. It only requires basic adjustments to create and apply the effect. Generally, you just have to move the sliders from left to right or enter a specific input. Whether you're a color grading expert or not, you can certainly put this tool to good use.
Step-By-Step Guide
Do you want to use the Wondershare Filmora- Mobile as your video color grading app? That's great. To get started, check out the tutorial written below and follow the indicated steps accordingly.
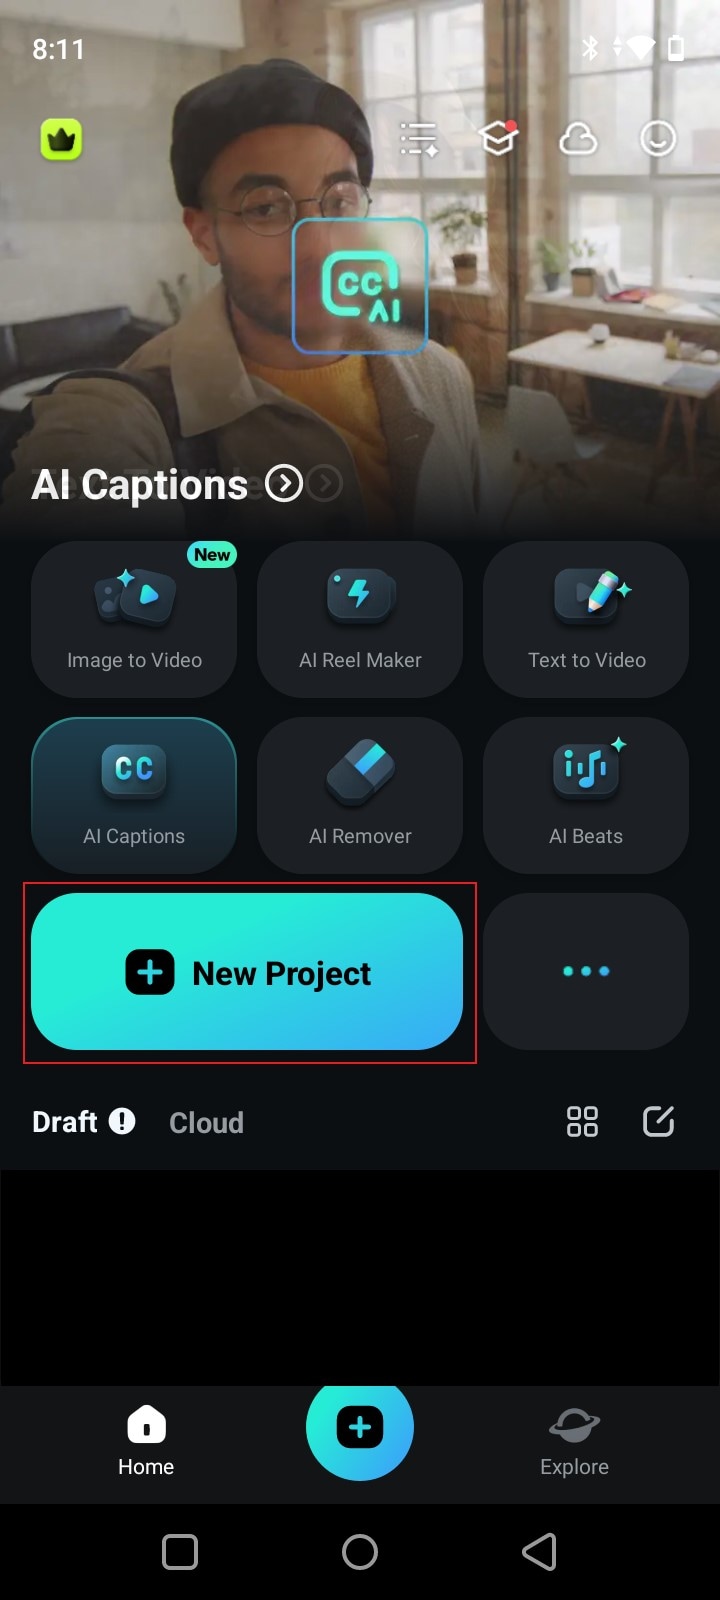
Step 1: Launch the Wondershare Filmora application on your mobile device.
 secure download

Step 2: Click New Project to start editing or open an existing session from the Drafts section.
Step 3: After that, import the clip you want to edit.
Step 4: Go to the Editor Timeline and select the footage for further customization. A new set of options will then appear in the menu. From there, select Filter.
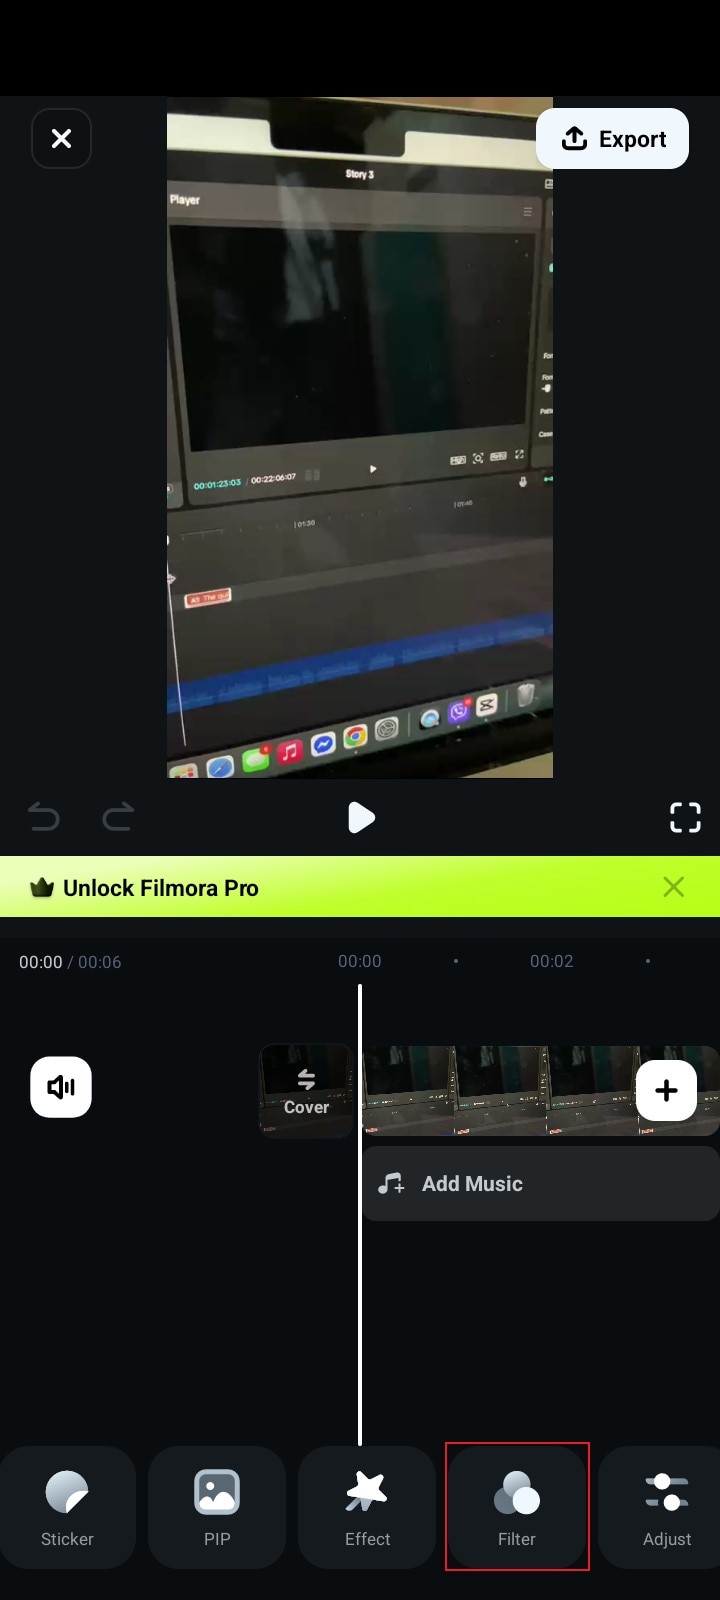
Step 5: If you don't want to make adjustments manually, simply go to the Filter tab and select a preset you desire to use. It comes in a variety of categories. Hence, make sure that you check them out and go over the available options.
Step 6: On the one hand, click the Adjust tab if you wish to perform color grading from scratch. From there, you're given different options that you can configure according to your liking. For instance, you may use the HSL, Exposure, Contrast, Saturation, Vibrance, Black Level, White Level, Brightness, Highlight, Shadow, Temperature, Tone, and Vignetting. Simply tap them individually and drag their corresponding sliders to your desired level.
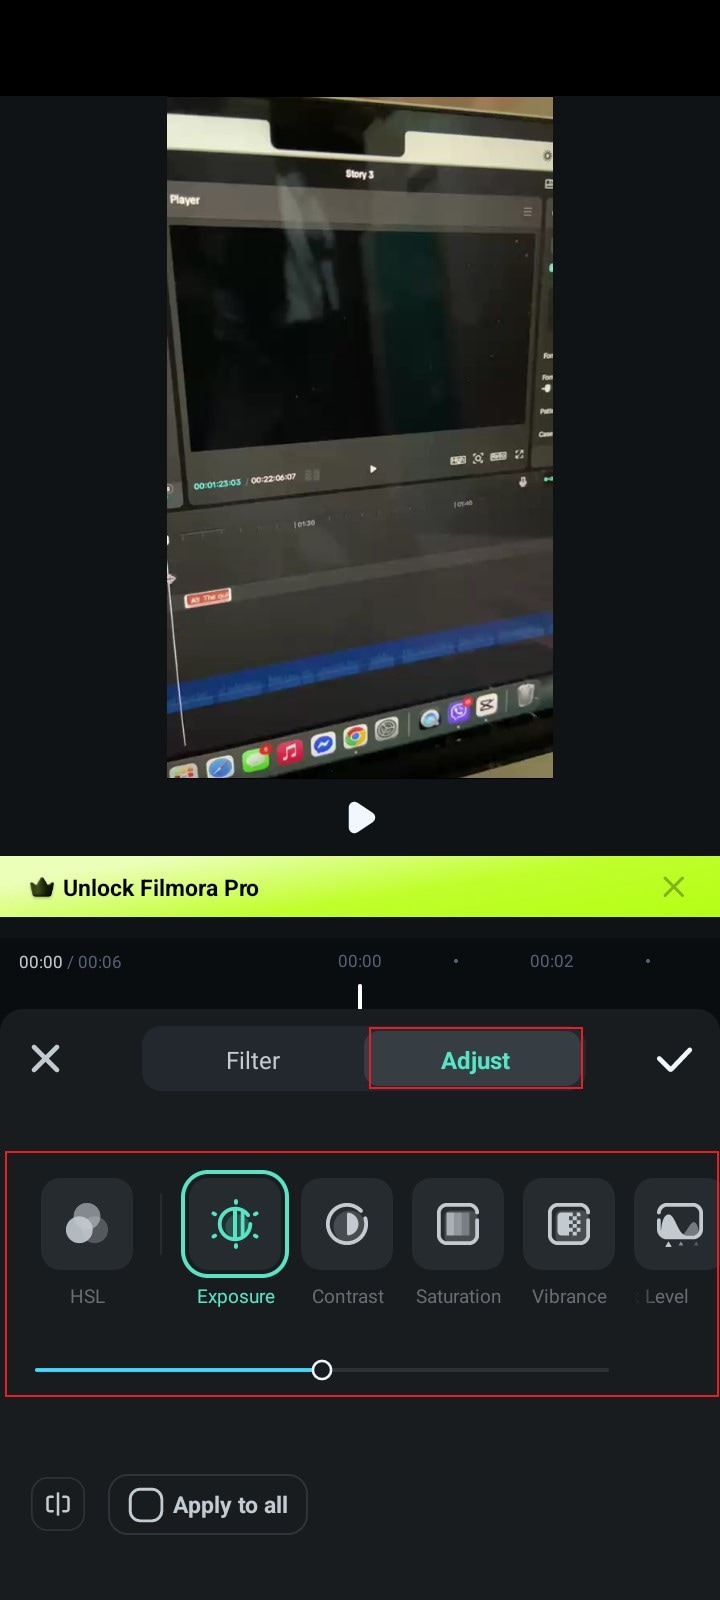
Step 7: Once done, click the Check icon to save the changes.
How to Leverage AI Suggestions While Maintaining Creative Visions?
If you're using the mobile version of Wondershare Filmora, you're truly in control when it comes to color grading. Why so? Simply because you're given several options to make the adjustments by hand. On the one hand, it's quite different if you're editing the video using the desktop app. As mentioned earlier, this app version is filled with various AI-powered tools that can assist you in the process. Sure. You can freely use such features for video color grading. For instance, you may try AI Color Palette and see how it can help you in this regard. However, you should keep your creative visions while implementing the suggestions from AI. Don't worry. There are some tips that can help you out in this regard. Check them out from the list below.
- Consider AI suggestions a starting point instead of a final verdict. Don't hesitate to make manual adjustments if necessary.
- Check all the given versions of the output and make a wise choice. If you cannot find the perfect one, then try to regenerate once again.
- Customize the final output before adding it to the project.
- Make sure that the AI understands the type of output you wish to generate. This way, the suggestions will be extremely useful to your video project.
Tips For Customizing AI-Generated Color Schemes
You can be sure that the color scheme generated by AI Color Palette is stunning and beautiful. It can certainly take your video content to the next level. However, we cannot deny the fact that such an exceptional output still needs fine-tuning sometimes. Don't worry. In this regard, you can use the color panel within the Wondershare Filmora platform. Just go over the available options and tweak their default settings based on your preference. To get started, check out the tips written below.
- Look at the brightness, contrast, temperature, and saturation settings. These are the main elements you need to recalibrate if you wish to ensure that the clips blend seamlessly.
- You may configure some advanced color settings to adjust specific video elements. Just go to the exposure, contrast, highlights, and shadows to make the necessary changes.
- In order to tweak certain color components, the HSL panel will be of great help. Simply recalibrate the Hue, Saturation, and Luminance settings altogether.
It's understandable that manual video color grading is a lot of work. That's why you should consider saving your configurations if you're planning to apply the same effect throughout your project. Don't worry. It's very easy. To do that, follow the steps below.
Step 1: Under the Color tab on the right-side panel, click Save As Custom.
Step 2: Enter your preferred preset name into the provided input field, then click OK.
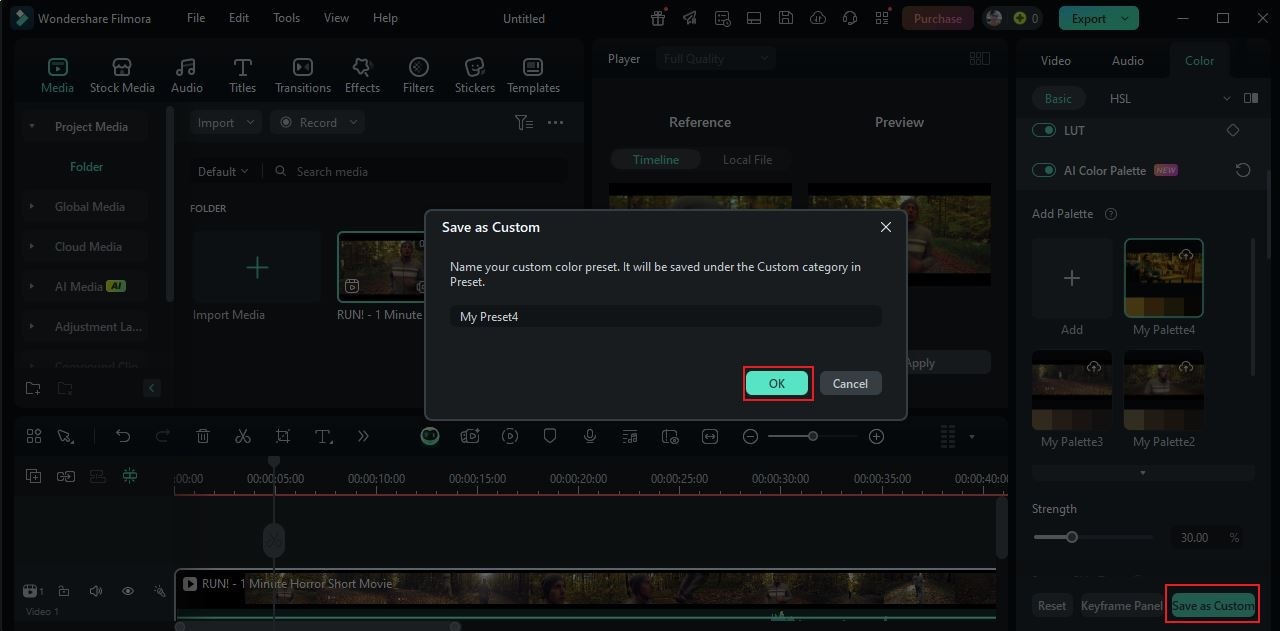
Step 3: Finally, your custom preset will be saved for future use.
Examples of AI Color Palette Transformation
Do you want to see how the traditional and AI-powered color grading features improve different video content? If so, check out some of them below.
Cinematic Video Example
Vlog Content Example
Educational Video Example

Tips for Handling Challenging Video Footage
Let's say you're handling challenging video footage, either the lighting is too low, or the noise is tremendous. If that is the case, you have to make initial adjustments before applying the AI-generated color palette. To assist you, read the tips written below.
- Adjust the white balance settings to make the clip look natural, balanced, and professional.
- If the clip is too dark and grainy, the AI Denoise tool can be of great help to enhance it.
- For a more convenient option, try the AI Video Enhancer tool. It's the simplest way to improve the video quality in a click or two.
Conclusion
Video color grading is a very important part of video production, responsible for quality, visual mood, and storytelling. By adding such effects to your outputs, you can easily transform them into compelling content. The traditional process of color grading is a handful of work. You have to go through every available setting and tweak the controls manually until you achieve a desirable result. Wondershare Filmora is equipped with a powerful set of tools you can use in this regard. But that's not the entirety of it. If you want to take a more convenient approach, this video color grading app offers an alternative. You can use AI Color Palette to copy a certain color-grading configuration and apply it to your own videos. Of course. This process is fully automated. Convenient, right? Therefore, don't hesitate to give it a try. Download Wondershare Filmora today and transform your video content. Be one of the creators out there who are using Filmora's AI Color tools and making the most of them.
secure download 