Videos can add a dynamic element to your PowerPoint presentations, making them more engaging. But sometimes, videos are too long, or you might need to speed them up to fit your presentation better. Adjusting the speed can help highlight key points or save time.
Although PowerPoint isn't known for video editing, there are ways to adjust video playback. In this guide, you'll learn simple methods to speed up a video in PowerPoint, even without a built-in speed tool. These tips will help you create more effective presentations.

In this article
Part 1. Understanding PowerPoint's Video Features
PowerPoint makes it easy to insert videos right into your slides, and you can do a lot with them—like trimming out parts you don't need, setting the video to play automatically or when you click, and even adjusting settings like volume and looping.

But here's the catch: PowerPoint doesn’t have a built-in tool to speed up videos. Unlike dedicated video editing software where you can easily adjust playback speed, PowerPoint doesn’t offer this option directly. That said, you can still make it work!
One way is to speed up the video using external video editing software before adding it to your slides. Another trick is to trim down longer videos into shorter clips, which can help convey your message faster. While these methods take a little extra effort, they’re totally doable and can make your presentation flow better and keep your audience engaged.
Part 2. How to Speed Up a Video in PowerPoint
Now that we've covered the basics of PowerPoint's video features, let's dive into how you can actually speed up a video in your presentation. Even though PowerPoint doesn’t have a direct "speed up" button, there’s a workaround that gets the job done using the Developer tab and Windows Media Player. Follow these simple steps to get started.
Step 1. Enable the Developer Tab
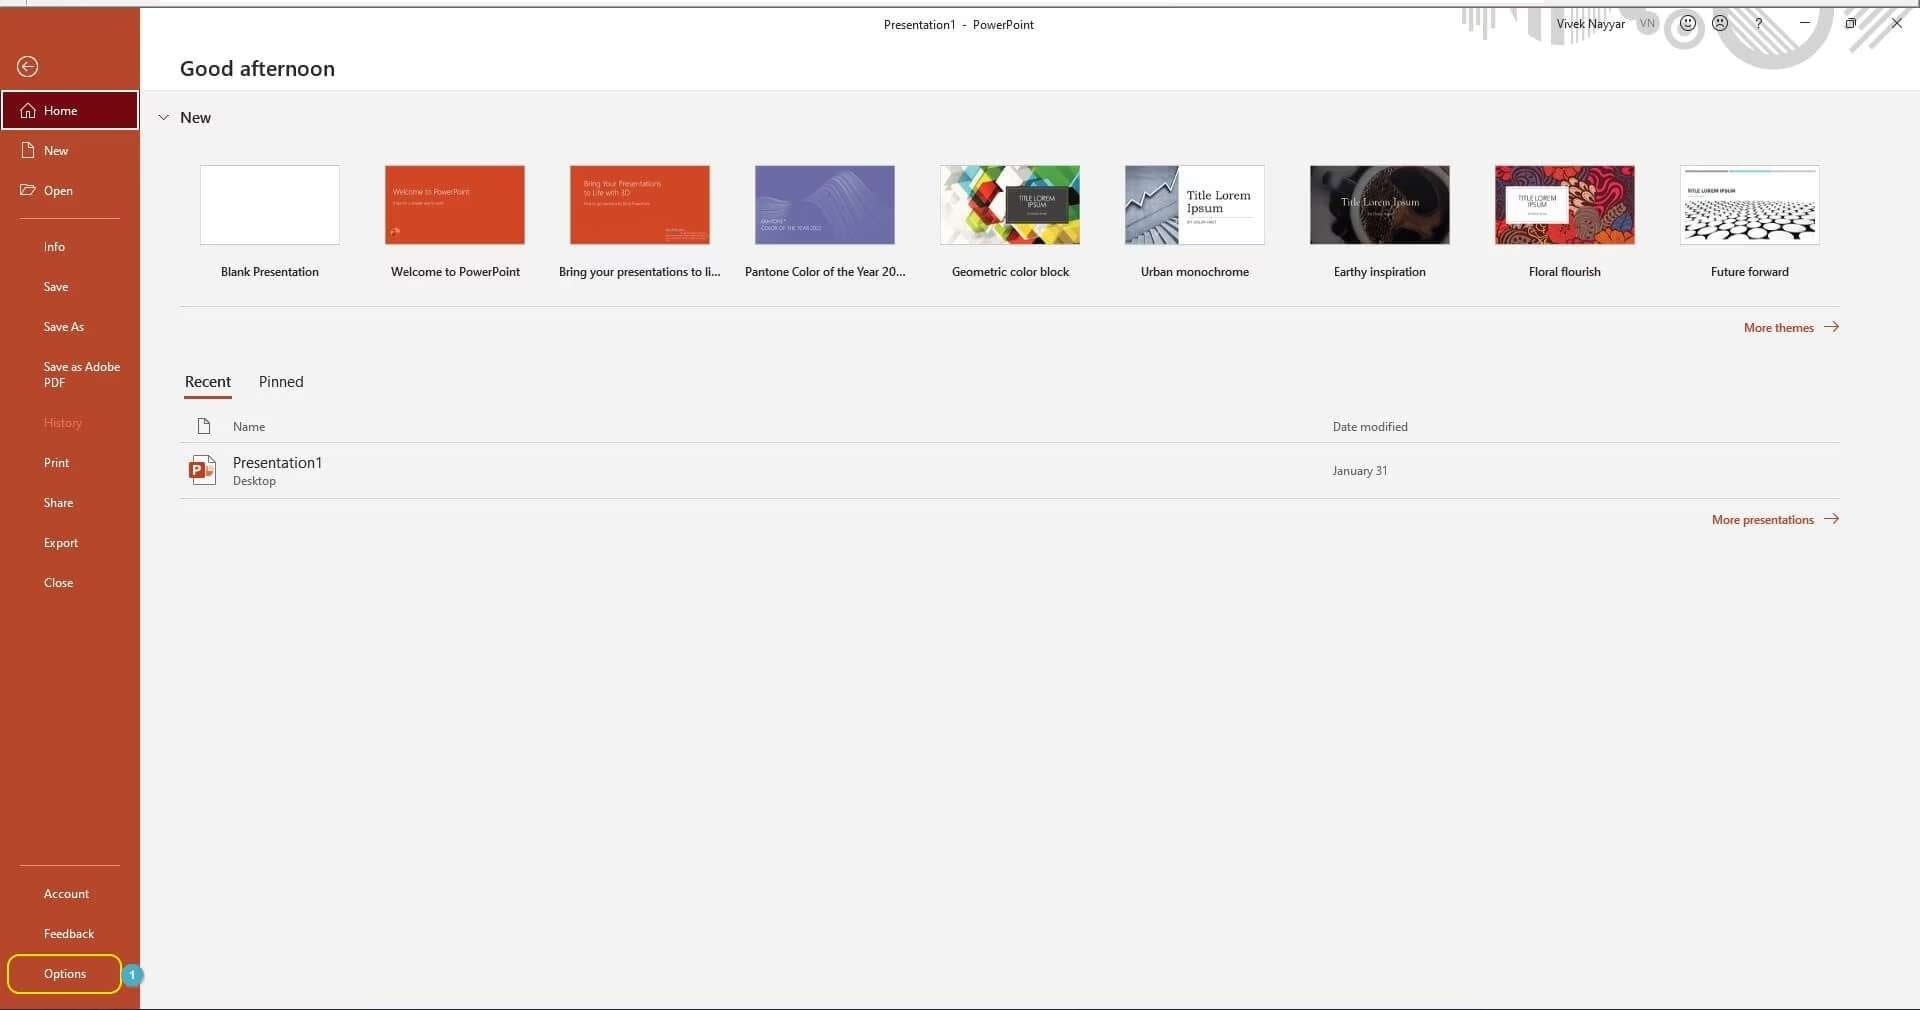
First, open Microsoft PowerPoint on your computer (we’re using PowerPoint 2019 on Windows 11 here). Start with a blank presentation, and then go to the top menu and click on File. Choose ''Options' from the menu that appears at the bottom.
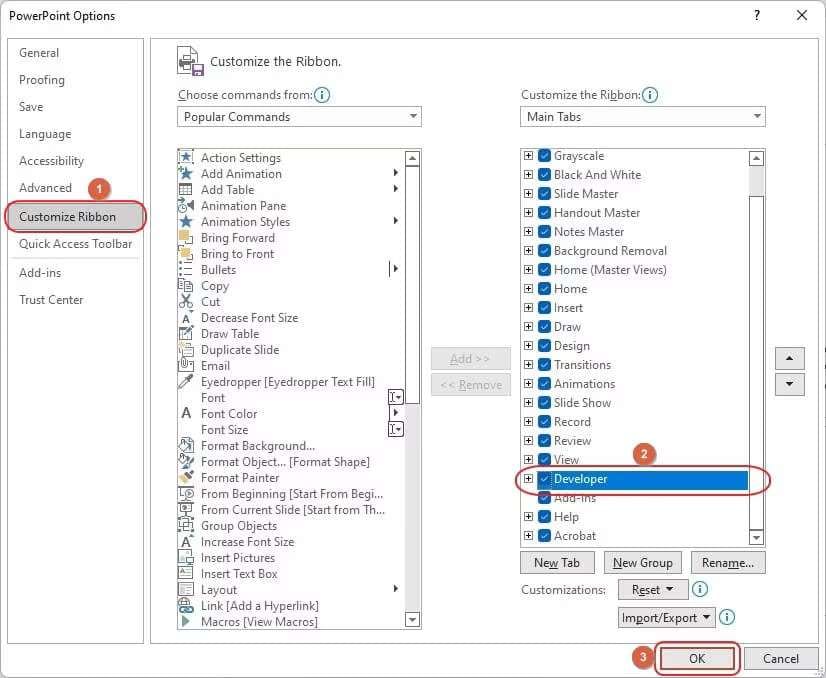
In the PowerPoint Options box, look at the left side and click on Customize Ribbon. On the right, tick the box beside Developer under Main Tabs. Click OK to save your changes.
Step 2. Add a Windows Media Player Instance
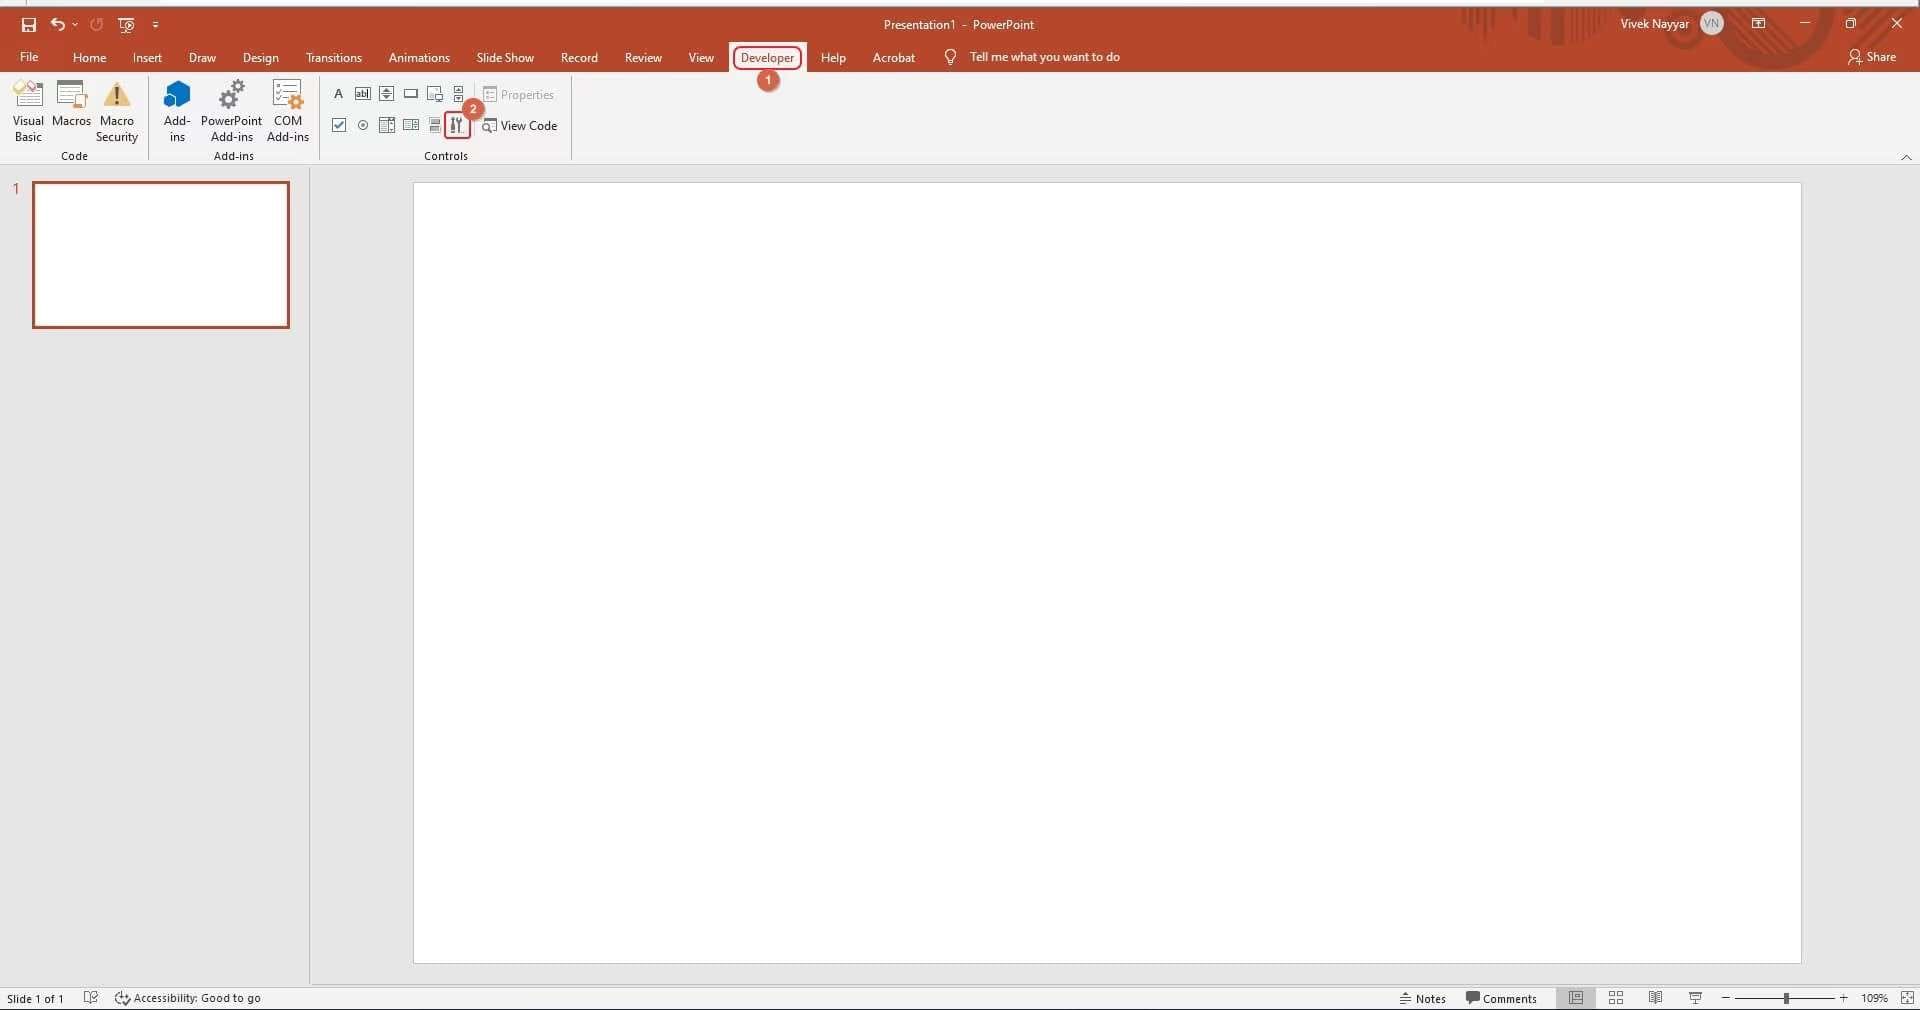
Now, you’ll see the Developer tab at the top of the PowerPoint interface. Click on it, and then choose More Controls in the Controls section of the ribbon.
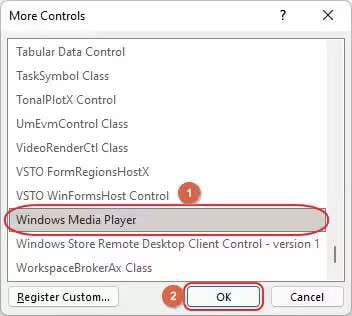
When the More Controls box appears, scroll through the list and select Windows Media Player. Click OK.
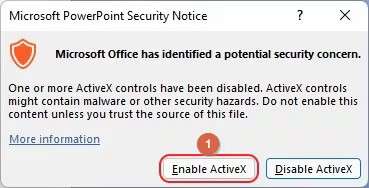
Back on your slide, click and drag to create a Windows Media Player box in whatever size you want. If prompted, click Enable ActiveX to allow the video to play in this new Windows Media Player instance.
Step 3. Choose the Source Video and Adjust the Playback Speed
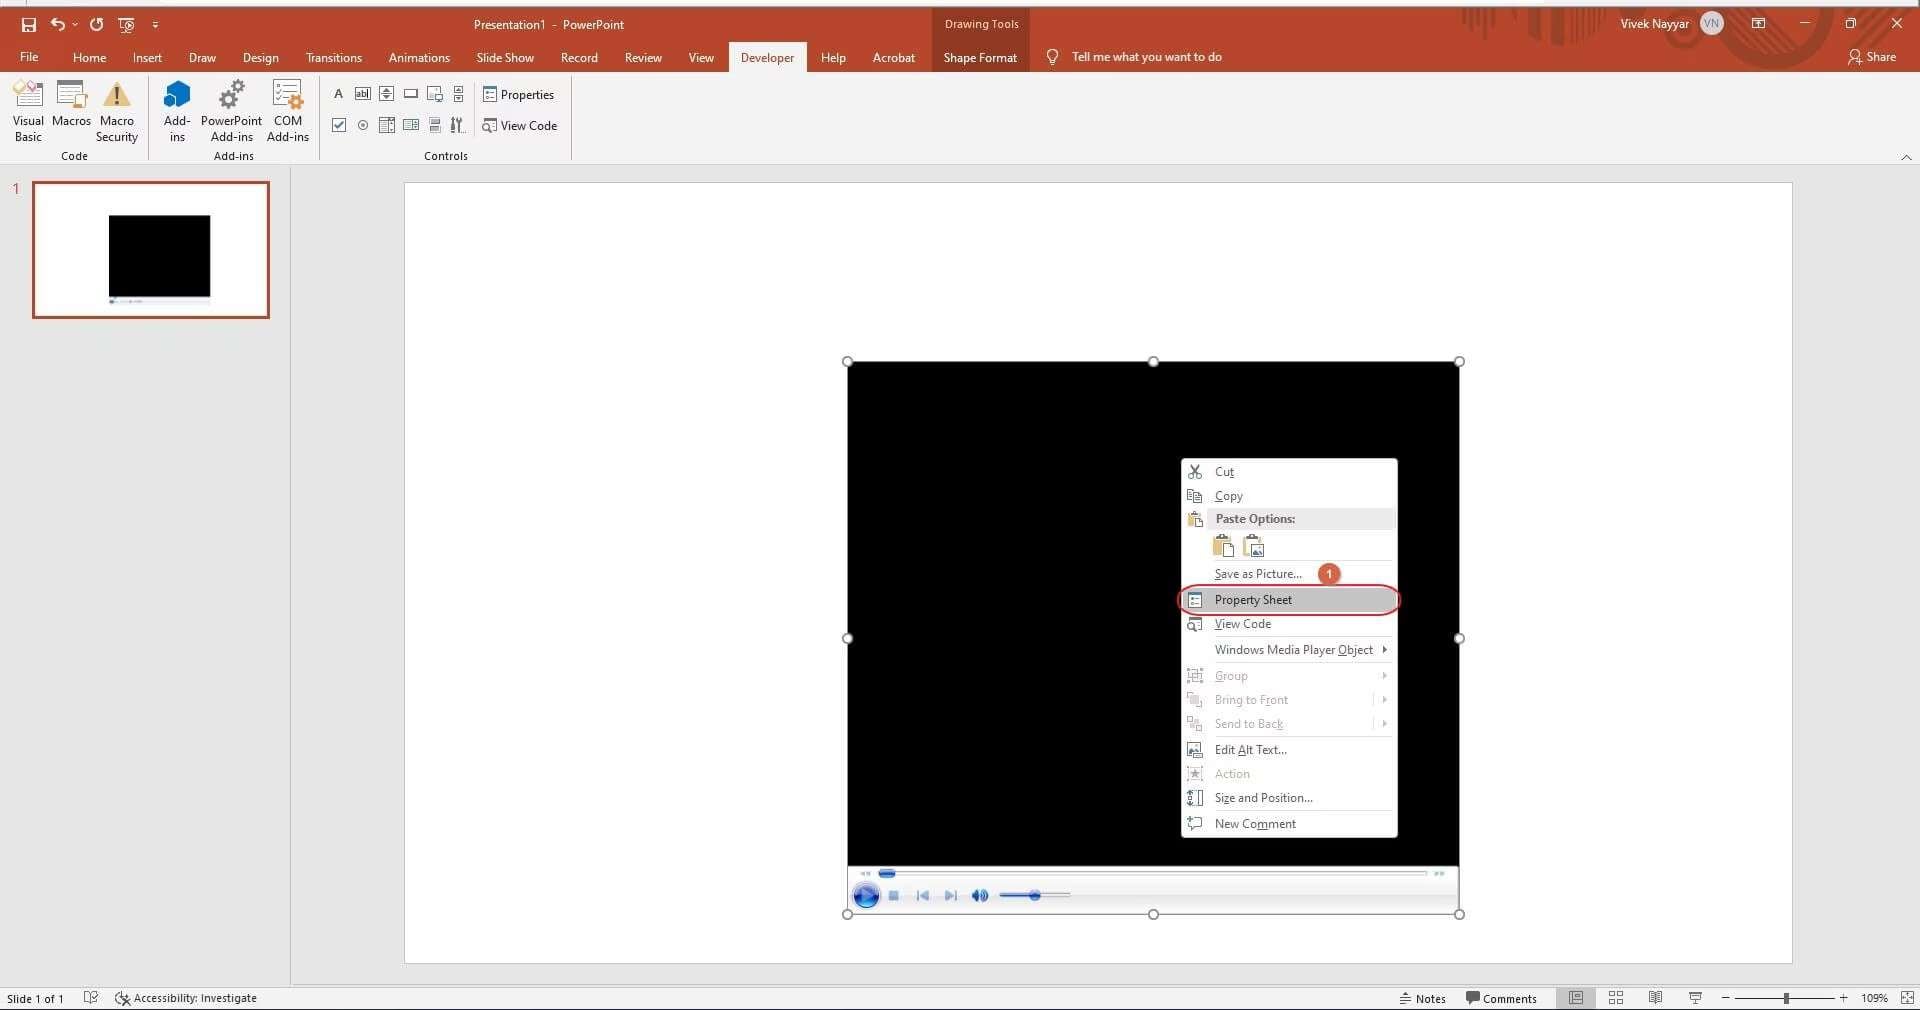
Right-click on the Windows Media Player box you just added, and select Property Sheet from the menu.
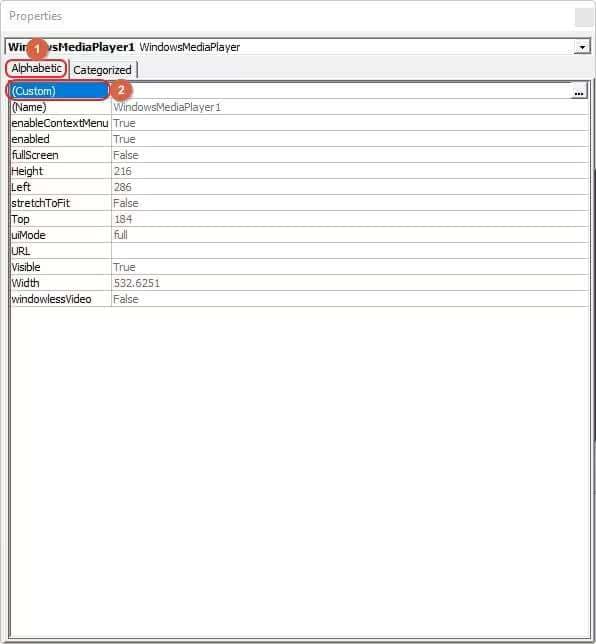
In the Properties box, double-click on Custom under the Alphabetic tab.
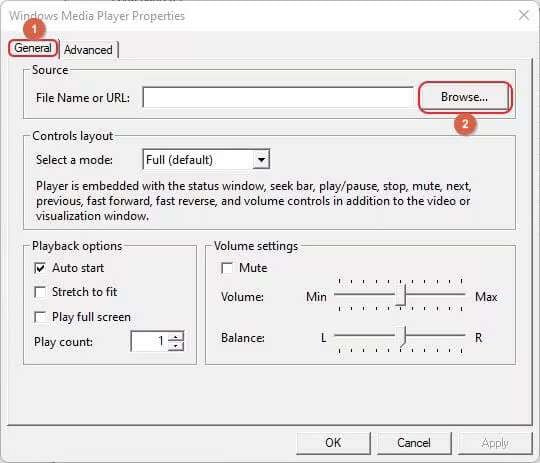
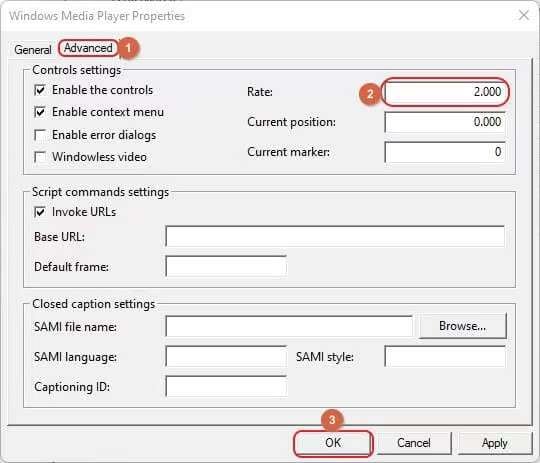
A new Windows Media Player Properties box will pop up. Go to the General tab and click Browse in the Source section to find and select your video.
Next, head to the Advanced tab and find the Rate field under the Controls settings. Increase the value in the Rate field to speed up your video on your PowerPoint (e.g., setting it to 2 will double the speed). When you’re done, click OK to save your changes and close all the boxes.
Finally, hit F5 on your keyboard to preview your presentation, and check out the sped-up video!
Part 3. Adding More Impact to Speed-Up Videos in PowerPoint
Now that you've mastered speeding up videos in PowerPoint, let's talk about how to make them even more impactful. By using transitions, animations, captions, and text overlays, you can enhance your video and make your presentation more attractive. These elements help emphasize key points, add visual interest, and ensure your audience stays focused on your message. Here’s how you can do it:
Step 1. Get to the Target Slide
Start by opening your PowerPoint presentation and navigate to the slide where your sped-up video is located.
Step 2. Add Transitions and Animations
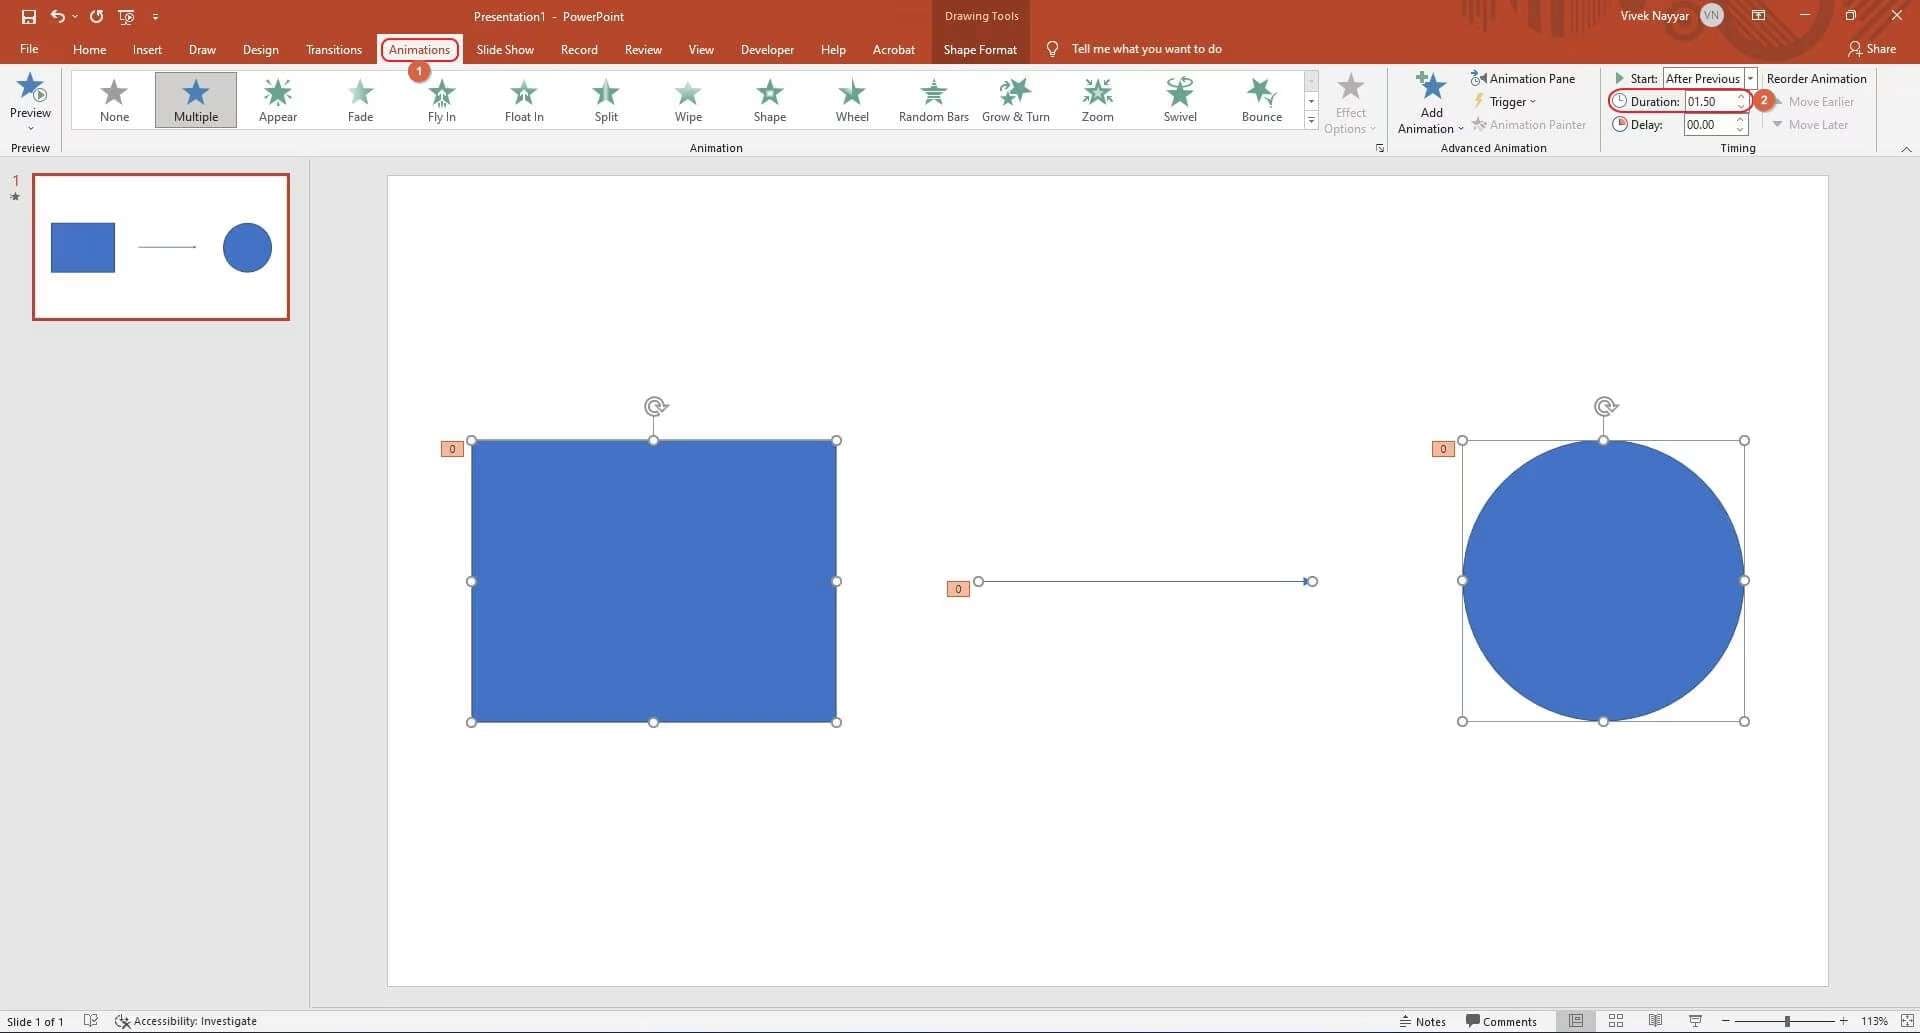
To add transitions or animations, go to the Animations tab at the top of PowerPoint. If you want to apply an animation to a specific object, such as text or an image, click on that object. Then, choose an animation style from the gallery. You` can customize the speed of the animation by adjusting the Duration field in the Timing section of the ribbon.
To speed things up, decrease the duration time. You can also use Ctrl + A to select all objects on the slide and apply the same animation speed to everything at once, which is a huge time-saver.
Step 3: Add Captions and Text Overlays
Captions and text overlays can reinforce the key points in your video. To add these, go to the Insert tab and click on Text Box. Click on the slide where you want the text to appear and start typing. You can format the text by changing the font, size, and color to match the theme of your presentation.
To ensure that your captions and text overlays are in sync with your sped-up video, you can use animations. Select the text box, go back to the Animations tab, and choose an animation effect. Adjust the Start option to determine when the text appears (e.g., with the video or after a delay), and tweak the Duration to match the pacing of the video.
Part 4. Alternatives to PowerPoint for Video Speed Adjustments
While PowerPoint offers many great features, as we discussed earlier, it lacks a straightforward tool for speeding up videos. If you’re looking for an easier and more flexible way to adjust video speed, Wondershare Filmora is an excellent alternative.
Filmora provides you with a uniform speed and speed ramping function that allows you to change video speed effortlessly, along with offering a host of other editing tools that can enhance your videos. This software is designed for both beginners and experienced video editors, offering a simple interface with powerful features.
With Filmora, you can adjust the speed of your videos using either uniform speed changes or more dynamic effects with speed ramping. Here’s how you can speed up a video using Filmora.
Method 1: Adjust Video Speed Using Uniform Speed
Step 1. Get to the Uniform Speed Panel
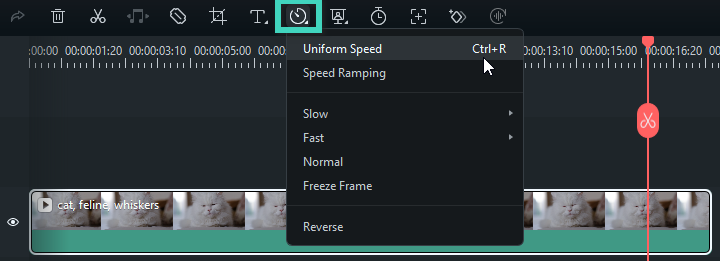
After launching Filmora and adding your video to the timeline, click on the video in the timeline. From the toolbar above, click the Speed icon, and then select Uniform Speed.
Step 2. Change Video Speed to Constant Speed
Use the Speed slider to adjust the playback speed by dragging it to the right to speed up or to the left to slow down the video. For more precision, you can directly enter your preferred speed in the Duration field.

Step 3. Preview the Video and Save
Click the Play button in the Preview window or press the Spacebar to see how the changes look. If you're satisfied, save your project with the updated speed settings.

Method 2: Modify Video Playback Speed with Speed Ramping
Step 1. Go to the Speed Ramping Panel
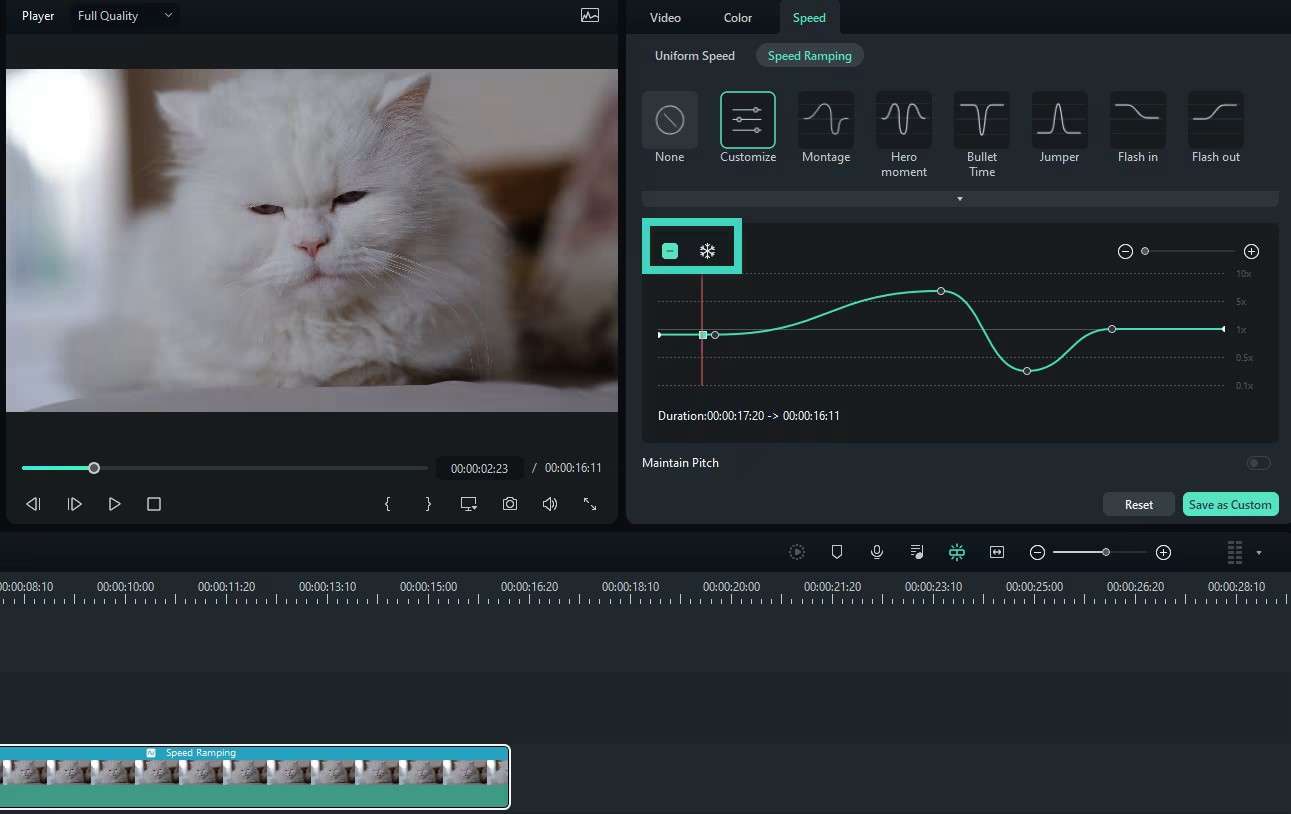
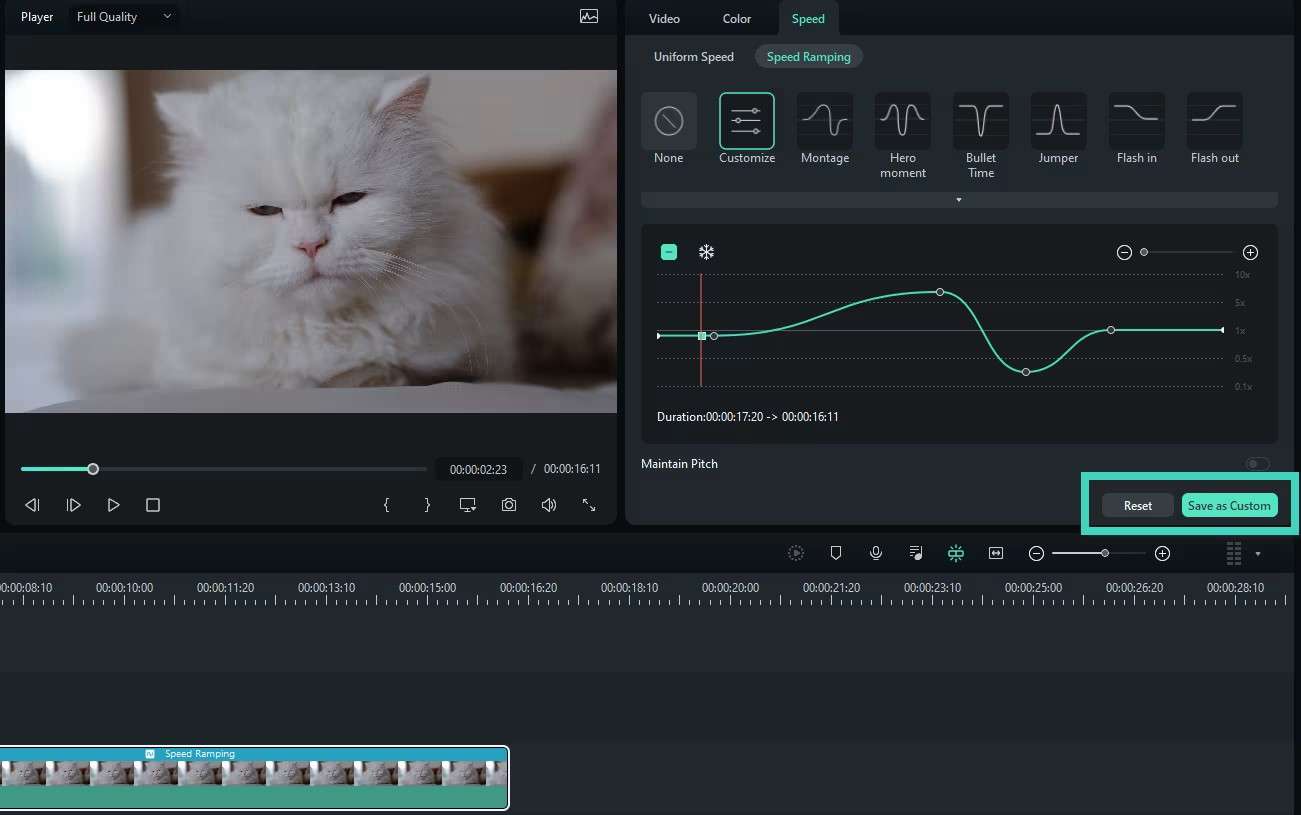
Click on the video in the timeline, then select the Speed icon and choose Speed Ramping. You’ll see several preset options on the property panel, such as Customize, Montage, Hero Moment, and others.

Step 2. Select and Customize Speed Ramping Preset
Choose a preset to apply variable speed effects to different portions of your video. You can customize each speed point by dragging it up or down to adjust the speed or left and right to change the section of the video it applies to.
To add or remove speed points, use the Plus icon or the Snowflake icon for freeze frames.
Step 3. Preview the Video and Save
Press the Spacebar or click the Play button to preview your video. If needed, reset the changes or save your customized speed ramping settings for future use.
Method 3: Change Speed in Timeline
To change the video speed directly in the timeline, hover over the end of the video clip in the timeline while holding down the Ctrl key. Then, drag the edge of the clip backward to slow it down or forward to speed it up. You’ll notice color strips (purple for slow, red for fast) indicating the speed change.

Method 4: Playback Speed Shortcuts for Windows
Filmora also offers quick keyboard shortcuts to control playback speed directly:
- Reverse Video: Press the J key (speed range: -1x to -32x).
- Pause Video: Tap the K key.
- Forward Video: Use the L key (speed range: 2x to 32x)
Conclusion
While PowerPoint is a powerful tool for creating presentations with embedded videos, it falls short when it comes to directly adjusting video speed. PowerPoint excels in features like trimming, playing, and adding basic effects to videos, making it a versatile choice for most presentation needs. However, its lack of a dedicated video speed adjustment tool means users have to rely on workarounds or external tools.
For those seeking more flexibility and precision, Filmora is an excellent alternative, providing both uniform speed adjustments and advanced speed ramping options. By combining PowerPoint’s robust presentation capabilities with Filmora’s advanced video editing tools, you can create dynamic, engaging presentations that capture your audience’s attention.
FAQ
-
How do I change the duration of a video in PowerPoint?
Go to the bottom right of the video window and click the Settings icon. From the menu, choose Playback Speed. Set the speed to 0.25 for the slowest playback. You might also need to lower the volume since the audio will be very slow. The sound icon is located on the same ribbon as the Settings icon, but on the left. -
How can I convert PPT to video faster?
To quickly convert a PowerPoint presentation to a video, start by optimizing your file—simplify your content and compress images. Next, go to File > Export > Create a Video. Choose your desired video quality and set any timing options. Finally, click Create Video and save the file. -
What’s the easiest way to speed up a video for PowerPoint?
The simplest method is to use a video editing tool like Wondershare Filmora to speed up the video before inserting it into PowerPoint. After editing, save the video and embed it into your slide. -
Will speeding up a video in PowerPoint affect the video quality?
If you use a good video editor, the quality should remain intact. Just ensure that the sped-up video is saved in a high-quality format before inserting it into PowerPoint.


 100% Security Verified | No Subscription Required | No Malware

