


 100% Security Verified | No Subscription Required | No Malware


 ChatGPT
 Perplexity
 Gemini
 Claude
 Grok
Grok
Are you trying to speed up your video using FFmpeg? We’ve got you covered. FFmpeg is an open-source and cross-platform software used for handling multimedia data, including videos. But if you're unfamiliar with its command-line interface, even performing basic tasks like speeding up a video can be confusing.
That's why this guide aims to make it easy for you by breaking down the process into simple steps. Even if you are new to the software, you'll know the right command for FFmpeg to speed up your videos and apply it to create a timelapse effect or simply shorten your footage duration.
In this article
Part 1. Get Started with FFmpeg
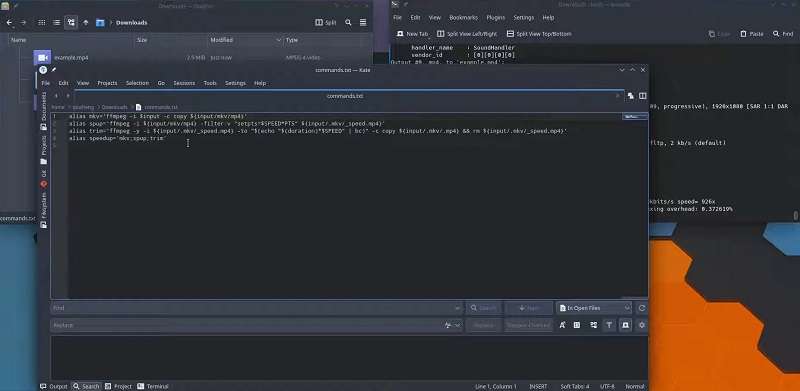
Unlike most video editing software that provides a graphical user interface (GUI), FFmpeg operates as a command-line tool. This means you'll need to input text commands to perform various tasks. These commands are defined by specific parameters and syntax, which tell FFmpeg exactly what to do with your multimedia files.
Although it seems tough, one of the key advantages of FFmpeg is its ability to handle any task with precise control from the command line. FFmpeg mainly serves as a universal media converter, but you can also decode, encode, transcode, filter, play any media file in any format, and, of course, change the playback speed of a video.
Where to Download FFmpeg
To start using FFmpeg, you’ll need to download and install it on your computer. Begin by visiting the official FFmpeg website. Then, you’ll find download links for different operating systems, including Windows, macOS, and Linux.
Part 2. How to Speed Up Video with FFmpeg
Speeding up a video with FFmpeg involves manipulating the Presentation Timestamp (PTS) of each video frame. The PTS determines when each frame is displayed during playback, and by adjusting these timestamps, you can control the speed of the video.
There are two primary methods to achieve this: using the setpts video filter or exporting the video to a raw bitstream format and re-muxing it with new timestamps.
1. Using the setpts Video Filter
The setpts (set presentation timestamp) filter is a tool in FFmpeg that allows you to modify the PTS values of video frames. By scaling the PTS, you can effectively speed up or slow down the video on FFmpeg. It will adjust the frame timestamps according to the formula you provide.
For example, to double the speed of the video, you could set the PTS to half of its original value:
ffmpeg -i input.mp4 -vf "setpts=0.5PTS" output.mp4
In this command, each element means:
- -i input.mp4 specifies the input video file.
- -vf "setpts=0.5PTS" applies the setpts filter to scale the PTS to 0.5 times its original value, meaning doubling the playback speed.
- output.mp4 is the name of the output video file.
- The setpts=0.5PTS expression scales the PTS by 0.5, which means each frame is presented twice as fast, so your video will play at double speed.
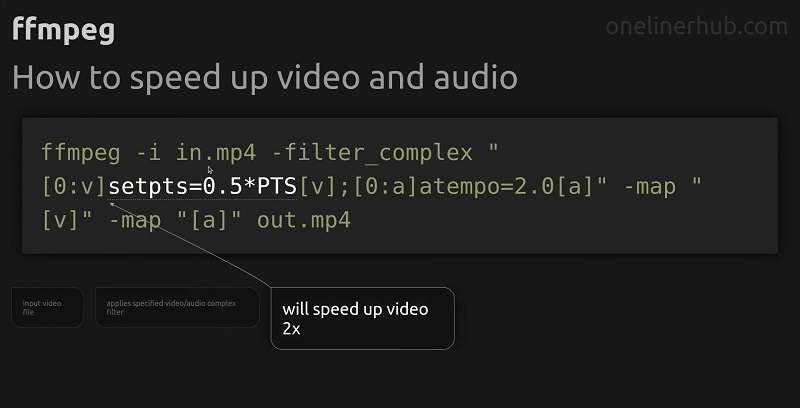
However, note that using the setpts filter only affects the video speed, not the audio. If you also want to remove the audio track (since it won’t be in sync with the sped-up video), you can include the -an option, like this:
ffmpeg -i input.mp4 -vf "setpts=0.5PTS" -an output.mp4
Meanwhile, to achieve a dramatic increase in video speed, such as 60 times the original rate, you can do so by typing the “setpts=PTS/60” command. This command divides the PTS by 60, making the video play 60 times faster:
ffmpeg -i input.mp4 -filter:v "setpts=PTS/60" -an output.mp4
To speed up the video on FFmpeg by 60 times and then resample it to play at a certain FPS (in this example, 24 FPS), you can add the “fps=24” in your command like this:
ffmpeg -i input.mp4 -filter:v "setpts=PTS/60,fps=24" -an output.mp4
2. Raw Bitstream Method
Another way to speed up video using FFmpeg is using the raw bitstream method. It’s a lossless process that changes only the timestamps of the video frames while preserving the video stream exactly as it is. This approach is ideal if you need to change the playback speed without making any other changes to the video quality or content. Here’s how to use this method:
Step 1: Copy the Video to a Raw Bitstream Format
First, you'll need to copy the video stream to a raw bitstream format. This process involves converting the video into a format that FFmpeg can easily work with when generating new timestamps.
For example, you can type the following command for H.264 encoded videos: ffmpeg -i input.mp4 -map 0:v -c:v copy -bsf:v h264_mp4toannexb raw.h264
These commands extract the video stream from the input file (input.mp4) and convert it into a raw bitstream format (in this case raw.h264) so that the video content remains unchanged.
Step 2: Generate New Timestamps While Muxing to a Container
After converting the video to a raw bitstream, you can generate new timestamps by muxing the raw stream back into a container format like MP4. During this step, you’ll specify the desired playback frame rate, which determines the speed of the output video.
For example: ffmpeg -fflags +genpts -r 30 -i raw.h264 -c:v copy output.mp4
In this command:
- -fflags +genpts tells FFmpeg to generate new PTS values.
- -r 30 sets the playback frame rate to 30 frames per second (FPS). You can adjust this value to control the speed of the output video.
- -c:v copy ensures that the video stream is copied without re-encoding, maintaining the original quality.
By changing the value of -r, you can achieve the desired playback speed. Increasing the frame rate will speed up the video while decreasing it will slow it down.
Part 3. Another Cost-Effective Solution to Speed Up Your Video
If you feel like using FFmpeg doesn’t suit you because the command-line interface might be too complex or cumbersome, there are alternative, cost-effective solutions for speeding up your video. One of the best options is Wondershare Filmora. You can use its free version first to explore its features and upgrade to a paid plan if you need more advanced tools.
Unlike FFmpeg, which relies on command-line inputs, Filmora allows you to perform speed adjustments through an intuitive, visual interface. This makes it more accessible for users who prefer not to deal with complex commands.

With Filmora, you have the ability to control your video's playback speed in a very flexible way. You can speed up your video up to 100 times faster than the original speed, or slow it down to just 0.01 times its normal speed.
Moreover, Filmora also offers a feature called Speed Ramping. Using this feature, you can change the speed of different parts of your video and transition them smoothly from one speed to another.
How to use Filmora to speed up video
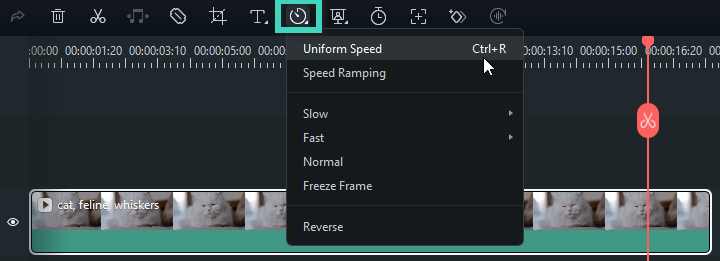
Step 1: Adjust video speed using the speed controls
Start by selecting your video in the timeline. Then, click the Speed icon located in the toolbar above the timeline. From the options that appear, choose "Uniform Speed" to begin changing the playback speed of your video.
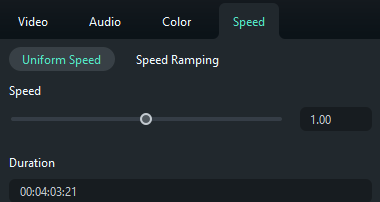
Step 2: Set the desired playback speed
To speed up your video, move the Speed slider to the right. Or, you can manually enter a speed value greater than 1 in the Duration field for more accurate adjustments.
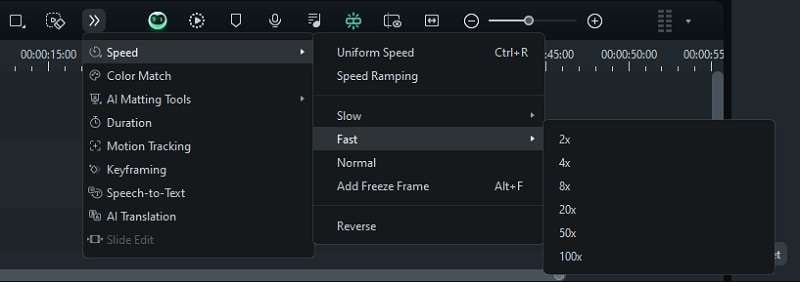
Step 3: Choose a fast-speed preset
Alternatively, you can opt for one of the speed presets. Go to Speed > Fast, and you'll find options for 2x, 4x, 8x, 20x, 50x, and 100x speeds. Select the preset that best suits your needs.
How to Make Various Speed Effects with Speed Ramping
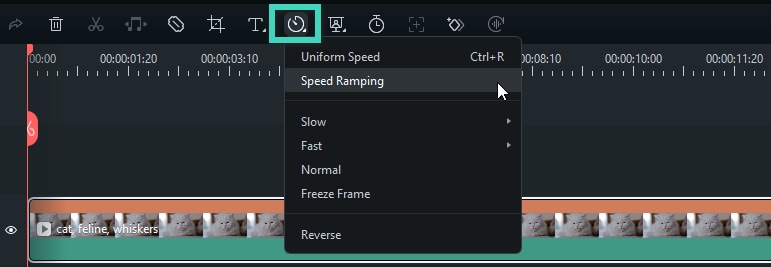
Step 1: Access the Speed Ramping feature
To create more dynamic speed changes throughout the video, you need to use Filmora’s Speed Ramping feature. Speed Ramping allows you to gradually speed up or slow down the video at specific points.
To access it, click on the Speed icon and select "Speed Ramping" from the options.
In the Speed Ramping settings, you’ll see various presets available. Refer to Filmora’s guide for detailed descriptions of each preset or experiment with them to find the best fit for your project.

Step 2: Adjust the speed points
Once you’ve chosen a preset, you can fine-tune the speed points. Drag the speed points up to make it faster or down to make it slower. Then, move them left or right to change the video section affected by these changes.
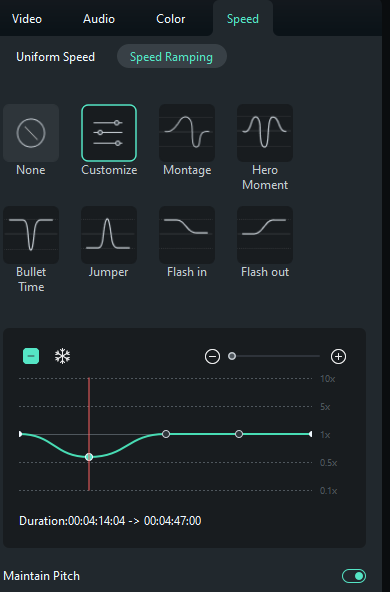
If you need to add or remove speed points, you can click the Plus (+) or Minus (-) icons. To freeze a part of your video, position the playhead where you want the freeze frame, and click the snow icon to add it. Then, set the desired duration and apply.
Conclusion
FFmpeg is a bit unique due to its command-line approach. So, if you want to speed up videos using FFmpeg, you need to become familiar with its command-line syntax and filters. You can refer to this guide anytime when you need to adjust video speed to create time-lapse effects or simply shorten your footage.
However, if the command-line interface feels too complex, user-friendly alternatives like Wondershare Filmora may suit you more. Filmora offers intuitive visual tools for speeding up videos. Its accessible interface can also streamline the process, making it easier for those who prefer a more hands-on approach.
FAQ
-
1. Can I adjust the audio speed along with the video on FFmpeg?
To adjust the audio speed along with the video on FFmpeg, you need to insert -an on your command. Or if you want to adjust the audio only, you can use the atempo audio filter or string multiple atempo filters together if you need greater flexibility. -
2. Can I preview the changes before finalizing the video on FFmpeg?
Unlike GUI-based editors, FFmpeg does not provide real-time feedback, meaning you can’t preview your edits as you work. This lack of immediate visual cues can make it difficult to gauge the success of your commands until you see the final output. -
3. What should I do if FFmpeg commands are not working?
Double-check your command and consult the FFmpeg website for detailed guidance. If you encounter issues, report the bug by including your goal, the problem faced, the exact command used, the full console output from FFmpeg, and any relevant details needed to reproduce the issue. This information will help in diagnosing and resolving the problem.
