In terms of movie production, nothing is impossible nowadays. Any scene, whether or not it’s complicated in nature, can now be easily portrayed on-screen. Yes. That is absolutely true, given the current capabilities of modern technology. For the most part, the tasks are greatly streamlined. However, we cannot deny that there are salient elements that need to be considered, especially during post-production. One of which is the film frame rate. If you wish to craft and render a smooth video output, the film frame rate must be configured accordingly. Don’t worry. It is indeed a piece of cake.
In this article, we will discuss the highlights, types, and benefits of the film frame rate. We will also suggest a few tips that can help you choose the best one for your project. Lastly, we will provide a short guide on how to configure the film frame rate accordingly. Continue reading below to learn more.
In this article
How to Configure Film Frame Rate Using Wondershare Filmora?
As previously indicated, it is very important that the film frame rate is cohesively and appropriately calibrated. That is the key secret to ensuring the smoothness of your video content. Fret not. This task is actually not rocket science. In a minute or two, you can easily change your video settings and assign your preferred frame rate. Wondershare Filmora can absolutely help you with that. Do you want to try it on your end? If that is so, check out the details below to learn more.

Key Features
Wondershare Filmora gives you extensive access to the various features and numerous video settings. Some of them are listed below. Read the items and familiarize yourself for your reference.
- Film frame rate configuration: It allows you to change the film frame rate settings based on your preferences. Just choose your desired option from the given list.
- Simple and advanced video editing: It is equipped with numerous tools that can help you perform a variety of video editing techniques.
- Useful creative assets: It offers a huge library of various resources that you can access and use within the platform. Among them are stock pictures, video clips, filters, effects, and many others.
- High-quality video templates: It is home to tons of high-quality video templates that you can easily customize in case you don’t wish to start from scratch.
- Artificial intelligence: It provides access to AI-powered tools that you can integrate into your creation process for ease of use and convenience.
- Flexible export options: It allows you to render and export your video outputs in various formats. Among the supported file types are MP4, WMV, AVI, MOV, F4V, MKV, TS, 3GP, MPEG-2, WEBM, GIF, and MP3.
Step-By-Step Guide
Wondershare Filmora is very easy to use and navigate. In just a snap, you can easily configure the film frame rate of your video content. Do you want to try it now on your end? If that is so, check out the tutorial provided below. Read the instructions and follow the indicated steps accordingly.
Step 1: Download the Wondershare Filmora application from its official website. Right after, install it on your computer.
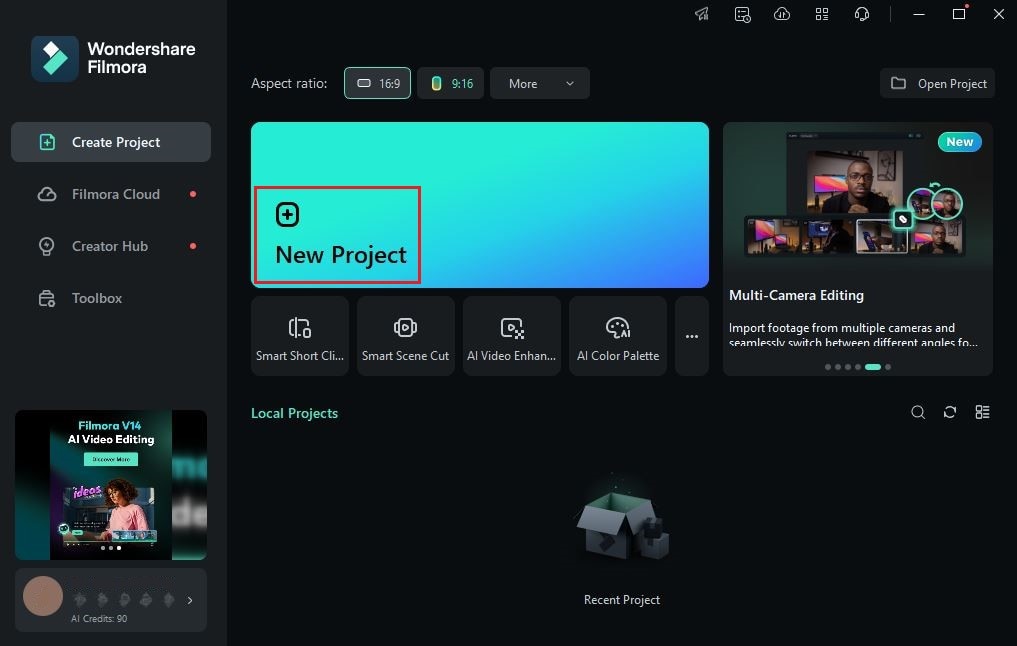
Step 2: Run the newly installed video editing software on your desktop afterward. Once it fully loads up, access the main dashboard and tap New Project to start editing. Alternatively, go to the Local Projects section right below it and open an existing session if there is any.

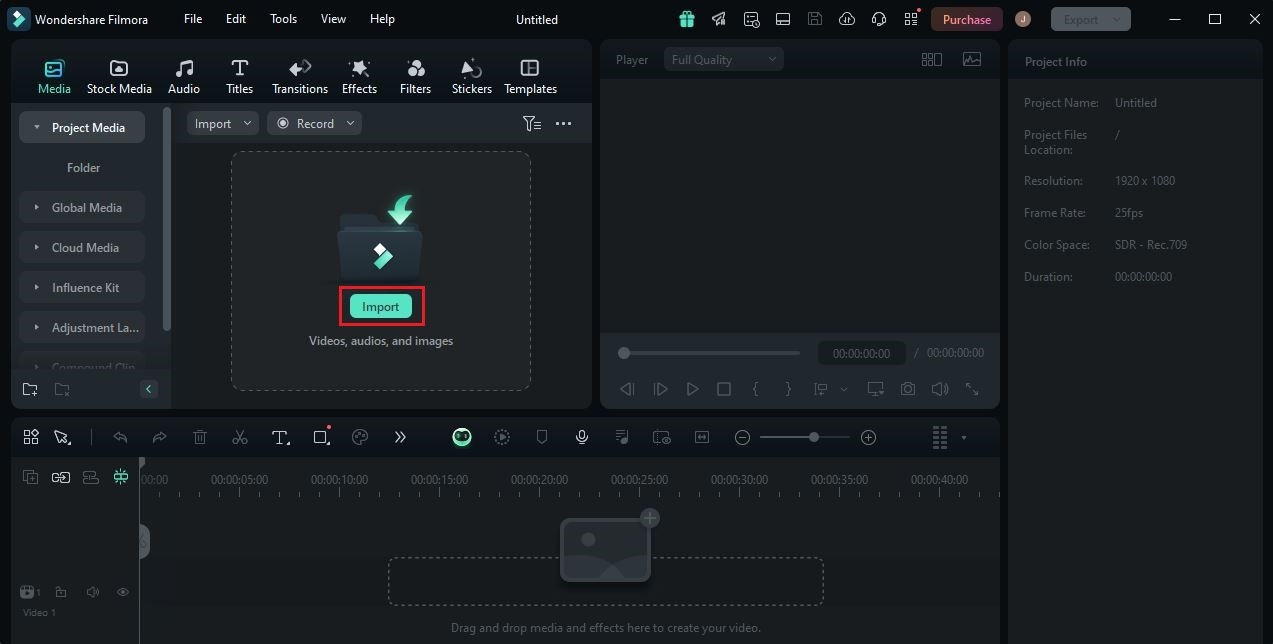
Step 3: After that, go to the Elements Panel and tap Import under the Media tab. Select all the files you are going to use and upload them to the platform. Once done, grab the assets one by one and drag them to the Editor Timeline.

Step 4: At this point, start editing your video project. Finalize the arrangement of the assets and make all the necessary adjustments. Do the color correction procedures afterward and ensure that the audio files are well-plotted across the timeline.

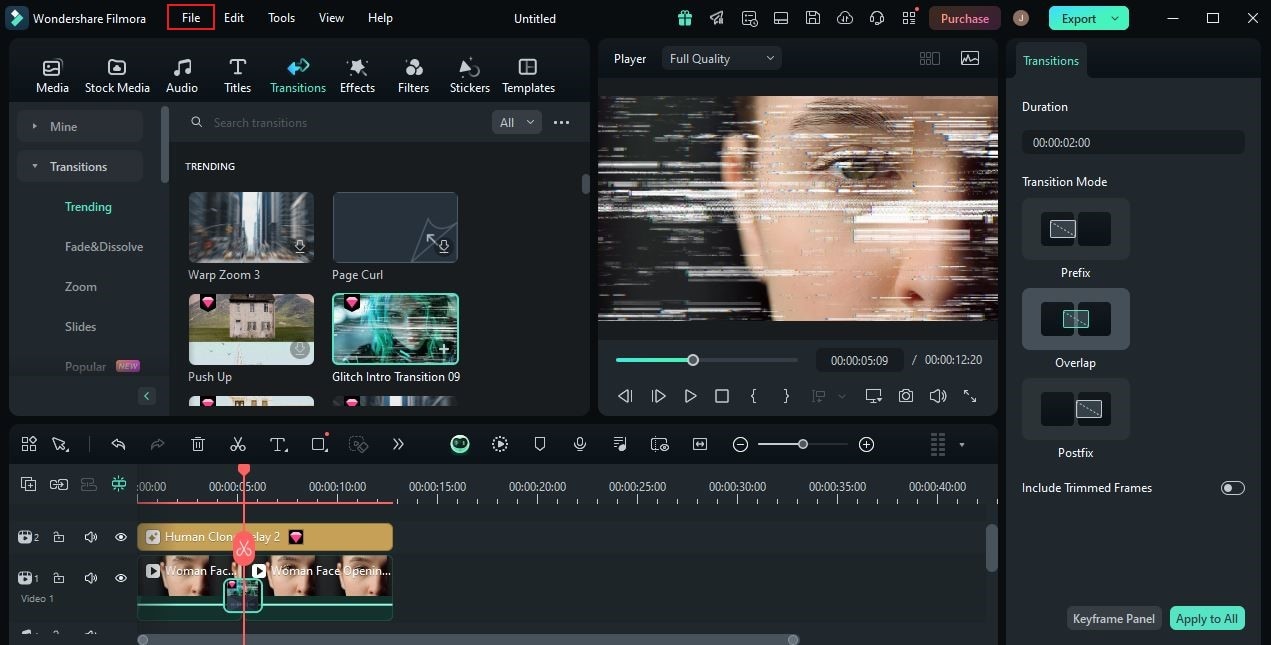
Step 5: Once completed, you may now recalibrate the film frame rate settings. Don’t worry. It’s indeed a walk in the park. To get started, go to the top menu bar and click File.

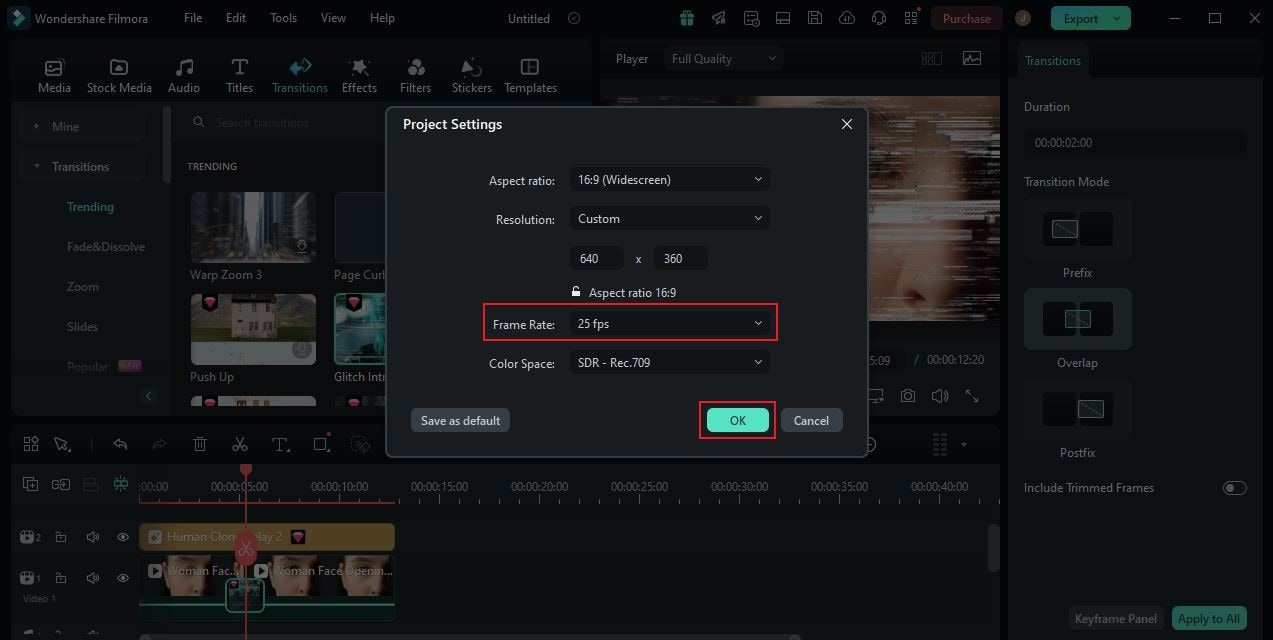
Step 6: Select Project Settings from the list of options. Immediately, a new window will be displayed on your computer screen. From there, find Frame Rate and click the drop-down menu next to it. Choose the specific film frame rate you wish to use. Once done, tap OK to save and apply the changes.

Step 7: Finally, play and watch the video output. Check if the selected film frame rate is working great on your content. If you’re satisfied with the result, click the Export button right above the Preview Panel to render the video and save a copy to your computer. Otherwise, continue making changes until a desirable outcome is achieved on your end.
Things You Should Know About the Film Frame Rate
At this point, many people are still wondering how cameras capture motion and record a video. Sure. This topic might seem a little complicated at a glance. But don’t worry. In reality, it is really not. Let’s just say that the camera records a series of images called frames. These frames are arranged accordingly and played at a specific rate to fit the motion in the recorded video. As the frames are played back, the video seems to be moving. That is the simplest explanation that can help you understand this matter.
In order to achieve a desirable outcome, the frames must be played at a particular rate. That’s why you should set the film frame rate accordingly. Frame rate refers to the measurement used to identify the speed of the frames while they are being played back. Each type of video content requires a specific film frame rate configuration. You have to make sure that it is well-calibrated before you finally export the output. Otherwise, the video will not look as smooth as it should be.
The film frame rate actually comes with a variety of options. Each of them serves a specific purpose that can help you obtain your desired outcome. That being the case, you should familiarize yourself with some of them. Do you want to know what those are? If so, check out the list below for more information.
24 FPS

The most common type of film frame rate is 24 FPS. It is a standard option for filmmakers who wish to exhibit a cinematic video effect. While there are other faster options, 24 FPS can give your footage a natural look and feel. You may consider this option if you’re not working on films with too much action and locomotion.
30 FPS

Another option you may consider is 30 FPS. Apparently, it captures more frames in a second compared to the first film frame rate. That means the movements captured in your videos will appear to be smoother and more fluid when played back. Set this FPS if you’re working on video projects filled with too many movements. Examples are action movies, sports video content, live TV feeds, and the like. For sure, it’s going to give you a nice result.
60 FPS

Last on the list is 60 FPS. It’s definitely the best choice if you want to create a smooth and decent slow-motion video. Why so? Simply because it renders more frames in one second. When played back at a slower rate, the effect will surely appear to be more realistic and natural. Go for this higher film frame rate if you want to emphasize visual details very clearly.
What is the Best Frame Rate For Films?
When it comes to movies, 24 FPS is the most common option being considered. It is capable of supporting various types of films while maintaining good playback quality and economical efficiency. That being the case, the 24 FPS film frame rate has become very popular across the globe. Are you planning to take it into consideration as well? If that is so, then check out the list below and read the other benefits you can get from it.
Style
You can be sure that 24 FPS has the ability to execute your desired video style flawlessly. So long as the movements are not that extreme, the result will be a real work of art, indeed.

Motion
On average, the typical motion captured on videos can be played smoothly in 24 FPS. You don’t need a higher film frame rate if it doesn’t show too much motion on the video. 24 FPS can already give you a realistic output in this regard.
Video Delivery
The delivery of your video output actually varies depending on where it is being played. That’s why you should configure the film frame rate very well. In this respect, the safest and best option is 24 FPS. It is the standard film frame rate that modern viewing devices can easily handle.

Cinema Display
Are you planning to show your film on the big screen? If that is so, you should consider the use of 24 FPS. This film frame rate is the best configuration that perfectly fits most of the projectors in movie theaters. Therefore, use 24 FPS if you want to give your video a cinematic look and feel.
Conclusion
The level of video smoothness while being played on a device affects our overall viewing experience. It becomes more enjoyable if the content is projected flawlessly without buffer or lag. That’s why you should set the film frame rate very well. 24 FPS, 30 FPS, or 60 FPS are among the best options in this regard. Depending on the type of video content, you can choose and use any of them. How to reconfigure the film frame rate? Well, it’s as easy as falling off a log. Download Wondershare Filmora and create your video project from there. It’s a potent content-creation software that provides not only advanced tools but also access to such project settings. Explore this platform on your end and make the most of the benefits it has to offer.


 100% Security Verified | No Subscription Required | No Malware

