Sometimes, you may take an ideal video, but notice that some of the objects in the frame are unnecessary and draw the attention away from the main subject. In such cases, you may want to crop your video and enhance the atmosphere you were trying to create.
If so, you're in the right place. Here is a complete guide and all possible methods for cropping videos on Mac that you can try to get the best results. Stay tuned for a bonus tip to make your recordings more professional and breathtaking.
In this article
Potential Issues When Cropping Videos
Before you start your cropping journey, you should be aware of potential issues you may encounter. We'll name some of them below to help you navigate the experience better and know what to expect in the future.
- Aspect ratio changes — The aspect ratio will change if you create custom crops, so you should pay special attention to this aspect if you plan to share your creations on social media platforms.
- Resolution issues — The cropping experience may influence the resolution, leading to poorer quality.
- File size changes — Although not significant, cropping your videos on Mac will influence the file size, so you should be aware of this when saving the new file.
These changes may impact your experience, so keep them in mind to avoid problematic situations.
Cropping Videos on Macbook With Built-in Tools
Mac devices have built-in and free tools you can use to crop your videos in just a few seconds. Although QuickTime Player and iMovie are fast, and you can create custom crops, they may affect the quality of your recordings. Anyway, here are the steps about how to crop videos on MacOS with Quicktime and iMovie.
How to Crop Videos on MacOS With Quicktime?
The built-in free QuickTime Player application doesn't provide a cropping feature you need for your journey. However, if you have a subscription to QuickTime Player Pro, you may be able to get what you're looking for.
The process is overly complicated since you'll need Photoshop as well to make your cropping expectations come to life. Without further ado, let's see how to crop your videos on Mac using QuickTime:
- Open your video in the app.
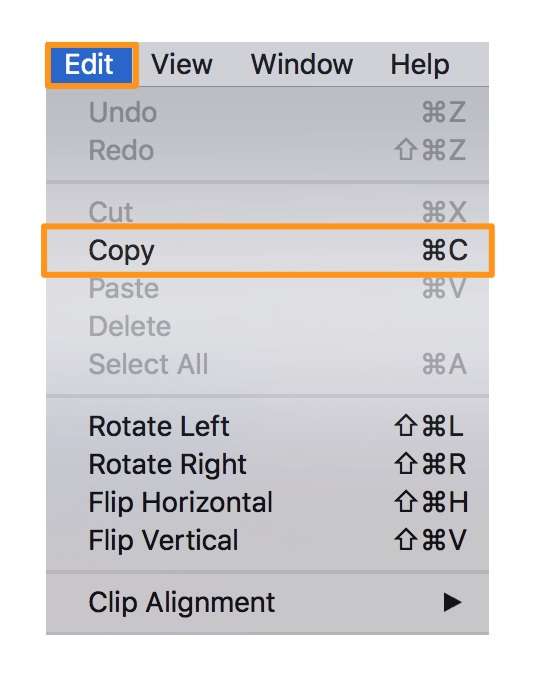
- Capture a frame by selecting Edit > Copy from the top bar.
- Now, head to Photoshop and start a new project.
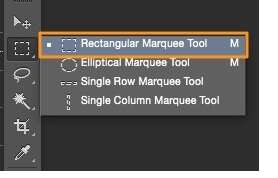
- Paste the image you've copied and click on the Rectangular Marquee Tool. Select the area you want to crop.
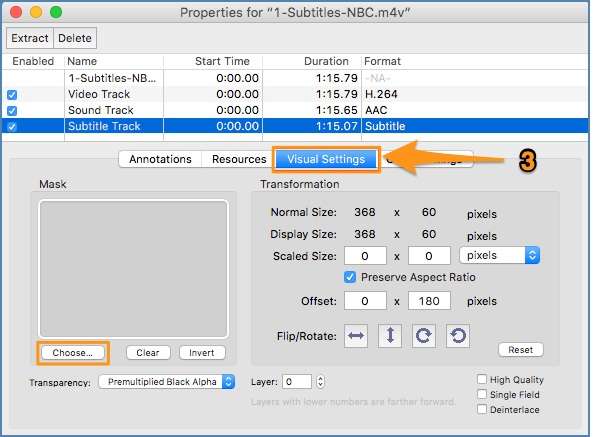
- In QuickTime, head to Windows > Show Movie Properties.

- Open Visual Settings and click the Choose option. Import your cropped video.
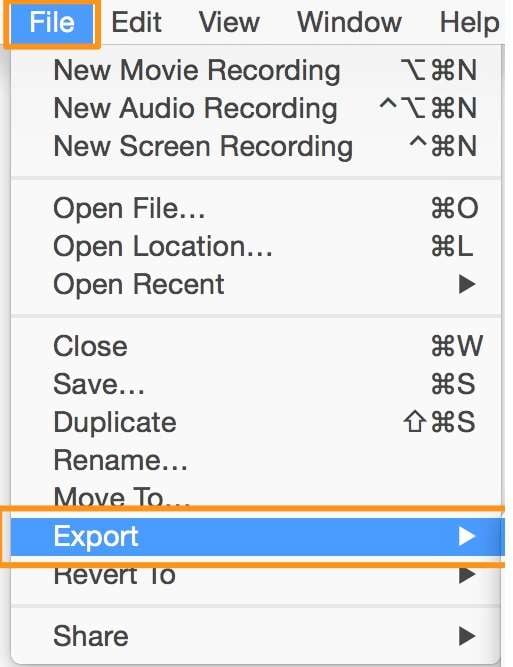
- Click Export to finish.
As you can see, using QuickTime Player is daunting and time-consuming.
How to Crop Videos on MacOS With iMovie?
iMovie is an application you can download for free on Mac devices. It's easier to use than the abovementioned option, and you can follow this guide to make your cropping visions come to life:
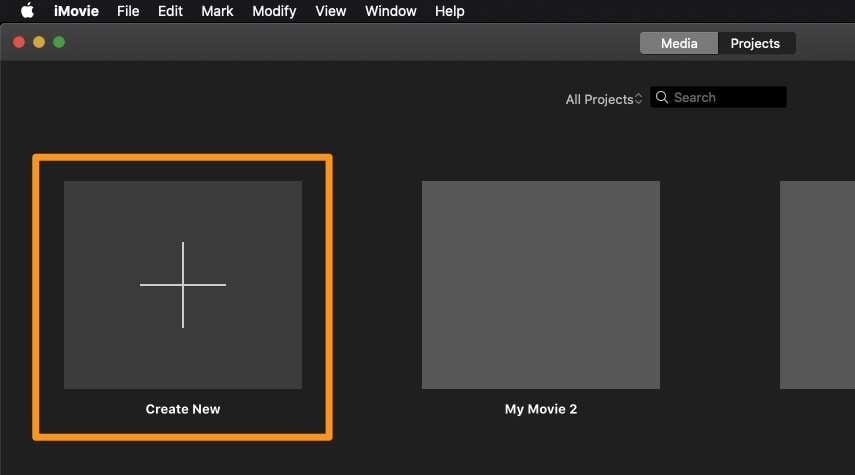
- Open the iMovie app and click on the Create New option.
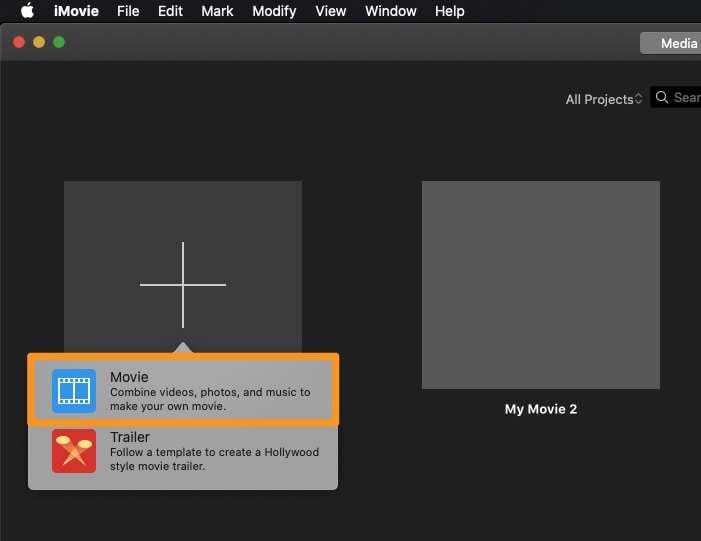
- Select Movie from the drop-down menu.
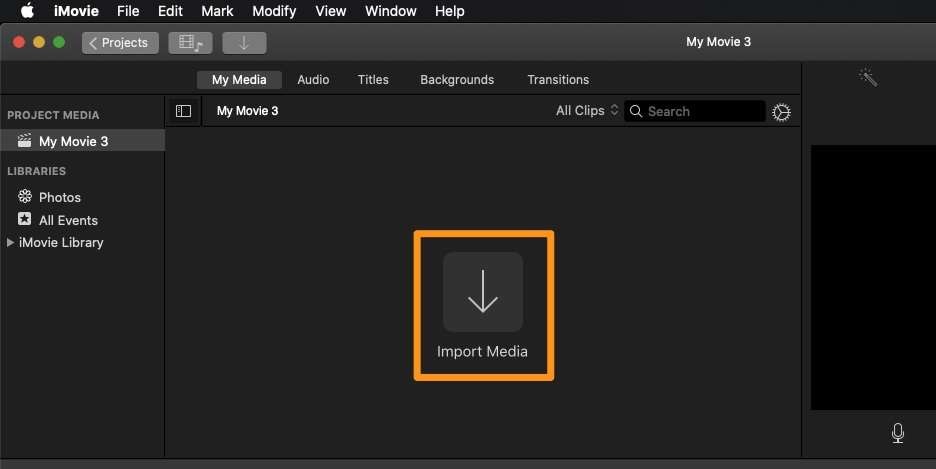
- Click the Import Media button and choose your video file.
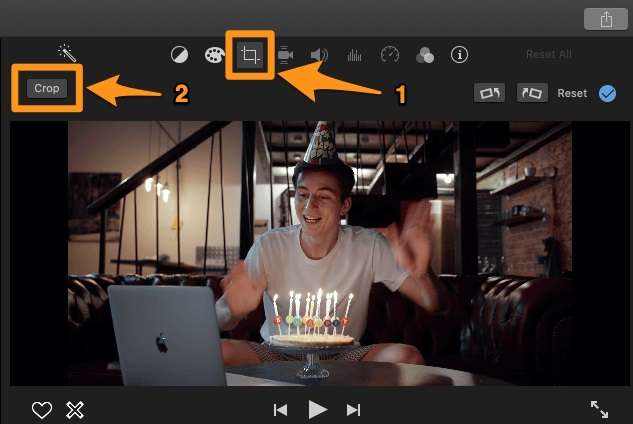
- Next, click the crop icon from the top bar and select the desired area.
- Click Crop to finish the process.
Using iMovie to crop videos is far more efficient, and you'll get results in seconds with this app.
Cropping Videos on Macbook With Third-Party Software
Quicktime and iMovie can only be used to make basic video editing like cropping, and it also takes complicated steps to achieve that. Using third-party software solutions like Wondershare Filmora can have many benefits for your journey.
- Cropping videos on Mac by choosing from the preset aspect ratios quickly.
- Customizing the rectangular to crop out any unwanted elements
- Using Auto reframe to resize the videos automatically
- Cropping videos on Mac to any shapes by applying a mask.
Featured in both basic and advanced video editing, you can use Wondershare Filmora to create much more perfect videos.
How to Crop Videos on MacOS With Filmora?
The first step is to head to the official Wondershare Filmora website and download the tool to your Mac device. Then, you can follow these steps to crop your videos on a Macbook.
- Open Wondershare Filmora and click the New Project option from the main menu.

- Next, import your video by dragging and dropping it to the platform. You should also drag the video to the timeline once imported.
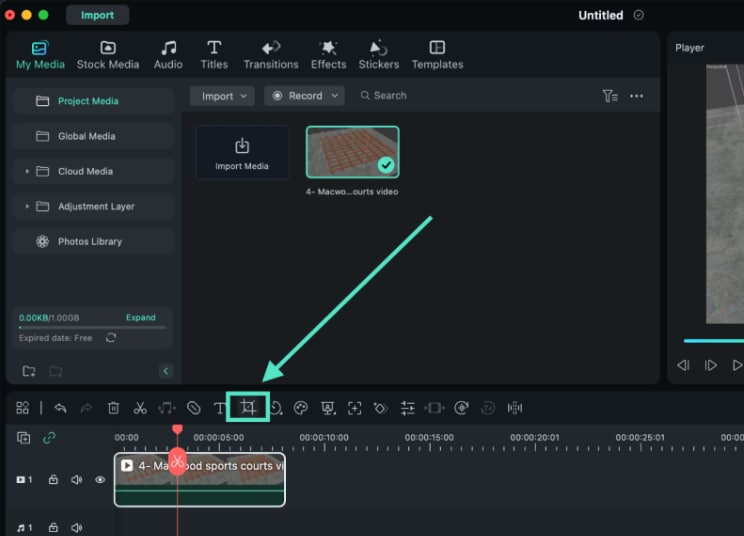
- Click the crop icon, as presented in the image below.
- Select the desired area.
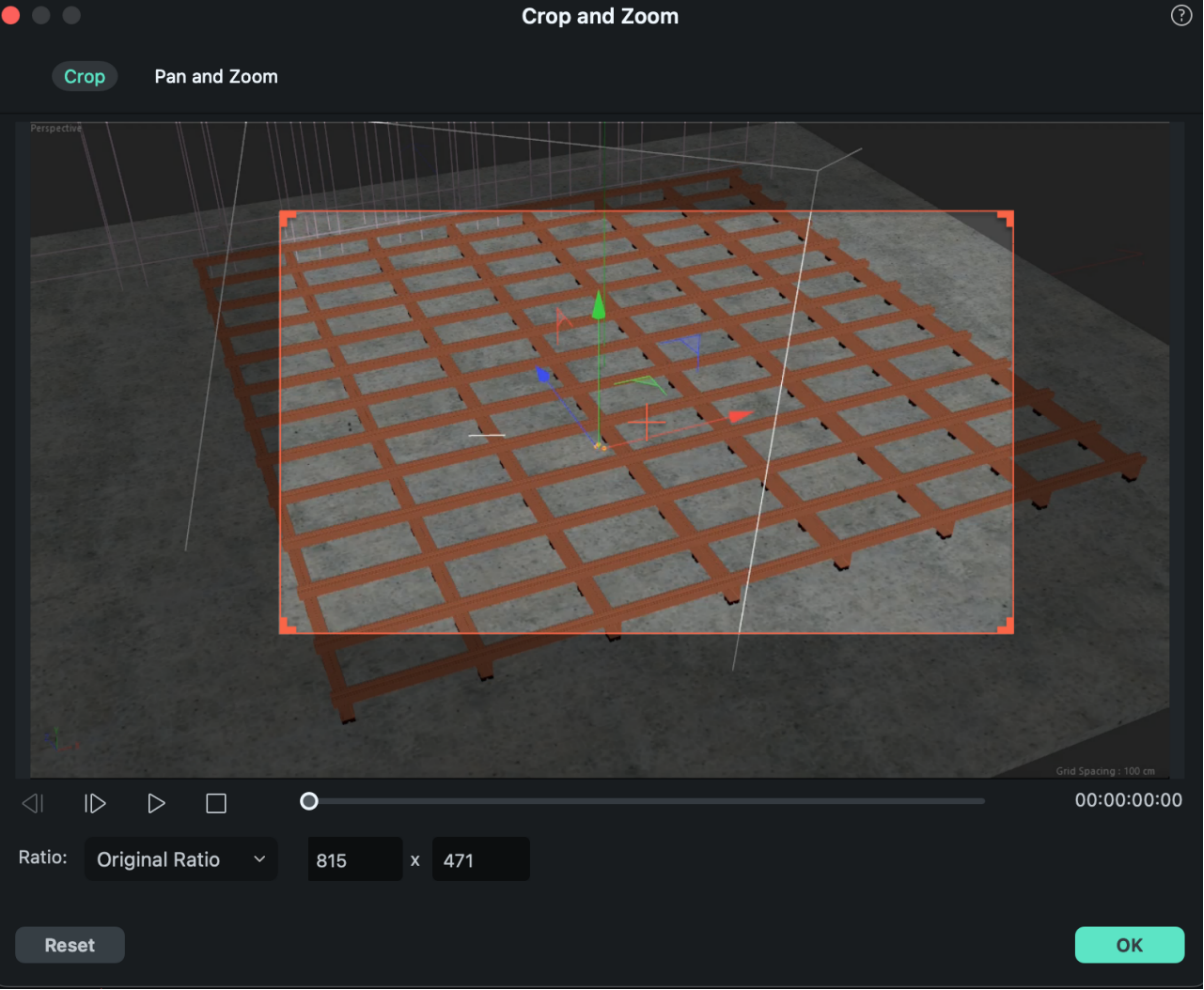
- Click OK to finish.
You can see that using and navigating Wondershare Filmora is easy, so you can master your cropping skills in no time with this tool.
Cropping Videos on Macbook With Online Tools
If you're looking for a method where you don't have to download tools or use additional features, online croppers may be your ideal solution. They are easy to use, and you won't get distracted by other tools that may occupy your time. However, the downside is that the resolution and the quality may change with such cropping methods.
How to Crop Videos on MacOS Online With Abraia.me?
One of the best online croppers you can find is Abraia.me. Using this solution is simple, and you can follow the steps below to navigate your experience.
- Head to the Abraia.me website.

- Select the area you want to crop.
- Click the Export Video button.

Bonus: Enhance Your Cropped Videos on Macbook With Filmora
As mentioned above, Wondershare Filmora is an advanced editing solution anyone can use to make their content more professional. If you have no previous experience in the editing field, you can use automated features to enhance the quality of your content and deliver outstanding results.
Moreover, you can use other advanced AI tools, such as smart cutouts, background changers, green screens, and many more, to customize the experience and make your visions come to life. Below, we'll present a guide to editing your recordings as fast as possible, but you can play around and discover everything Wondershare Filmora offers.
- Open Wondershare Filmora and start a new project.

- Import your video.
- Click the video in the timeline and head to the Basic tab.
- Toggle the Auto Enhance bar and watch the video transform.
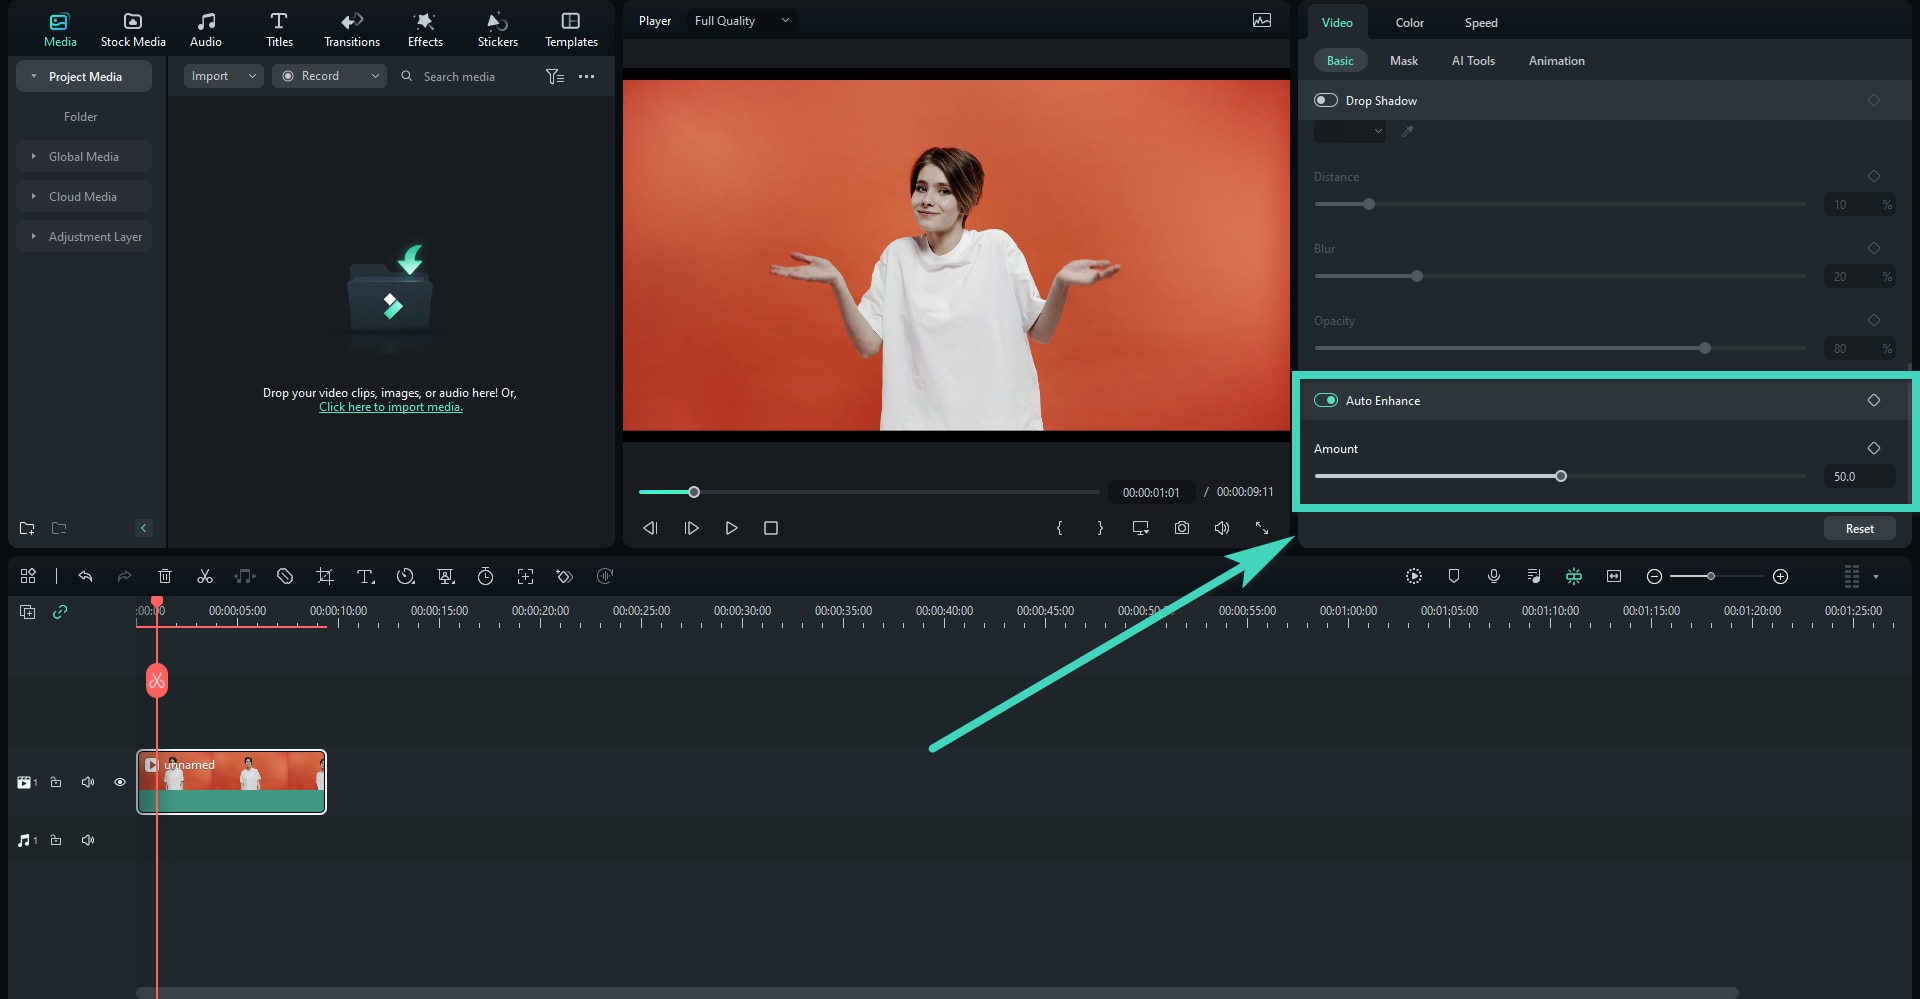
- Under the same tab, toggle the Color March bar to make the colors more vivid and color correct the mistakes.

Once you use these two features, the video will be professional and ready for further use.
Conclusion
Cropping videos on Mac can enhance the visual experience and make your creations look more professional. We've researched the market and discovered all possible methods you can try.
If you want the best results without compromising quality, use Wondershare Filmora for your cropping journey.
You'll also have numerous advanced features that will completely transform your videos and make them look and feel professional. Thanks to this solution, you can prepare your recordings for the audience in just a few minutes.


