
 100% Security Verified | No Subscription Required | No Malware


 ChatGPT
 Perplexity
 Gemini
 Claude
 Grok
Grok
Do you find it hard to apply zoom transition in Premiere Pro? A choppy or poorly executed zoom effect can make your video look awkward. But don't worry! This guide will help you master a dramatic zoom-in transition in Premiere Pro or a smooth zoom-out effect.
We'll also highlight common mistakes to avoid when applying the zoom effect in Premiere Pro. Plus, suggest an alternative video editor for an easier workflow. Let's dive into the details and upgrade your editing skills now!

In this article
Part 1. Step-by-Step Guide to Do a Zoom Transition in Premiere Pro
Want to create a seamless Adobe Premiere Pro zoom-in transition that adds a cinematic style to your videos? Applying zoom effects to your video can make scene changes smooth and visually appealing. Follow these simple steps to achieve a smooth zoom effect and enhance your edits.
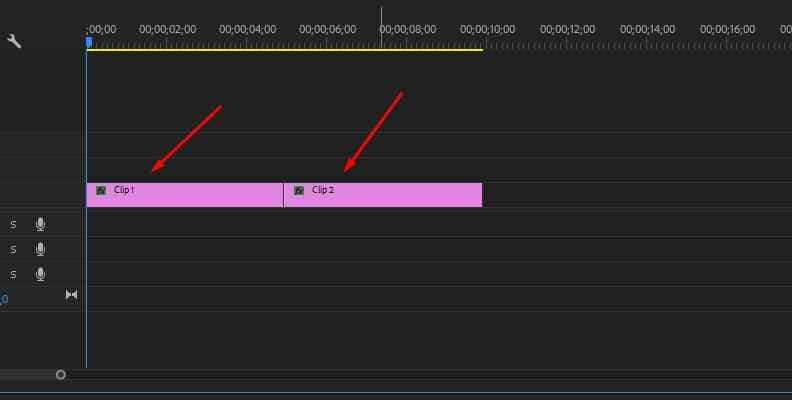
Step 1. Add Your Clips to the Timeline
Import the video clips into Premiere Pro. Then, drag them onto the timeline and place them back-to-back where you want the transition to occur.
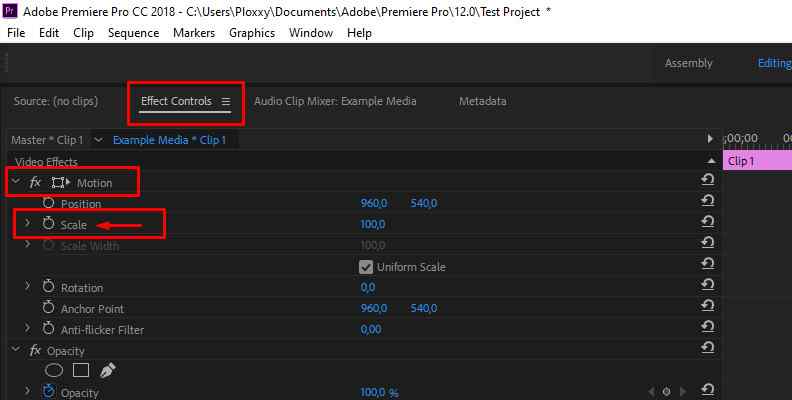
Step 2. Scale Up the Second Clip
Select the second clip and go to the Effect Controls panel. Find the Scale setting and increase it to around 120-150% to create the zoom effect.
Step 3. Add Keyframes for a Smooth Transition
Move to the start of the second clip and set a keyframe for Scale at 100%.
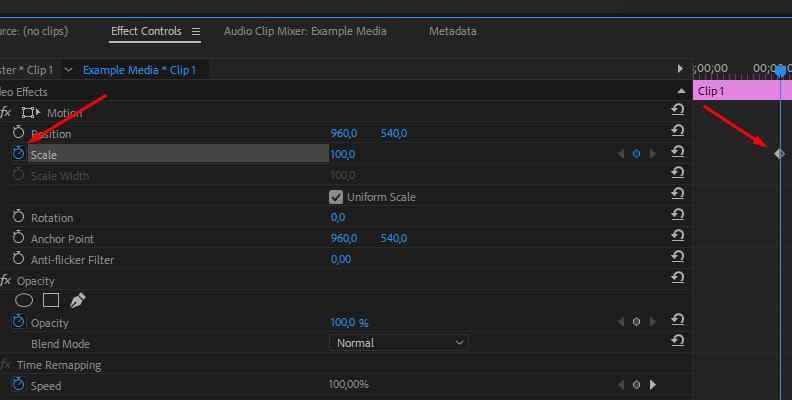
Move forward a few frames and set another keyframe at the desired zoom level (e.g., 120-150%).

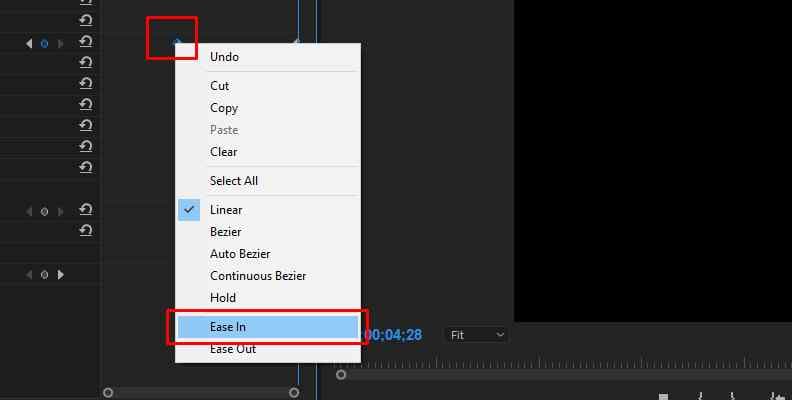
Then, you can adjust the keyframes for a smoother transition. To do this, right-click the first keyframe and select Ease In, then right-click on the second keyframe and choose Ease Out.
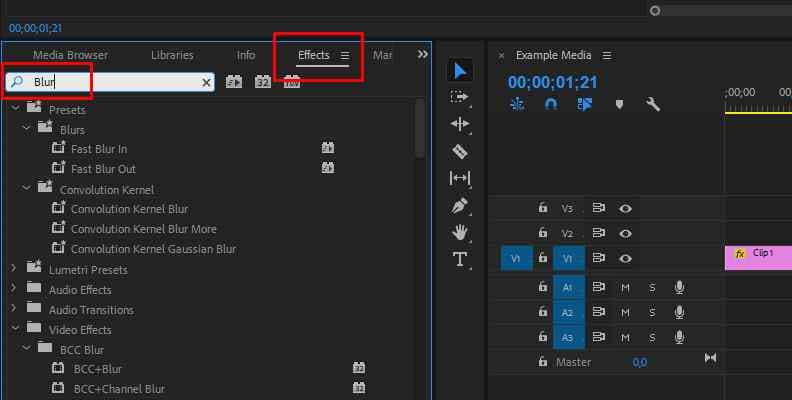
Step 4. Apply Motion Blur for a Natural Look
Search for the Blur effect in the Effects Panel and apply it to the second clip. Adjust the Blur Length to create a more fluid and natural transition.
By following these steps, you can apply Adobe Premiere zoom transition with ease. Next, let's explore an alternative video editor that simplifies the process of applying this effect even further!
🤩 Posts You Might Be Interested In: How to Create the Ken Burns Effect in Adobe Premiere Pro >>
Part 2. Alternative Video Editing Software – Wondershare Filmora
Looking for an easier way to apply the Premiere Pro zoom-in effect? Editing a video in Adobe Premiere Pro might feel complex for beginners. For more beginner-friendly editing software, try using Wondershare Filmora.
Why Filmora is a Great Alternative for Zoom Transitions
Both Adobe Premiere Pro and Wondershare Filmora are excellent tools for video editing, but they cater to different user needs:
 secure download

If you're short on time or prefer a simpler editing process, Filmora is your best choice. It can help save you time without compromising the video quality.

How to Zoom Transition in Wondershare Filmora
Adding a zoom transition effect in Filmora is simple. It doesn't require manual keyframing like in Adobe Premiere Pro. Follow these steps to create a smooth zoom-in or zoom-out transition effortlessly.
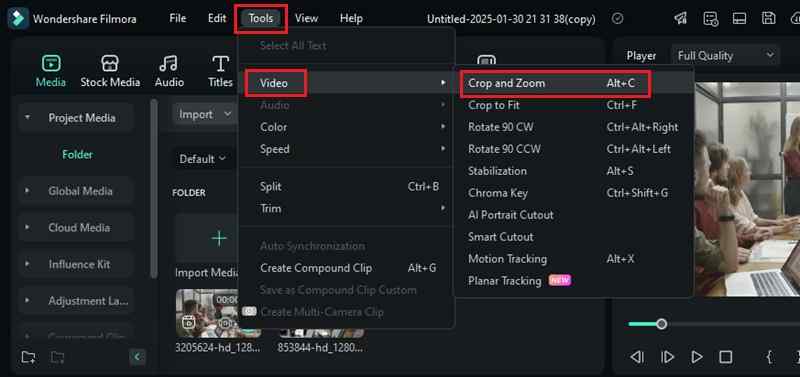
Step 1. Open Crop and Zoom Tool
First, click on the clip you want to apply the zoom effect. Then, go to Tools > Video > Crop and Zoom. This action will open a new pop-up window. Or, you can right-click on the clip in the timeline and select Crop and Zoom option from the pop-up menu.
Step 2. Choose the Pan and Zoom Mode
Switch to the Pan and Zoom tab at the top panel. Then, you'll see two frames over your footage:
- Green frame (Start): The initial view.
- Red frame (End): The final zoomed-in or zoomed-out view.
Select one of the five available pan and zoom modes from the options in the lower-right corner:
- Zoom In: Enlarges the subject by transitioning from a larger green frame to a smaller red frame (e.g., a close-up shoot on a face).
- Zoom Out: Creates a gradual pullback by moving from a small green frame to a larger red frame (e.g., revealing a wider scene).
- Pan Left: Moves the frame horizontally from left to right.
- Pan Right: Moves the frame horizontally from right to left.
- Swap: Switches the start and end positions.
Step 3. Adjust and Apply the Zoom Effect
Drag the edges of the Start (green box) and End (red box) frames to customize the zoom direction and intensity. Ensure the framing aligns with your desired effect. Then, click Apply to finalize the changes.
With these steps, you can achieve zoom-in transition effects without complicated keyframing. Filmora makes it easy to enhance your videos with smooth zoom transitions in just a few clicks!
Part 3. Common Mistakes to Avoid When Creating Zoom Transitions
A smooth zoom transition in Premiere Pro can make your videos look professional. But, small mistakes can make them look awkward or choppy. Here are some common mistakes to watch out for and how to fix them.
1. Zooming Too Fast or Too Slow
If the zoom happens too quickly, it can feel sudden and jarring. It might not have the impact you want if it's too slow. To fix this:
- Spread out your keyframes to create a more natural zoom.
- Use Ease In and Ease Out settings to make the motion smoother.
- Watch your transition a few times and adjust the speed if needed.
2. Forgetting Motion Blur
Zoom transitions without motion blur can feel stiff and unnatural. Motion blur helps blend frames together and makes the zoom feel smoother. To add motion blur in Premiere Pro:
- Apply the Directional Blur effect and adjust the Blur Length.
- Use plugins like Boris FX or Red Giant for more advanced blur effects.
3. Mixing Clips That Don't Match
The zoom transition may look odd if your video clips have different resolutions, colors, or frame rates. To make everything look smooth:
- Ensure all clips have the same resolution and frame rate before adding the zoom effect.
- Adjust colors and lighting to make the clips match better.
4. Using Zoom Transitions Too Often
Zoom effects can be exciting, but using them too much can be distracting. To keep your videos interesting:
- Mix in other transitions like fade, dissolve, or slide effects.
- Use zoom transitions only when they help tell your story, like focusing on an important detail.
🤩 Posts You Might Be Interested In: Motion Blur in Final Cut Pro Review: What Works in 2025 >>
Conclusion
A smooth zoom transition in Premiere Pro can make your videos look more dramatic. Following the right steps to apply this effect will make your edits look clean and natural. Avoid mistakes like abrupt zoom speeds, mismatched clips, and lack of motion blur to achieve a polished look.
If Adobe Premiere Pro feels too complex, Wondershare Filmora is a great alternative. Unlike when applying the zoom effect in Premiere Pro, Filmora offers more simple steps. Try them in your next video and enhance your video content right now!
