At a glance, it looks like improving the visual quality of video content is a lot of work. Why so? Simply because it involves a variety of manual adjustments and configurations that need to be done precisely and meticulously. But don’t worry. There is another way to complete this kind of task without engaging in such laborious procedures. Basically, you may just use some cinematic LUTs to achieve specific color effects. Yes. No manual work is needed. All you have to do is explore the best cinematic LUTs and choose one for your video content.
Cinematic LUTs are there for a good reason. Aside from convenience, they also offer a wide variety of styles that cannot be easily found elsewhere. That’s why you should take this option into consideration whenever you edit your video content. Explore the available choices provided by the video editing software and try it on your project. There are tons of tutorials out there that can help you maximize the benefits of this feature. For sure, you will not get lost in the process.
In this article, we will delve into the primary benefits of paid and free cinematic LUTs. We will also list down the best recommendations in this regard. Lastly, we will provide a short guide on how to apply cinematic LUTs to video projects. Continue reading below to learn more.
In this article
-
- It’s a great help for beginners and aspiring filmmakers.
- It speeds up the color grading and color correction process.
- It makes the video content look consistent from start to finish.
- It helps you achieve a particular visual effect without too much effort.
- It offers various presets that look beautiful and appealing.
Apply Cinematic LUTs to Video Projects Using Wondershare Filmora
LUTs are tools that automatically modify the video’s color settings to create a specific visual effect. It’s the best option you can try if you don’t want to do color grading and color correction from scratch. Many video editing apps like Wondershare Filmora support this kind of feature very well. Hence, you’ll not have a hard time exploring and implementing it in your own video project. Should you try the free cinematic LUTs of Wondershare Filmora? Absolutely. To know more about its LUTs and other video editing features, check out the discussions below.

Key Features
Here are the key features of Wondershare Filmora that can help you use and apply cinematic LUTs efficiently.
- Wondershare Filmora is packed with numerous features capable of facilitating both basic and professional video editing. To mention a few, these are keyframing, speed ramping, green screen, color match, motion tracking, compound clips, and many others. Before you apply cinematic LUTs, use these tools first to prepare and finalize your video clips and other media assets.
- Wondershare Filmora offers a large library of templates and resources. If you don’t have many media assets from your local storage, you can use these materials for your projects. Among the files you can access on this platform include stock images, clips, stickers, art, effects, transitions, and many others. Of course, free cinematic LUTs are also included on the list.
- Wondershare Filmora has tons of AI tools to offer to users. Among them are AI Text-Based Editing, AI Thumbnail Creator, AI Text-To-Video, AI Smart Cutout, AI Music Generator, and many others. Yes. It is not mandatory to seek assistance from artificial intelligence. But just in case you need it in the future, take note that Wondershare Filmora can indeed help you.
- Wondershare Filmora supports a variety of file formats for video exports. To mention a few, these are MP4, WMV, AVI, MOV, F4V, MKV, TS, 3GP, MPEG-2, WEBM, GIF, and MP3. Just select your preferred file type and then configure the export settings accordingly.
Step-By-Step Guide
It doesn’t take a genius to apply cinematic LUTs on Wondershare Filmora. In fact, you can easily do it with just the snap of a finger. Do you now want to try it on your end? If that is so, check out the tutorial provided below. Read the instructions and follow the indicated steps accordingly.
Step 1: Download Wondershare Filmora from its official website. Right after, install it on your computer.
Step 2: Launch the newly installed video editing software on your desktop afterward. Once it fully loads up, navigate to the main dashboard and click New Project to start editing. Alternatively, scroll down to the Recent Projects section and open an existing session if there is any.

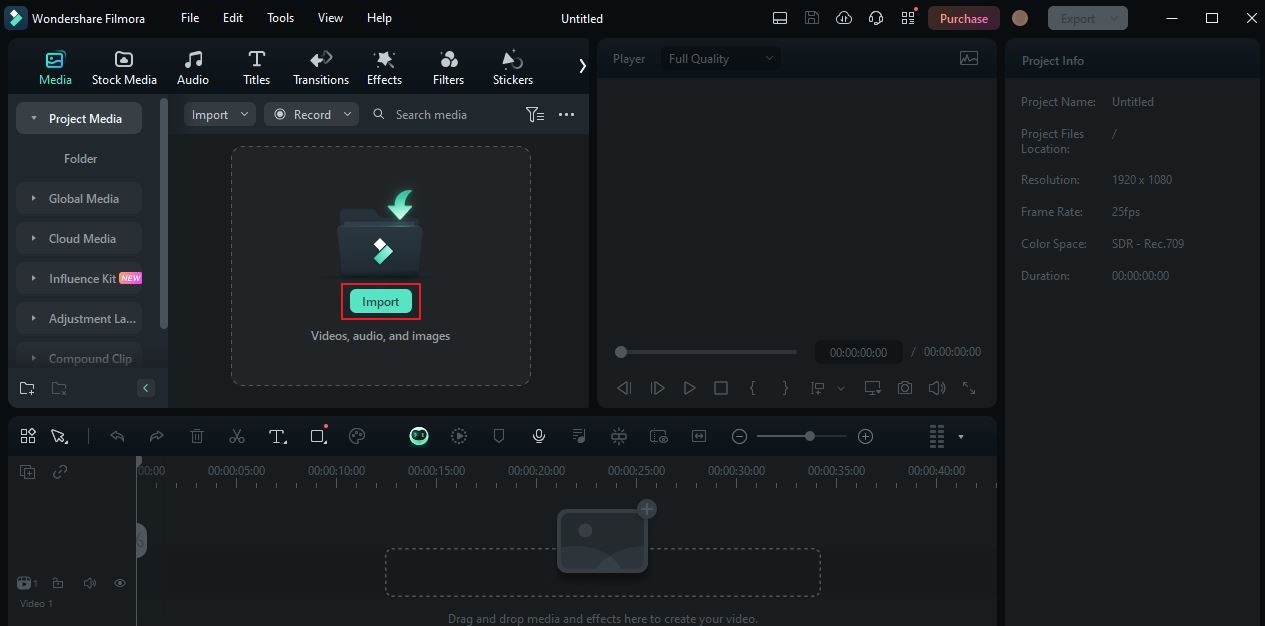
Step 3: After that, it’s time to organize the media assets you’re going to use in the project. To get started, go to the Elements Panel and then click the Import button under the Media tab. Select the files from your local storage and upload them to the platform. Don’t worry. Depending on the type and size of the files, this process will only take a few minutes to complete.

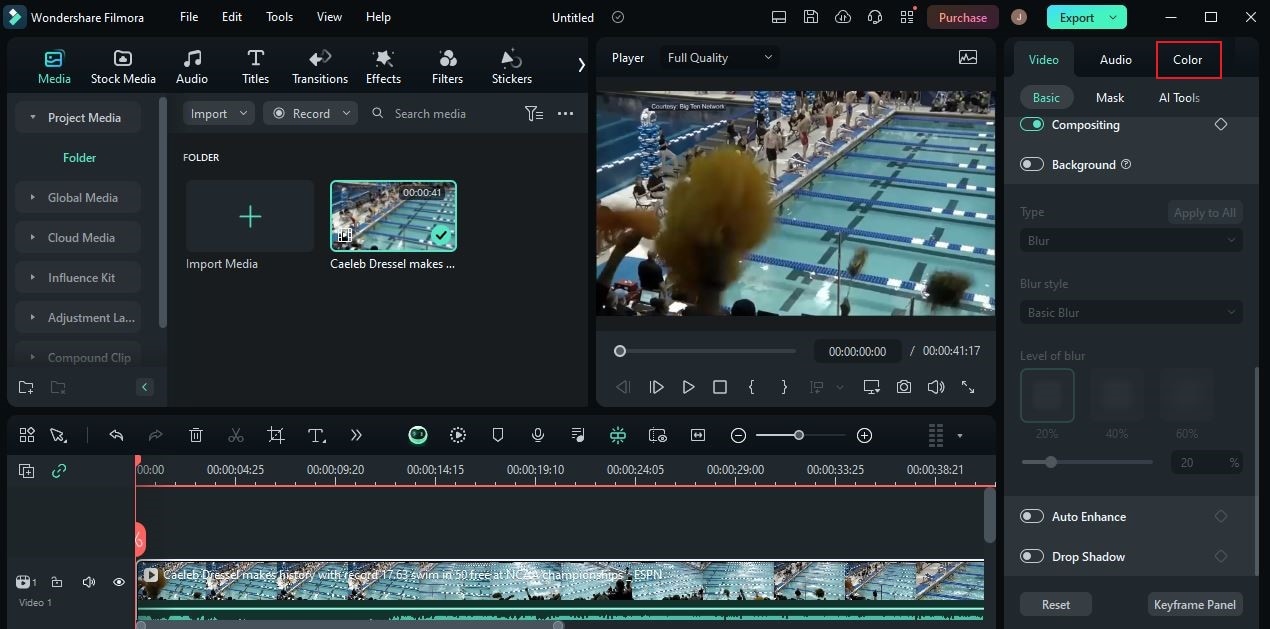
Step 4: Grab the video clips and then drag them one by one from the Media tab to the Editor Timeline. Arrange the assets based on your preferences. Once done, you can now start adding the cinematic LUT to your video clips. To do that, click a specific clip on the Editor Timeline. A new panel will then be displayed on the right-side corner. From there, click Color.

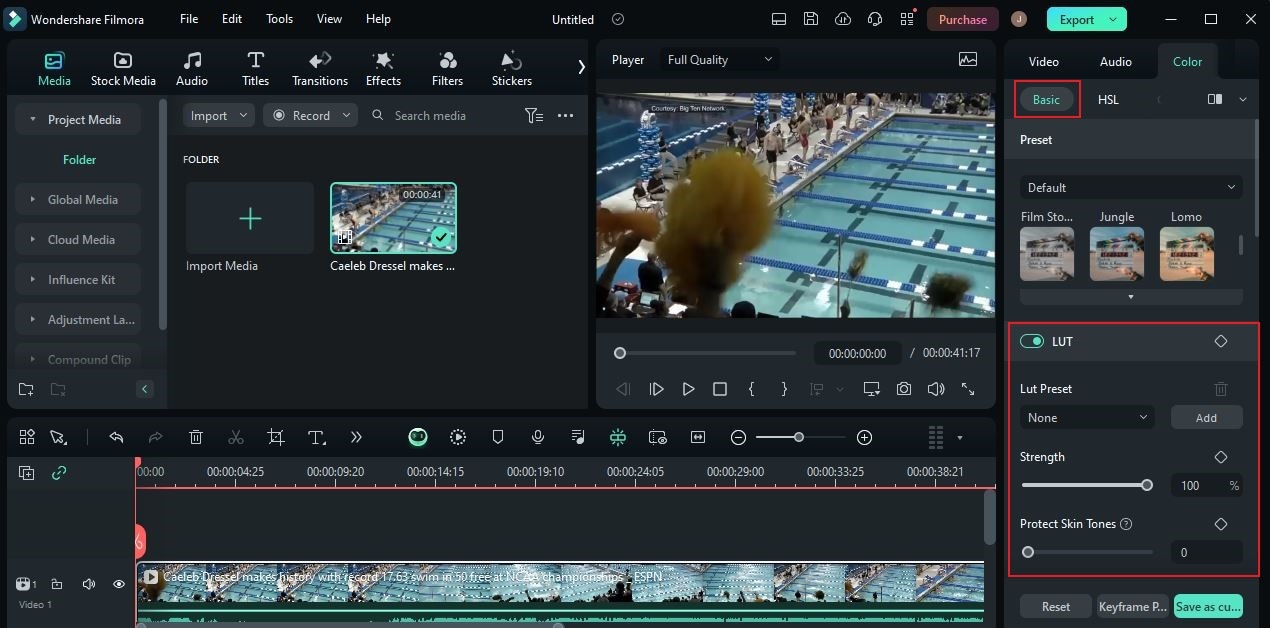
Step 5: Go to the Basic tab afterward and then scroll down to LUT. Toggle on the radio button next to it to access the LUT settings. Following that, click the drop-down menu below LUT Preset and select your preferred free cinematic LUT. Alternatively, tap the Add button beside it if you cannot find the LUT package you wish to use.

Step 6: Next, it’s time to configure a few LUT settings. Simply drag the Strength and Protect Skin Tone sliders from left to right or right to left until you achieve a desirable outcome. If you need to further calibrate the Color settings, simply switch on the radio button next to Color, Light, Adjust, and Vignette. From there, explore the provided settings and make your desired changes.
Step 7: Finally, play and watch the output. If you’re satisfied with the results, click the Export button to render the video and save a copy to your computer. Otherwise, continue making certain adjustments until you get a desirable outcome.
Should You Use Cinematic LUTs in Your Video Projects?
Adjusting the color settings of your video projects to create certain visual effects is not a walk in the park. It’s a process that requires careful thinking and accurate execution. Many people are gifted with the skills and experience to efficiently perform such a meticulous task. However, we cannot deny that others don’t have this kind of expertise. In this case, the availability of cinematic LUTs comes in very handy for almost everyone. Imagine applying the color effect with just the snap of a finger. Of course, that’s a whole new level of ease and convenience. But hold on. Cinematic LUTs have other benefits to offer. Do you want to know what those are? If so, check out the list provided below.
It’s a great help for beginners and aspiring filmmakers.
In essence, color grading and color correction cover a wide variety of video editing procedures. They are not like the other types of techniques that can be easily planned and executed. That being the case, beginners and aspiring filmmakers are advised to use customized cinematic LUTs for projects with stringent requirements. Don’t worry. Applying cinematic LUTs only takes a few steps to complete. No advanced skill sets are required.

It speeds up the color grading and color correction process.
Take note that color grading and color correction demands a lot of time. Why so? The simplest explanation is that they entail certain configurations that cannot be instantly adjusted in a snap. To expedite the process and meet your deadlines, the best option for you is to use cinematic LUTs. Just explore the selections at your disposal and choose one that fits the puzzle.
It makes the video content look consistent from start to finish.
There might be some discrepancies with the output’s quality if you manually do the color grading and color correction. Don’t sweat it. That is completely normal. However, it might somehow affect your video content if the difference is too noticeable. If you want to get rid of these color issues, cinematic LUTs can offer you a great solution. Apply a specific LUT to all the clips in your video projects. This way, the video will surely register a consistent color setting from start to finish.

It helps you achieve a particular visual effect without too much effort.
TV shows and movies often employ a high-standard filter or color grading effect. That said, many people use them as inspiration for their own video projects. Well, there is no problem with that. It’s totally fine. However, some of these color grading settings are very hard to replicate manually. In this case, cinematic LUTs come in very handy. Yes. Most video editing software offers cinematic LUTs inspired by famous films and TV shows. You just need to explore the library and choose one from the given selections.
It offers various presets that look beautiful and appealing.
Indeed, the majority of cinematic LUTs out there look stunning and beautiful. They can absolutely give an incredible glow to your video projects. If you wish to use them for the sake of aesthetics, feel free to do so. Don’t worry. There is nothing wrong with that so long as it helps you achieve a desirable visual effect.

Top 5 Cinematic LUTs to Try
As previously indicated cinematic LUTs are considered a default feature of many video editing apps out there. You can just go to the designated resources library within the platform and explore the selections at your disposal. In this regard, Wondershare Filmora has a large collection of free cinematic LUTs. Do you want to see a few samples and go over them? If so, check out the list below of the best cinematic LUTs that you can access and use on Wondershare Filmora.
Cool Film

First on the list is Cool Film. As the name suggests, this cinematic LUT features a low-temperature filter that somehow gives the clips a bluish-color tone. You can use Cool Film for any video project that features a serious or lonesome theme. Just make sure that the exposure settings complement very well to get a beautiful result.
Dark Film

Do you want to add a vintage and classic vibe to your video project? If that is so, the Dark Film is one of the cinematic LUTs you may consider. Generally, its color temperature is set higher than usual under low exposure. As a result, the Dark Film cinematic LUT makes the video appear brownish and tanned. Try this option if your video features an event from the past. For sure, it will give viewers the right idea.
Summer Film

The Summer Film cinematic LUT is a great option for video clips that feature outdoor scenery. It makes the scene look vibrant and full of life. If you have footage of al fresco events, beach parties, or similar, try to use this cinematic LUT. One way or another, it’s going to take your video to a whole new level.
Joker

The metallic green filter for videos looks amazingly beautiful to numerous types of content. It somehow evokes significant emotions related to sadness, grief, and dolor. If you’re working on a project with the same theme, try this Joker cinematic LUT. Certainly, it will help you convey the exact message and meaning you want to imply to the viewers.
Stylish Apocalyptic

Last but not least is Stylish Apocalyptic. It’s one of the free cinematic LUTs that gives some grayish color tones to the video content. If you want to moderate the brightness of colors in your video project, this one is a great option. Just configure it well with your footage to make sure that the original colors are still recognizable and identifiable. Otherwise, your video may turn black-and-white completely if too much effect is applied.
Conclusion
It’s fair to say that color setting is one of video editing’s vital elements. If calibrated poorly, there is a high probability that the video output will not play out well. That’s why you should consider it as your priority when working on this kind of project. If you have the means, then you can try to do color grading and color correction manually. On another note, you may use pre-made cinematic LUTs to apply your desired effect. Download Wondershare Filmora on your computer and explore its large collection of free cinematic LUTs. One of them will surely match your preferred style and transform the visual quality of your video content.


 100% Security Verified | No Subscription Required | No Malware

