


 100% Security Verified | No Subscription Required | No Malware


 ChatGPT
 Perplexity
 Gemini
 Claude
 Grok
Grok
Slow motion is a great way to make videos more dramatic. This video editing technique is often used to add drama, emphasize details, or enhance the emotional impact of a scene. However, achieving smooth and professional slow-motion effects can be tricky, especially if you're new to video editing. That’s where Adobe Premiere Pro comes in.
You can create smooth slow motion in Adobe Premiere Pro, as it offers powerful tools to help you create slow-motion effects with ease. In this guide, we’ll walk you through simple and advanced methods on how to slow down a video using Premiere Pro.
Ready to elevate your video editing skills? Dive into the guide and start mastering slow-motion techniques with Adobe Premiere Pro today!
In this article
Part 1. Basic Method: Speed/Duration Adjustment
One of the simplest and most straightforward ways to create slow motion in Premiere Pro is by adjusting the speed/duration of your videos. This method is ideal for those who are new to video editing or need a quick way to slow down a video clip.
How to slow down a video Premiere Pro
Step 1. Select the Clip
Click on the clip in the timeline that you wish to slow down, and ensure it is selected before proceeding.
Step 2. Access Speed/Duration Settings
Right-click on the selected clip and choose Speed/Duration from the menu that appears. This action will open a window where you can adjust the speed.
Step 3. Adjust the Speed
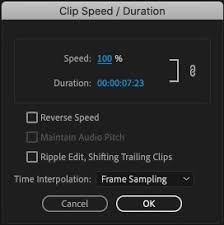
In the Speed/Duration window, lower the speed percentage to slow down the video. For example, setting the speed to 50% will make the video play at half its original speed. You can also manually enter a new duration for the clip.
Step 4. Optional Settings
If you want to adjust the speed and duration separately, uncheck the link icon. In the same window, you will find three additional options:
- Reverse Speed: This option makes the footage play in reverse.
- Maintain Audio Pitch: Check this box to keep the audio pitch as close to the original as possible when the speed is changed.
- Ripple Edit: Use this option to automatically shift other clips on your timeline, keeping your edit in sync.
After making your adjustments, click OK. Premiere Pro will then apply the changes, and your clip will now play in slow motion.
Step 5. Preview and Adjust
After adjusting the speed, play your video to see the slow-motion effect. If further changes are needed, go back to the Speed/Duration settings and make the necessary adjustments.
With these steps, you can easily create a slow-motion in Adobe Premiere Pro using the Speed/Duration adjustment. This simple method is perfect for beginners and adds instant dramatic effect to your videos. Once you’re comfortable with this technique, you can try out more advanced techniques to further enhance your edits.
Part 2. Advanced Method: Using Time Remapping
For those looking to take their slow-motion effects to the next level, Time Remapping in Premiere Pro offers more precise control. This advanced technique allows you to create both slow-motion and fast-motion effects within a single clip.
Here’s how to make slow motion in Premiere Pro using Time Remapping:
Step 1. Enable Time Remapping
Select the clip you want to work with in the timeline. Then, right-click on the clip and choose Show Clip Keyframes > Time Remapping > Speed. The clip will be highlighted in blue. A horizontal line will appear in the middle of the clip to control its speed. If you have difficulty seeing it, zoom in on the timeline.

Step 2. Add Keyframes
To set different speeds at specific points in your clip, you need to use keyframes. Hold down the Ctrl key (or Cmd key on Mac) and click on the speed line in the timeline where you want to set a keyframe. Each click will add a keyframe at that point, allowing you to adjust the speed between keyframes.
Step 3. Adjust Speed
Move the line between keyframes up to increase speed or down to decrease it. A tooltip will show the current speed change as a percentage of the original speed.
Step 4. Review the Changes
Watch your clip to see how the speed adjustment affects playback. Adjust the keyframes and speed settings as needed for the desired outcome. Once you’re happy with the effect, you can continue editing or finalizing your project.
For a more detailed tutorial, you can go to this link. Now that you know how to do slow motion in Premiere Pro, you might want to explore alternative tools that simplify the process. In the next section, we will introduce you to alternative software to slow down your videos.
Part 3. Exploring Easier Alternatives – Wondershare Filmora
If you’re looking for a more user-friendly option to create slow-motion videos, Wondershare Filmora is an excellent alternative to Premiere Pro. Filmora offers a straightforward process for editing videos, including applying slow-motion effects.
You can create professional slow-motion effects easily, without the complicated learning curve of software like Premiere Pro. It also includes built-in effects, transitions, and audio tools, giving you everything you need in one place.
Key Features
- Speed Ramping: Dynamically adjusts the speed of your video clips, allowing you to create smooth transitions and dramatic effects with ease.
- Keyframing: Offers precise control over various parameters, including speed changes, enabling smooth transitions between different speeds within a single clip.
- AI Frame Interpolation: Automatically generates extra frames for smoother slow-motion effects, enhancing overall video quality.
- Instant Preview: Provides real-time previews of your edits, allowing quick adjustments without the need for rendering.
To help you decide if Filmora is the right alternative for you, here’s a quick overview of its advantages and potential limitations compared to Premiere Pro.
This guide will show you two simple ways to add a slow-motion effect to your video using Wondershare Filmora. Simply follow the steps outlined below:
Method 1. Apply Slow Motion to the Entire Clip
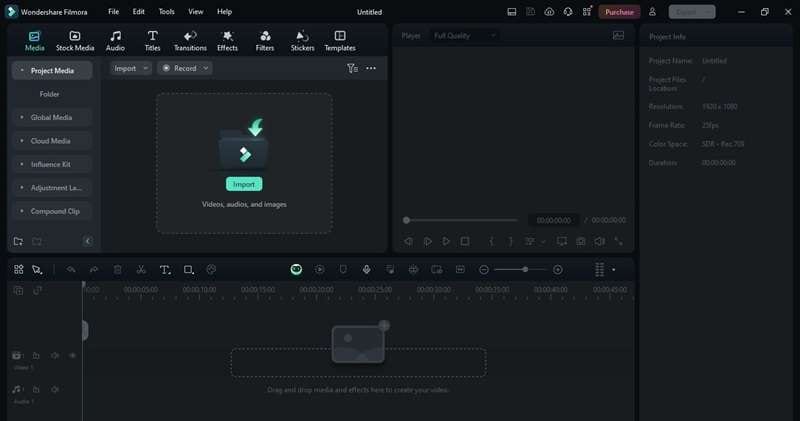
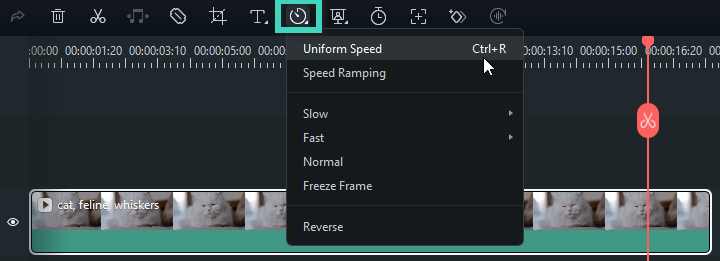
Step 1. Access the Uniform Speed Feature
Once you’ve added your video to the timeline, click on the clip and right-click. Navigate to the toolbar above the timeline and click on Speed > Uniform Speed. You can also access this by right-clicking on the clip, and from the options that appear, select Speed > Uniform Speed.
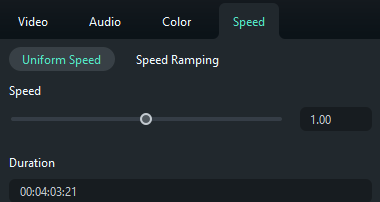
Step 2. Adjust the Speed
Move the Speed slider to the left to slow down the video. The number next to the slider shows how much the speed is reduced. Adjust it to your liking.
Method 2. Applying Slow Motion with Speed Ramping
Step 1. Access the Speed Ramping Feature
After adding your video to the timeline, click on the clip, then right-click. Choose Speed > Speed Ramping from the menu. Alternatively, you can go to the toolbar above the timeline and select More > Speed > Speed Ramping.

Step 2. Adjust the Speed Ramps
In the Speed Ramping panel, select Customize, then drag the adjustment points below the centerline to slow down that part of the clip. You can also use one of the presets to automatically apply a slow-motion effect. To add a new adjustment point, play the video, pause at the desired frame, and click the Plus icon.

Part 4. Enhancing Slow Motion with Optical Flow
For those seeking to achieve exceptionally smooth slow-motion effects, Adobe Premiere Pro’s Optical Flow feature is an excellent tool. Optical Flow enhances slow-motion footage by generating intermediate frames between the existing ones, resulting in a seamless and fluid appearance.
Optical Flow is a frame interpolation technique that analyzes the motion in your video to create additional frames. This helps to maintain smoothness and reduce any stuttering that might occur with basic speed adjustments. It’s especially beneficial when the standard methods don’t provide the desired fluidity.
Here is how to apply and adjust Optical Flow in Premiere Pro
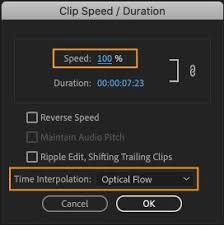
Step 1. Right-click on the clip you want to adjust and select Speed/Duration. This action will open a dialog box.
Step 2. Enter the desired playback speed as a percentage in the Speed field.
Step 3. In the Time Interpolation dropdown menu, choose Optical Flow, then click OK to apply the changes.
Step 4. Go to Sequence and choose either Render In to Out or Render Selection to render the clip.
Step 5. Play the clip to see how Optical Flow has created smooth slow motion by adding new frames.
Using Optical Flow in Wondershare Filmora
Wondershare Filmora also offers an Optical Flow feature to enhance slow-motion effects. This tool helps achieve smooth transitions and high-quality results in your videos. Here’s how to use it in Filmora:
Step 1. On your video timeline, select the clip you want to apply slow motion to.
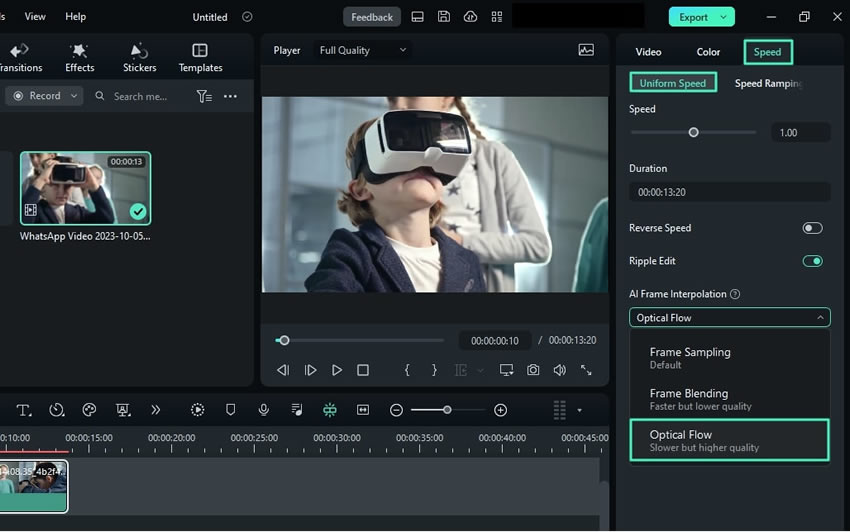
Step 2. Right-click on the clip and choose Speed > Uniform Speed.
Step 3. Adjust the speed by dragging the speed slider to the left to slow down the video. Expand AI Frame Interpolation and select Optical Flow.
Step 4. Click Render Preview in the timeline toolbar to see the preview results of your edits. Or you can export the video for a final review.
Part 5. Troubleshooting Common Issues
Even with advanced techniques like Optical Flow, you may encounter some issues in your slow-motion videos. Here are common problems and practical solutions to ensure a smooth final product.
Common Problems
- Choppy Playback: Slow-motion footage might appear stuttery or uneven.
- Audio Sync Issues: Audio may become out of sync with the video after speed adjustments.
- Rendering Errors: Problems can arise during the rendering process, affecting the final output.
Tips and Solutions
- Fixing Choppy Playback
- Check that your project settings match your footage’s frame rate. Mismatches can cause stuttering.
- Adjust playback resolution to a lower setting in Premiere Pro for smoother previews.
- Ensure Optical Flow is properly applied to generate smooth intermediate frames.
- Resolving Audio Sync Issues
- If the audio sync is off, unlink the audio from the video, adjust the video speed, and then re-link.
- Use the Speed/Duration settings to match audio speed with the slowed-down video.
- Addressing Rendering Errors
- Ensure the software is updated to the latest version to avoid compatibility issues.
- Clear your media cache files from File > Preferences > Media Cache to resolve rendering problems.
- Render your video in smaller segments if you encounter errors, then combine them in the final export.
With these troubleshooting tips, you can overcome common issues and achieve a polished, professional slow-motion effect in your videos.
🤩 Posts You Might Be Interested In:
Conclusion
Mastering slow motion in Adobe Premiere Pro can elevate your video projects with dramatic and captivating effects. You can use basic speed adjustments to advanced techniques like Time Remapping and Optical Flow to achieve smooth slow motion videos.
For those seeking Adobe Premiere Pro alternatives, you can try Wondershare Filmora. It offers user-friendly alternatives that deliver high-quality slow-motion effects without the steep learning curve. Whether you stick with Premiere Pro or explore Filmora, you can create your own slow motion videos with ease using this guide. Start creating one right now!
