Videos are a great medium, but uploading them can be challenging due to size or data limits. Resizing videos can help overcome these obstacles.
Many software options, like Handbrake and Wondershare Filmora, allow you to export videos in smaller sizes. Handbrake is ideal for batch resizing, while Filmora offers powerful editing features. Here’s a guide on how to Resize Video in Handbrake and Filmora.
In this article
Part 1. How to resize video with Handbrake
Open the Handbrake and follow the steps listed below.
Once open, the software will present you with options to either import a single video file for resize or a whole batch via folder selection.
Once you have imported the video file, the software will present you with two choices.
- Option 1: Use a preset available in the application — the best choice for beginners to choose for beginners.
- Option 2: Set a custom resolution via the Dimensions Tab.

How your screen will look once you have imported a video file.
How to Resize Video via Option 1
Step 1: Import Video File by choosing
- Single Import, or
- Batch Import

Step 2: Choose a Preset in Handbrake.

Step 3: Click on Start Encode after choosing the desired preset.

Step 4: Wait for the Encode to finish. The application shows progress in a bar at the bottom of the screen.

Step 5: Click on Browse in the bottom right corner to enter the Save File dialogue. At this point, you can set a file name and select a new save location.


How to Resize Video via Option 2
Step 1: Import Video File by choosing
- Single Import, or
- Batch Import

Step 2: Click on the Dimensions Tab to open up a dialog box that will let you edit video resolution.


Step 3: Modify resolution to ensure the clip you get is in the right setup.
If you see 1920 x 1080 on your screen, the first number (1920) stands for the width of the video file, while the second number (1080) stands for the height.

Part 2: An easier way to resize video with Wondershare Filmora
While the resize feature in Handbrake is capable of working on multiple video files at once, the user interface of the application may seem daunting to some. Hence, if you’re just starting to learn, we recommend accessing more user-friendly software, say Wondershare Filmora Video Editor .
Wondershare Filmora is an easy-to-use yet powerful video editor suitable for all creators, allowing you to effortlessly convert horizontal videos into vertical ones. Notably, Filmora not only has the Auto Reframe feature but also includes an advanced compression function, and it offers a method for manually adjusting video dimensions. Wondershare Filmora is a clear winner! Its advanced video compressor makes it incredibly easy to reduce file size without any loss of quality while ensuring that your videos meet the size requirements for social media uploads.
And if that’s not enough, Filmora also has an Auto Reframe feature, along with other ways to help reduce file size. You can adjust the video resolution, tweak the bitrate and frame rate, or cut the video length. Plus, it comes with advanced features to enhance your videos before sharing them on social media.
Plus, it’s incredibly fast, with compression speeds up to 47x faster! And the best part? If you’re reducing file sizes for YouTube uploads, you can use the recommended bitrate for the best possible quality.
And if that’s not enough, Filmora also has an Auto Reframe feature, along with other ways to help reduce file size. You can adjust the video resolution, tweak the bitrate and frame rate, or cut the video length. Plus, it comes with advanced features to enhance your videos before sharing them on social media.
- Auto reframe video in 16:9, 1:1, 9:16, 4:3 or 21:9.
- Offers cool video effects and filters to make your video become professional.
- Cross-platform supported - (Windows, Mac, iOS, Android).
- Resize Your Videos Without Quality Loss.

So, what are you waiting for? Give Filmora a try to reduce the size of your video files! Just follow this simple guide to get started:
Method 1: Using Advanced Video Compressor
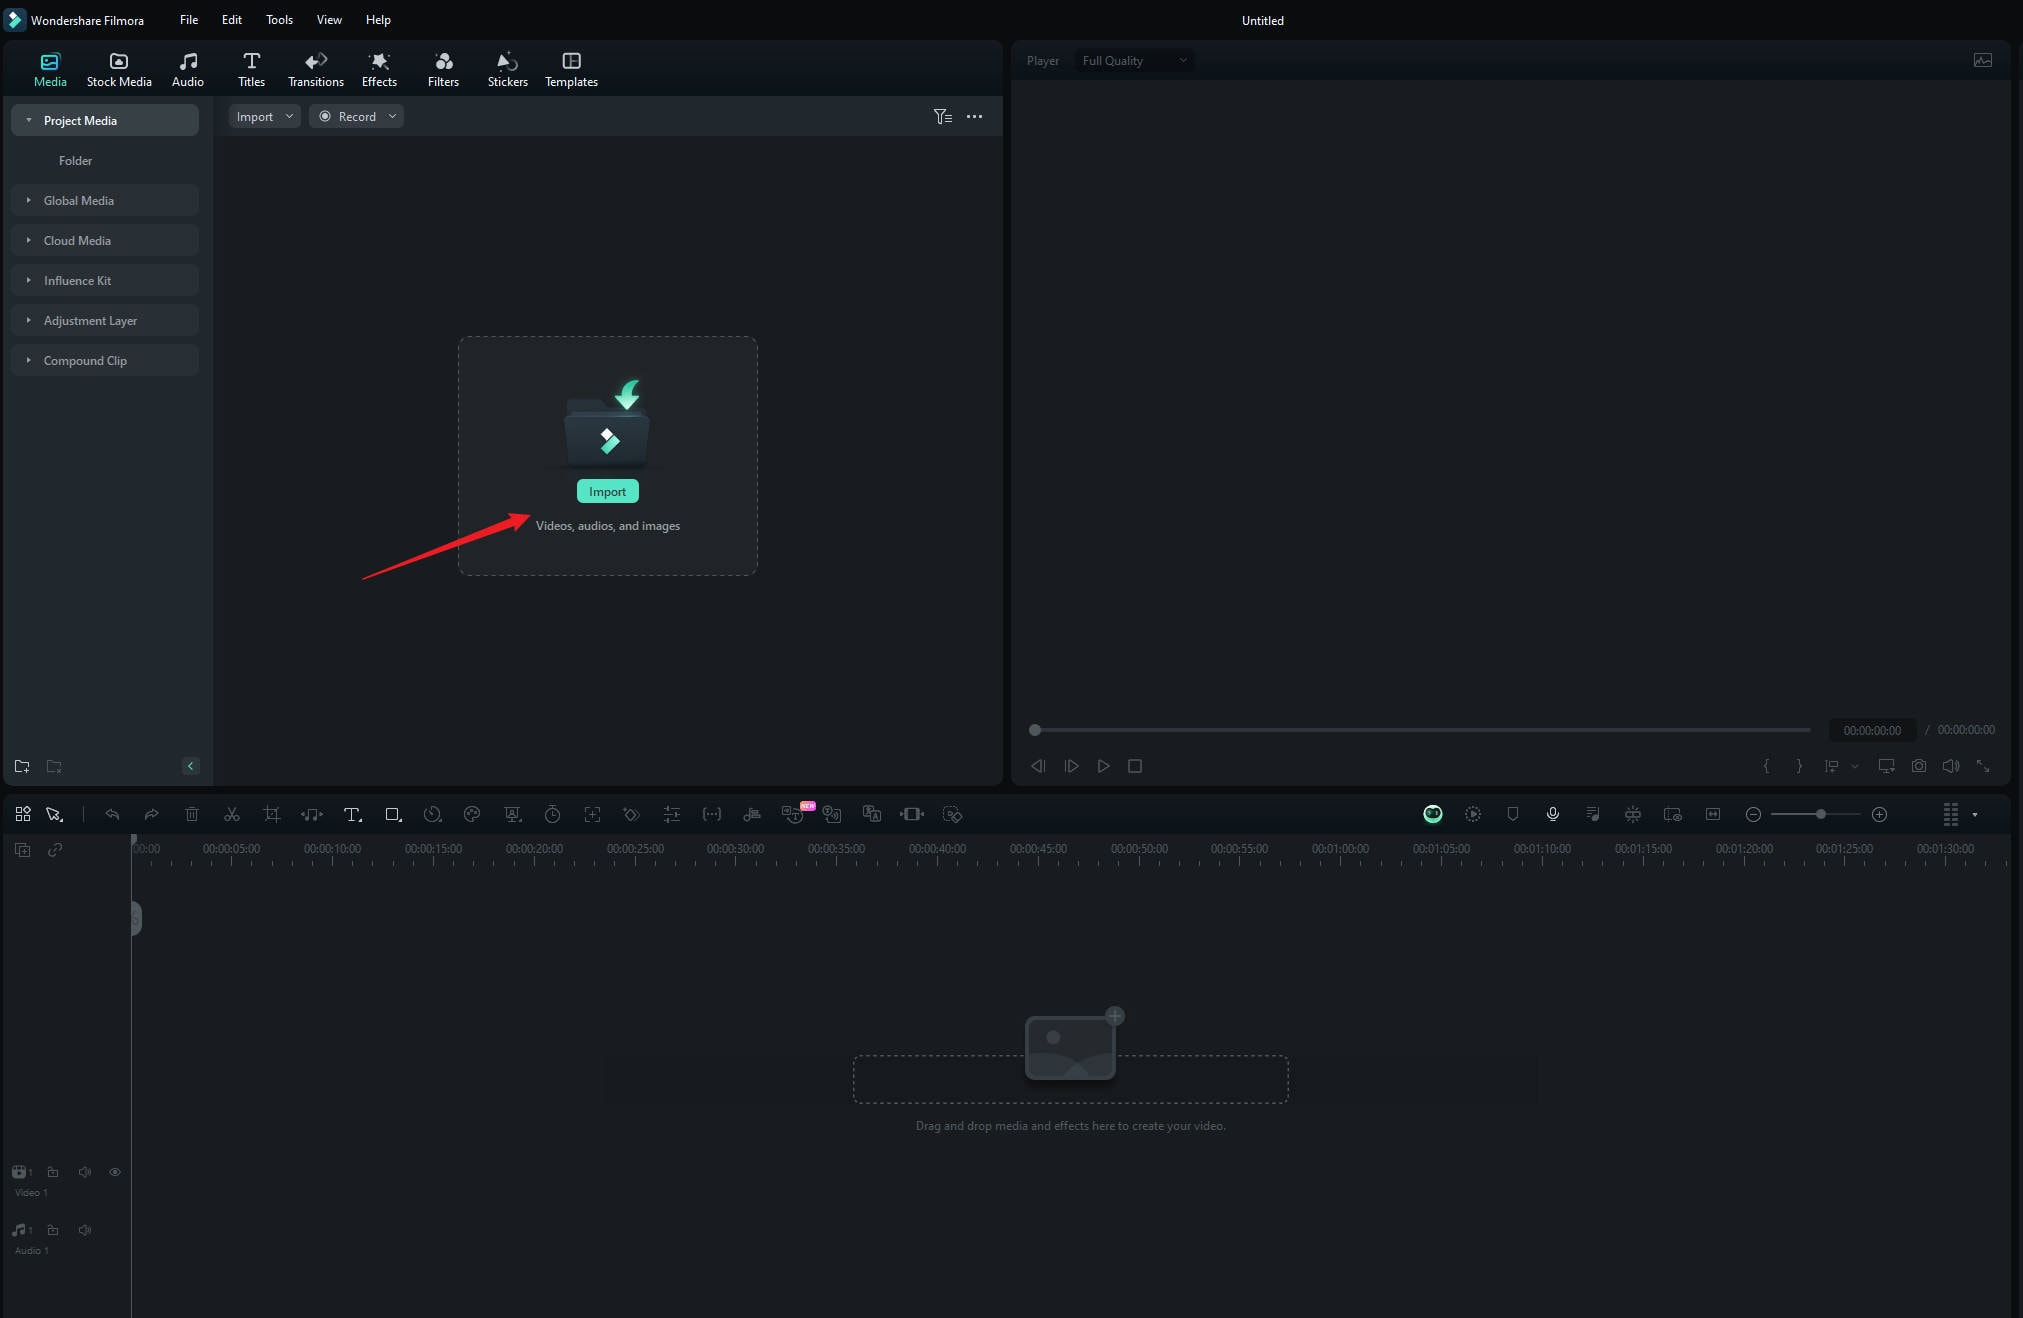
Step1Launch Filmora and upload your video
If you haven’t downloaded Wondershare Filmora yet, you can grab the latest version here. After installing, just double-click the icon to open it. Once Filmora is open, start a new project and import your video from Google Drive or Dropbox, or simply drag and drop your videos into Filmora.
Step2Compress your video
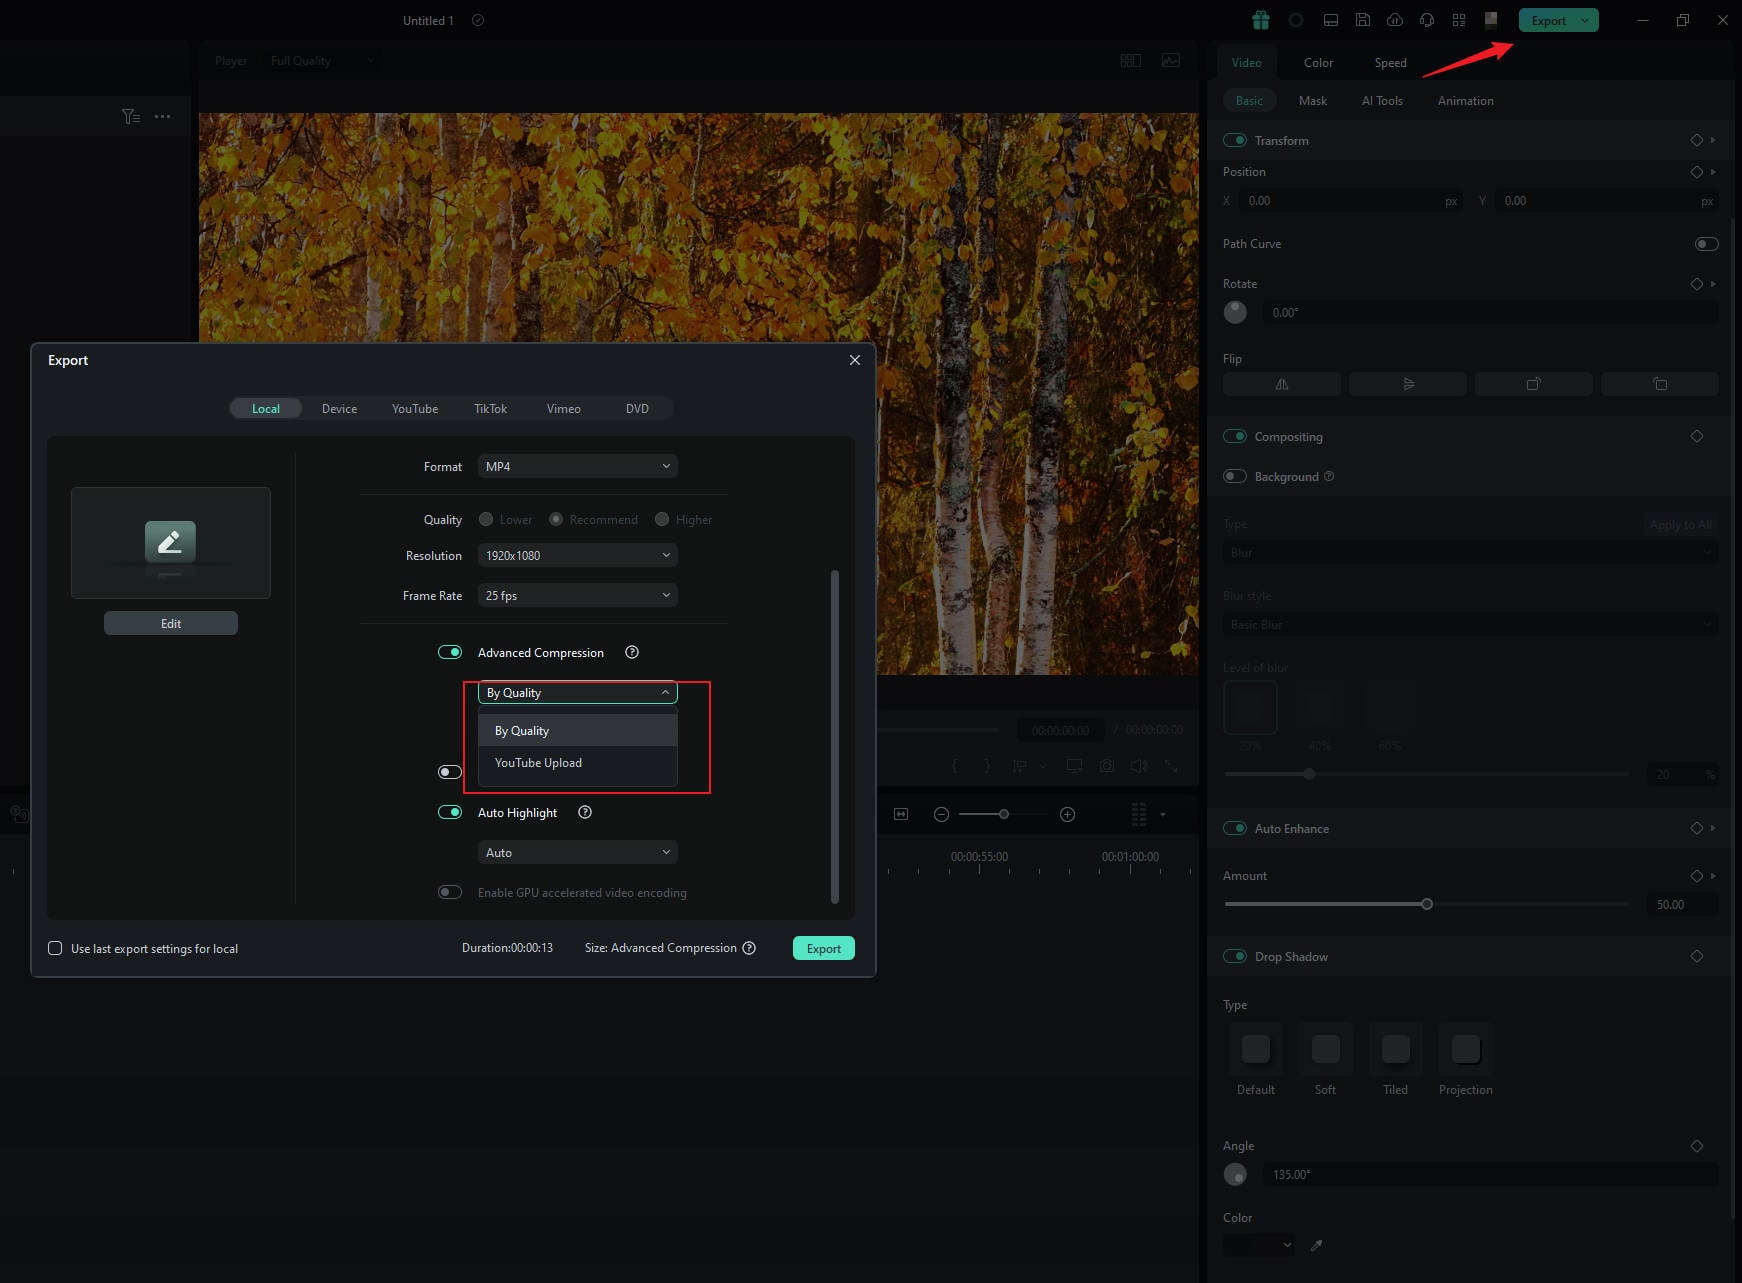
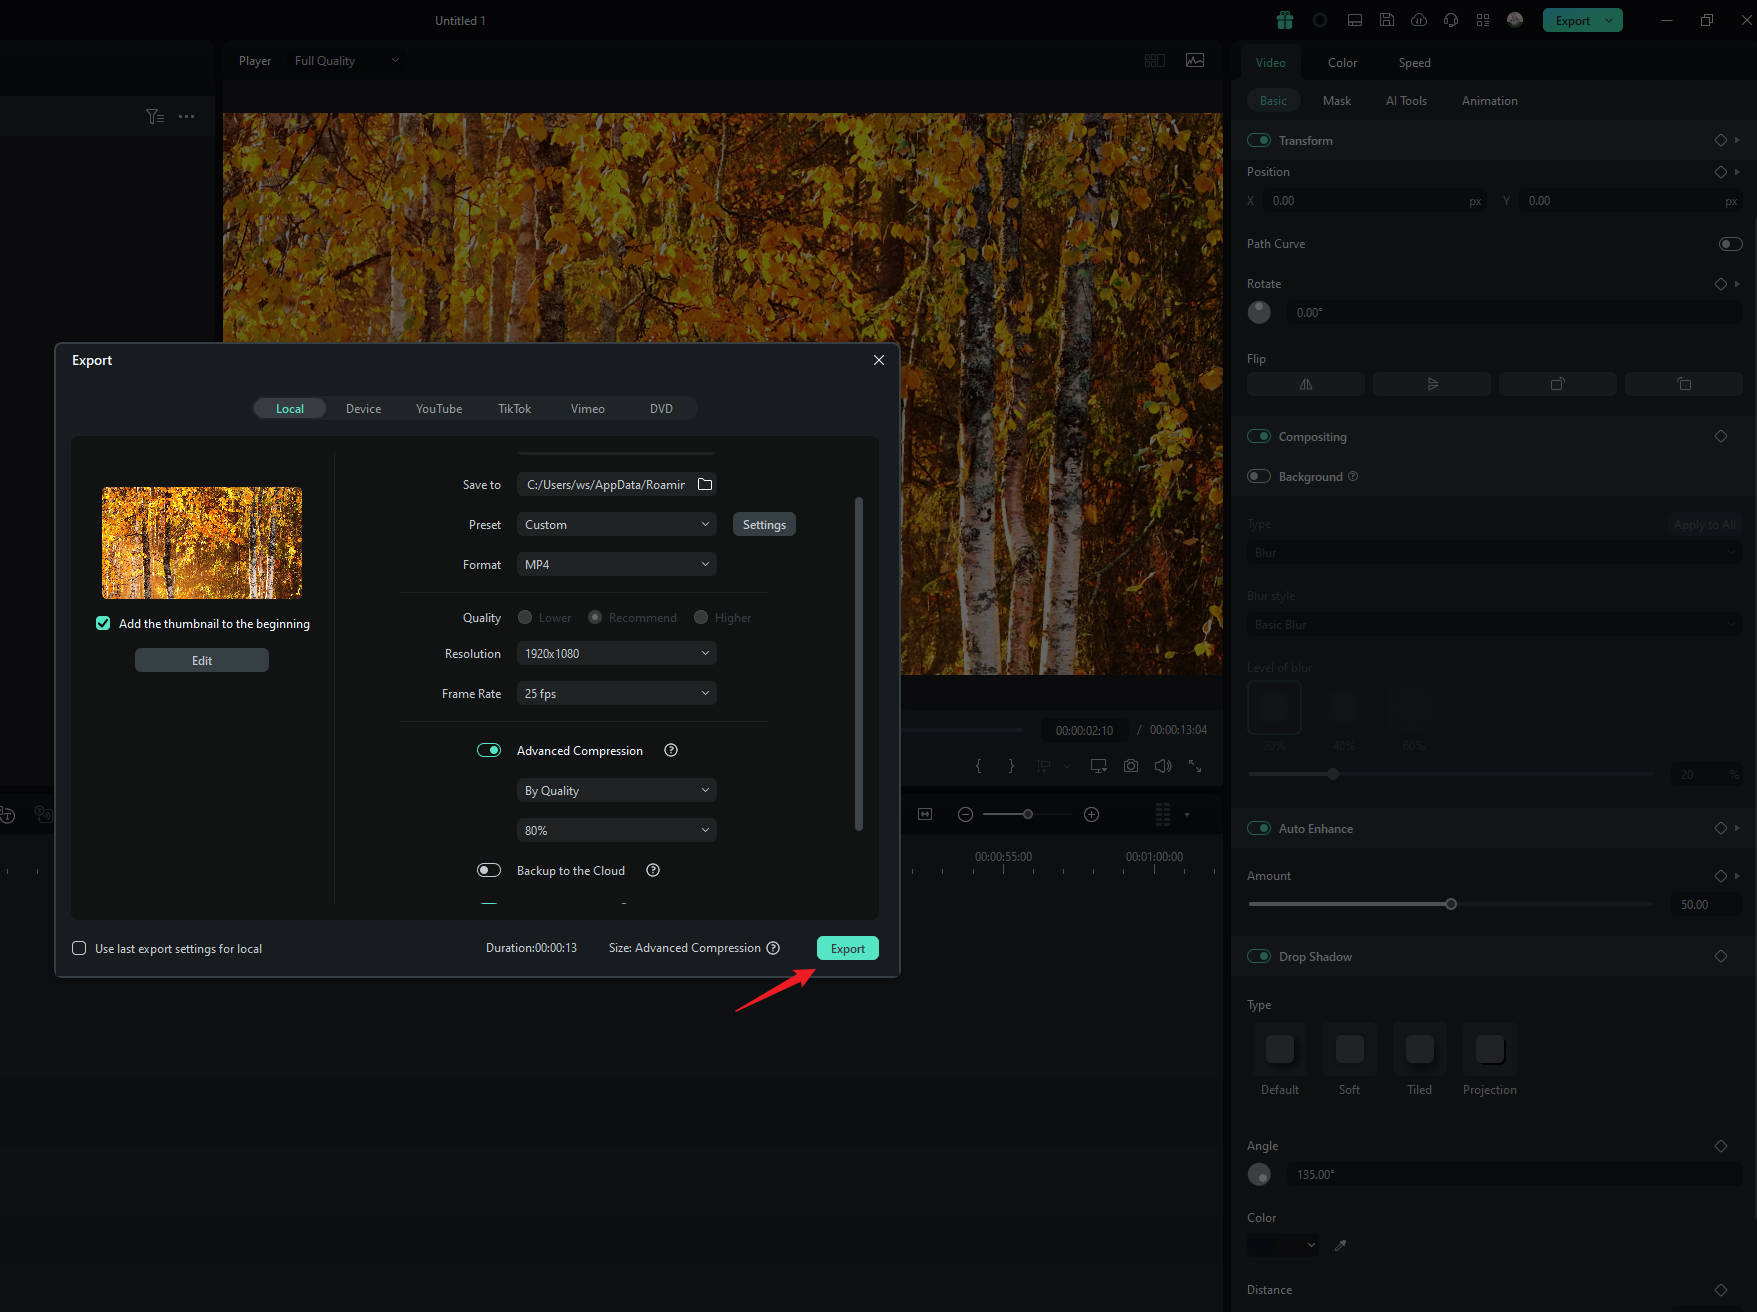
Click "Export" at the top right, then choose your video compression mode: "By Quality" or "YouTube Upload".
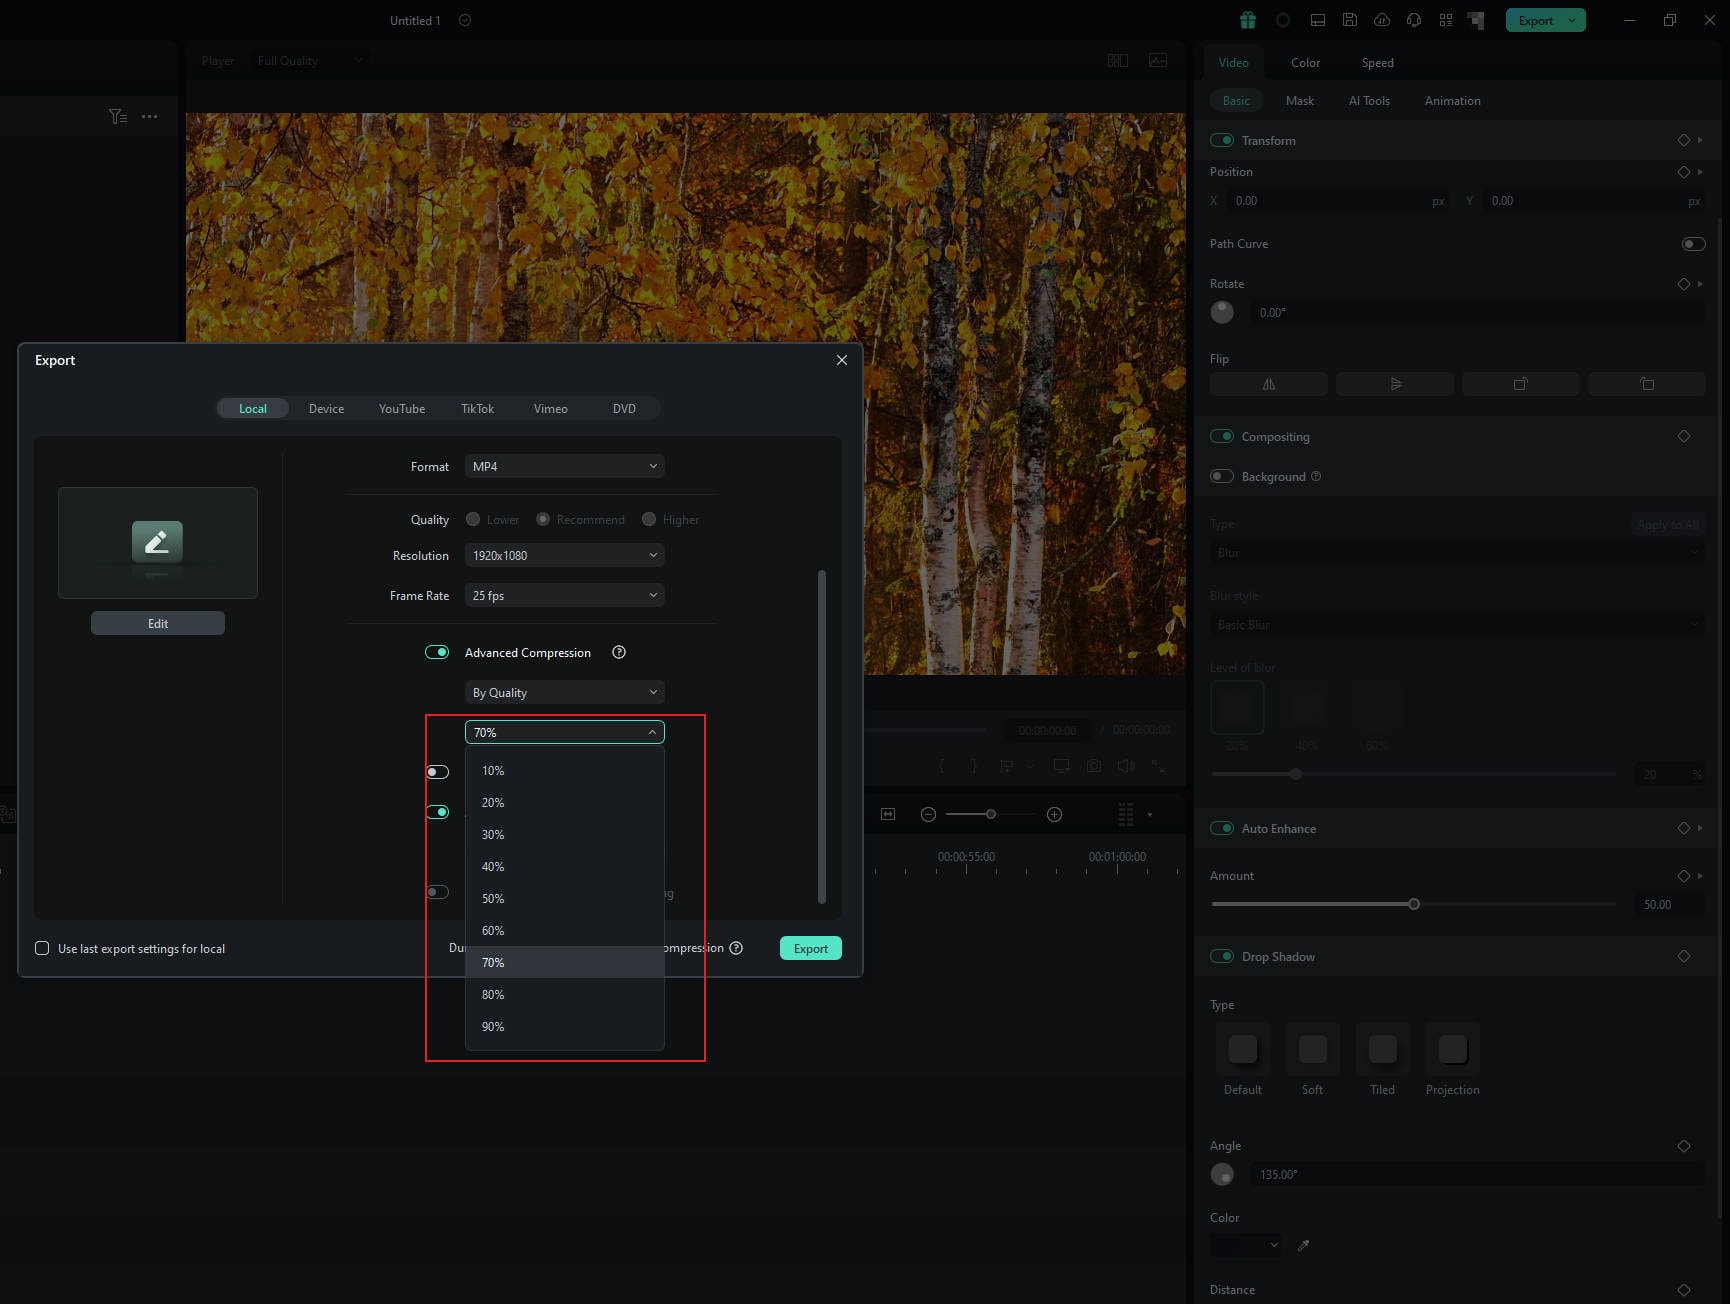
If you choose "By Quality", you can adjust the file size by selecting a quality level, from 10% to 90%. Meanwhile, if you choose "YouTube Upload", the video will automatically be compressed to the recommended bitrate for YouTube, which helps prevent blurriness when uploading.
Step3Export your video
Choose the option that works best for you, and the tool will automatically compress your video. Once it’s done, just click "Export" to save your video with the smaller file size.
Method 2: Using Auto Reframe Feature
Step1Upload your video and access the Auto Reframe feature
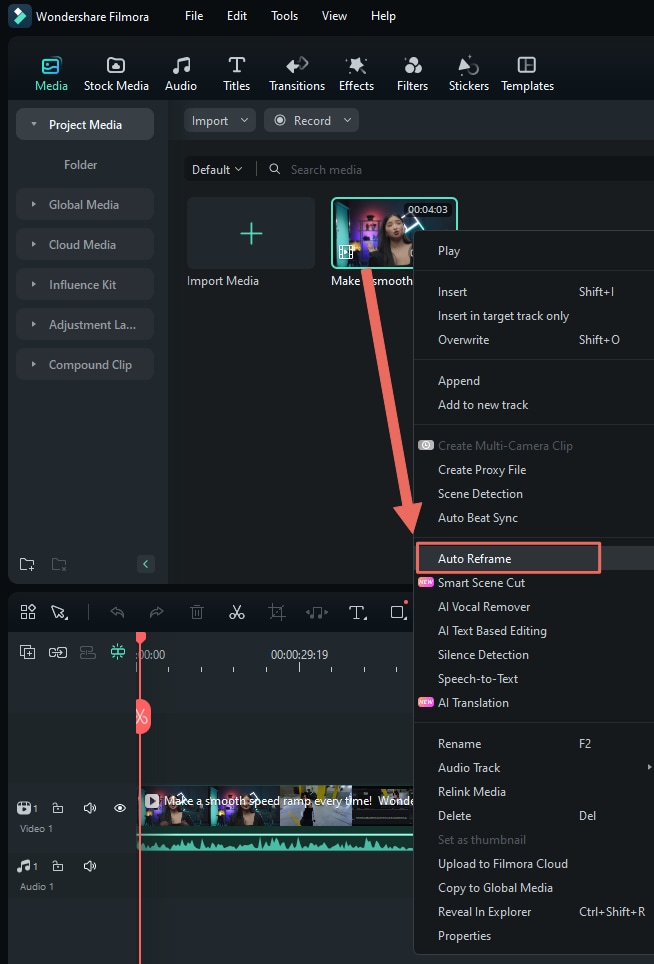
After uploading your video to Filmora, go to Tools > Auto Reframe, or simply right-click the video in the media library and select Auto Reframe.
Step2Adjust aspect ratio
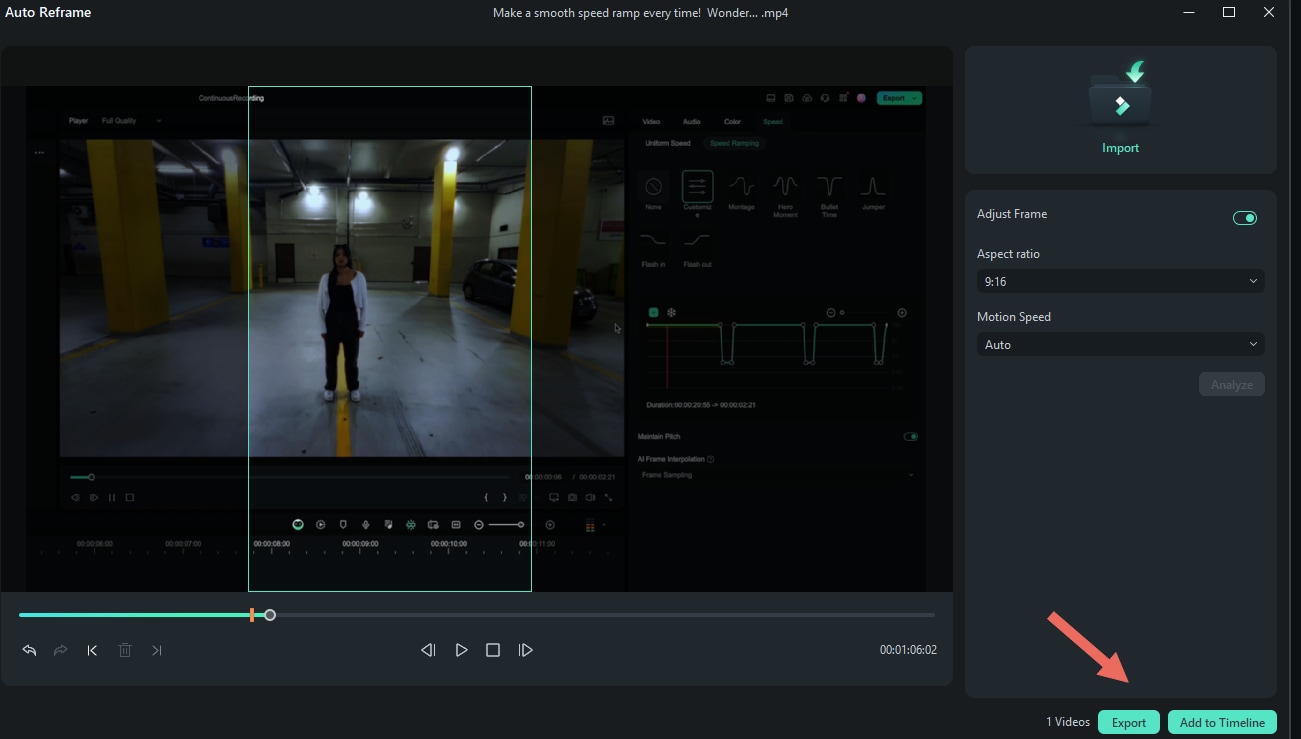
In the pop up window, you’ll see several aspect ratio options like square (1:1), vertical (9:16), standard (4:3), widescreen (16:9), and cinema (21:9). Choose the one that will help reduce your video size. For example, if your video was originally widescreen (16:9), switching to a square (1:1) or vertical (9:16) aspect ratio can reduce the file size.
Once you’ve made your selection, click "Analysis" to let Filmora adjust the video accordingly.

Step3Review the preview and make any additional adjustments
Once you've set everything up and reframed your video, take a moment to preview it. If you need to make changes, just pause the video and drag the frame where you want it. Do this as needed. When you're satisfied with how it looks, click "Export" or "Add to Timeline" to save your changes.
Step4Change the dimensions when exporting
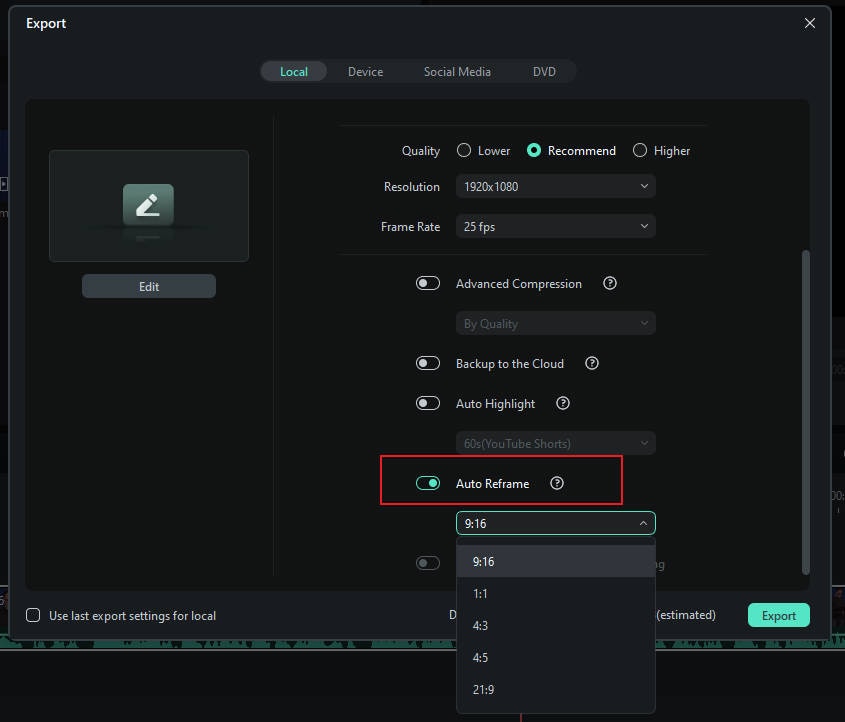
The above mentions changing the dimensions of a single video or multiple videos in the media library, but you can also directly export videos from the timeline, select "Auto Reframe," and modify the dimensions.
Method 3: Use The Crop Tool
Step1Find the Crop tool
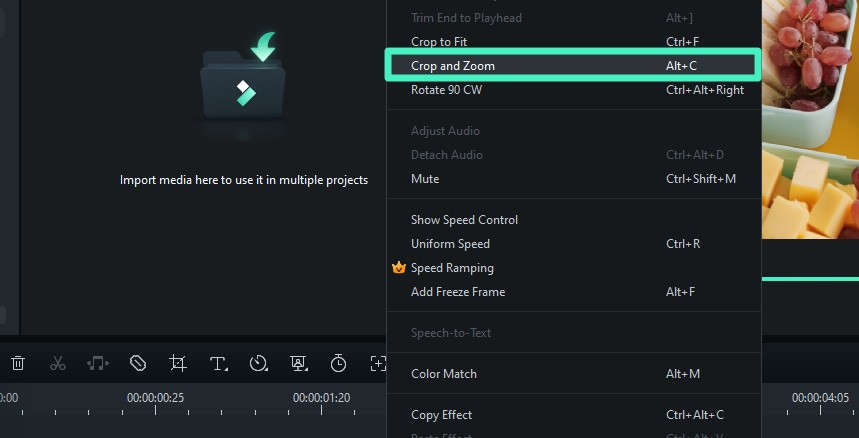
You can also reduce the size of your video by using the Crop tool to adjust the video dimensions. Just right-click on the video in the timeline and select the "Crop and Zoom" option.
Step2Select aspect ratio
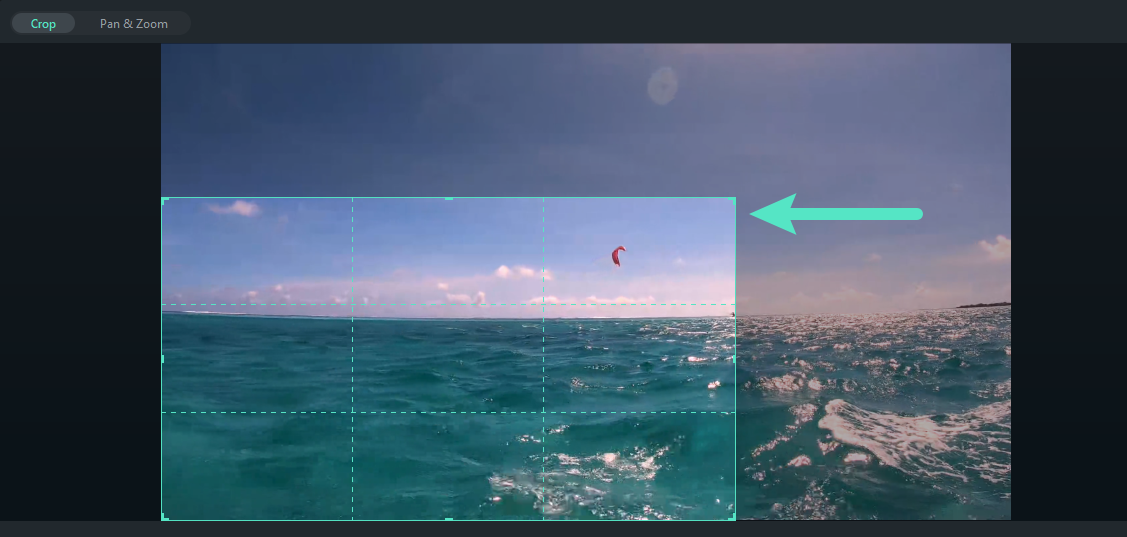
In the Crop and Zoom panel, you can adjust the crop area by choosing from the available ratio presets.

Step3Crop the video
To adjust the size and position, drag the crop box to choose the part of the video you want to keep. This will help resize your video and make the file smaller. When you're happy with it, click "Apply" to save your changes.
Method 4: Change Project Aspect Ratio
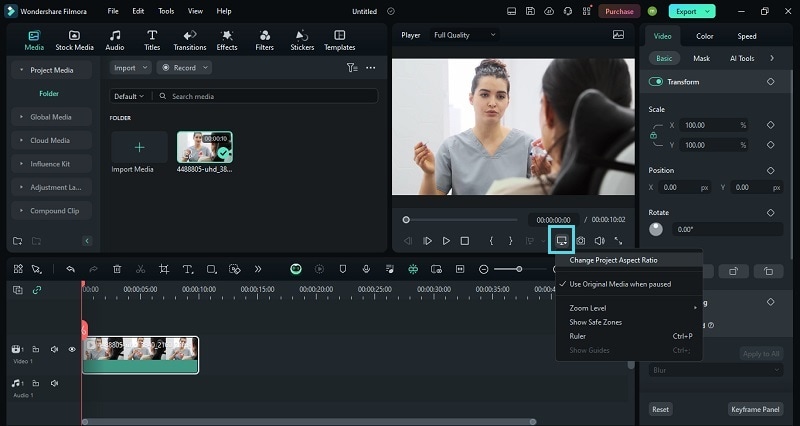
If you want a more straightforward approach, you can change the project aspect ratio. After importing your video to Filmora, click the Settings button and select "Change Project Aspect Ratio."
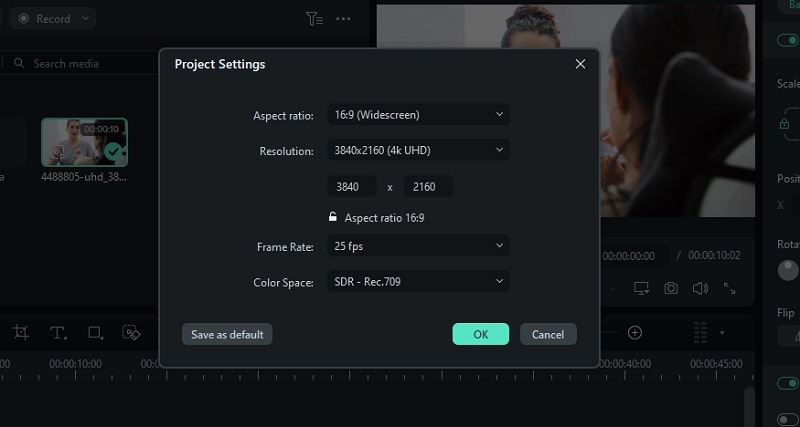
Then, you'll get to change the aspect ratio as well as the resolution and frame rate.
Bonus Part: How To Viral Your Video on Social Media
Are you frustrated with videos being too long? Especially now, when people prefer watching videos on their phones, social media videos need to be high-quality and concise to attract viewers.
Don't worry, Filmora can help you with this issue. The Smart Scene Cut feature in Filmora can intelligently extract the highlights from your video without the need for manual editing. Below is a tutorial video for you to watch.
Conclusion
Having read this piece, you may have noticed that software capable of resizing videos can prove quite useful. Wondershare Filmora is this, plus a lot more, its convenient and intuitive user interface is also something we believe will feel welcoming to users. Speaking of Handbrake, while effective and great for batch encoding — if you want to resize more than one video we recommend having Handbrake handy — its bare-bones interface can be intimidating. Regardless, both programs are convenient to utilize and perfectly capable of doing the task at hand with relative ease.


