You’ve probably seen it in intense action scenes or romantic moments in films, where everything slows down to make the scene more dramatic. That’s the beauty of the slow-motion effect. And it’s something you can easily create using Sony VEGAS Pro.
VEGAS Pro is capable of changing the video playback speed, making your video slower or faster. By creating slow-motion videos in Sony VEGAS Pro, you can make funny videos, create dramatic effects, and even highlight some details from your video.
To help you get started with how to make slow-motion videos in Sony VEGAS, below are the 3 easy methods you can follow. We will also give you another alternative in case you find the steps complex or VEGAS Pro is not within your budget.

In this article
Part 1. Introduction to Sony VEGAS Pro
Sony VEGAS Pro is a non-linear video editing software, which means you can edit video or audio clips without following a strict sequence. Because of this flexibility, you can focus on different parts of your project independently and it’s easier to refine specific sections without affecting the rest of your timeline.
VEGAS Pro is compatible only with Windows 10 and later versions. If you are about to use VEGAS Pro to make slow-motion videos, you can start with the free trial of the software, which usually lasts 30 days. After that, the Premium Plan starts at $19.99/month. You can download Sony VEGAS Pro from the website here.

Part 2. How to Make Slow Motion Videos on VEGAS Pro
With several methods available in the VEGAS Pro, achieving smooth slow-motion effects requires high-quality footage and a solid understanding of how frame rates and resampling work together. The recommended minimum frame rate (FPS) of your video for creating a slow-motion effect is 30 FPS, but the higher the frame rate, the smoother the result will be.
Moreover, VEGAS Pro primarily uses a process of repeating frames and resampling to create this effect, so make sure that you have enabled the resampling in the software. Now, let’s check out available methods to makeslow-motion videos on VEGAS Pro.
Method 1: Changing the Playback Rate
One of the simplest and most accurate methods for adjusting motion speed is by changing the playback rate in the Media Properties. It only takes a few steps to do it. However, the maximum slow-motion effect achievable is one-quarter of the original speed.
Step 1: Open the Properties Window
Launch Sony VEGAS Pro on your computer and import the video you wish to edit. Right-click on the video clip in the timeline and select "Properties" from the context menu to open a new window.
Step 2: Adjust Playback Speed
In the Properties window, locate the "Playback" option and enter the desired frame rate in the corresponding field. If you want to make a slow-down video, you need to reduce the frame rate to a lower value than the original (the default Playback Rate is 1.000).

You can also modify additional settings under the Video Event section if needed. Click "OK" to apply the changes.
Method 2: Using Trim Stretch
Another effective way to create slow-motion effects in Sony VEGAS Pro is using the Trim Stretch feature. Trim Stretch allows you to adjust the speed of a video clip by stretching or compressing its duration directly on the timeline. This tool changes the playback speed proportionally, so if you stretch the clip, it plays slower. If you compress it, it plays faster.
Step 1: Drag to Slow Down
First, select the video clip you want to slow down on the timeline. Click and drag one end of the clip outward to extend its duration, which will initially stretch the video but not yet apply a slow-motion effect.
Step 2: Use the Ctrl Key
While dragging the end of the clip, hold down the "Ctrl" key on your keyboard. This action activates the Trim Stretch feature, allowing you to adjust the clip’s speed more precisely.

Step 3: Apply Trim Stretch
Continue dragging the end of the clip while holding "Ctrl" to manually stretch it and achieve the slow-motion effect. The more you stretch the clip, the slower the playback speed will be.
Method 3: Using Velocity Envelope
The Velocity Envelope feature provides an even more advanced method for creating the slow-motion effect in Sony VEGAS Pro. playback speed. With Velocity Envelopes, you can adjust the speed of a video clip from 1% to 1,000% of its original speed. You can ramp up the speed, slow it down, and make multiple adjustments throughout the clip.
Step 1: Select the Velocity Option
Right-click on the video clip you wish to modify. From the menu, choose Insert/Remove Envelope > Velocity from the submenu. This action will add a green velocity line to your clip on the timeline.

Step 2: Adjust the Velocity
You can now manipulate the velocity line to change the playback speed. Drag the line down to decrease speed.

Part 3. Affordable Option to Make Slow Motion Video
Another way to slow down your video while still having high-quality results is by using more affordable software like Wondershare Filmora. Filmora comes as a top option in terms of its user-friendly interface and powerful features. You can start with the free version and upgrade to the premium plan with multiple options.
Like VEGAS Pro, Filmora also provides several ways to make slow-motion videos. First, you can change the playback video and make a uniform speed. Alternatively, you can also use the Speed Ramping feature if you want to take control over your video’s speed to make an even more impressive video effect.
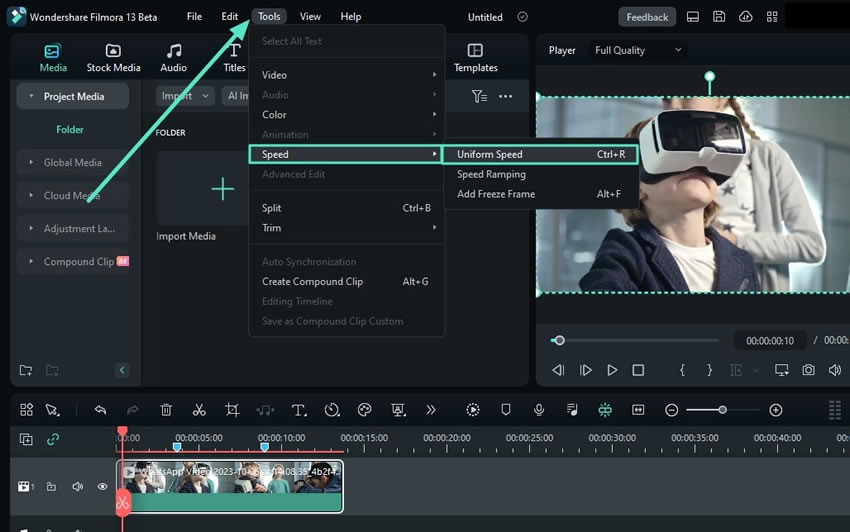
Some other Filmora features you can enjoy are:
- AI frame interpolation video that helps smoothen transitions between frames
- Video stabilizer to eliminate shaky footage
- Compound Clips to combine multiple clips into a single sequence for easier editing
- Extensive collection of Filters and Effects to enhance your videos with just a few clicks
- Built-in video templates to speed up your workflow
You can watch the video guide by Filmora or follow the step-by-step guide below to make slow-motion videos.
How to make slow-motion videos with Filmora
Step 1: Slow down the video using the Speed Controls
Click on your video in the timeline, then select the Speed icon from the toolbar above. Choose the "Uniform Speed" option to begin adjusting your video's playback speed.
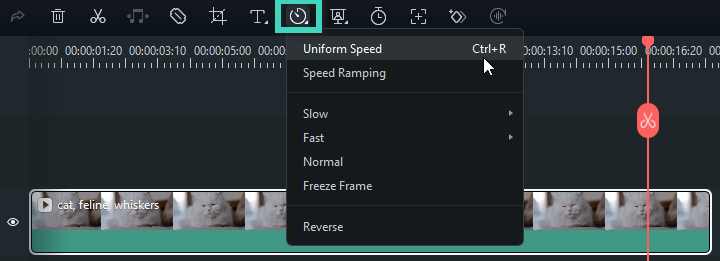
Step 2: Adjust the playback speed
To slow down the video, adjust the playback speed by dragging the Speed slider to the left. For more precise control, you can enter your preferred speed value in the Duration field. Make sure it’s lower than 1.
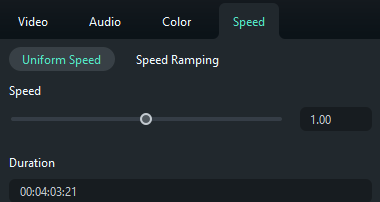
Step 3: Make various speed effects with Speed Ramping
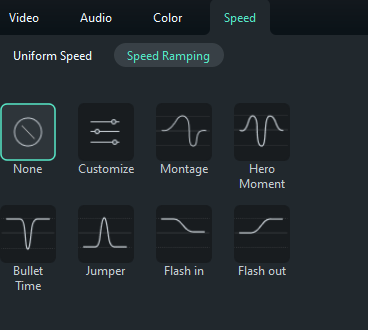
To create dynamic speed effects, you can use Filmora’s Speed Ramping feature. Click the Speed icon again, but this time, choose Speed Ramping.
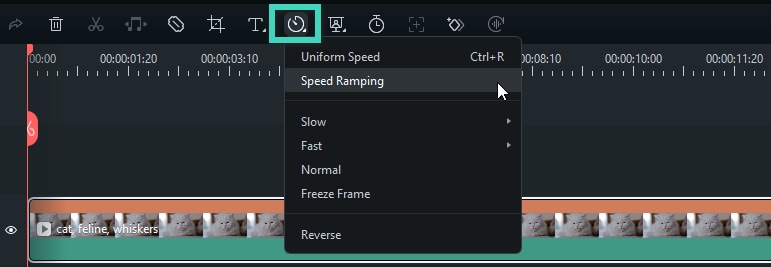
Next, click on your video in the timeline and go to Speed > Speed Ramping under the Property Panel on the right. You will find several presets to apply. Check Filmora’s guide for more details about each preset or you can try them to find which suits you best.
Step 4: Adjust the speed points
Once you’ve selected a preset, you can further adjust the speed points. Drag the speed points up or down to increase or decrease the speed. You can also move the points left or right to change the section of the video where the speed adjustments apply.
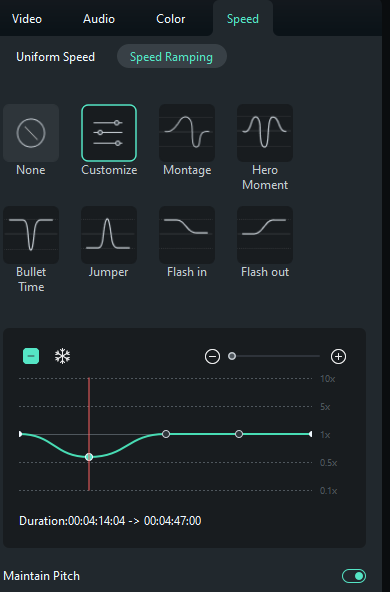
To add or remove speed points, click the Plus (+) or Minus (-) icons as needed. If you want to freeze a part of your video, position the play head at the desired point, click the snow icon to add a freeze frame, set the duration, and apply.
You can watch Filmora’s YouTube video about speed ramping here.
Step 5: Change the speed in the timeline
For a more intuitive adjustment, you can directly modify the speed of your video by dragging its edge in the timeline.
Hold down the Ctrl key on your keyboard and position your mouse over the edge of the video clip in the timeline. You will see a speed change icon appear. While continuing to hold the Ctrl key, drag the edge of the clip backward to slow it down.
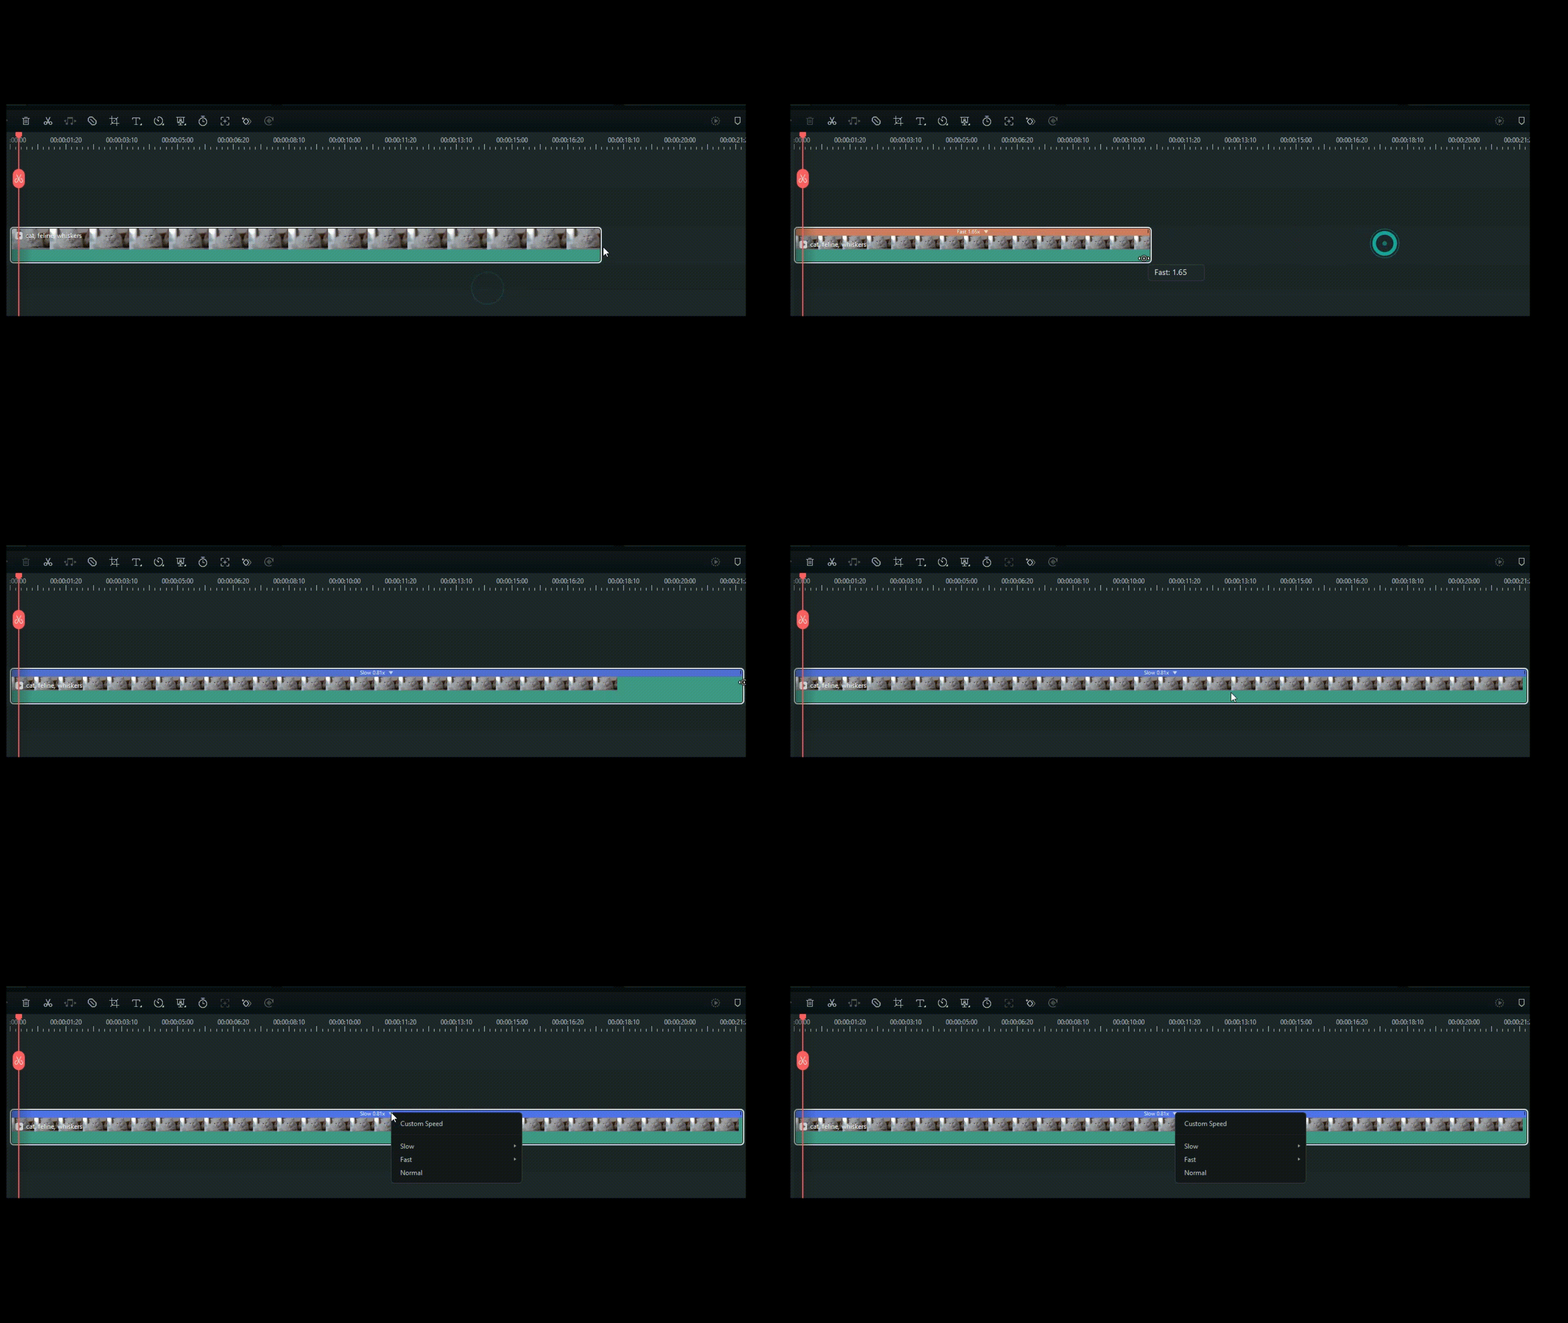
As you adjust the speed, a purple strip will appear if you slow down the clip, and a red strip will show if you speed it up.
Step 6: Preview and fine-tune the video
After making your adjustments, click the Play button in the Preview window or press the Spacebar to review the changes.
Tips to Enhance Your Slow-Motion Video
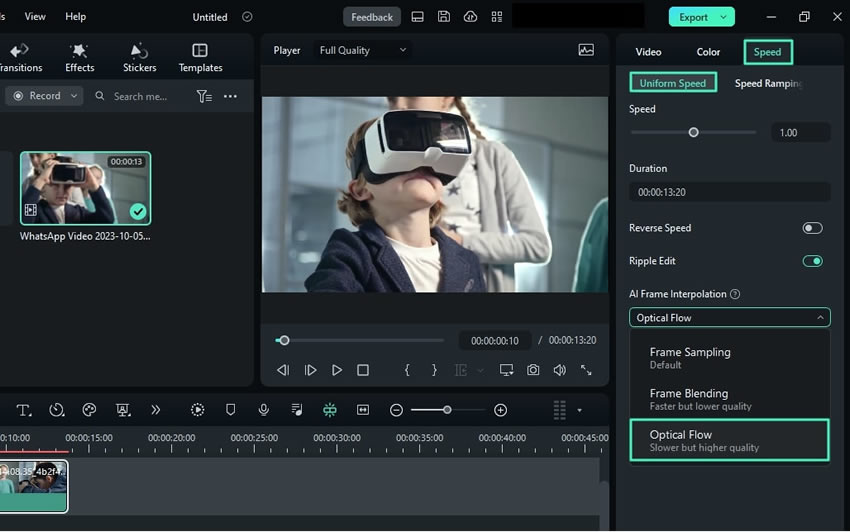
Sometimes, slow-motion video can appear choppy if you suddenly change the playback speed without properly adjusting the frame rate. To address this, you can use Filmora’s AI Frame Interpolation feature to smooth out the playback.
AI Frame Interpolation is particularly helpful in creating slow-motion videos, as it works by generating additional frames between the existing ones. It analyzes the motion in the video and predicts intermediate frames to create a smoother transition between them.

To use the AI Frame Interpolation feature, first select the video you’ve placed in the timeline. Next, go to the settings panel on the right. Click on Speed > Uniform Speed. Then, expand the "AI Frame Interpolation" section and select "Optical Flow" from the available options.
Part 4. Types of Content You Can Make with Slow Motion Video
Now that you’ve learned several ways to make slow-motion effects, you’re ready to pour your creativity into making a stand-out slow-motion video. Usually, slow-motion effects are used to highlight moments of impact, emotion, or detail that might be missed at normal speed. See what type of content you can make with slow-motion videos:
- Creating highlight
Sports events, performances, or special occasions like New Year celebrations often use slow-motion video to showcase important moments. Slowing down the action helps highlight key details. For example, you can capture the thrill of a game-winning goal, a dance move, or the joy of a special celebration.
- Product demonstrations
You can use slow motion to clearly show the features and functions of a product. By slowing down processes or actions, you can provide viewers with a detailed view of how the product works and highlight its unique features.
- Artistic shots
Slow-motion videos can help transform ordinary scenes into artistic visuals. Even simple footage of flowing water can look ethereal when slowed down. Slow-motion video can add a dramatic and beautiful touch, turning everyday moments into a work of art.
🤩 Posts You Might Be Interested In:
Conclusion
Making slow-motion videos, like you’ve seen in films, can add a dramatic element to your content. And now, you have the tools and techniques to make a smooth and impressive slow-motion effect.
As we have covered, you can achieve slow-motion effects in Sony VEGAS Pro through three methods: adjusting the playback rate, using Trim Stretch, or applying Velocity Envelopes. And if you’re looking for a more budget-friendly and user-friendly alternative, Wondershare Filmora is the recommended option.
With features like adjustable playback speed, Speed Ramping, and AI Frame Interpolation, Filmora helps you create professional-quality slow-motion videos without the complexity or expense of more advanced software.


 100% Security Verified | No Subscription Required | No Malware

