
 100% Security Verified | No Subscription Required | No Malware


 ChatGPT
 Perplexity
 Gemini
 Claude
 Grok
Grok
Ever since it was announced last month in May 2025, people have been buzzing about Veo 3. The hype is real. If you've tried Google Veo 3, you've got a slick, AI-generated video on your hands. Cool, right? But something still feels…unfinished.
If that's what you're experiencing, you're clicking at the right article! You can take your Veo 3 AI video and give it the polish it deserves. With the right tools and a few easy steps, you can turn any Gemini Veo 3 clip into a scroll-stopping piece of content that actually feels complete.
In this article
Part 1. What Is Google Veo 3 and Why It's Changing AI Video Creation
For those who still haven't caught up with the news yet, Veo 3 AI is the latest AI video generator from Google and part of the Gemini lineup, built to turn simple prompts into stunning videos.
What sets the Google Veo 3 AI video generator apart is how real everything looks. We're talking crisp 1080p quality, smooth motion, lifelike lip sync, and even camera shots that feel straight out of a movie.
And because of what the Veo 3 video generator can do, it's no surprise that people everywhere want to give it a shot. In fact, it's been taking over social media with all kinds of creative content. Here are the top trends people are loving right now:
Short Film Style: Veo 3 is perfect for quick, cinematic storytelling. People are making dramatic scenes that feel like mini-movies in just a few seconds.
POV Narratives: Creators use the Veo 3 AI video generator to tell stories from a first-person view, like reliving a war, exploring ancient times, or sharing a personal memory.
Theoretical Worlds: Some videos go deep, with characters talking about living inside a simulation or questioning reality itself. It's like mixing sci-fi with philosophy in AI form.
Part 2. Filmora + Veo 3 AI Video Editing Software Review & Tips
| Prompt | Generated Video by Veo 3 |
| First Shot: A detective in a trench coat stands beneath neon lights. A crane shot slowly descends as he crouches down. Second Shot: An over-the-shoulder macro shot shows the detective’s hand reaching for a silver metal box near a storm drain. Third Shot: A rapid zoom-in to an extreme close-up of his eyes, with pupils contracting sharply. |
|
| The camera orbits around the main subject — a giant dragon flapping its wings, carrying a young girl as they soar through the sky. Keep the video in high definition. |
|
| A confident model dressed in beige-toned clothing stands in a modern concrete courtyard under the harsh noon sunlight. The camera starts with a low-angle shot, slowly tilting upward to reveal her full look. Sharp shadows slice through the space, emphasizing the contours of her silhouette. She subtly turns her head toward the light, her eyelashes casting delicate shadows across her cheekbones. A commanding aura fills the entire scene. |
|
| The camera follows the motion of the scene. A massive dragon roars and beats its wings, lunging forward with its jaws wide open toward a terrified man who stumbles backward. Fierce winds howl around them as lightning crackles through the sky. Dust swirls violently as the orange glow of a distant volcanic eruption lights up the heavens. The atmosphere is tense and dangerous. |
|
Those Veo 3 AI videos above look pretty insane, right? Still, even with all the mind-blowing things Veo 3 can do, your video might still feel like it's missing something.
That's because, like most AI-generated tools, the Google Veo 3 video generator focuses on visuals but leaves out the finishing touches. After all, if you want your video to really stand out, post-editing still matters. Here's what Veo 3 doesn't give you yet:
- Music and Sound Design: While some Veo 3 clips include basic audio, most lack background music, ambient sounds, or well-timed effects to match the emotion of the scene.
- Color Grading and Filters: The visuals are raw and often need a little polish. Without color grading, your video might look flat or inconsistent between shots.
- Text, Titles, and Captions: There's no way to add on-screen text, subtitles, or intros that help explain your story or hook your audience.
- Video Timing and Pacing Control: You can't fully control the duration or tempo of the scenes, which can leave your final cut feeling rushed or uneven.
That's exactly why you'll need a robust video editor to take your AI-generated footage to the next level—and Wondershare Filmora now supports Veo 3's Image to Video quality natively. Not only can you generate high-quality, audio-synced scenes using Veo 3 directly inside Filmora, but you also get a full suite of editing tools to.
Filmora bridges the gap between AI video generation and polished content creation—giving creators everything they need in one powerful, intuitive platform.
 secure download

Here's how Filmora gives you everything you need to polish your Veo 3 video and get it ready for your audience:
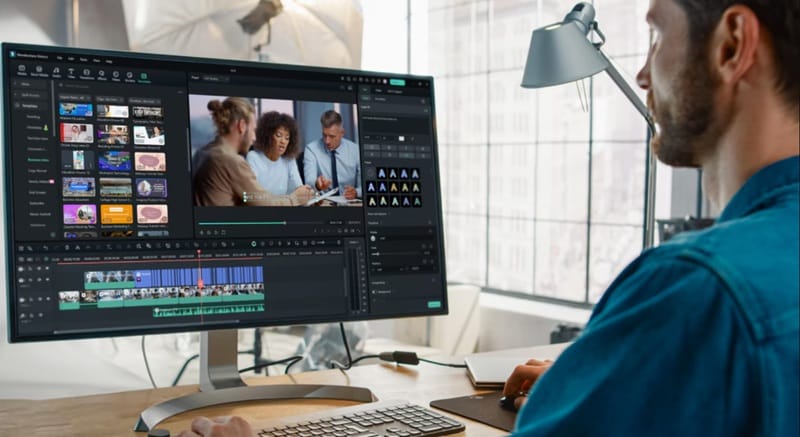
Drop-In Your Video and Start Editing Right Away
Filmora makes it super easy to get started. Just drag your Veo 3 clip into the timeline, and you're ready to edit. No confusing setup, no waiting.
Use Ready-Made Templates to Speed Things Up
Don't want to build everything from scratch? Filmora has templates that help you finish your video faster. You just add your Veo 3 footage and tweak a few things.
Add Sounds That Match Your Video Instantly
Veo 3 videos don't come with sound effects. Filmora's AI Sound Effect Generator picks sounds that fit the mood and action in your video, so everything feels more alive.
Remove Backgrounds and Fix Weird Visuals
If your Veo 3 video has something off in the background, Filmora's AI Smart Cutout can fix it. You can highlight just your subject and clean up the rest with no green screen.
Match Your Video with the Perfect Music
Use Filmora's AI Smart BGM Generator to add music that fits your video style. It picks songs based on your scene and even matches the timing.
Style Your Video with Better Colors
Filmora's AI Color Palette helps your video look more stylish. You can give your Veo 3 clip a cinematic, warm, or creative look with just one click.
Add Transitions and Text for a Professional Look
Make your Veo 3 video flow better by adding smooth transitions. You can also drop in dynamic text, titles, or captions to tell your story more clearly.
Part 3. Veo3 Video Creation Tutorial + Filmora Polishing Workflow
Now that you've got the big picture, it's time to put it all into action. By using the Veo 3 AI video generator to create your visuals and Filmora to handle the final edits, you can craft something that looks polished and totally original. This combo gives you the best of both worlds.
So, follow the step-by-step guide below to build your own standout AI video with Veo 3 and finish it strong with Filmora.
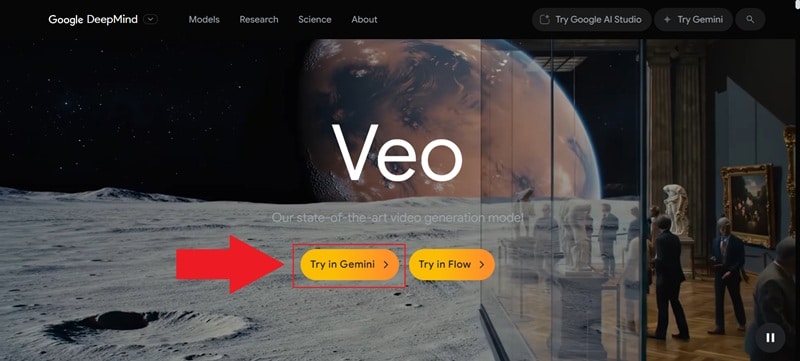
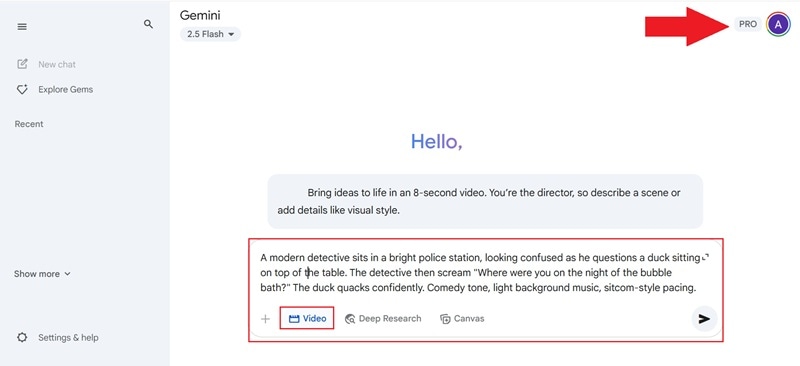
Step1Access the Veo 3 AI video generator
To begin, go to the Veo 3 AI video generator site. You'll see two ways to use the tool: through Gemini Veo 3 or Flow. For this example, go ahead and click on "Try in Gemini".
Step2Write your prompt and generate a video
You'll then get redirected to Gemini. Just a heads-up, the Veo 3 AI video generator is only available with the Pro version. So make sure you're logged in and using Gemini Pro.
After that, click the "Video" option below and start typing your prompt. This part matters, so try to be as detailed as possible to get the best results. When you're ready, just hit enter and let it work its magic.
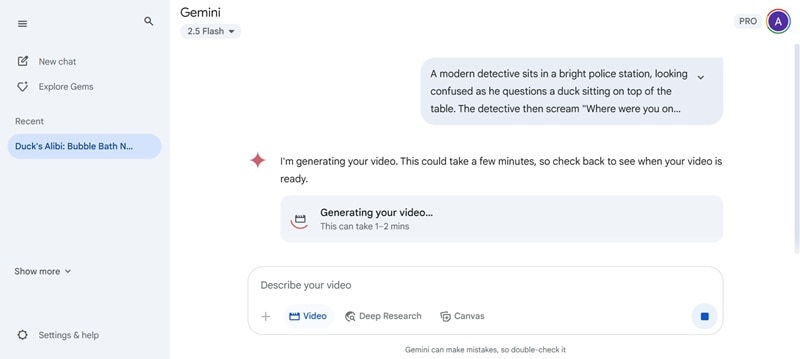
Veo 3 usually takes around 1 to 3 minutes to generate your video. Once it's ready, just download it to your device.
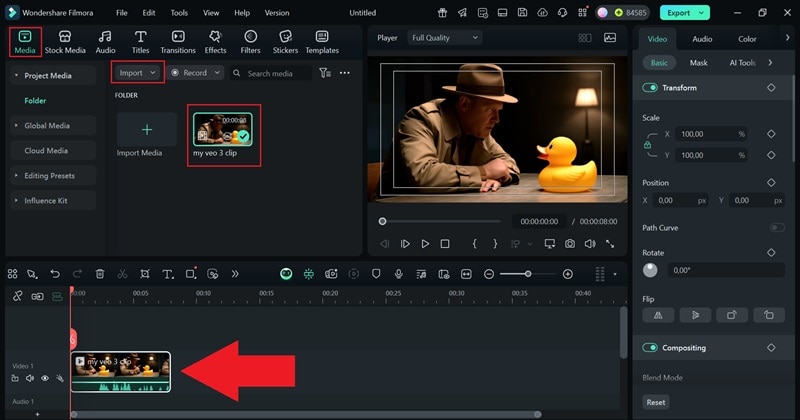
Step3Import your video to Filmora
Next, open the latest version of Filmora and start a new project. Go to the "Media" tab, click "Import" to upload your Veo 3 AI video, then drag the clip onto the timeline to start editing.
secure download
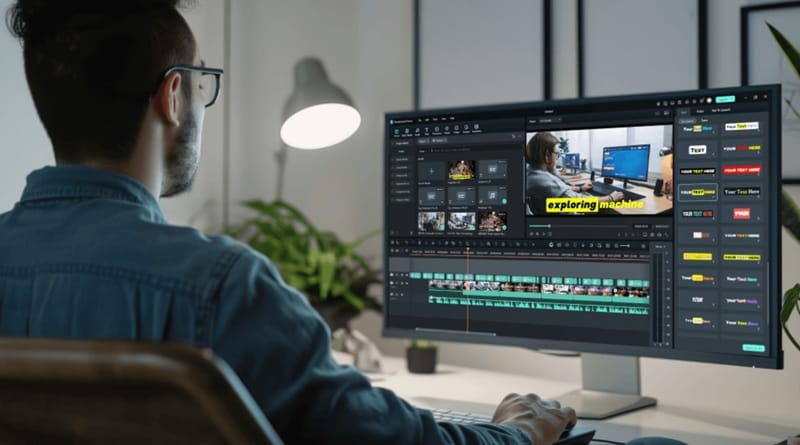
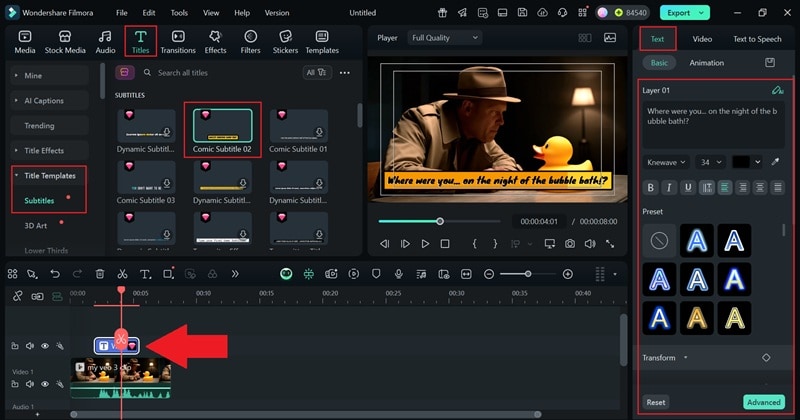
Step4Add text to the video
There's a bunch of ways you can upgrade your Veo 3 AI video. A good place to start is by adding captions. Just head to the "Titles" tab, click on "Title Templates", and pick the "Subtitles" category. Choose the style you like, drag it onto the timeline, and then use the panel on the left to edit the text and make it your own.
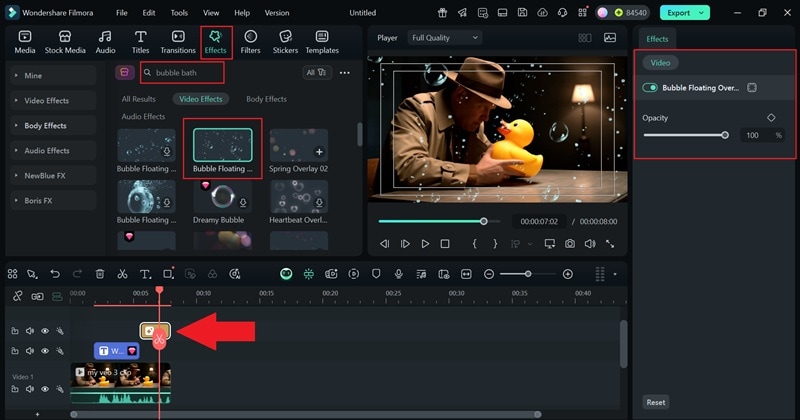
Step5Add video effects
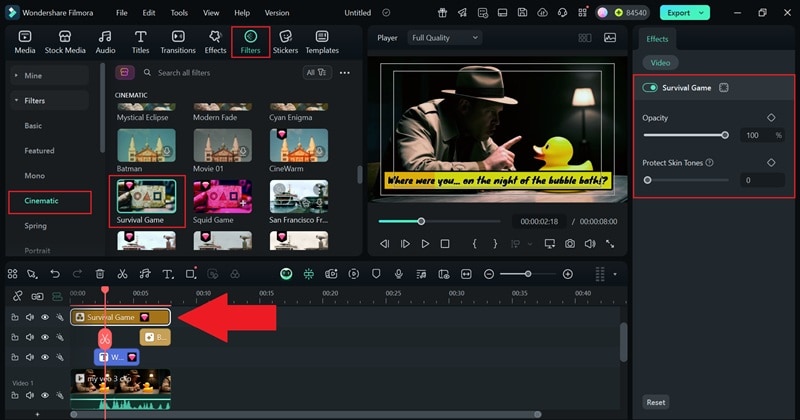
Next, try adding a video effect that fits the moment. For example, you can use a bubble effect right after the detective asks a question to add a bit of irony like the duck might actually be guilty. Just go to the "Effects" tab, search for "Bubble", then drag it onto the timeline where you want it. Use the panel to tweak how strong the effect looks.
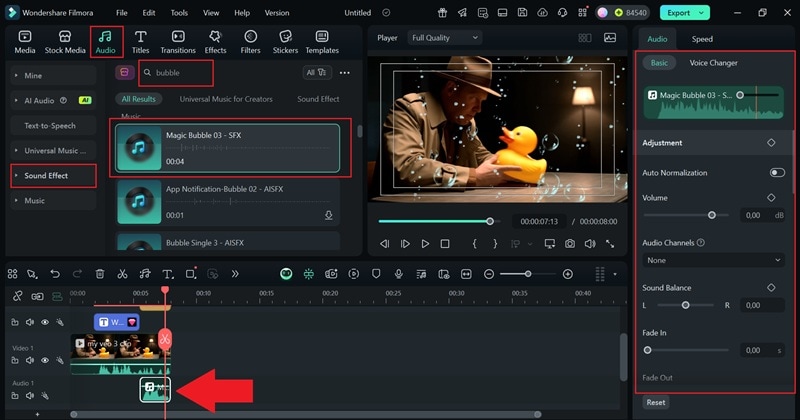
Step6Add sound effects
Don't forget to add sound effects to make everything feel more real. Head over to the "Audio" tab, choose "Sound Effects", and use the search bar like you did before. Drop the sound onto the timeline and line it up with the bubble effect so it feels natural. Then use the panel to tweak the volume or fade it in and out.
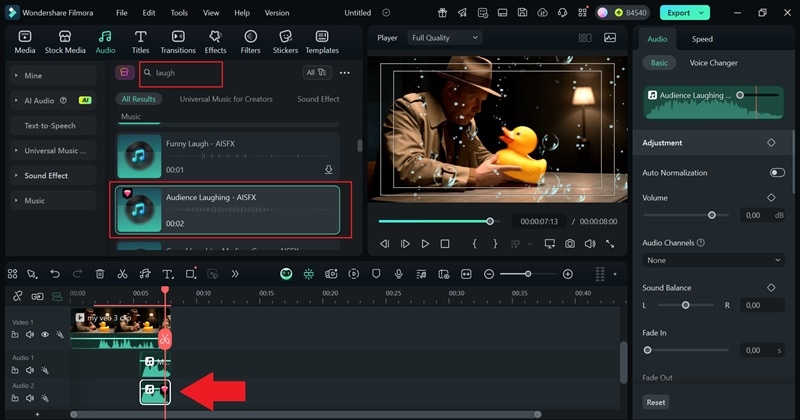
You can also throw in a laughing sound effect right at the punchline to make the moment hit harder. Just type "laugh" in the search bar and follow the same steps as before to add and adjust it.
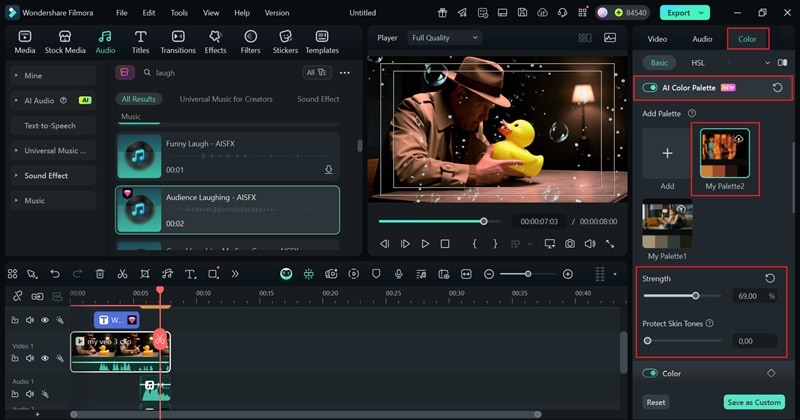
Step7Add color grading
You can also make your Veo 3 AI video look more cinematic by tweaking the color grading. Click on the clip in your timeline, then hit "Color" in the panel on the left. Scroll down and switch on the "AI Color Palette" feature. From there, adjust the color strength based on the reference photo you uploaded earlier from your device.
Another easy way to change up the look is by using filters. Just go to the "Filters" tab, click on the "Cinematic" category, and pick the ones you like. Drag them onto the timeline, then use the panel on the left to adjust how strong the effect shows up.
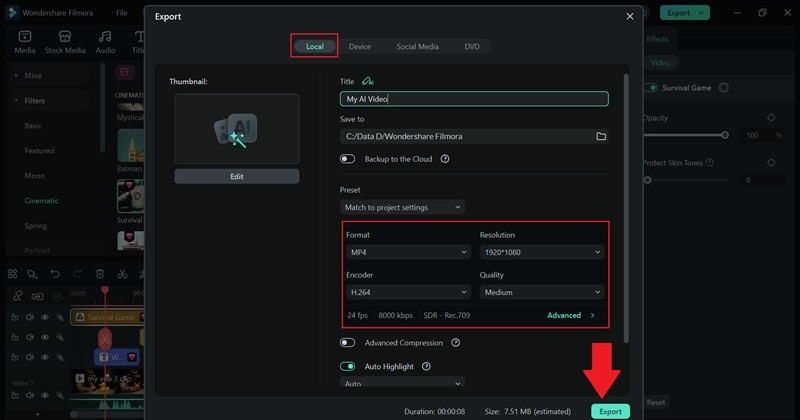
Step8Export your video
Once your edit's looking solid and you're ready to finish, hit the "Export" button at the top. Choose "Local" to save it on your device or share it directly to your social media. Select your video format, rename the file if needed, set the quality, and pick where you want it saved. After that, click "Export" again and your video is good to go.
🤩 Posts You Might Be Interested In:
- How to Master Google Veo 3 Prompts
- Filmora Veo 3 AI Video Editing Software Review & Integration
- Veo 3 vs Kling – Ultimate Comparison
- Extensive Guide to Use Google Veo 3
- How to Fix Veo 3 No Audio Issues
Conclusion
Google Veo 3 AI video generator is the latest buzz in the AI video world because the results look super realistic. People are using it to create movie scenes, historical POVs, and all kinds of creative content. Still, the Veo 3 AI video generator isn't fully complete on its own. It doesn't give you things like text, effects, or the right tone.
To finish the job right, bring your Veo 3 AI video into Filmora. This all-in-one editor lets you add subtitles, sound effects, filters, transitions, color grading, and more. By combining the best of both Veo 3 and Filmora, you can create a finished video that feels polished, creative, and truly your own.
secure download
