
 100% Security Verified | No Subscription Required | No Malware


 ChatGPT
 Perplexity
 Gemini
 Claude
 Grok
Grok
Artificial intelligence is evolving rapidly, with Google’s Veo 3 and Kuaishou’s Kling 2.1 setting new standards for AI video generation. Whether you’re looking for a professional vfx software alternative or a fast social media tool, this Filmora-powered guide compares Veo 3 vs Kling 2.1 to help you build a seamless AI video editing pipeline.
But generating a video is only the first step. To polish, edit, and publish professional content, creators often rely on video editors like Filmora. This article walks you through a full comparison of Veo 3 vs. Kling, explains which one fits your needs, and shows you exactly how to finish the AI video creation pipeline using Filmora Video Editor.
In this article
Part 1: What is Veo and Veo 3
Veo 3, developed by Google DeepMind, is a powerful AI video generator designed to create hyper-realistic videos from text or image prompts. It produces high-definition, coherent footage up to several minutes long.
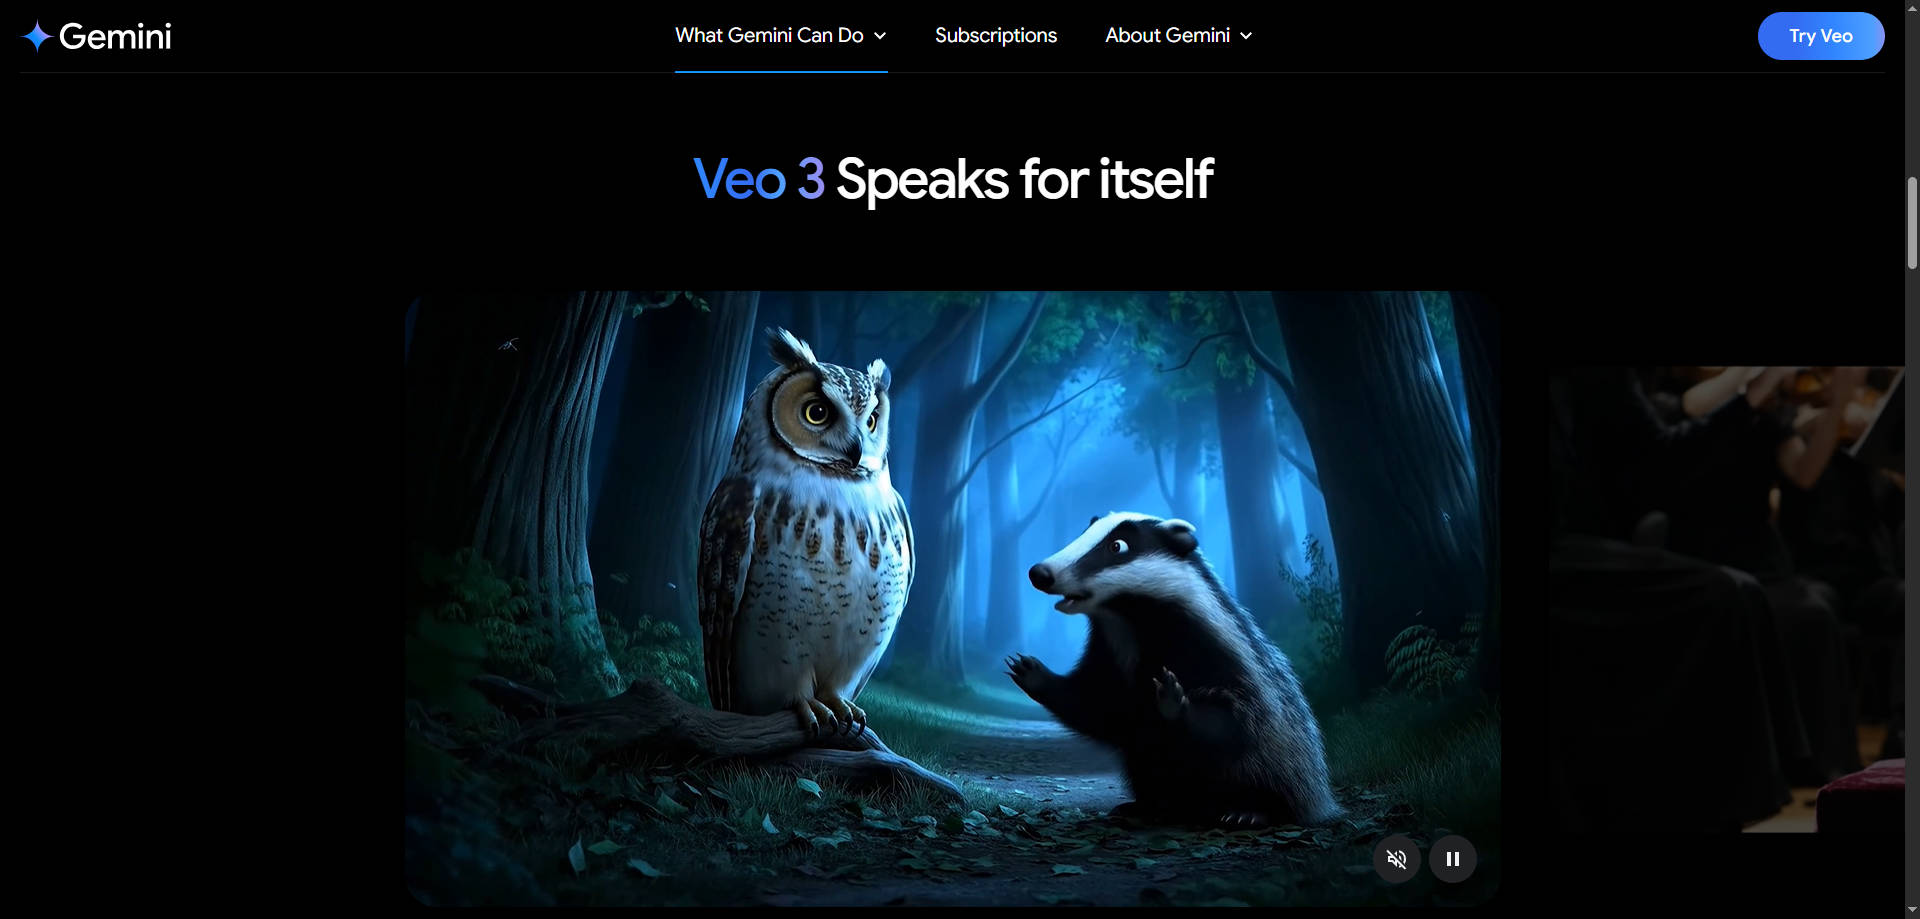
Veo 3 is especially praised for its ability to handle complex scenes, including fast motion, shadows, natural lighting, and dynamic environments. Discover the core features of its latest Veo 3.1 model and the optimal prompts formula.
What's New in Veo 3 Compared to Previous Versions
Compared to Veo 2 or its beta iterations, Veo 3 introduces major upgrades:
| Feature | Veo 2 | Veo 3 |
| Max Output Resolution | 1080p | 4K UHD |
| Frame Rate | 24 fps | 30 fps |
| Prompt Flexibility | Text only | Text + Image |
| Scene Stability | Moderate | High |
| AI Understanding | Basic | Deep contextual logic |
These enhancements make Veo 3 ideal for cinematic content where detail and realism are non-negotiable.
Part 2: What is Kling and Kling 2.1
Kling, developed by Kuaishou, is China's answer to Veo. It is focused on speed, efficiency, and creative flair. Kling 2.1 is its powerful version, offering greater control and even faster rendering. Learn the core features and prompts for Kling 2.5 Turbo.

Kling excels at producing short-form videos that are ideal for platforms like TikTok, Xiaohongshu, or Instagram Reels.
Kling 2.1 vs Kling: Evolution Breakdown
| Feature | Kling | Kling 2.1 |
| Rendering Speed | Fast | Ultra-Fast (2x) |
| Scene Quality | Decent | Improved lighting and realism |
| Prompt Length Support | Short | Long, detailed prompts |
| Localization | Chinese only | Multi-language input |
Kling 2.1 pushes the boundaries by allowing more narrative-rich videos while keeping the rendering time impressively low.
Part 3. Deep Dive: Veo 3 vs Kling 2.1 – Comparison for VFX and Video Editing
Regarding AI-powered video generation, Veo 3 and Kling 2.1 are two of the most innovative tools on the market—yet they serve distinct purposes. While both convert text prompts into animated visuals, their capabilities, pricing, rendering speed, and ideal use cases vary greatly.
Here's a freshly updated comparison, drawing from real-world testing, creator feedback, and performance data:
Let's break it down feature by feature:
| Test Item | Kling 2.1 | Veo 2/3 |
| Multiple Characters (Image-to-Video) | ⭐
 |
⭐⭐⭐
 |
| Physics Simulation (Image-to-Video) | ⭐
 |
⭐⭐⭐
 |
| Complex Shape Preservation (Image-to-Video) | ⭐
 |
⭐⭐⭐
 |
| Cartoon Style (Image-to-Video) | ⭐
 |
⭐⭐⭐
 |
| Semantic Understanding (Text-to-video) | ⭐
 |
⭐⭐⭐
 |
| Cinematic Camera Work (Text-to-video) | ⭐
 |
⭐⭐⭐
 |
| Cartoon Rendering Quality (Text-to-video) | ⭐
 |
⭐⭐⭐
 |
| Chinese Elements (Text-to-video) | ⭐⭐⭐
 |
⭐⭐
 |
| Fun/Internet Appeal (Text-to-video) | ⭐⭐⭐
 |
⭐⭐
 |
Veo 3 vs Kling 2.1 – Which One Should You Choose?
Choosing between Veo 3 and Kling 2.1 depends on your creative goals, budget, and audience platform. Both tools are excellent in their own right, but they're optimized for different user types and production needs.
When to Use Veo 3:
- You're aiming to create cinematic-quality visuals with realistic lighting, detailed motion, and high-end aesthetics.
- Your videos require longer narratives, voiceovers, or story-driven sequences.
- You plan to publish on platforms like YouTube, Vimeo, or corporate websites, where resolution and coherence matter more than speed.
💡 Best For: Product explainers, educational videos, animated short films, branded content.
When to Use Kling 2.1:
- You need fast turnarounds, often within minutes, for social media campaigns or content calendars.
- You're creating fun, attention-grabbing shorts that match current trends or platform-specific formats (9:16 vertical).
- Your focus is on quantity and consistency more than ultra-realistic rendering.
💡 Best For: TikTok, Instagram Reels, Xiaohongshu, daily updates, or visual memes.
Part 4. Filmora AI Video Workflow Tutorial (Veo 3)
Once you've generated your video using Veo 3 or Kling 2.1, the next critical step is refining and finalizing your content. This is where Wondershare Filmora comes in—a powerful yet user-friendly video editor that's perfect for creators of all skill levels.
Whether you're trimming awkward transitions, adding background music, or designing cinematic visual effects, Filmora offers the tools you need to bring AI-generated footage to life.
 secure download

🎬 Use Case Scenarios
Scenario 1: Product Demo with Transitions
Recommended Tool: Veo 3 + Filmora
Why It Works
Veo provides detailed footage (e.g., close-ups, rotating views, background realism). Then use Filmora to add callouts, text overlays, and music transitions to create a full product showcase.
Scenario 2: Trend-Based Short Content
Recommended Tool: Kling 2.1 + Filmora
Why It Works
Start with Kling to generate the fast-paced visuals. In Filmora, apply motion tracking, add viral captions, emoji graphics, and trending audio to boost engagement.
Scenario 3: Explainer Reels for Brands
Recommended Tool: Kling 2.1 + Filmora
Why It Works
With Kling, create stylized mascot animations or minimalistic visual metaphors. Then, fine-tune pacing, add narration, and create brand intros using Filmora's templates.
How to Edit Veo 3 Videos on Filmora:
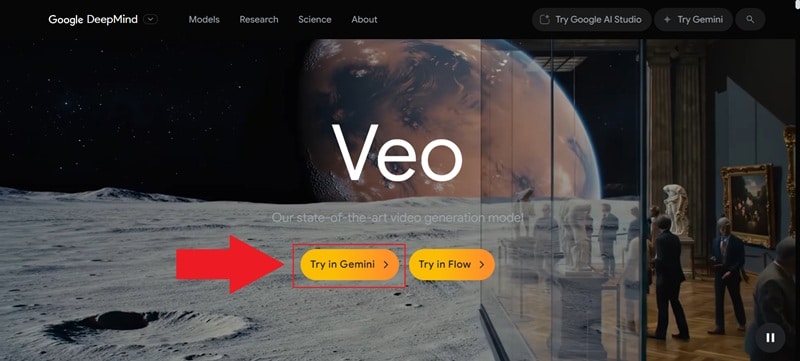
Step1Access the Veo 3 AI video generator
To begin, go to the Veo 3 AI video generator site. You'll see two ways to use the tool: through Gemini Veo 3 or Flow. For this example, go ahead and click on "Try in Gemini".
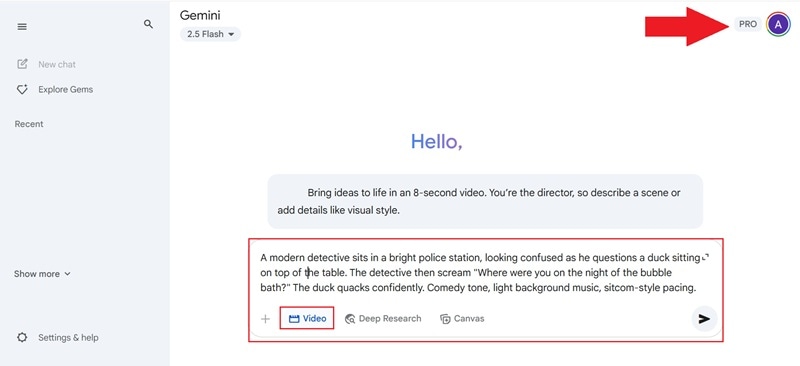
Step2Write your prompt and generate a video
You'll then be redirected to Gemini. Just a heads-up, the Veo 3 AI video generator is only available with the Pro version, so make sure you're logged in and using Gemini Pro.
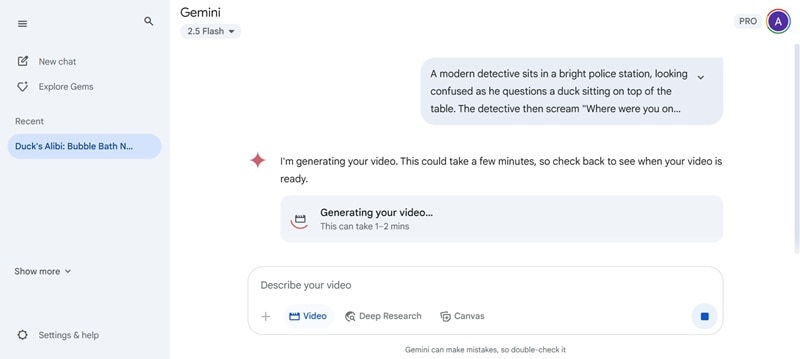
After that, click the "Video" option below and start typing your prompt. This part matters, so try to be as detailed as possible to get the best results. When you're ready, hit enter and let it work its magic.
Veo 3 usually generates your video in 1 to 3 minutes. Once it's ready, you can download it to your device.
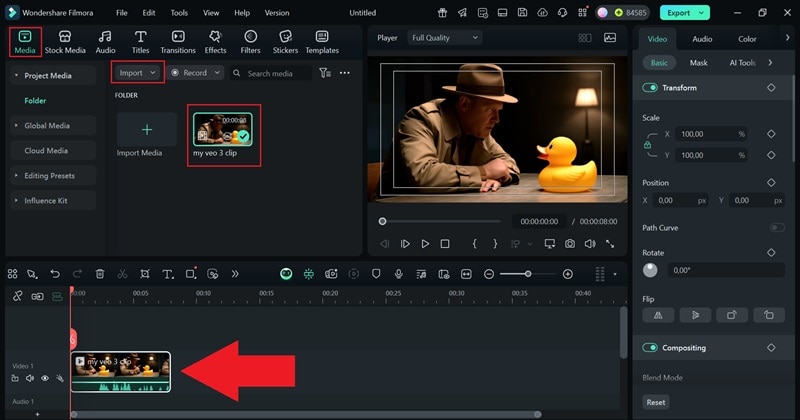
Step3Import your video to Filmora
Next, open the latest version of Filmora and start a new project. Go to the "Media" tab, click "Import" to upload your Veo 3 AI video, then drag the clip onto the timeline to start editing.
secure download
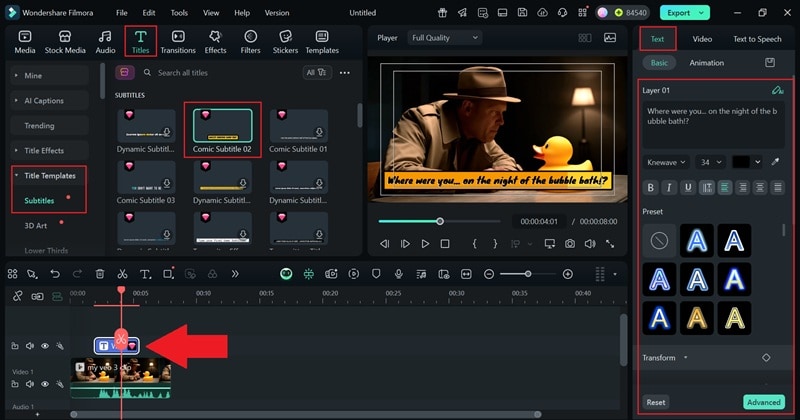
Step4Add text to the video
There are a bunch of ways you can upgrade your Veo 3 AI video. A good place to start is by adding captions. Just head to the "Titles" tab, click on "Title Templates", and pick the "Subtitles" category. Choose the style you like, drag it onto the timeline, and then use the panel on the left to edit the text and make it your own.
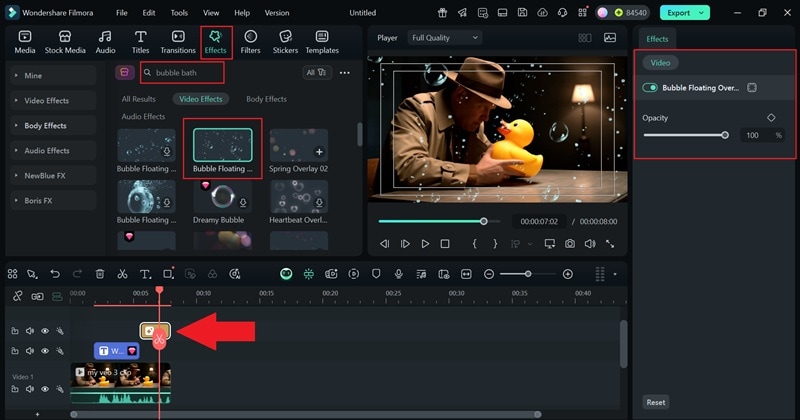
Step5Add video effects
Next, try adding a video effect that fits the moment. For example, you can use a bubble effect right after the detective asks a question to add a bit of irony, like the duck might be guilty. Go to the "Effects" tab, search for "Bubble", then drag it onto the timeline where you want it. Use the panel to tweak how strong the effect looks.
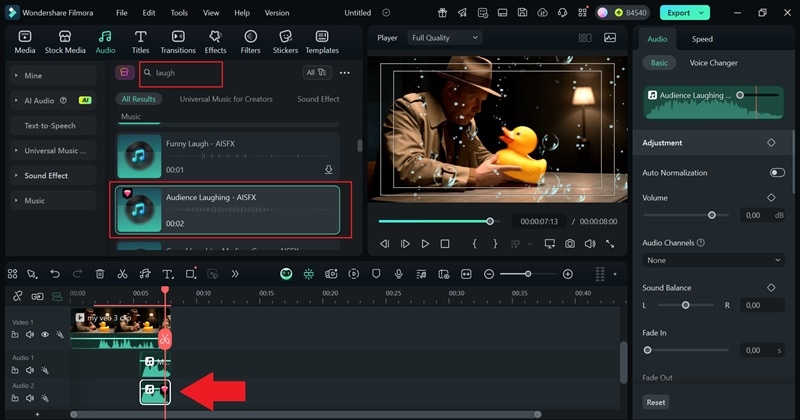
Step6Add sound effects
Remember to add sound effects to make everything feel more real. Head over to the "Audio" tab, choose "Sound Effects," and use the search bar like you did before. Drop the sound onto the timeline and line it up with the bubble effect so it feels natural. Then, use the panel to tweak the volume or fade it in and out.
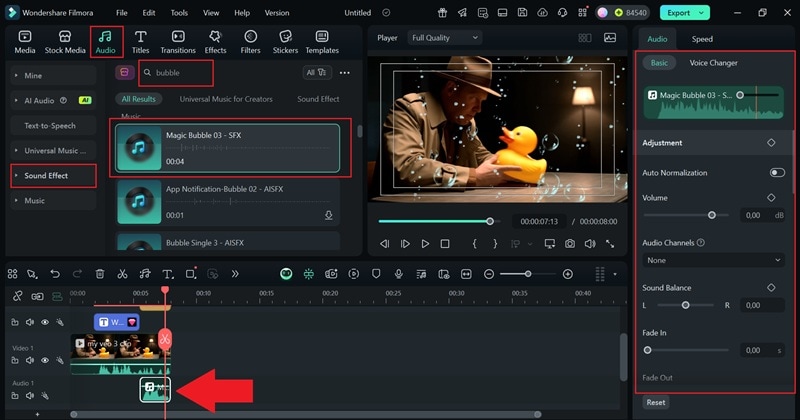
You can also add a laughing sound effect right at the punchline to make the moment more memorable. Just type "laugh" in the search bar and follow the same steps as before to add and adjust it.
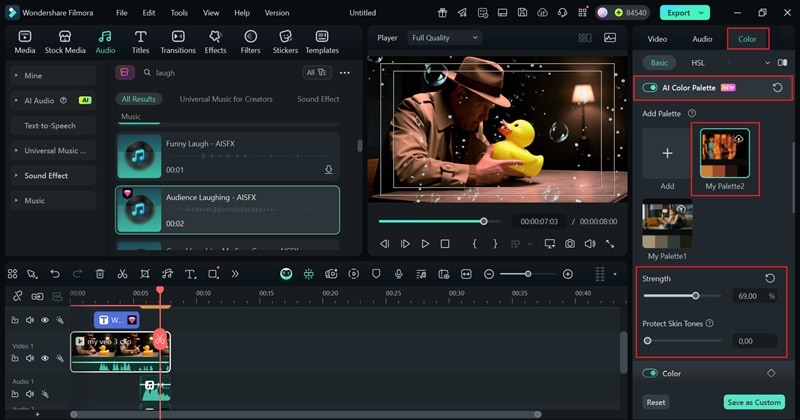
Step7Add color grading
You can also make your Veo 3 AI video look more cinematic by tweaking the color grading. Click on the clip in your timeline, then hit "Color" in the panel on the left. Scroll down and switch on the "AI Color Palette" feature. From there, adjust the color strength based on the reference photo you uploaded earlier from your device.
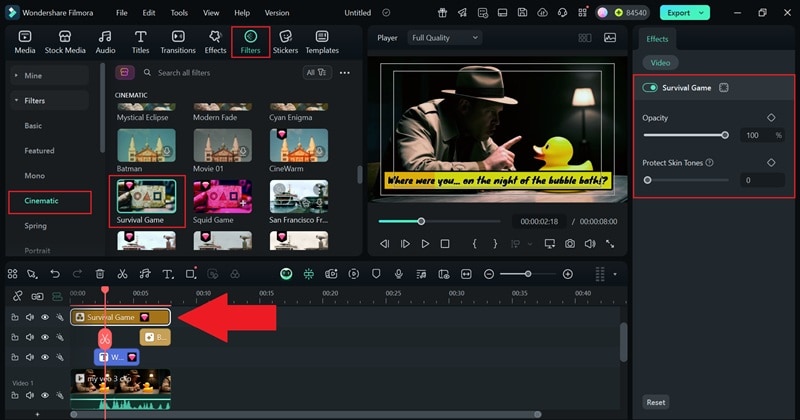
Another easy way to change up the look is to use filters. Go to the "Filters" tab, click on the "Cinematic" category, and pick the ones you like. Drag them onto the timeline, then use the panel on the left to adjust how strong the effect appears.
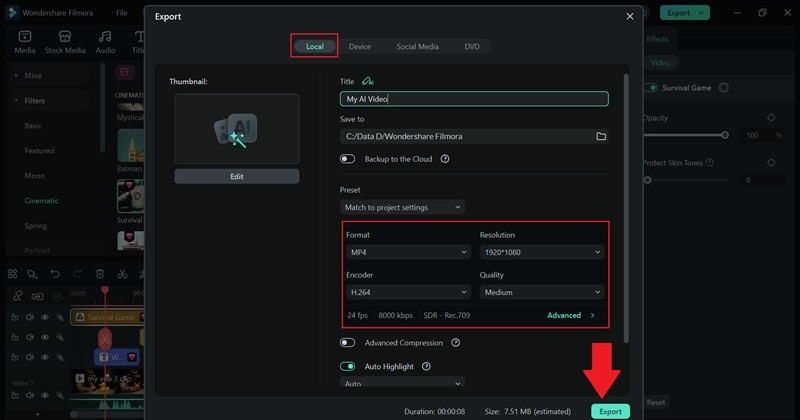
Step8Export your video
Once your edit looks solid and you're ready to finish, hit the "Export" button at the top. Choose "Local" to save it on your device or share it directly on your social media. Select your video format, rename the file if needed, set the quality, and pick where you want it saved. After that, click "Export" again, and your video is good to go.
Part 5. Common Pitfalls & How to Avoid Them
Even with cutting-edge tools like Veo 3 and Kling 2.1, and a capable editor like Filmora, creators may encounter obstacles that affect the quality or consistency of their videos. These issues often stem from the AI's interpretation of prompts, technical mismatches, or overlooked post-production steps.
Let's explore the most common problems and offer practical, step-by-step solutions using Filmora:
🔧 Problem #1: AI Footage Looks Unnatural or Choppy
Why It Happens:
AI models sometimes struggle with temporal consistency, especially in fast-action scenes or videos involving human motion or complex lighting transitions.
How to Fix It in Filmora:
- Select the choppy clip in the timeline.
- Apply Frame Blending from the "Speed" panel.
- Use Slow-Motion (0.75x or 0.5x) to reduce rapid jumps and emphasize smoothness.
- Add a transition effect (like Cross Dissolve) between segments to mask sudden changes.
🎵 Problem #2: Audio Doesn't Match Video Pacing
Why It Happens:
AI-generated videos don't come with pre-timed audio tracks, and overlaying music or voiceovers without adjustments can lead to sync issues.
How to Fix It in Filmora:
- Import your audio track into the Timeline.
- Enable Waveform View to visually align sound peaks with scene changes.
- Use Audio Ducking to lower background music during key voice segments.
- Add Silence Gaps or Stretch Audio to ensure alignment.
🎨 Problem #3: AI-Generated Scenes Feel Flat or Dull
Why It Happens:
AI models focus on realism but might neglect visual storytelling elements like color temperature, saturation, or lighting tone.
How to Fix It in Filmora:
- Go to the Color Tab in the Advanced Editor.
- Apply a Cinematic LUT (Look-Up Table) to instantly enhance tone.
- Adjust Contrast, Saturation, and Shadows for mood-building.
- Add a subtle Vignette Effect to draw focus to the center.
📏 Problem #4: Mismatched Video Resolutions or Aspect Ratios
Why It Happens:
Veo 3 and Kling may output different resolution formats depending on prompt settings or default configurations.
How to Fix It in Filmora:
- Set the project aspect ratio in File → Project Settings (e.g., 16:9, 1:1, 9:16).
- Use Crop to Fit to auto-adjust videos to the target ratio.
- Apply Zoom & Pan if you want to frame the subject precisely.
- Use Auto Reframe to resize your videos to ensure the focus is always on the action.
🤩 Posts You Might Be Interested In:
- How to Master Google Veo 3 Prompts
- Filmora Veo 3 AI Video Editing Software Review & Integration
- Extensive Guide to Use Google Veo 3
- How to Fix Veo 3 No Audio Issues
- Filmora + Veo 3 Image‑to‑Video Review
Conclusion
In the race of veo 3 vs kling, there's no one-size-fits-all answer—it depends on your project. Choose Veo 3 if you're crafting detailed, narrative-driven videos that require realism. Choose Kling 2.1 if your priority is speed, social media appeal, and fun, stylized outputs. No matter which tool you pick, complete your project using Filmora. It's the perfect video editor to refine, enhance, and export your AI-generated content.
secure download
FAQs
-
Q1. Which is better for cinematic videos: Veo 3 or Kling 2.1?
Veo 3 excels in cinematic and high-resolution content. Kling 2.1 is faster and better for short-form videos. -
Q2. Can I use both tools together in one project?
Yes! You can generate scenes in both and edit them together in Filmora. -
Q3. Is Filmora compatible with AI-generated videos?
Absolutely. Filmora supports most formats outputted by Veo and Kling, including MP4 and MOV. -
Q4. Can Filmora add voiceovers to AI videos?
Yes. You can record and sync voiceovers directly within Filmora's audio panel. -
Q5. Do I need a powerful PC to run Filmora with AI footage?
A mid-range PC with 8GB+ RAM and a decent GPU will handle Filmora and AI content smoothly. -
Q6. Is there a learning curve with Filmora?
Filmora is beginner-friendly and includes built-in tutorials, making it ideal for creators new to video editing.
