

 100% Security Verified | No Subscription Required | No Malware

OBS, a free and open-source recording and streaming software, can actually capture multiple audio and video sources in the same session. You can record microphones, desktop audio, webcams, cameras, and other sources together, though the way OBS saves and handles those sources afterward is different for audio and video.
If you want to know how to record multiple audio tracks in OBS, as well as multiple video sources, we’re here to walk you through the setup step by step. We’ll also cover how OBS handles separate tracks, common recording problems, and an alternative for recording and editing multiple sources in one app.
In this article
Part 1. How OBS Handles Multiple Video & Audio Tracks
Recording multiple sources is useful when you’re capturing a webcam alongside your screen, mixing in game audio, or using separate microphones for different speakers. But before you start, it’s important to know how OBS handles audio and video tracks so you can keep your recordings organized and separate during editing.
Audio Tracks in OBS
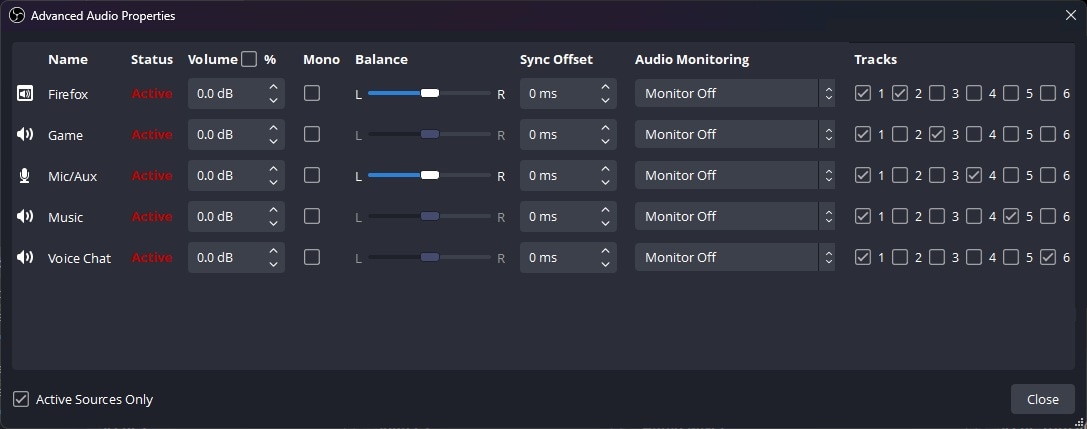
For audio, OBS allows you to record multiple sources on separate tracks, so you can keep each source independent for editing later. It supports up to six separate audio tracks per recording, with each track set to stereo by default. For example:
|
Source |
Track |
|
Microphone |
Track 2 |
|
Desktop audio |
Track 3 |
|
Game audio |
Track 4 |
|
Music |
Track 5 |
This routing only works in Advanced Output mode. Simple mode won't give you this option at all. Once you're there, you can assign sources to tracks through the Advanced Audio Properties menu in the Audio Mixer panel. We'll walk through the full setup in the next section.
Video Tracks in OBS
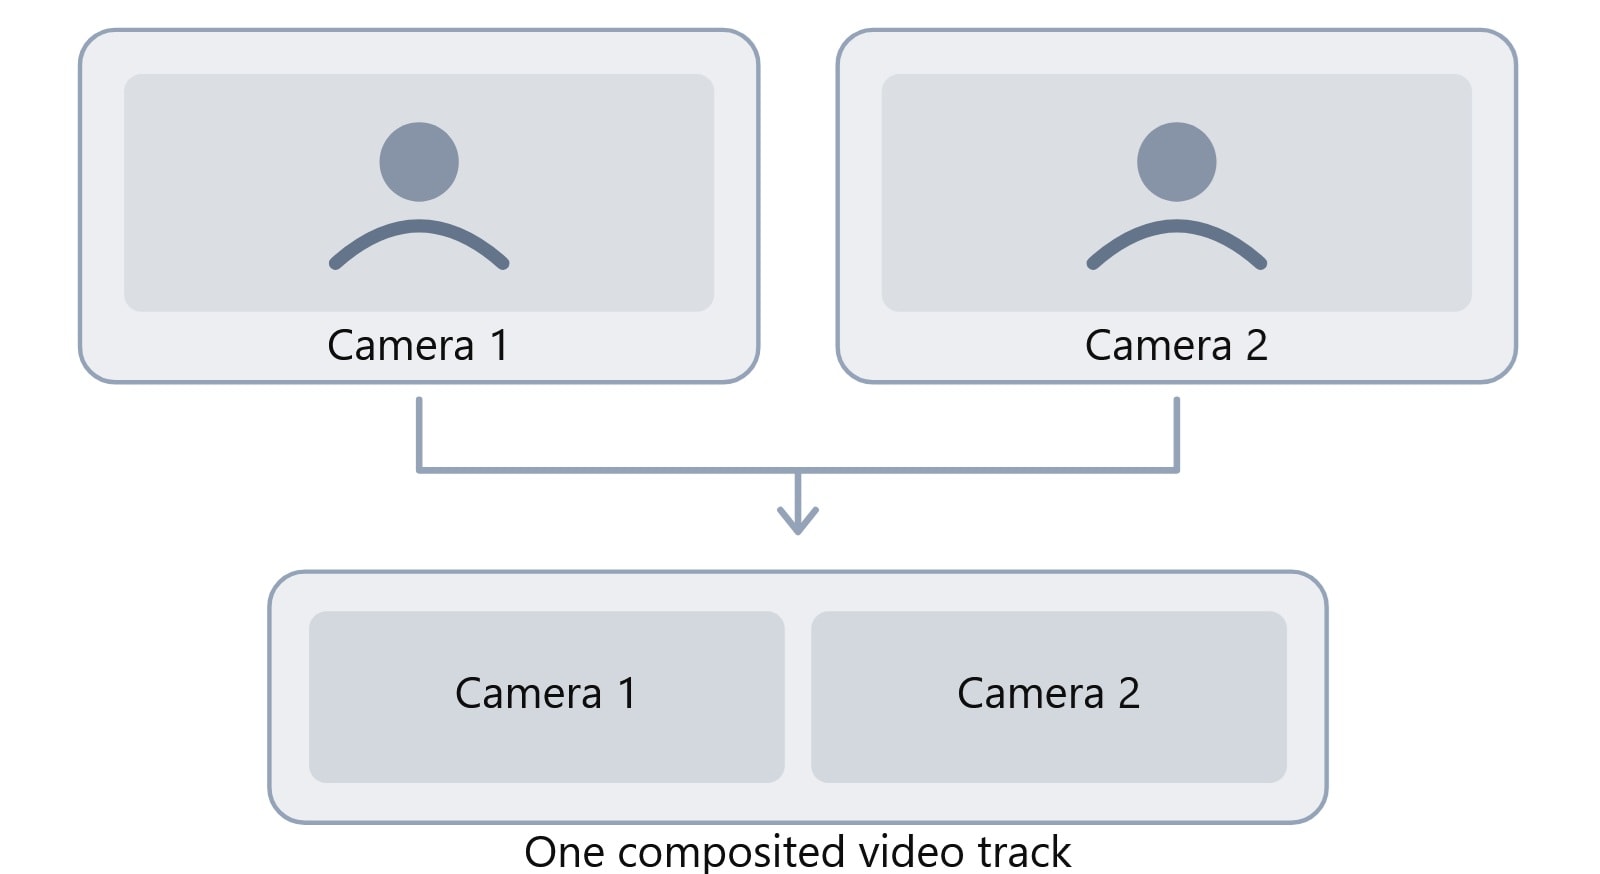
By default, OBS doesn’t record multiple video tracks separately. Video sources in OBS aren’t split into separate tracks. If you need each source saved individually, you may need a separate plugin.
For example, you can add two cameras to the same scene, but OBS renders the scene as a single composited video track rather than saving each camera as its own file. Both camera feeds will appear in the same recording based on how you arrange them in the scene.
Part 2. How to Record Multiple Audio Tracks in OBS
Now that you know how OBS records multiple sources, let's start setting them up. Follow the steps below on how to record multiple audio tracks in OBS.
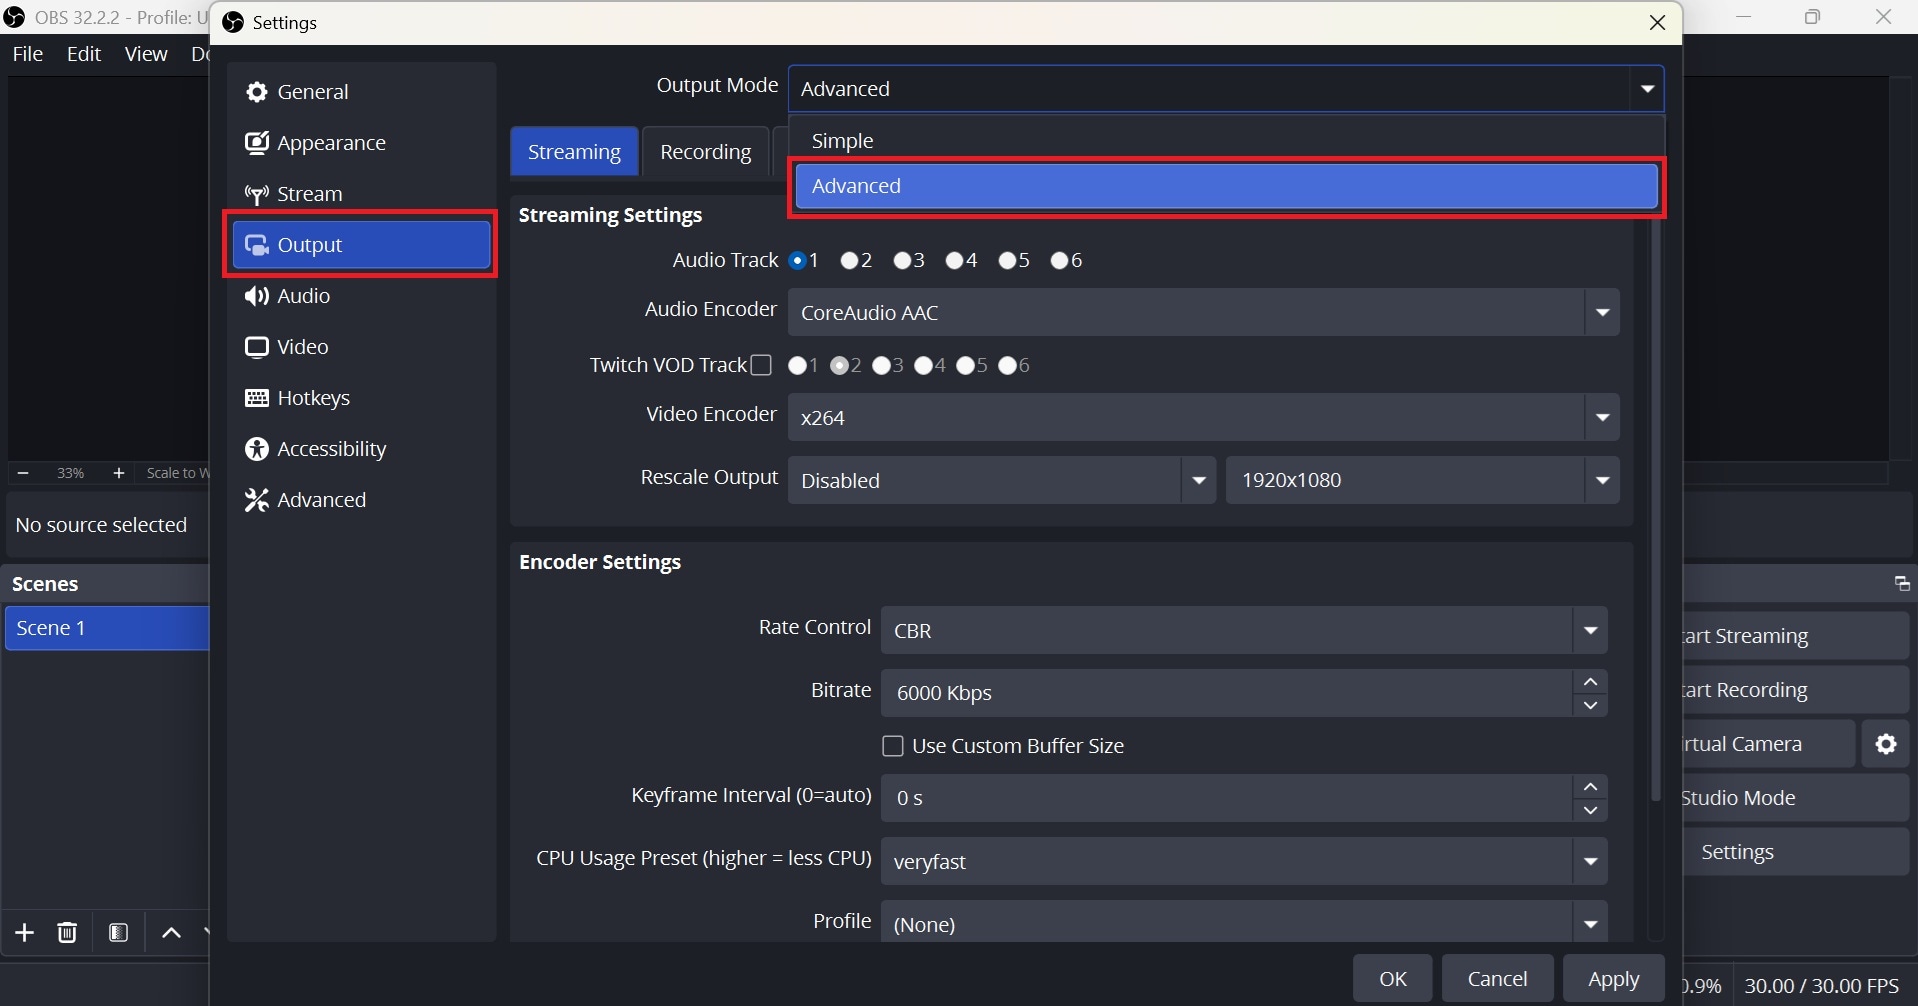
- Step 1. Go to Settings > Output, and change the Output Mode dropdown to Advanced.
- Step 2. In the Recording tab, you'll see six checkboxes labeled Track 1 through Track 6. Check the ones you plan to use.
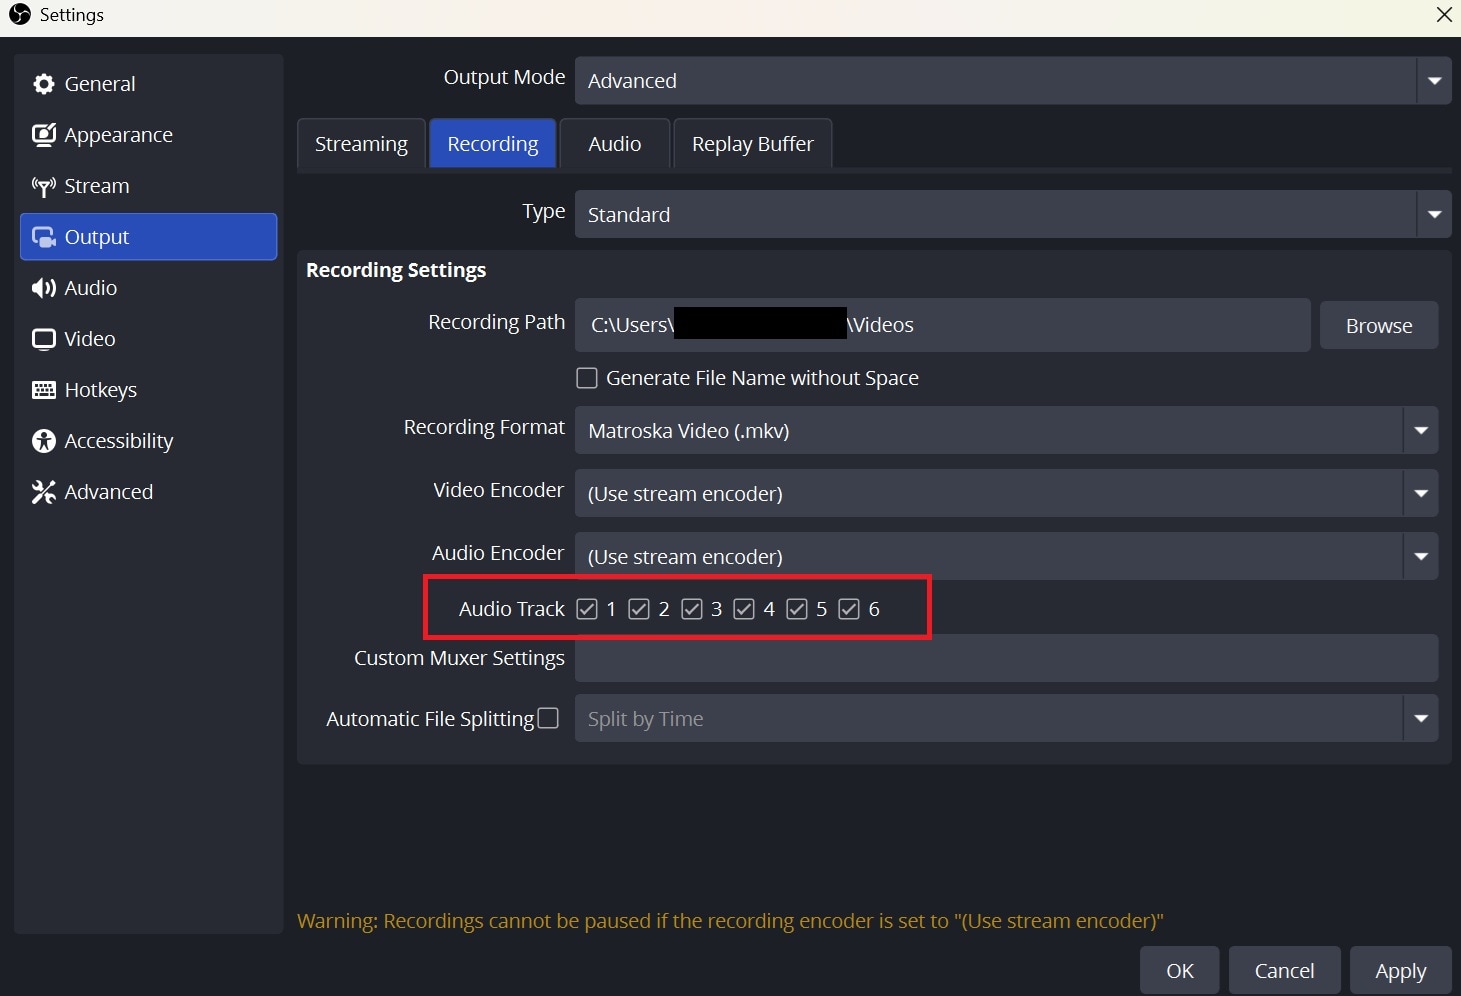
Note: You can rename each track so they're easier to identify later instead of seeing generic labels on the Audio tab next to Recording.
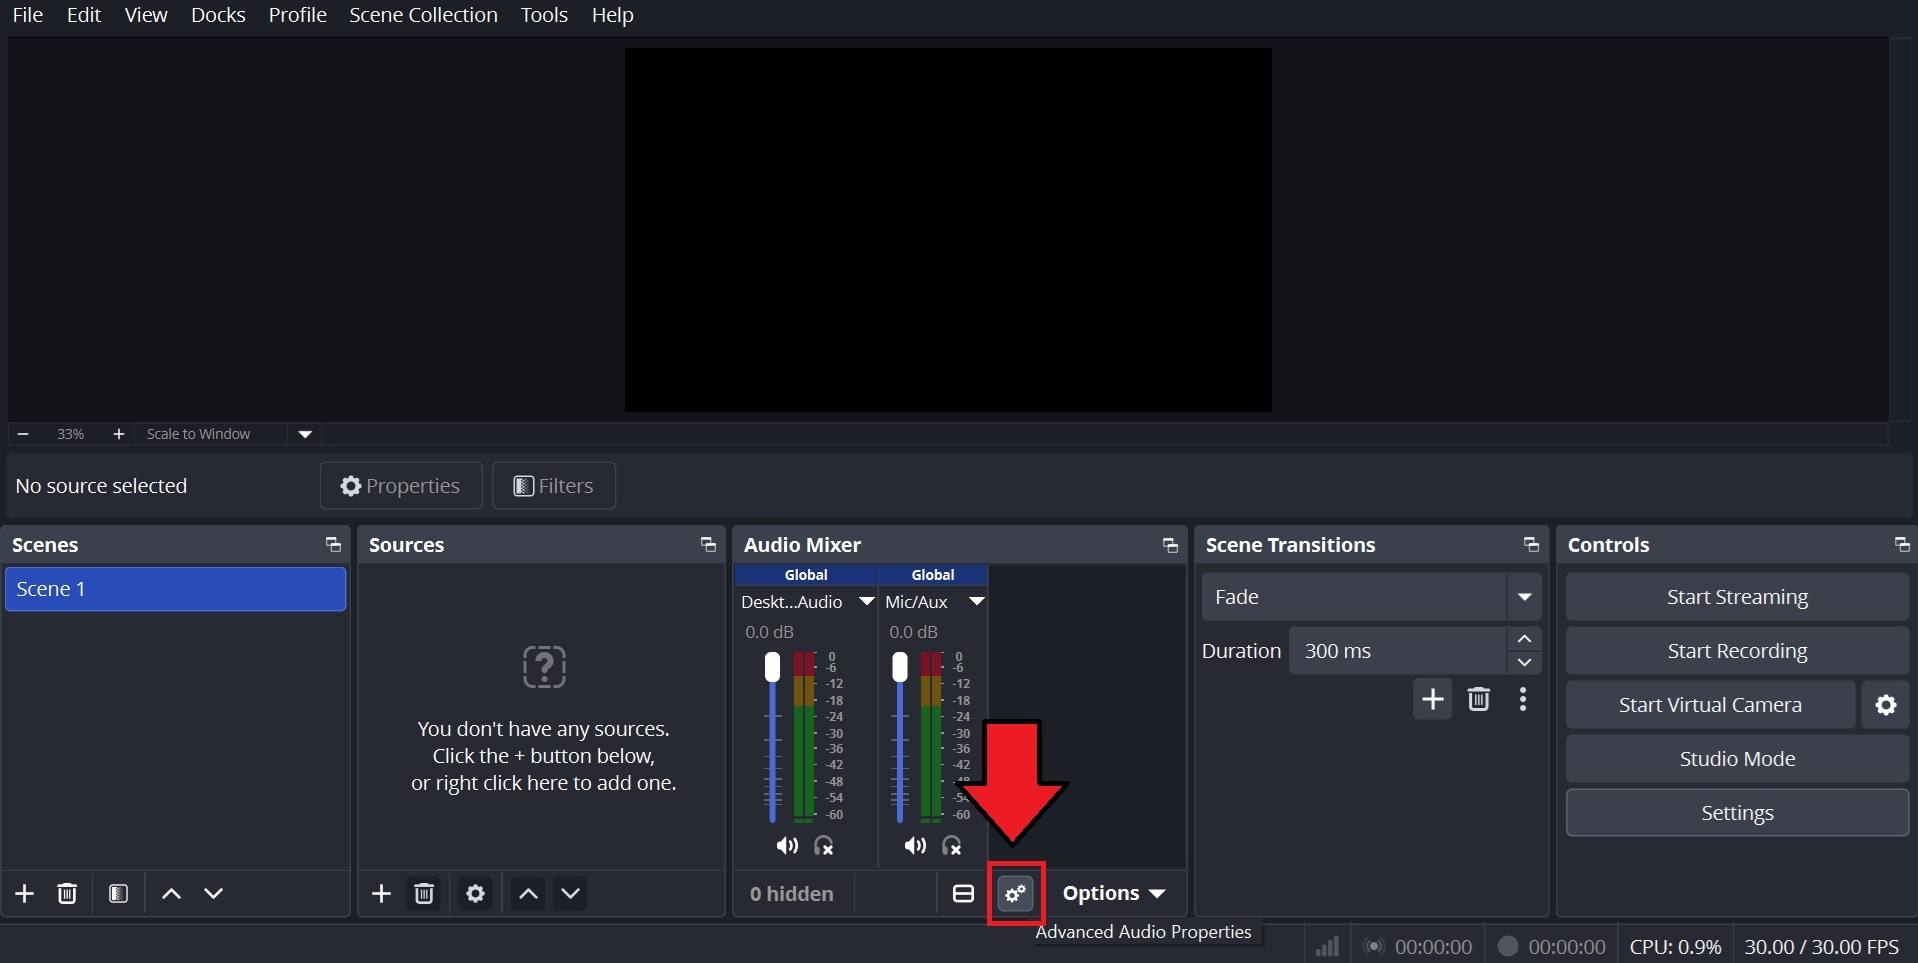
- Step 3. Back in the main OBS window, click the gear icon on the Audio Mixer panel and open Advanced Audio Properties.
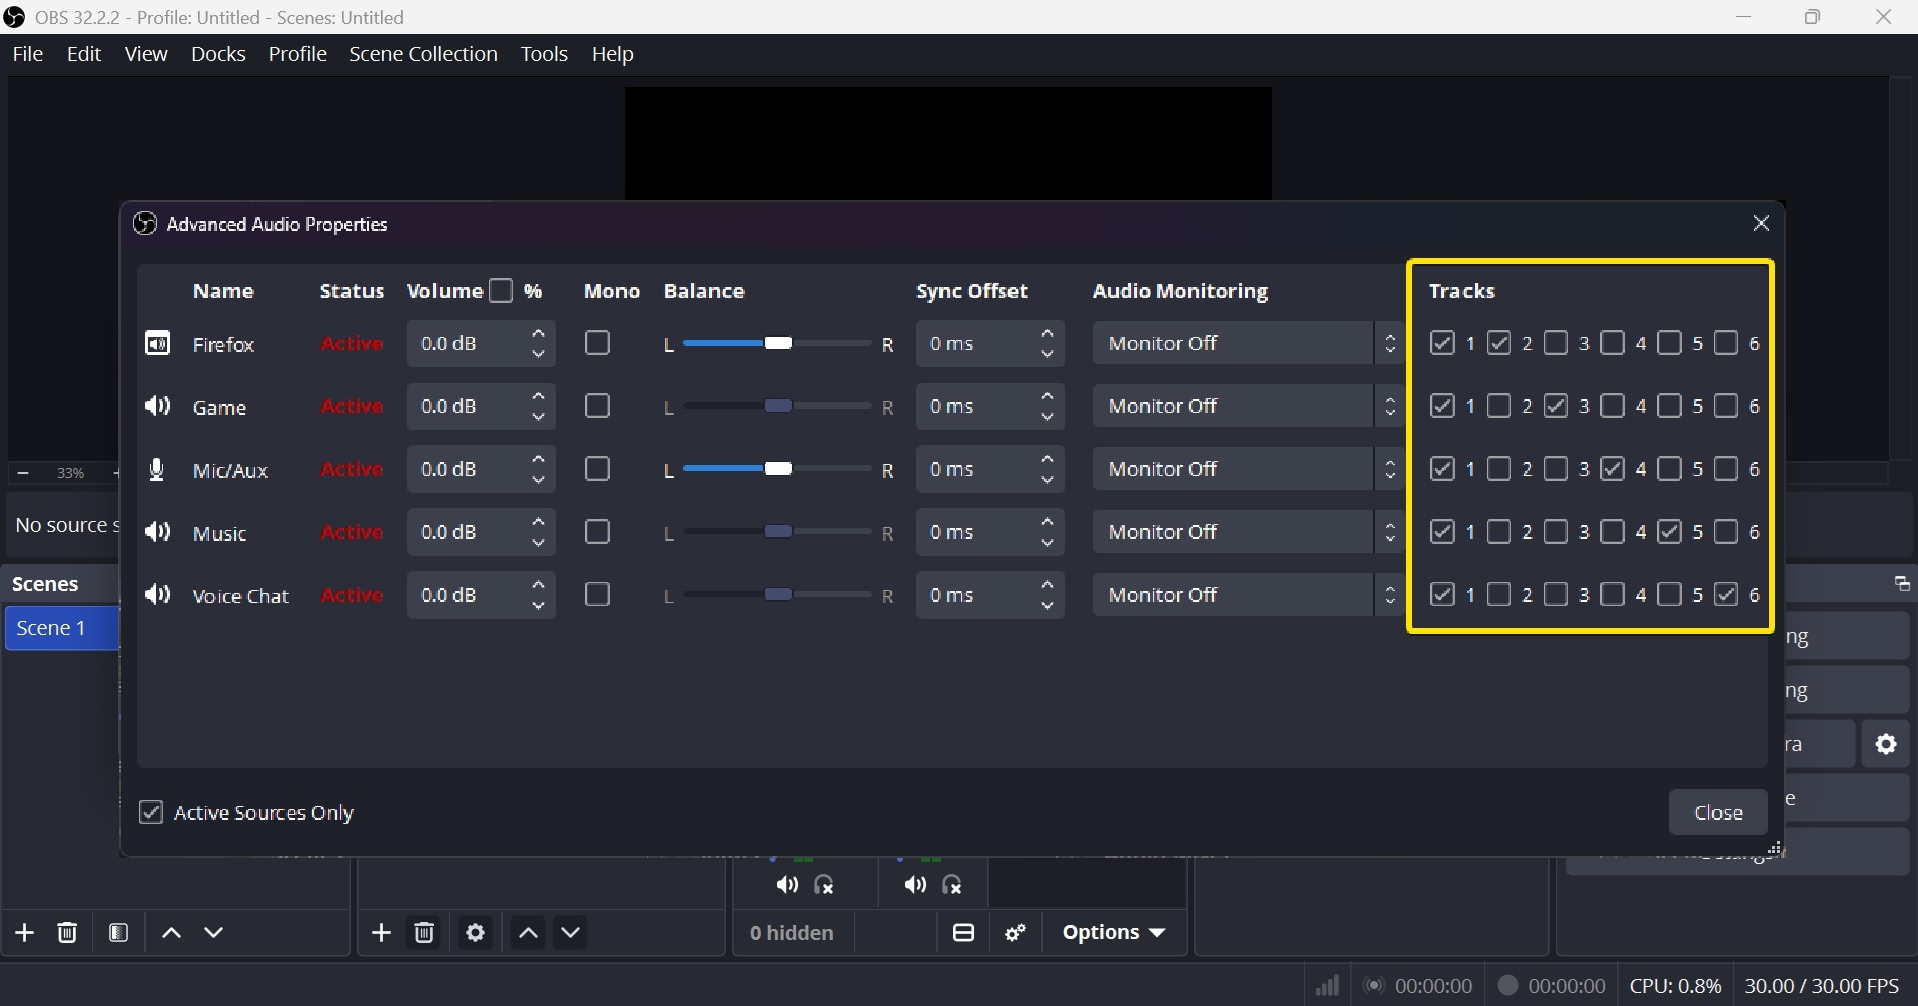
You'll see a grid with checkboxes for every source against every track number. Check the correct box for each source. After everything is routed, hit Start Recording.
Part 3. How to Record Multiple Video Sources in OBS
If you want to record multiple video sources simultaneously in OBS, follow these steps.
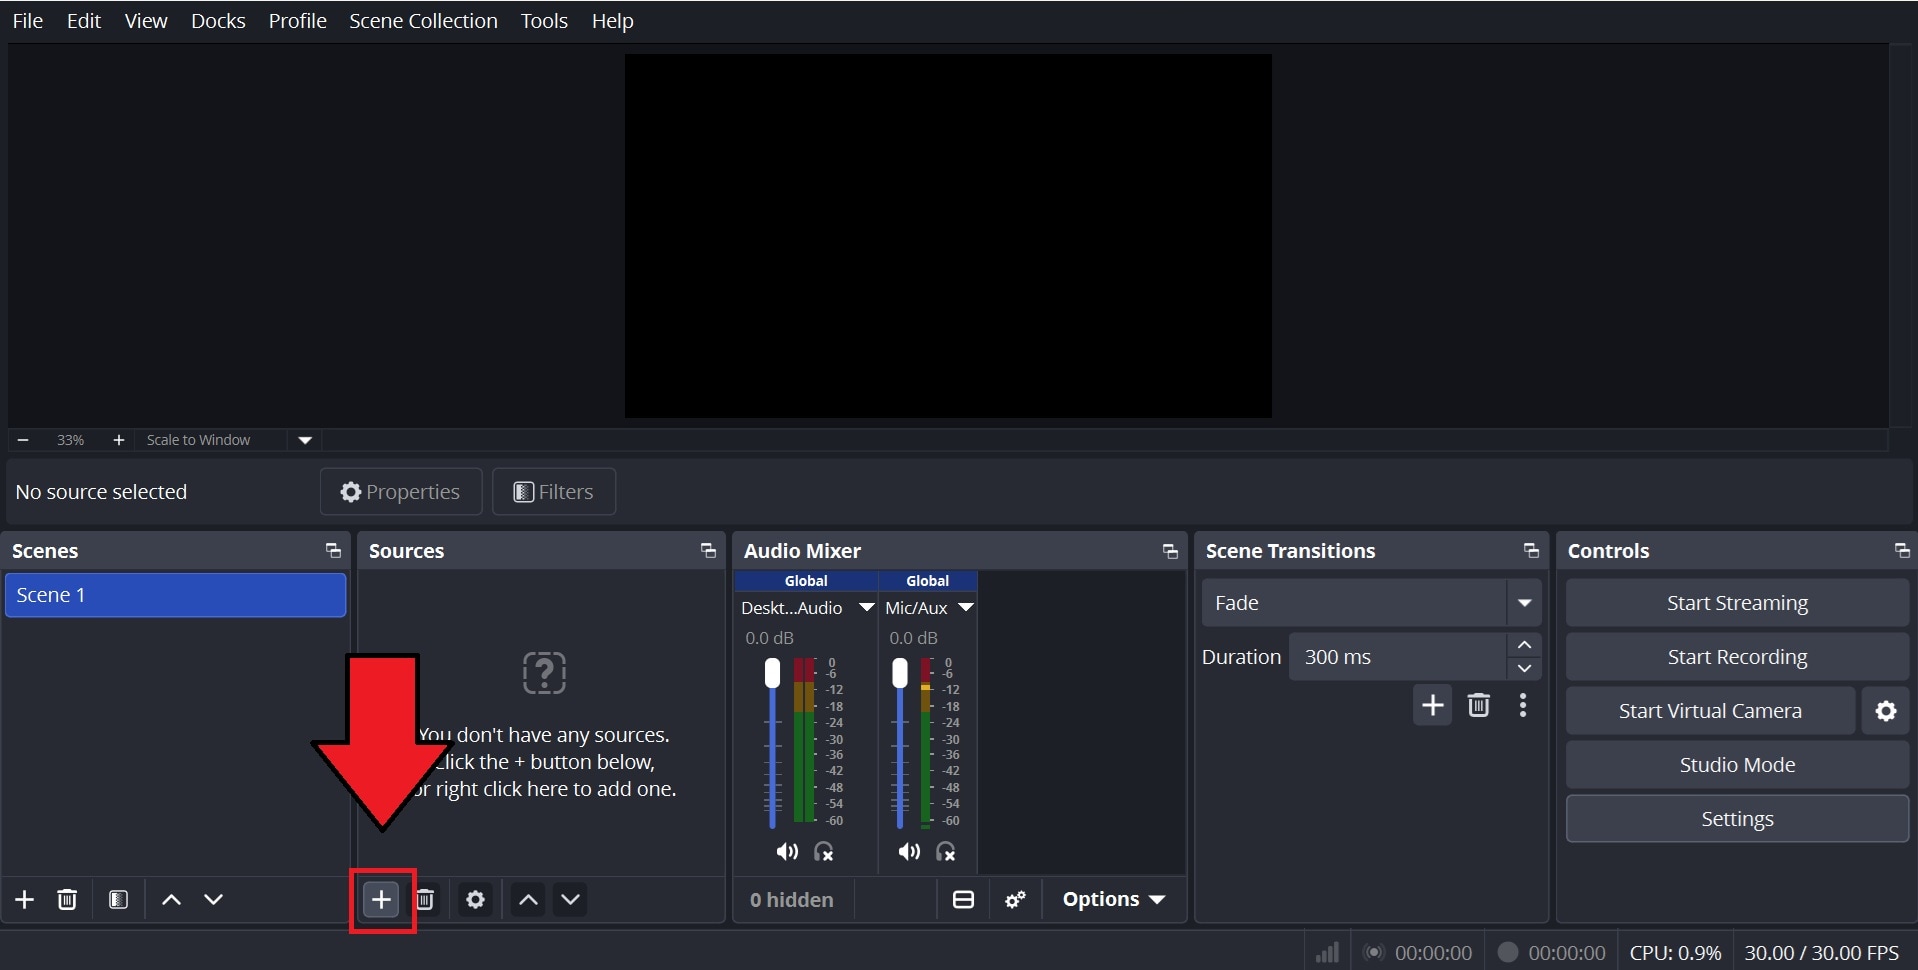
- Step 1. Click the + button to create a scene and add each video source. It can be a webcam, capture card, screen capture, etc.
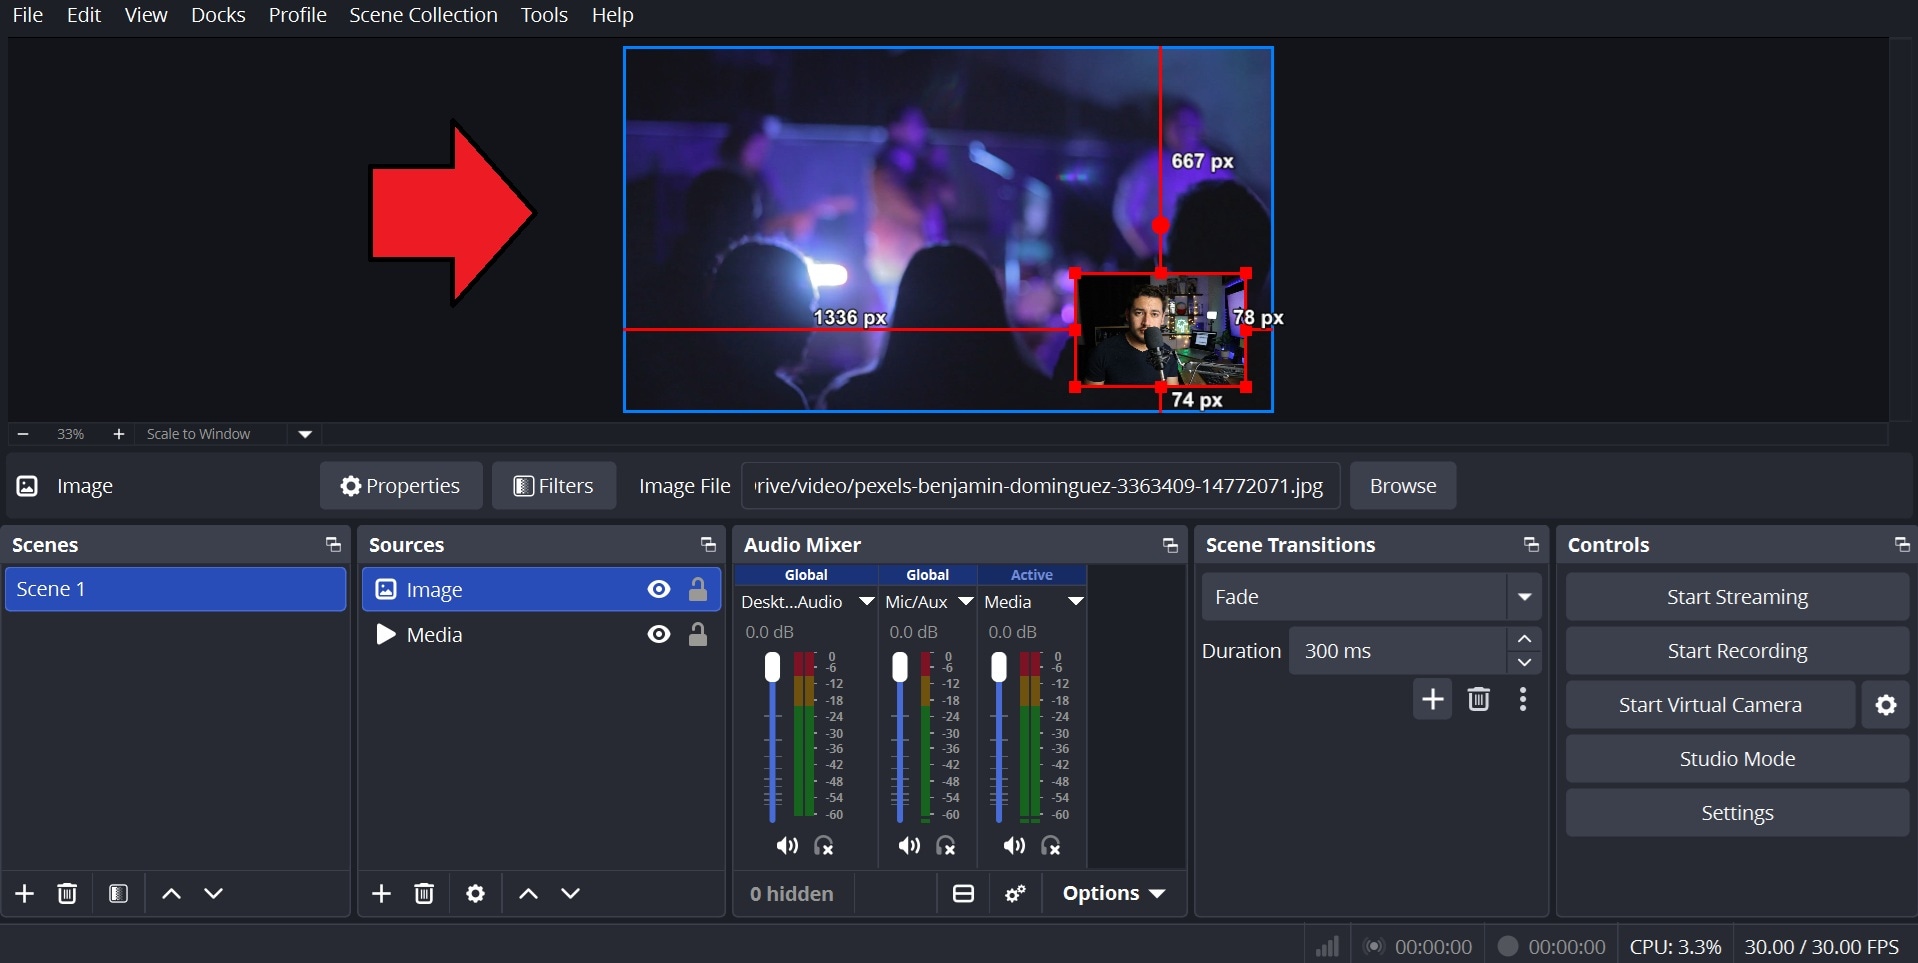
- Step 2. Resize and position each source the way you want it to look in the final video. Remember, this layout gets permanently recorded, so get it right before hitting record.
- Step 3. Start recording as usual. Hit Start Recording once your scene and sources are set up the way you want them.
How to Record Multiple Video Sources Separately in OBS
If you want to record multiple video sources separately in OBS, you can use a plugin that captures individual sources instead of the full scene. One option is the Source Record plugin, which lets you record a specific source independently in OBS.
Part 4. Common Problems When Recording Multiple Tracks in OBS
Even with everything set up correctly, multi-track recording in OBS can still throw a few curveballs. We've rounded up some of the most common ones, along with what you can do to fix them.
1. Compressed Audio
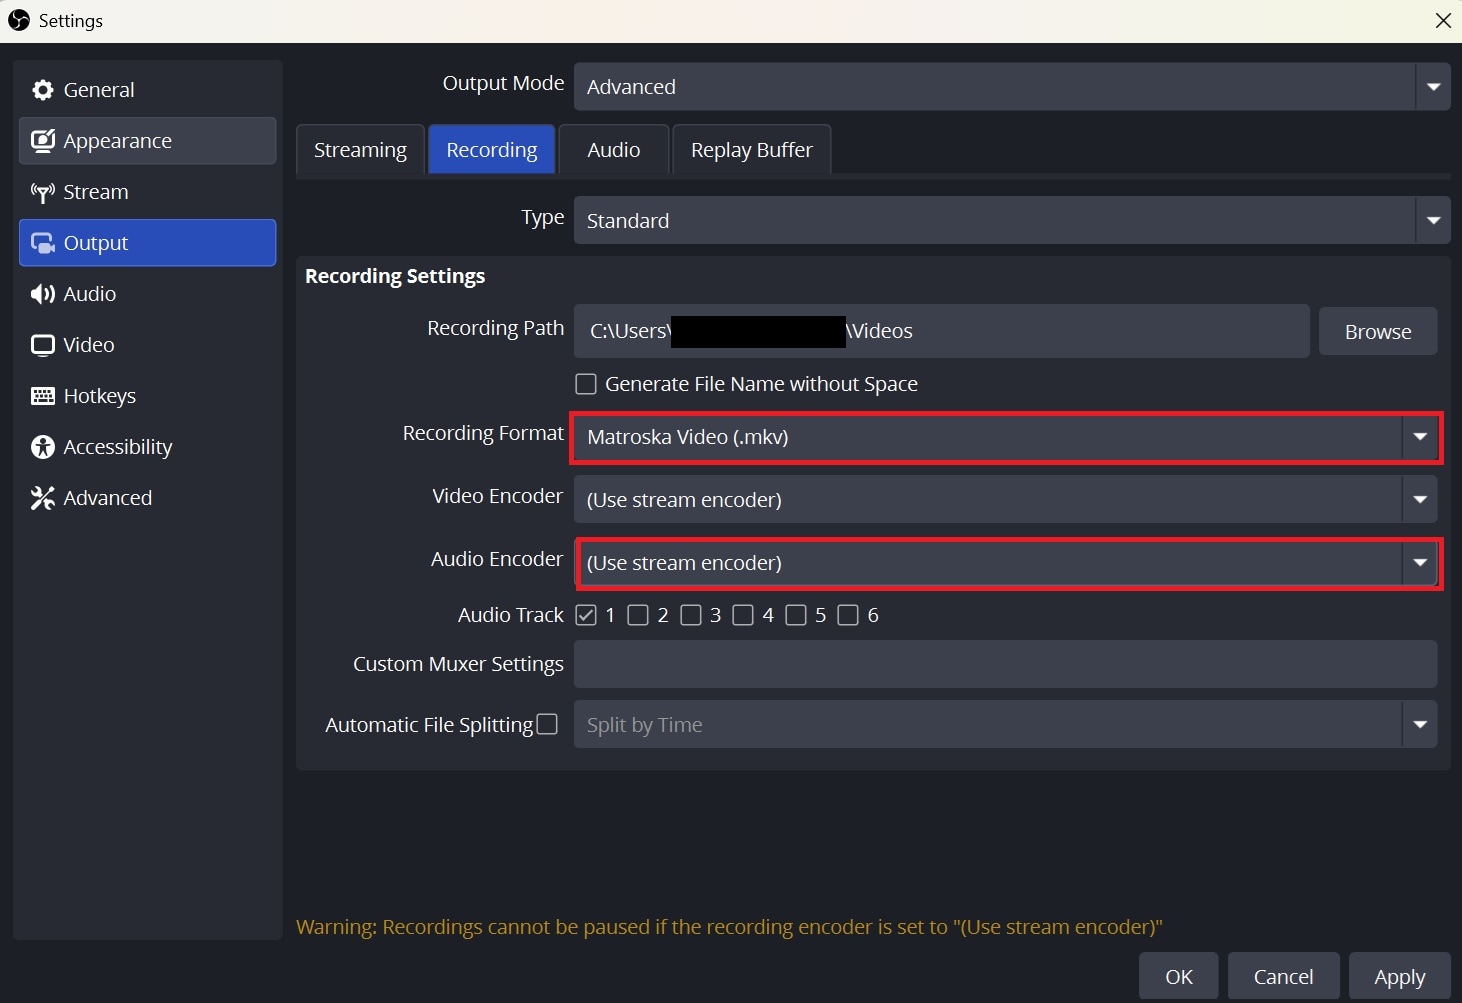
Common cause: Bitrate, codec, or encoder settings affecting final audio quality. The FFmpeg PCM encoder gives uncompressed audio, but can cause compatibility problems with multiple tracks in some editors.
How to fix: Check your recording audio settings, including bitrate and codec. Record to MKV, which OBS recommends for multi-track recording, then use File > Remux Recordings to create an MP4 afterward if needed.
2. Separate Tracks Are Missing
Common causes: Track boxes are not checked in the output settings, sources are not assigned to the right tracks, or the recording format doesn't support multiple tracks. Older OBS builds have also had this as a recurring bug.
How to fix:
- Confirm the track boxes are checked in Settings > Output > Recording
- Confirm sources are assigned to the right tracks in Advanced Audio Properties
- Confirm your format supports multiple tracks (FLV, for example, doesn't)
If everything checks out, try updating to the latest OBS version.
3. OBS Source Record Not Working
Common cause: The plugin is incompatible with your OBS version, or there are incorrect recording settings on the source itself.
How to fix:
- Make sure the plugin version is compatible with your current OBS version. If it's outdated or incompatible, install a supported version or fall back on OBS's standard scene recording.
- Check that the correct source is selected in the filter, recording is enabled for that source, and the output folder is set correctly.
4. Only One Audio Track Plays
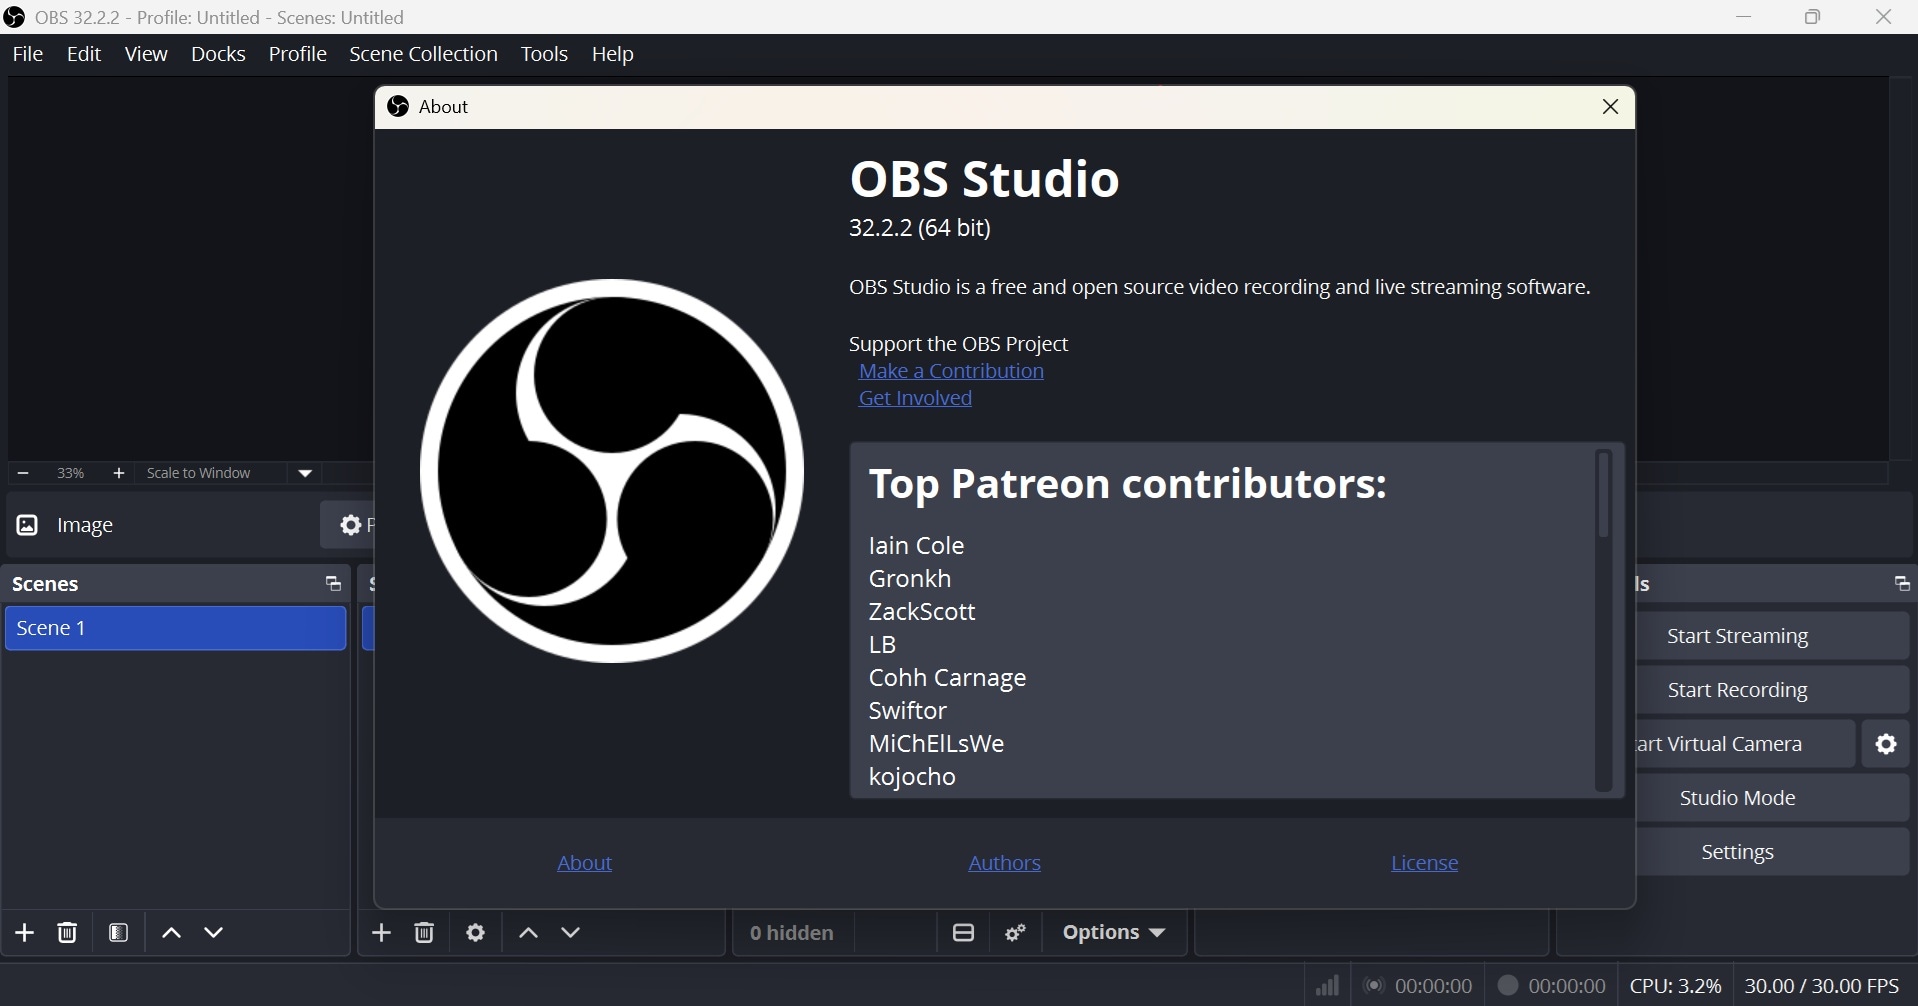
Common cause: Most media players, including VLC and Media Player Classic, default to playing a single audio track at a time. It’s not usually a recording error.
How to fix: In OBS, confirm each source is assigned to the intended track in Advanced Audio Properties, and confirm those tracks are enabled under Settings > Output > Recording. You can also check the recording in a video editor that supports multitrack audio.
Bonus: Record and Edit Multiple Sources in One App With Filmora
OBS is not the only recorder that can capture multiple sources at the same time. Wondershare Filmora offers a Screen Recorder that lets you record multiple video and audio sources, and even edit the footage and audio track in the same app.
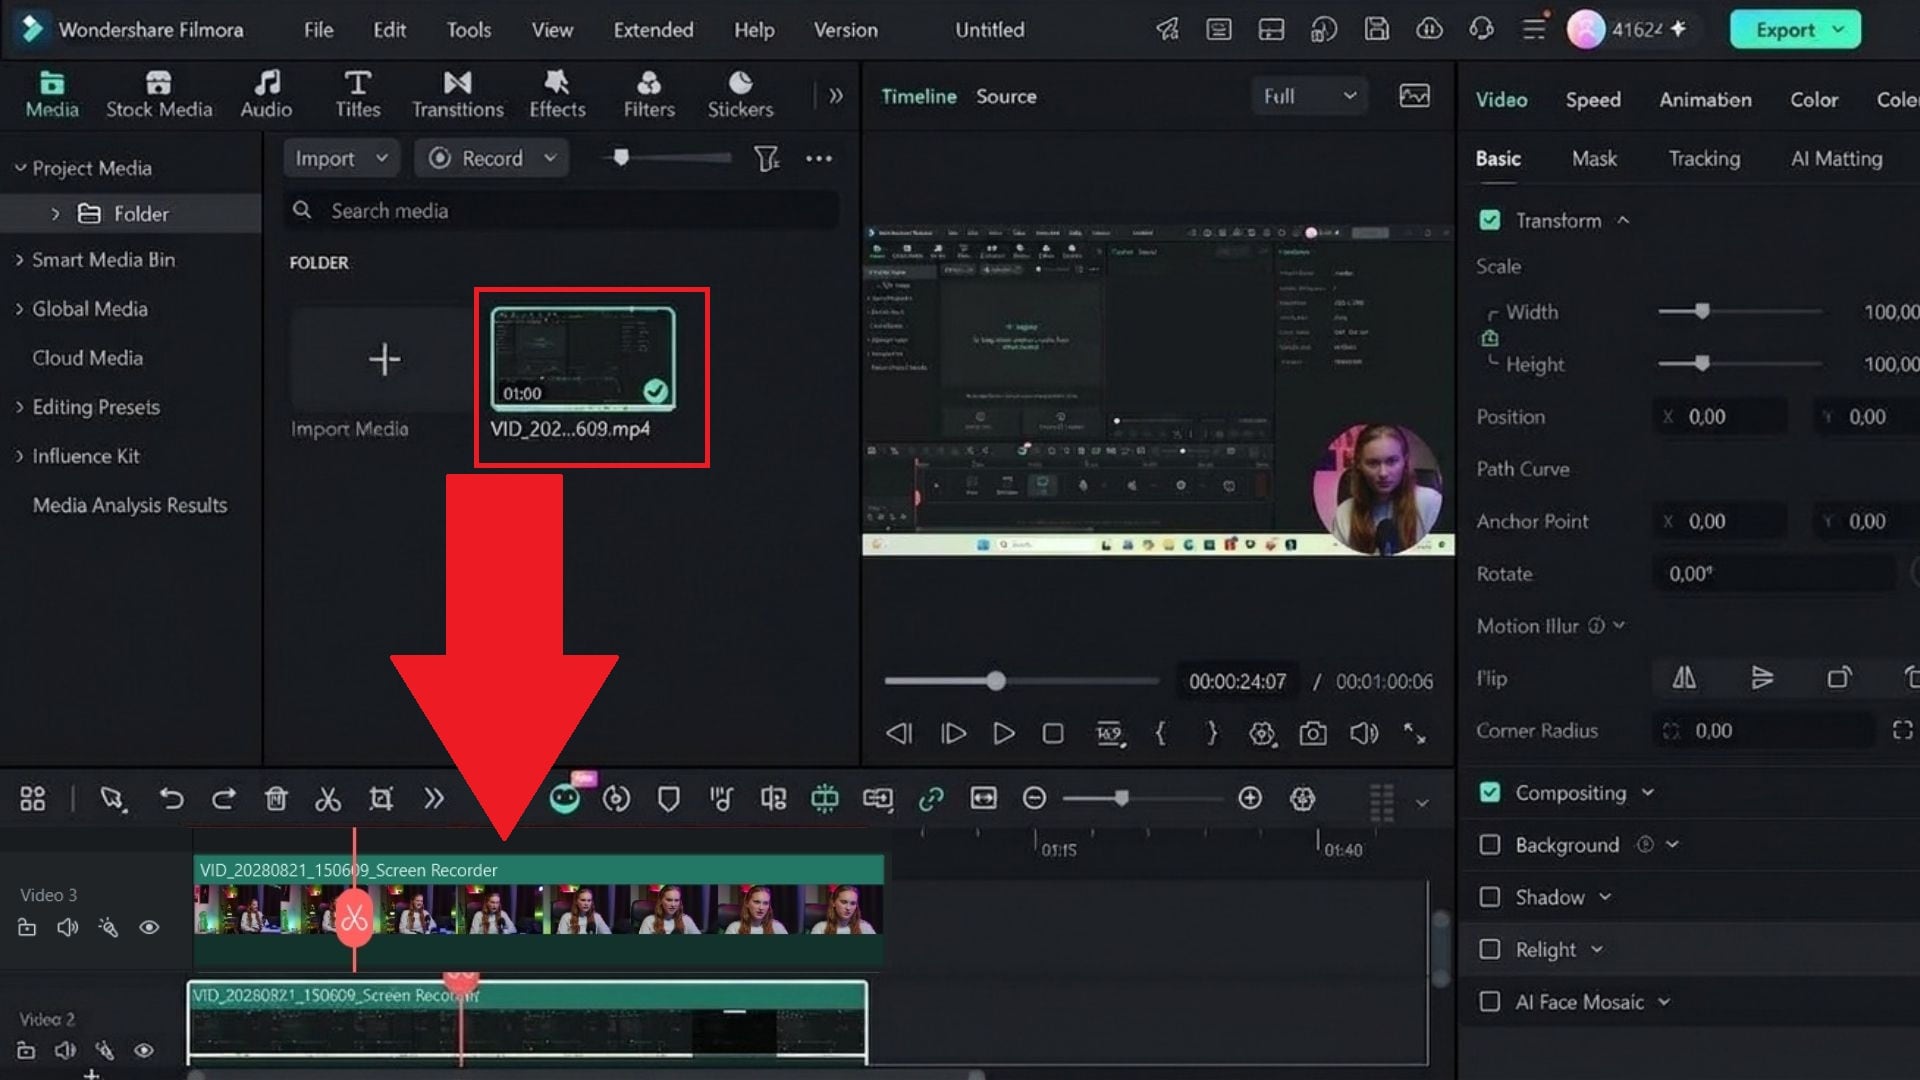
Compared to how OBS records multiple video sources within a single scene, Filmora can record each video source as its own separate track, along with separate audio tracks for each input. It automatically syncs the sources and adds them to the Media panel, so you can move them straight to the timeline for editing.
Why Choose Filmora for Multi-Source Recording?
- Record multiple video sources. Filmora’s Sources panel captures webcams, screens, PPTs, and gameplay in one session without plugins.
- Keep audio on separate tracks. Microphones, system audio, and external devices are recorded independently with automatic timecode sync.
- Keep recording if a source disconnects. Only the affected track stops while the other sources continue recording.
- Edit right after recording. Filmora combines screen recording and video editing in one app, with recorded media added directly to the Media panel for quick editing.
- Enhance video and audio. Built-in tools include noise reduction, color correction, audio leveling, and video/audio enhancement for cleaning up and balancing each track.
- Export in high quality. Output up to 4K and 8K with format and resolution presets built for platforms like YouTube, Instagram, and TikTok.
- Vast video/audio effects and creative assets.
- Powerful AI for effortless content creation.
- Intuitive, professional yet beginner-friendly.
- Works on Mac, Windows, iOS, and Android.



How to Record Multiple Audio and Video in Filmora
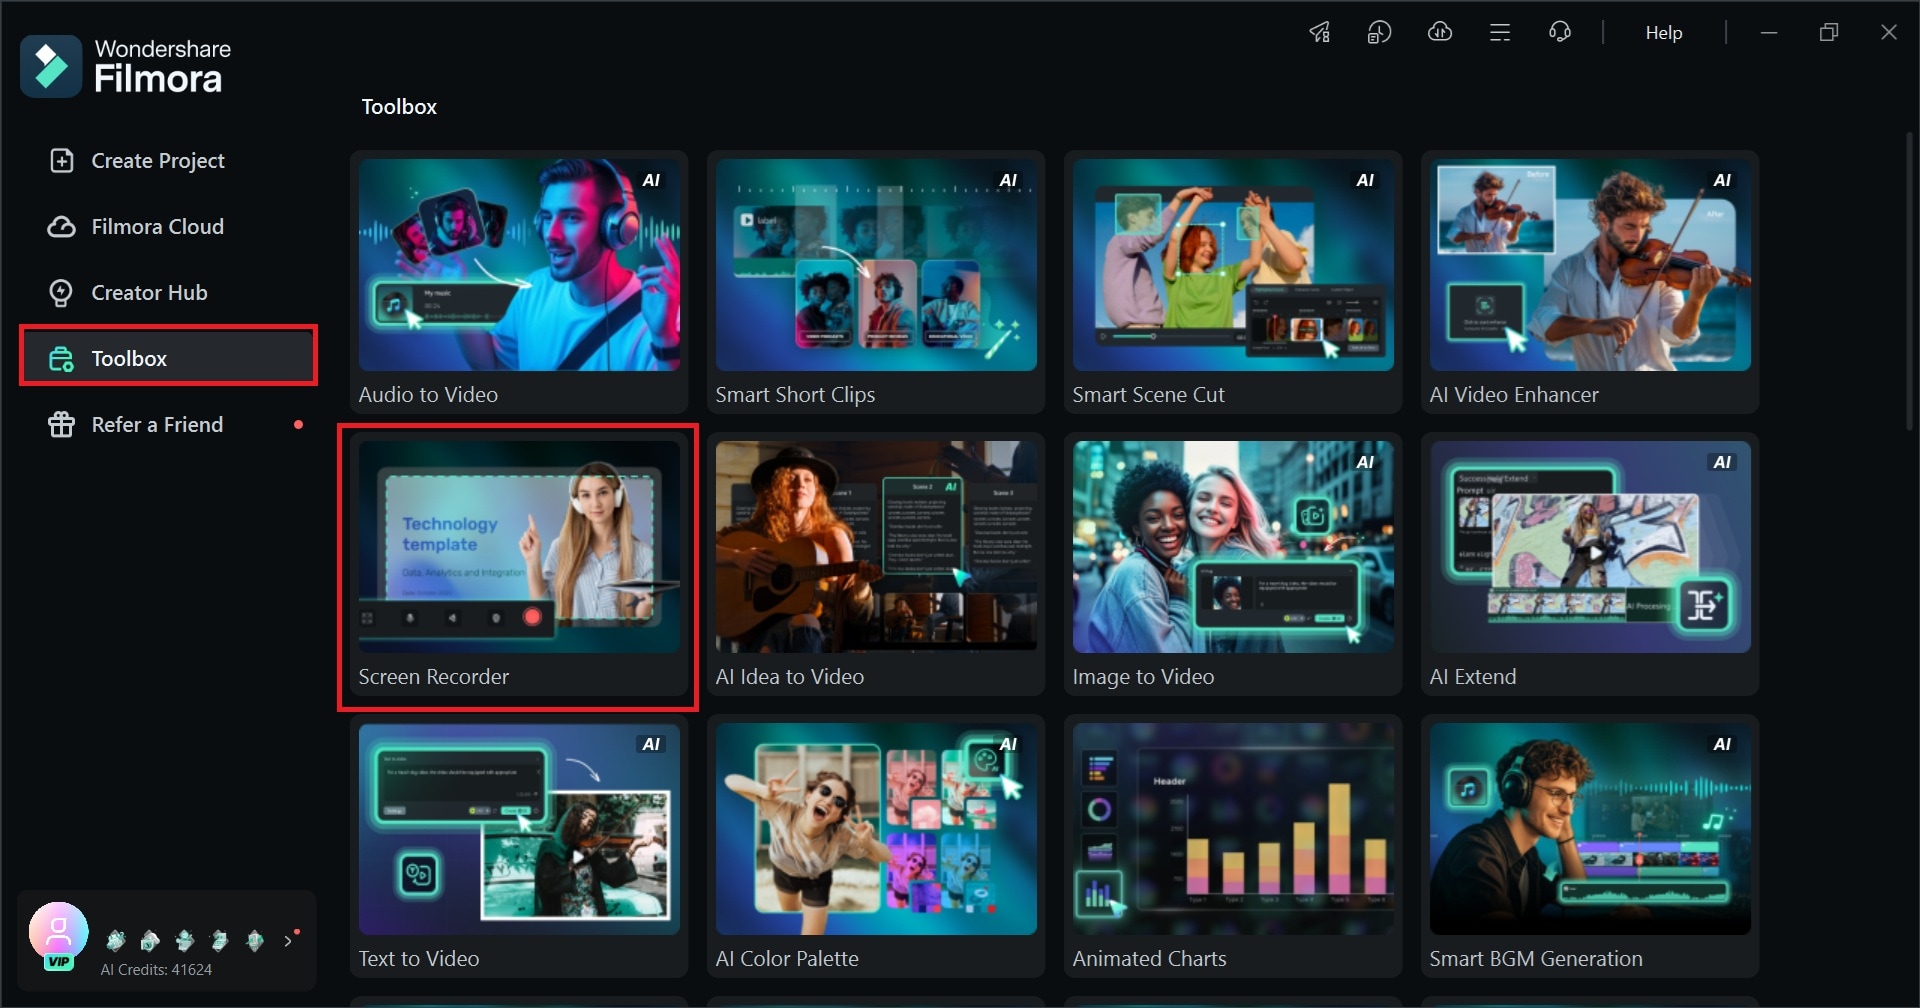
- Step 1. Open Filmora Screen Recorder from the Toolbox. Or, you can select Record > Record PC Screen from the workspace.
 secure download
 - Step 2. To capture multiple sources at once, select the Multi-source Recording option.
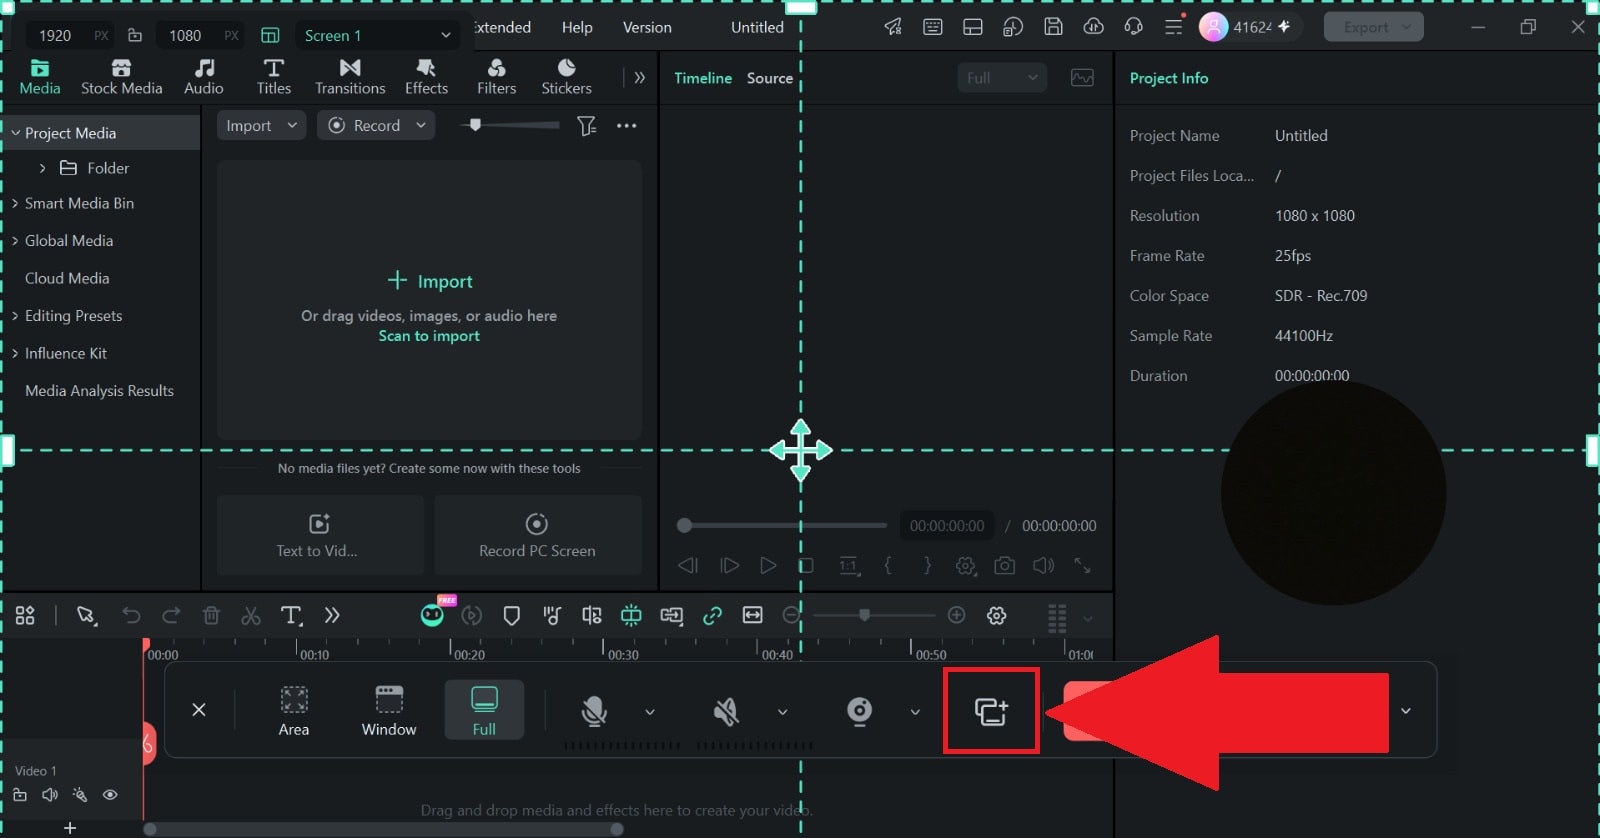
- Step 3. From the devices list, click the + button to add each device until it shows "Active," then close the panel.
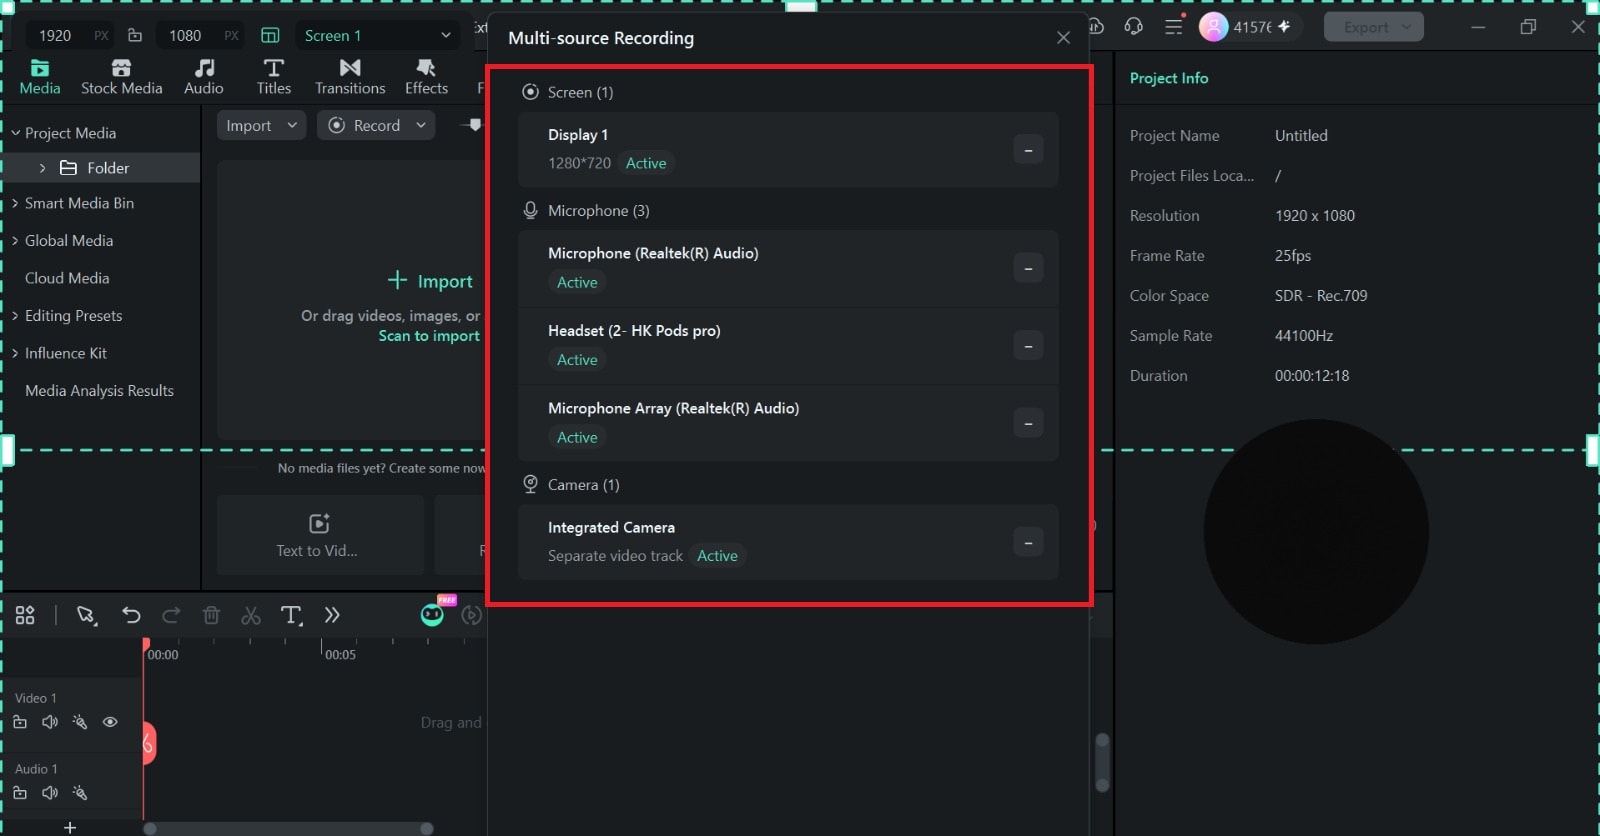
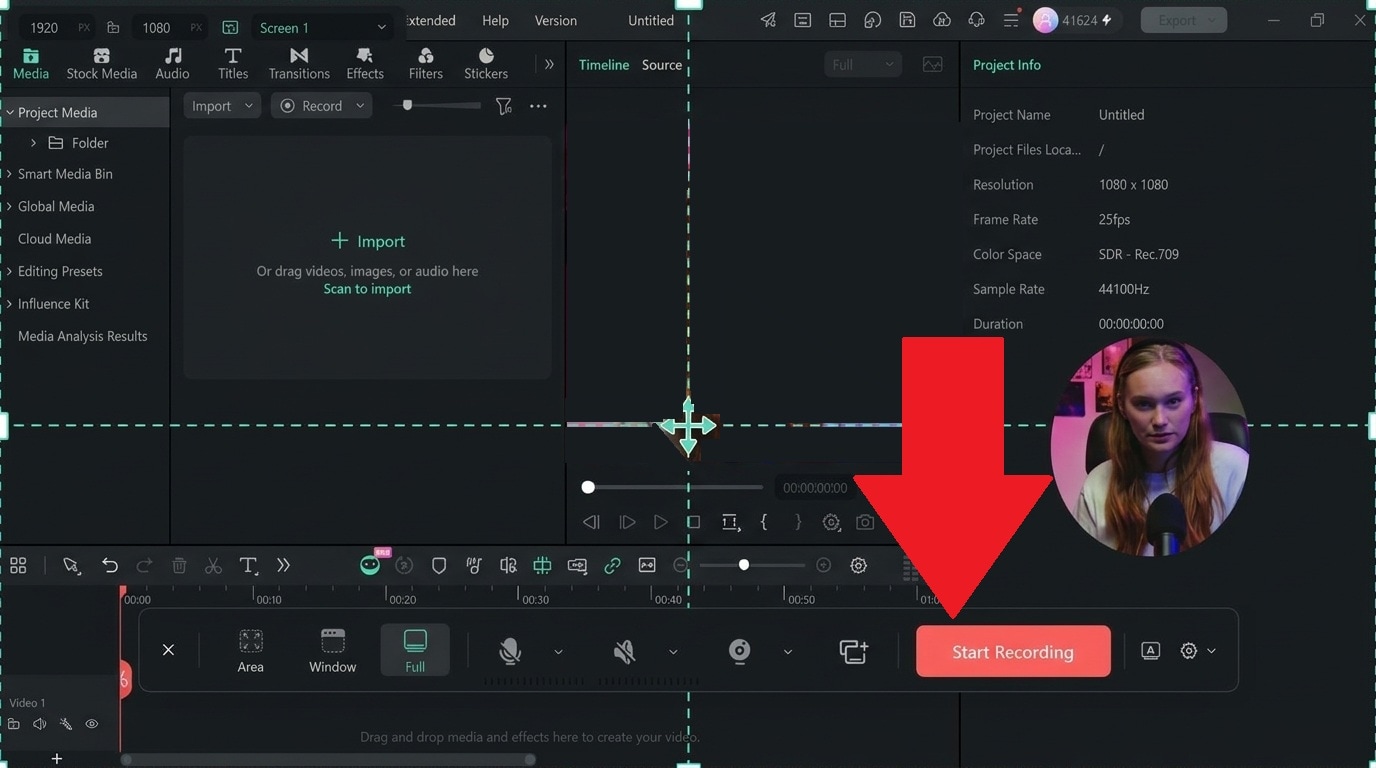
- Step 4. For screen display recording, adjust the area you want to record. Then, make sure the camera and audio are turned on so no source is missed once you start. Click Start Recording.
- Step 5. After recording, click Stop to end the session. Your video and audio will be in the Media panel. Drag the recording to the timeline, and each source and audio input will already be separated into its own track.
Conclusion
OBS can record sources separately only for audio. For multiple video sources, they are normally combined into one scene recording unless you use a plugin to capture them separately.
If you'd rather have separate audio and video tracks when recording without relying on additional plugins, Filmora’s Multi-source Recording offers another option with recording and editing in the same app. Give it a try and see how much easier it can be to manage your footage when everything's synced and ready to edit from the start.
