

 ChatGPT
 Perplexity
 Gemini
 Claude
 Grok
Grok
Ever noticed those really cool slow- or fast-motion effects in videos? Want to know how they get them? If yes, then this article is for you!
Video creators use a variety of tricks to bring a video to life and make it exciting. Speed ramping is just one of them. You can change the speed of different scenes of a video with this feature. Although many video editors has this feature, but Final Cut Pro is one of the popular among them.
In this article, we're going to cover how to use the Final Cut Pro speed ramp feature. We will also explore some tips and the common mistakes that you should avoid.
Let's dive in!
In this article
Part 1. What Are the Key Features of the Final Cut Pro Speed Editor
Some of the key features of Final Cut Pro speed ramp are as follows:
-
Precision Control: It lets you make precise speed adjustments to your video clips. You can easily speed up or slow down parts of your video with great accuracy.
-
Smooth Transitions: With the Speed Editor, you can create smooth transitions between different speeds. This makes your video look more professional and seamless.
-
Custom Speed Ramping: You can customize the speed changes exactly how you want them. Whether you want a gradual slowdown or a quick speed-up, the Speed Editor has you covered.
-
Easy Keyframe Management: Keyframes help you control the speed at specific points in your video. The Speed Editor makes it easy to add, move, and delete keyframes.
-
Real-Time Playback: You can see your speed changes in real-time as you edit. This helps you get the exact effect you want without waiting for rendering.
Now that we know about the features of the Final Cut speed ramp, let’s move forward and explore how you can create one.
Part 2. How To Speed Ramp in Final Cut Pro?
Final Cut Pro comes with a feature called "Speed Ramping" or "Variable Speed." This feature lets you adjust a video's speed over time. You can use it to easily create dramatic slow-motion effects or speed up action scenes.
This technique is commonly used in films, commercials, travel videos, and more. It can make your video more engaging and professional.
The good news for you is that this trick is very easy to learn. You do not need to be an editing expert to follow it. Let’s explore the step-by-step guide below on how to use a speed ramp in FCPX.
How do I create a smooth speed ramp in Final Cut Pro?
Creating a smooth speed ramp in Final Cut Pro can be easy. In this section, we are going to explore easy steps to do it. Let’s explore them together.
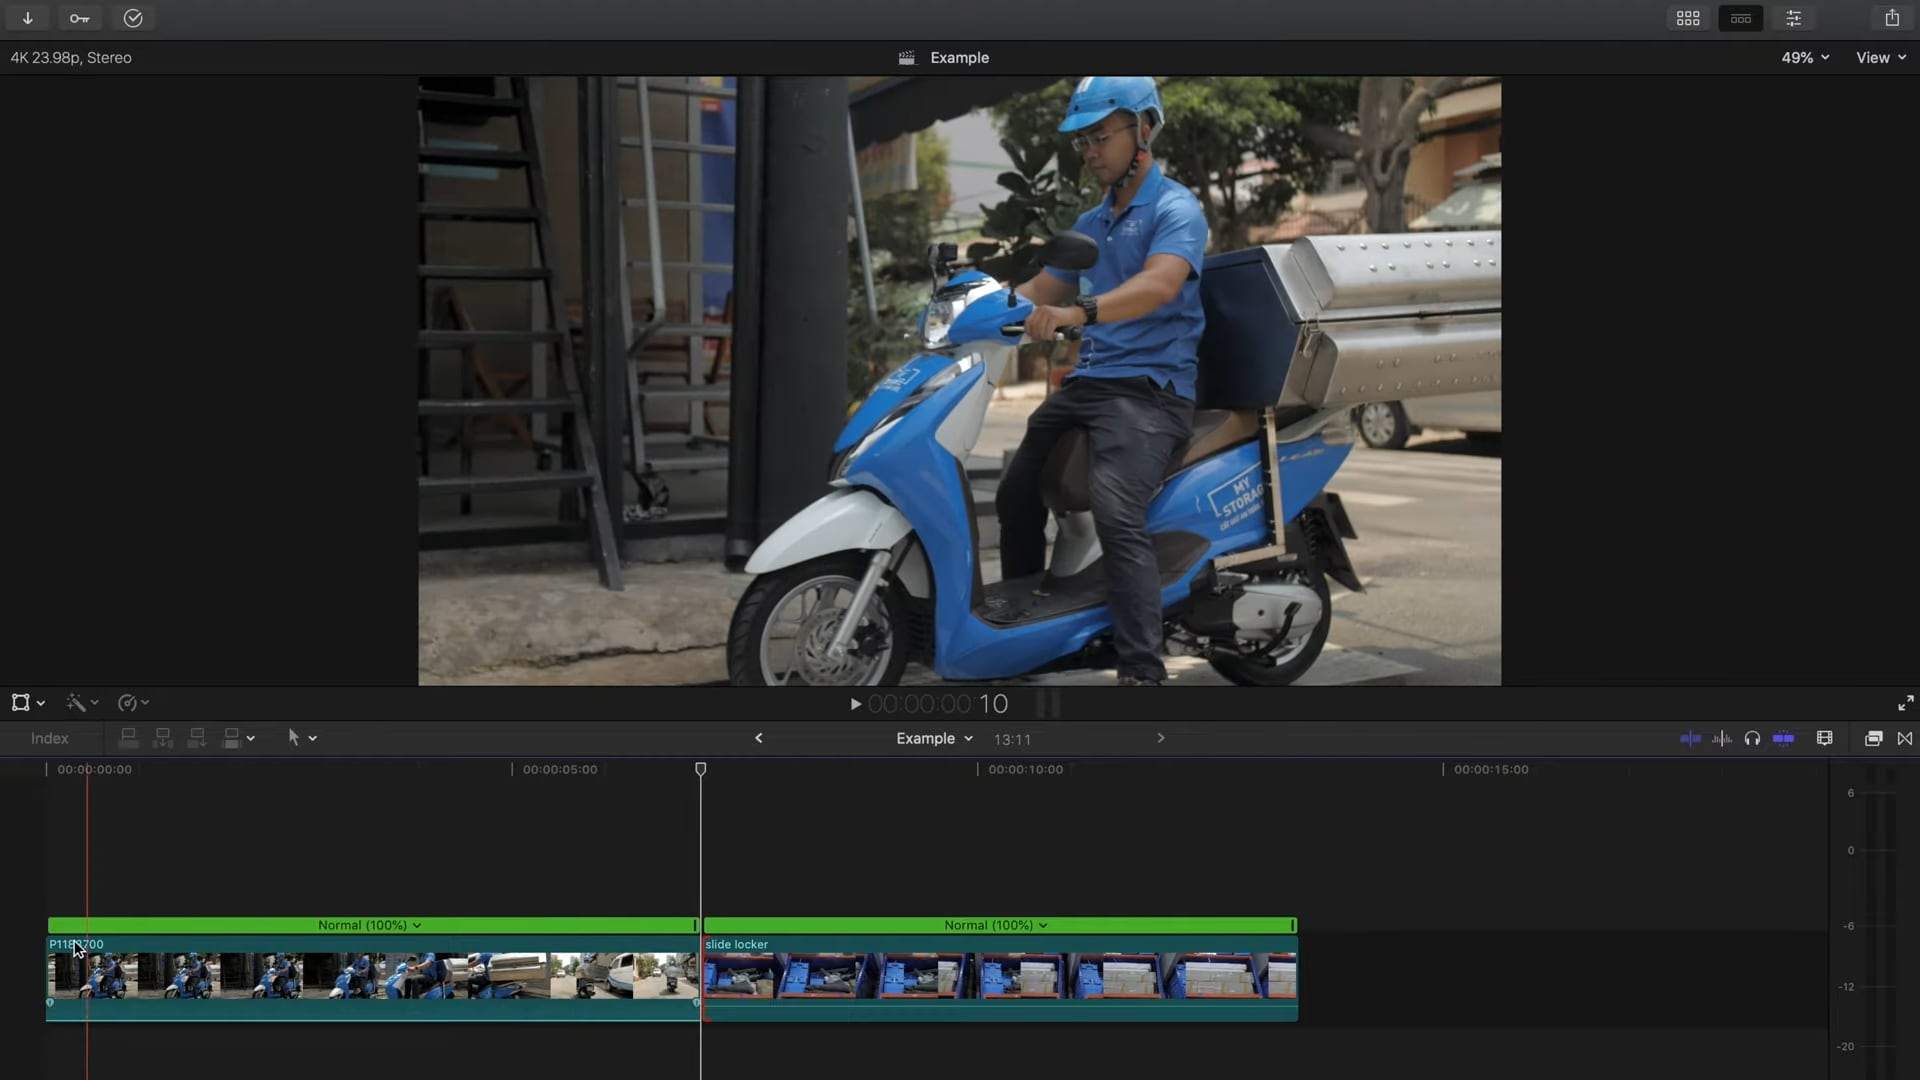
Step 1: First, open the Final Cut Pro software and import the video you want to edit. Then, drag and drop it onto the timeline.
Step 2: Next, move your playhead to choose the starting point where you want to change the speed. Then click " "Shift + B" to add a cut. Similarly, do it for the ending point. You can also add multiple segments in a single clip.
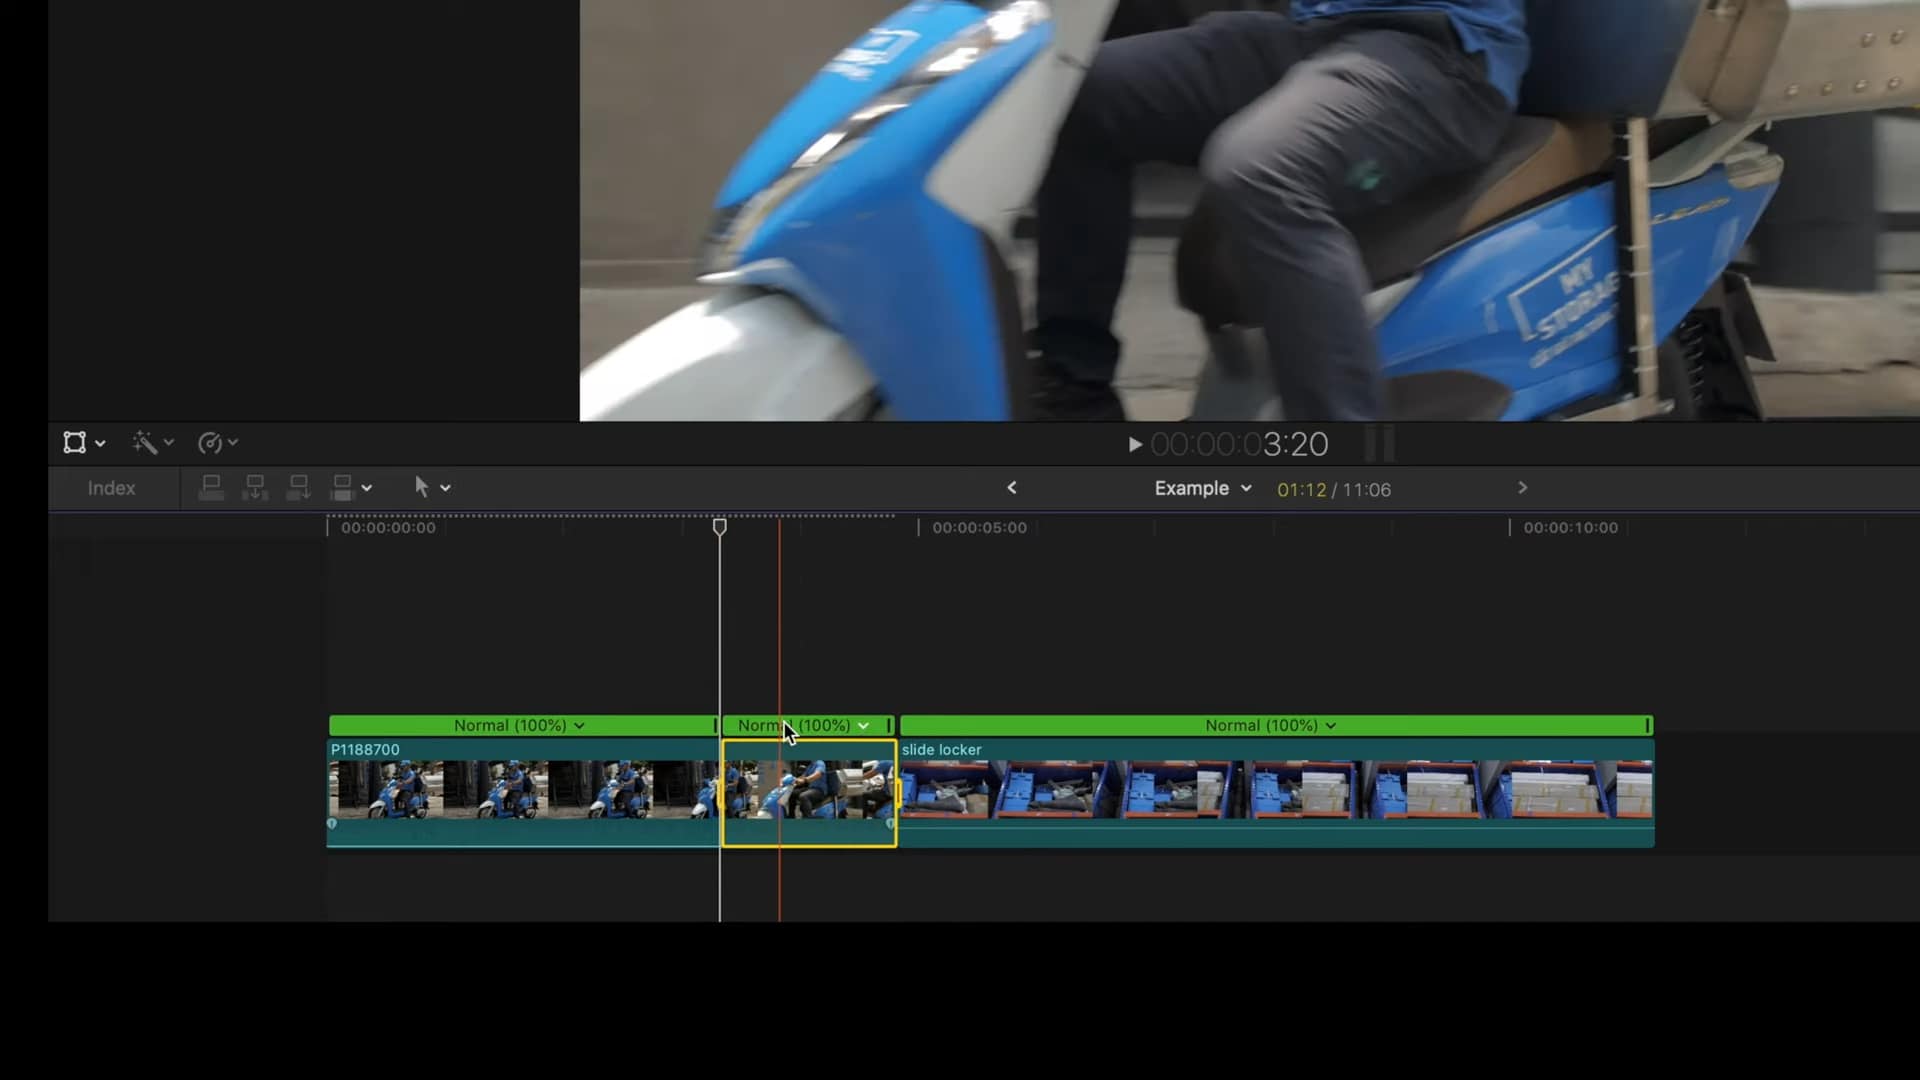
You can also use the " "Retime" " option to generate the speed segments. It will divide your video into various segments, and you can change the speed of each segment.

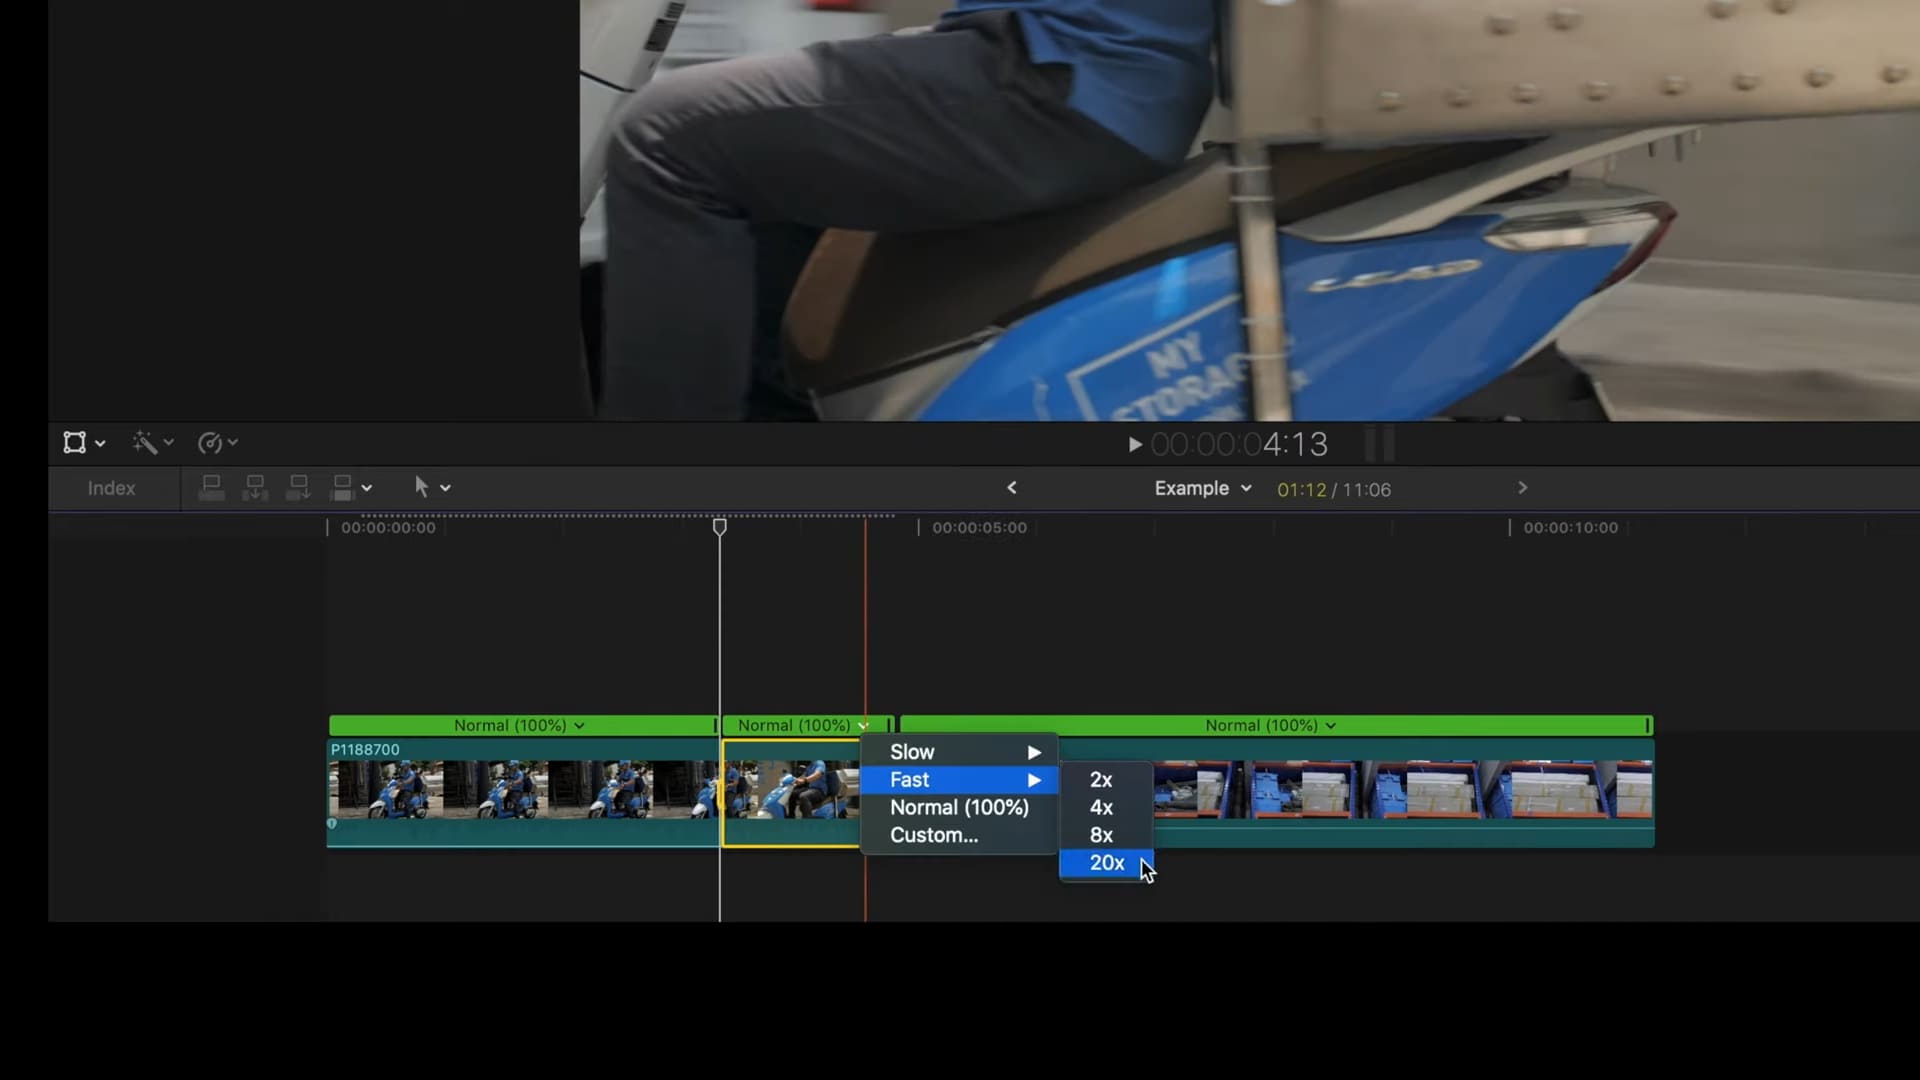
Step 3: You are now supposed to change the speed of the segments. Click the arrow next to the percentage and select the speed you want to apply from the given options.
You can also customize the speed by selecting the custom option.
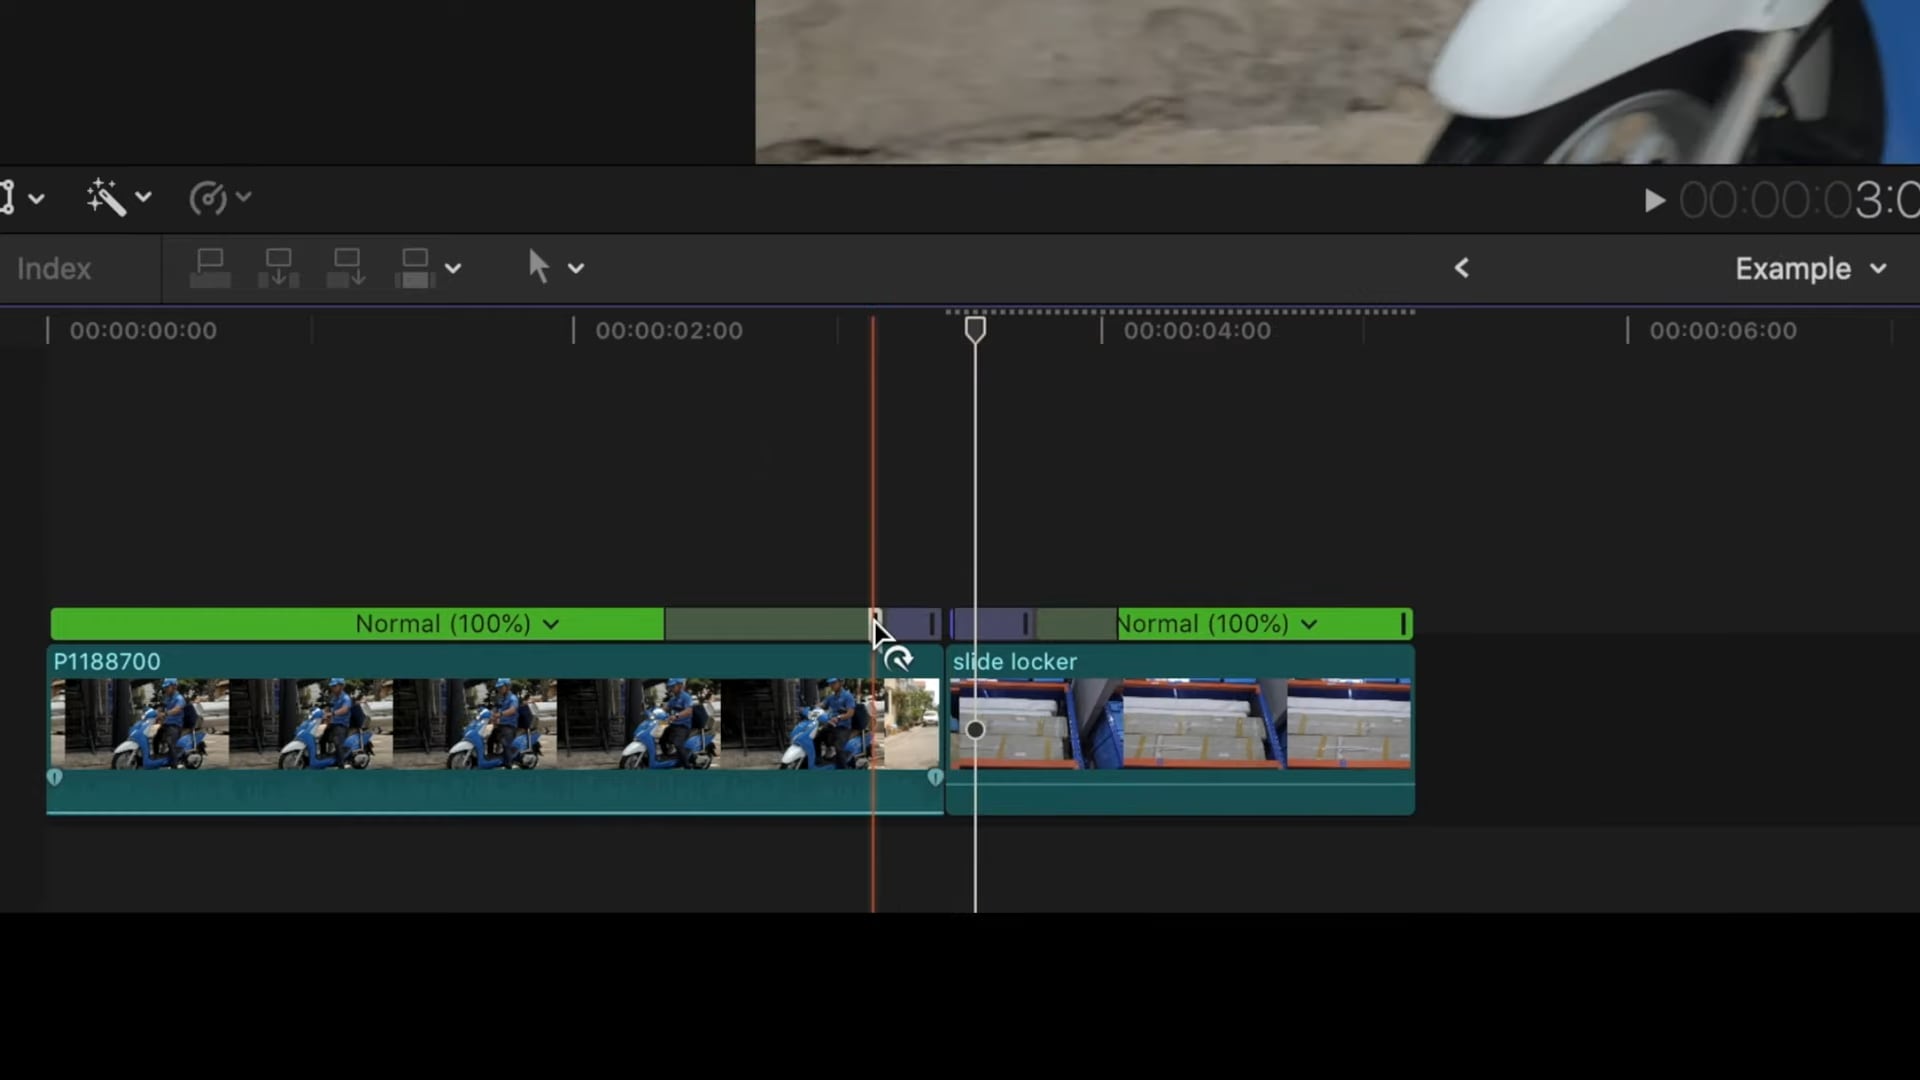
Step 4: Drag the speed handle to change the transition speed between the speed points. Pulling it to the right slows down the clip; pushing it to the left speeds it up.
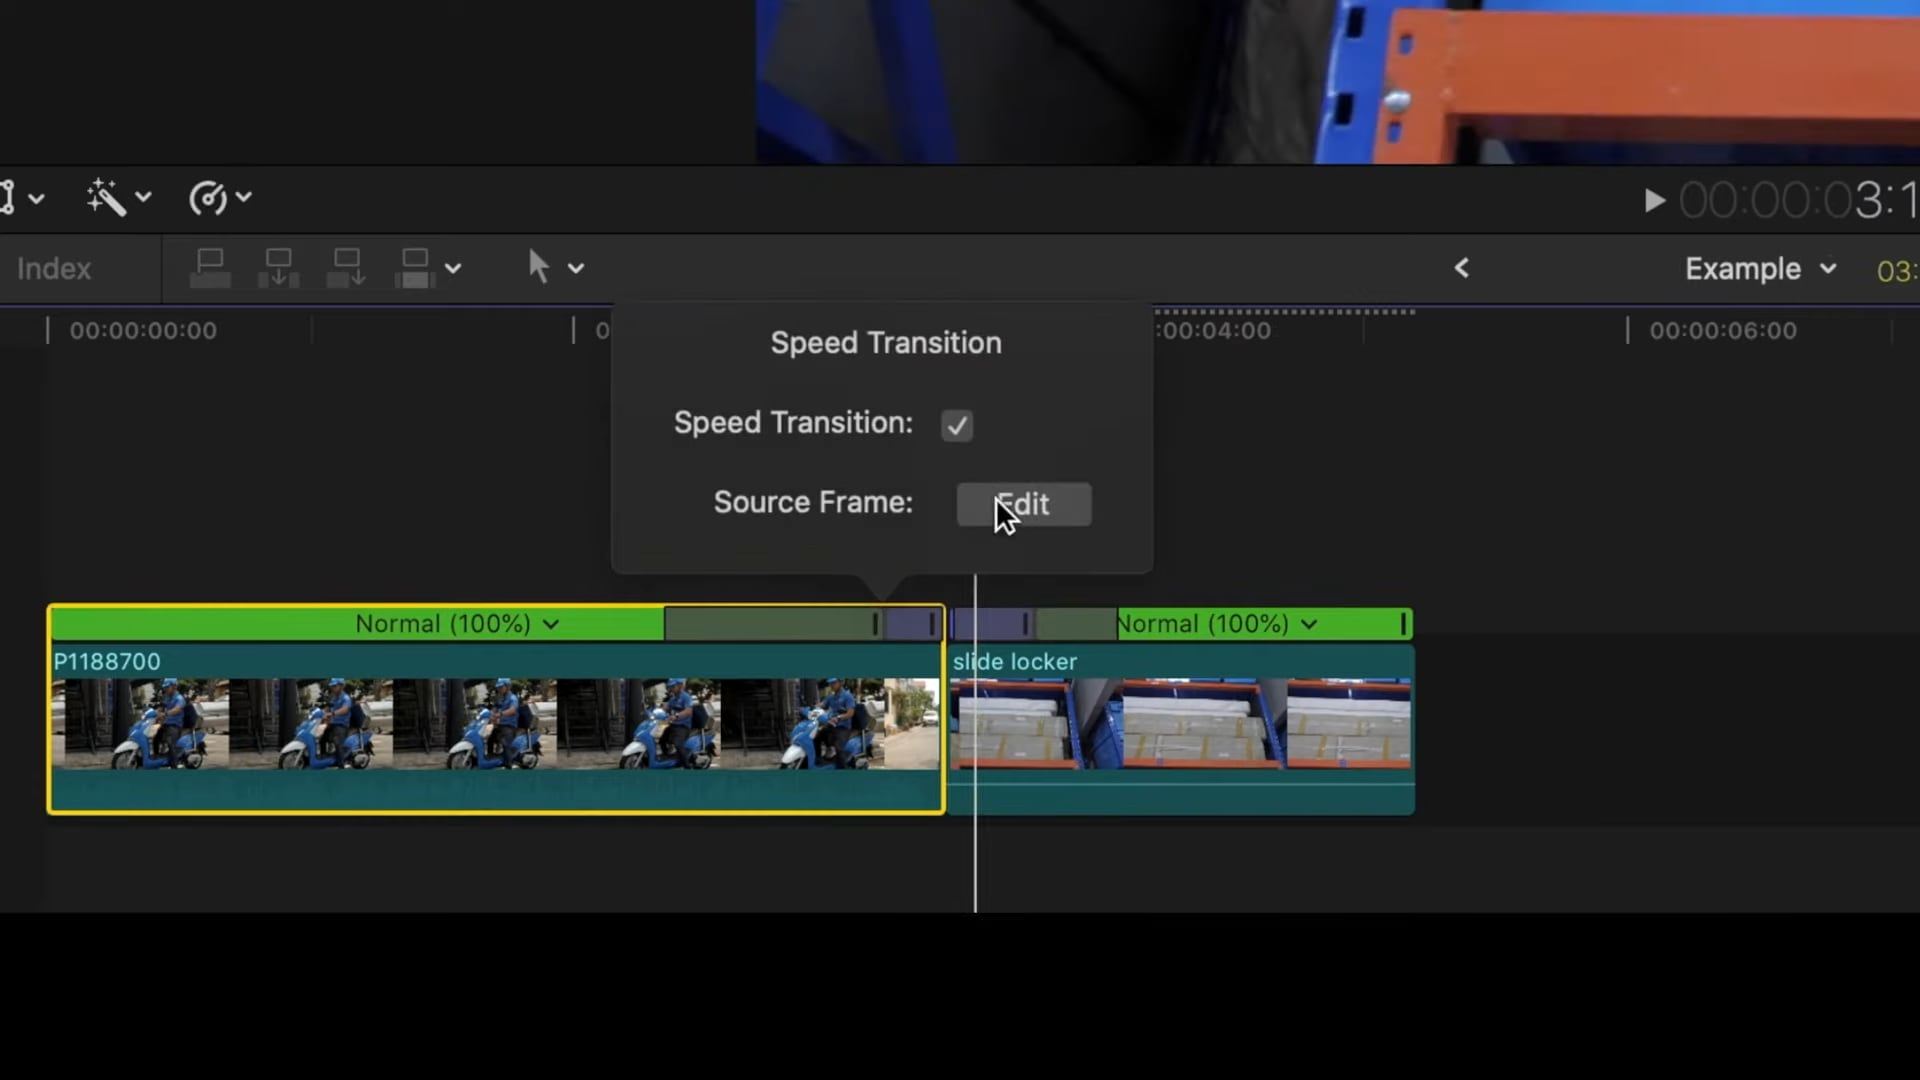
Step 5: Double-click on the speed bar and a window will appear. Click the "Edit" button next to the Source Frame in the speed transition window. You will see a filmstrip icon over the end frame of the speed segment.
To change the end frame, move the filmstrip icon left or right. As you move it, the viewer displays the current end frame.
This is how you can change the speed of your video clip using a speed ramp in Final Cut Pro. However, we have some tips that you can keep in mind to make the transitions more smooth between the speed points.
Speed ramping can add energy and excitement to your videos if used properly. This editing technique is used in many films, documentaries, and more.
Now that we have explored the tips to enhance the transition, there are also some common mistakes that you need to avoid. Let’s explore them in the next section.
Part 3. What Are the Common Mistakes To Avoid When Using Speed Ramping in Final Cut Pro?
This section will explore some of the common mistakes that you must avoid when using speed ramping in FCP. They are given below:
- Overusing the Effect: Speed ramping can look amazing, but using it too much can make your video seem gimmicky. Use it sparingly to highlight key moments.
- Poor Shot Selection: Not all videos work well with speed ramping. Choose stable shots with minimal camera shake, ideally filmed on a gimbal or tripod.
- Ignoring Frame Rates: Shoot at higher frame rates like 60fps or 120fps for smooth slow motion. Standard 24fps or 30fps footage can look choppy when slowed down.
- Abrupt Transitions: Failing to smooth transitions between speed changes can create jarring effects. Use easing tools to make gradual speed changes.
- Inappropriate Use: Speed ramping should serve the story or highlight important moments. Don’t use it just to add an effect without a clear purpose.
- Poor Timing: Misjudging the duration of speed ramps can mess up the pacing. Spend time fine-tuning the timing and length of your speed changes.
- Ignoring Audio: Speed ramping affects audio as well. Be mindful of how changing speeds impact your soundtrack or ambient sound, and adjust accordingly.
- Lack of Practice: Speed ramping requires practice to master. Experiment with different settings to refine your skills.
Well, you must be wondering how to remember all this. There is a lot that we need to avoid. Let’s explore if there is any other easy way to add speed effects to your videos.
Part 4. Can I Use Speed Ramps in Other Video Editing Software Besides Final Cut Pro
Yes you can! Filmora is one of the better known video editing software that has been designed with the speed ramp function for Windows, macOS, iPadOS, iOS, and Android; however, there are many others as well.
It was created by Wondershare and is also the most reliable video editor. It has a user-friendly interface and advanced editing features. This tool is suitable for both novices and expert video editors without any prior knowledge.
Precisely control the speed of video clips, enabling the creation of unique cinematic effects like slow motion, time-lapse, and speed changes within a single clip.
The Final Cut Pro speed ramp may be somewhat challenging, especially for beginners. For that reason, it requires some time to understand how to properly use this tool and take advantage of its full potential.
On the other hand, if you need to change the speed of your video immediately, then you’d better go for Filmora. A few clicks can result in amazing outcomes!
Advantages of Using Filmora for Speed Ramping
- User-Friendly Interface: Filmora offers a user-friendly interface that is great for both professionals and beginners. This makes speed ramping simple.
- Mulitiple Speed Ramping Presets: The software offers simple tools for adjusting speed quickly. This helps you make changes fast and keeps your editing process smooth.
- High-Quality Results: Filmora keeps your video looking sharp while changing speeds. You get professional results without losing any quality.
- Built-In Effects: Filmora comes with a range of effects and transitions. These tools enhance your speed ramping and give your videos a polished look.
- Affordable: This tool is lesser in price compared to many other editing tools. It’s a great option for both ocaassional and experienced users.
- Regular Updates: Filmora gets regular updates with new features. This keeps the tool up-to-date with the latest trends in video editing.
Well, you must be impressed by these features and want to know how to use Filmora. Why wait? Let’s jump to the next part and see how to use this amazing tool.
Video Tutorial on How To Create Speed Ramps in Filmora
Let's breakdown the video tutorials into detailed steps.
Steps to Speed Ramp in Filmora
First, download and install the Wodershare Filmora software on your PC/laptop. Then, follow the instructions given below:
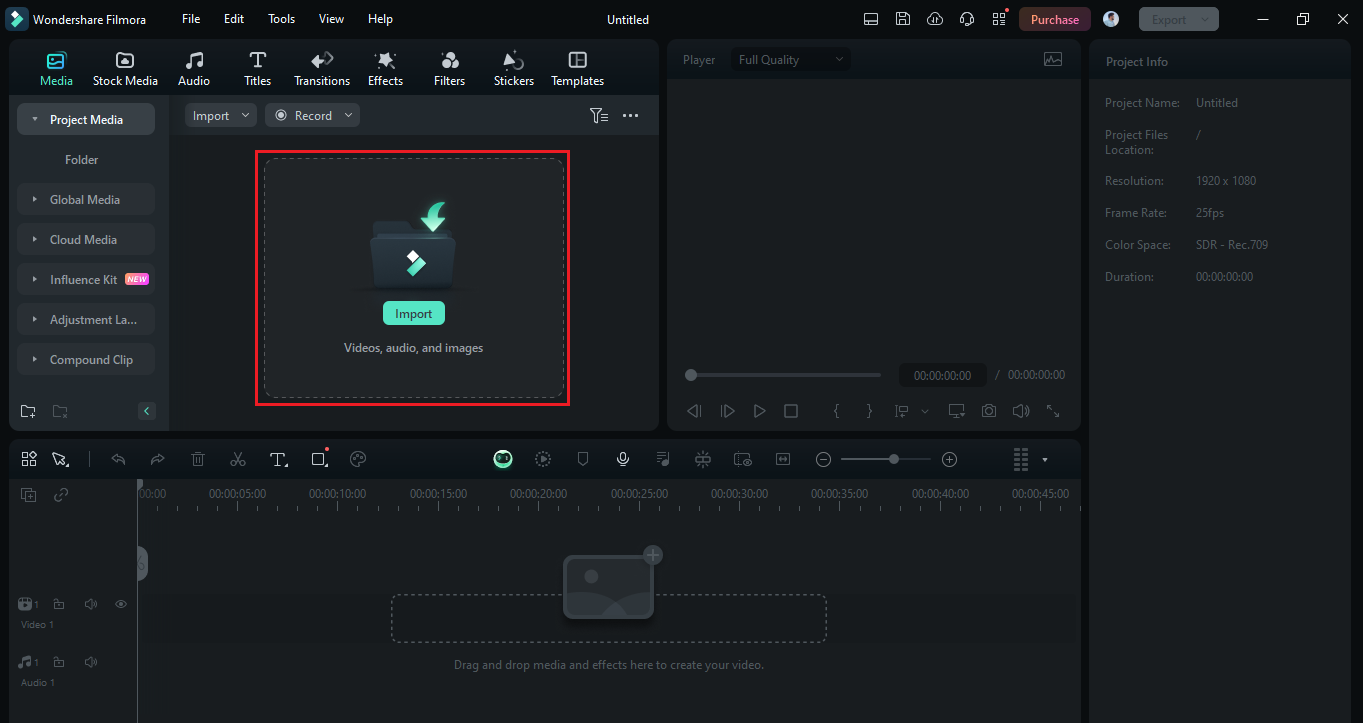
Step 1: Launch the Filmora software and click "New Project." " Then, import the video you want to edit and drag it into the timeline.
Step 2: Once you see your video on the timeline, right-click on it and select "Speed" > "Speed Ramping." A new window will appear on the right pane.
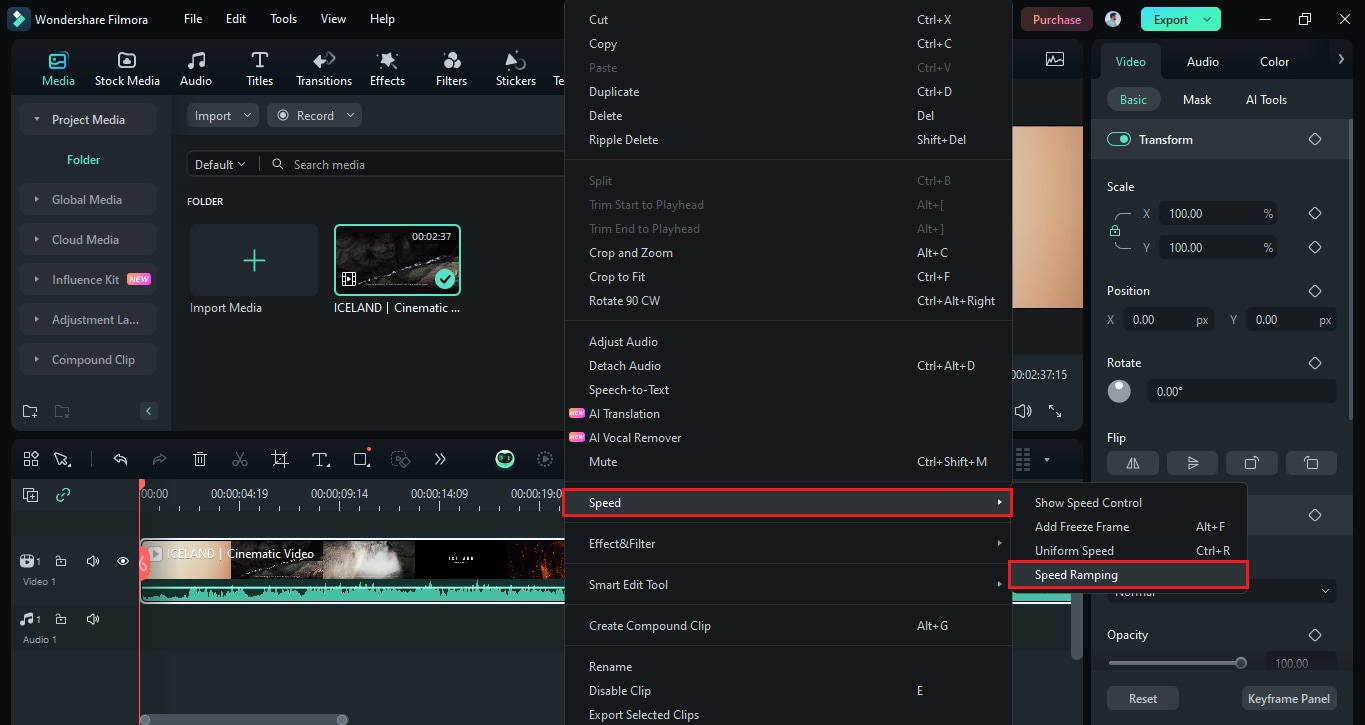
You can also open it by clicking the arrow icon in the tool bar right above the timeline. Click "Speed" and select "Speed Ramping."

Step 3: Now, you can start the speed ramp process. You can choose a custom preset to create your own effect or select from any ready-made one.
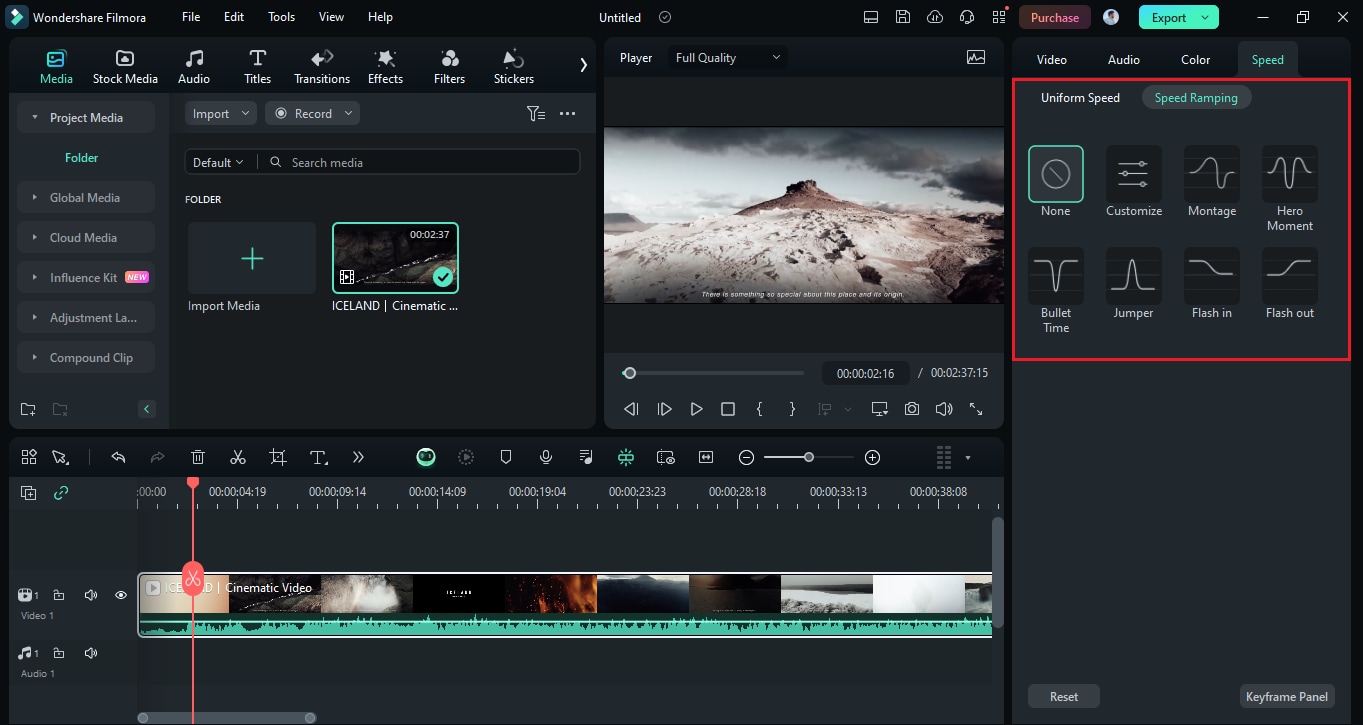
Step 4: Let's select the custom preset. In the same panel, a graph with keyframes will appear. You can move the keyframes and change the speed until you get the desired effect.
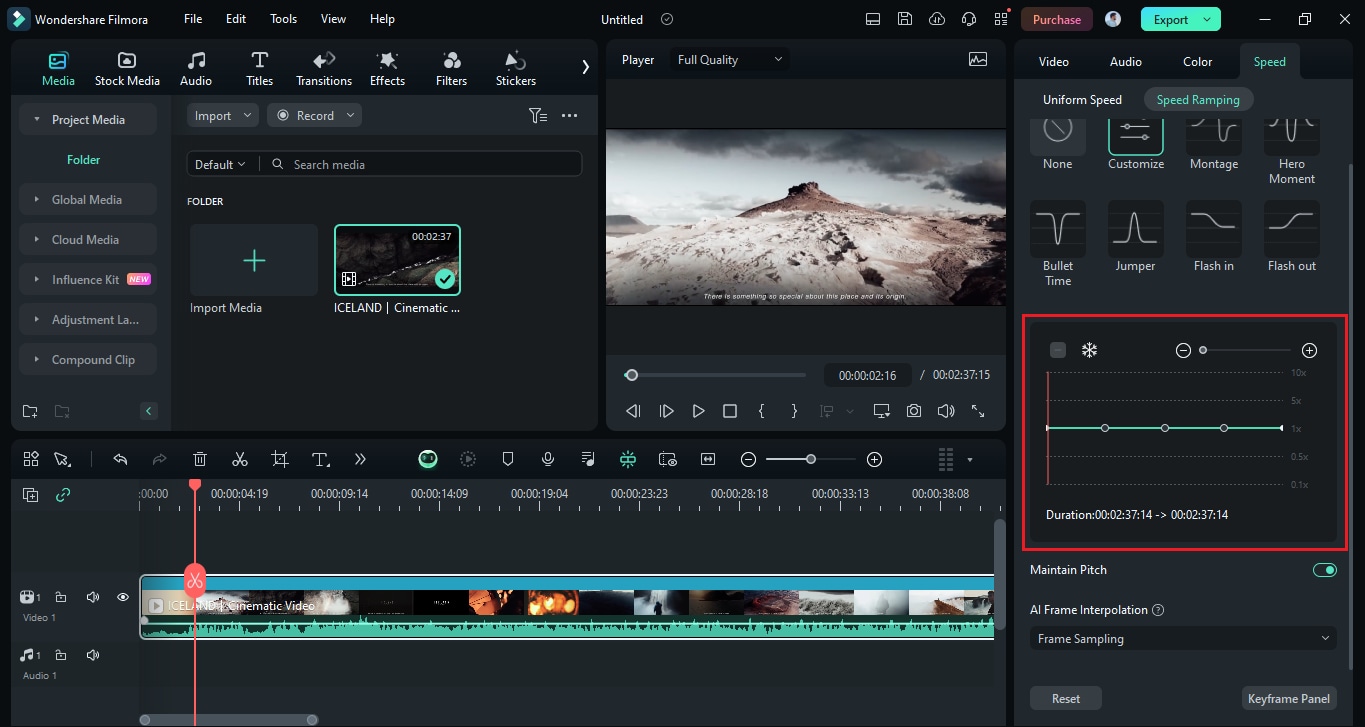
You can also change the keyframes and modify the speed even in ready-made presets.
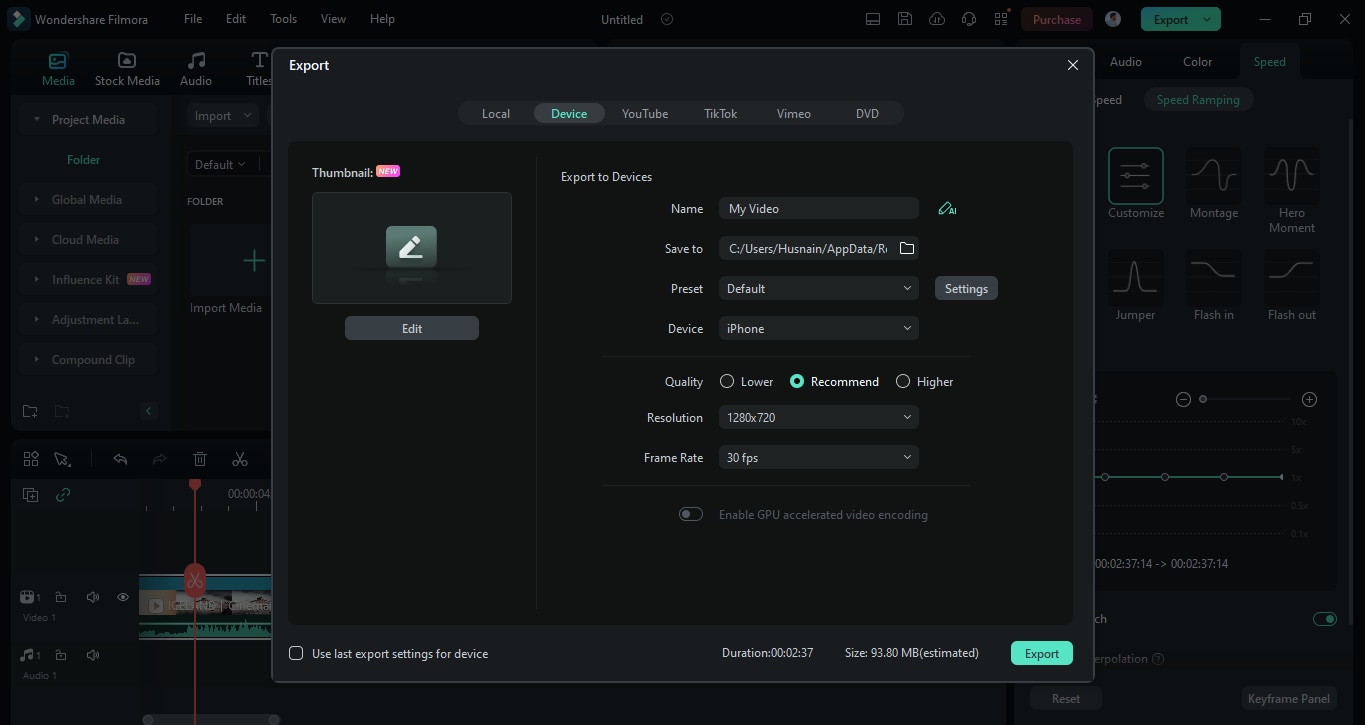
Step 5: Once you finish the speed ramping, click "OK" to apply the changes. Next, export your video by clicking the " "Export" button and choosing your preferred settings.
Tip: Update to Filmora v15.5.10+ to enable multi-segment speed adjustments for timeline clips (segment speed ramping). Read the full instructions here: Apply Segmented Speed Control in Filmora
That's it! This is how you can use Filmora to create speed ramps in your videos. Easy, isn't it? Unlike the speed ramp in Final Cut. Fimora's speed ramp features are easier to use and navigate. But let's just compare both these software in the next section.
Part 5. Comparison Table of Final Cut Pro and Filmora Speed Ramp
This section will compare a few aspects of both the speed ramp editors. You can review them and decide which is best suitable for the users, especially beginners.
| Features | Final Cut Pro | Filmora |
| Ease of Use | Final Cut Pro's process involves more steps and clicks, which can be complex for some users. | Filmora’s simple layout and clear instructions make speed ramping easy for beginners without any hassle. |
| Process | In Final Cut Pro, you need to add keyframes and adjust speed bars manually to change the speed. | In Filmora, you can adjust speed with just a few clicks or choose from ready-made effects for quick results. |
| Precision | Final Cut Pro offers precise control with detailed speed adjustments through its speed bar and filmstrip tools. | Filmora provides simple speed adjustments with keyframes, making it easier to create smooth transitions. |
| Presets | Final Cut Pro doesn’t offer any speed ramping presets, which some users find less helpful. | Filmora offers various built-in presets that make the speed-ramping process simple, especially for beginners. |
| Workflow | Final Cut Pro's speed ramping process can be more time-consuming due to multiple steps. | Filmora streamlines the workflow, allowing for quick adjustments and more efficient editing. |
| Advanced Features | Final Cut Pro includes advanced features like keyframe manipulation and detailed speed bar adjustments. | Filmora provides advanced features in a more accessible way, making them easy for users of all levels. |
Both Final Cut Pro and Filmora offer valuable tools for speed ramping. However, each one caters to different needs.
FCPX speed ramp excels in precision but requires a more complex workflow. Filmora stands out for its ease of use and quick adjustments, making it ideal for beginners. You can select any of them depending on your editing needs and experience level.
Final Words
Speed ramping on Final Cut Pro is a great way to add dynamic effects to your videos. You can change the speed of the video and create impressive visual impacts. No doubt speed ramp on Final Cut Pro offers great control, but it can be complex for beginners.
So, if you need a reliable which is easy to use, you can consider Filmora. It is perfect for both beginners and experts. Filmora allows you to achieve smooth and professional results without the hassle. Download it now and give it a try for your next video project.

 secure download

