
As technology advances each year, split-screen mode has become more common and accessible across various platforms. This feature is particularly valuable for busy individuals who want to maximize their productivity by multitasking.
For example, split-screen mode lets you compare documents side by side, watch a tutorial while following along in another app, or video chat while taking notes. It enhances your efficiency and helps you make the most of your time.
This guide will show you how to use split-screen mode on different platforms to make your tasks easier and boost your productivity.
In this article
Part 1. How to Activate Split Screen Mode on Different Devices
Dual screen mode, also known as split-screen mode, is a powerful feature that allows you to divide your screen into multiple sections, so you can run and view multiple applications at the same time.
Due to its numerous benefits, split-screen mode has become a standard feature across various devices. Here's how you can activate split-screen mode on different devices:
Android
Split-screen mode is available only on Android devices running version 7.0 and above. Plus, the steps to activate a split screen may vary slightly depending on your Android software version and phone model. Here are the general steps to follow:
- Step 1: Open the initial app you wish to use in split-screen mode.
- Step 2: Swipe up or press the recent apps button to view all recent apps.
- Step 3: Tap the icon of the app you want to use in the split-screen, then tap "Open in split screen view" to activate. If you can't find this feature, your phone may support "Floating Windows", which works similarly to split screen.
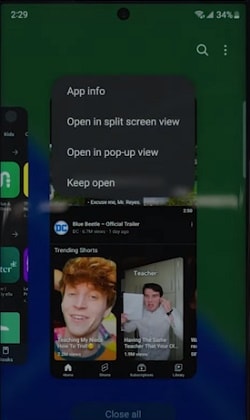
- Step 4: Select the second app you want to use, then tap its icon. It will open next to the first app in a multi-screen mode. You can adjust the divider's size by dragging it up or down as needed.
iPhones/iPads
Unfortunately, iPhones do not have a proper split-screen feature. If you want to multitask on an iPhone, you can use the "Picture-in-Picture" feature in certain apps, such as when watching a video or using FaceTime.
The split-screen feature, however, is available on iPads starting from version 13 and above. Here are the general steps to activate the split screen mode on iPad:
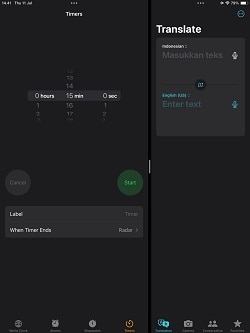
- Step 1: Open the first app that you want to use.
- Step 2: While using the app, click the three dots at the top of the app, and choose "Split view".
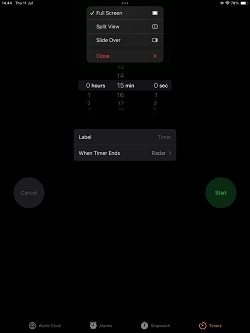
- Step 3: Locate the second app you want to open on your Home Screen or in the Dock, then tap it. Both apps will appear in Split View.
Windows
For Windows PCs, the split screen mode is only available starting from Windows 10 and above. Here are the steps to follow:
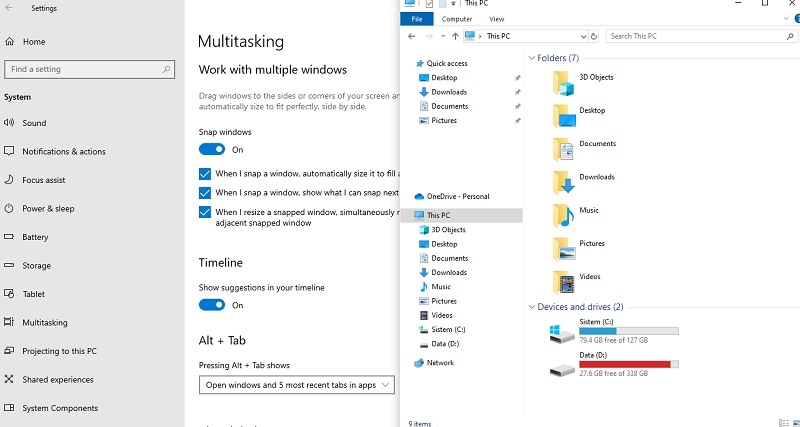
- Step 1: Click the Windows logo and choose "Settings".
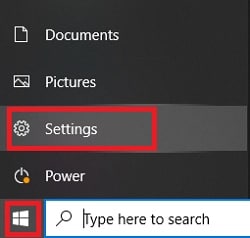
- Step 2: Select "System", then choose the "Multitasking "option and activate the "Snap Windows".
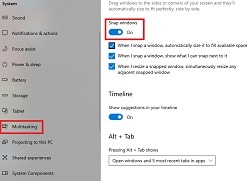
- Step 3: Choose the window you want to split by clicking on its title bar, then press the keyboard shortcut "Windows key + left/right arrow".
Mac
For Mac users, numerous apps also support Split View, so you can work in two apps side by side. You can activate double-screen mode on Mac by following the steps below:
- Step 1: On your Mac, place the pointer over the green button in the top-left corner of the window.
- Step 2: Select "Tile Window to Left of Screen" or "Tile Window to Right of Screen" from the menu that appears.
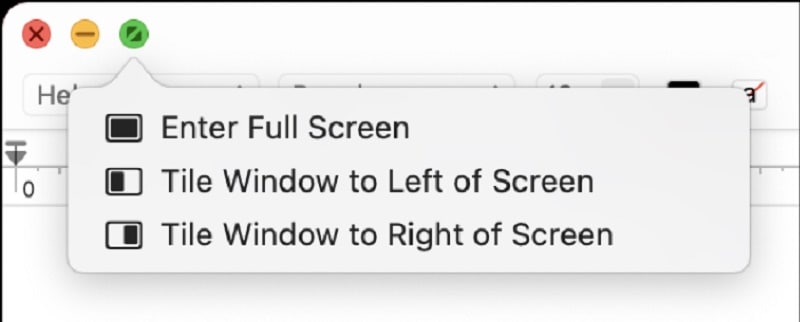
- Step 3: On the opposite side of the screen, click on the second app you want to use. This will create a Split View in a new desktop space.
Part 2. The Best Video Editing Software for Split Screen Videos: Wondershare Filmora
In the previous section, we've discussed how to activate split screen mode for multitasking purposes. Another great use of this technique is in video creation, where you can make videos that show multiple perspectives at once. It's especially helpful for content creators who comparison videos or need to showcase different aspects simultaneously.
If you are interested, you need to install video editing software like Wondershare Filmora. Filmora offers dedicated split-screen features for precise control over layout and content placement.
Compared to other video editing software offering split-screen mode, Filmora is often recommended as the top choice. Its split-screen feature stands out for its versatility and user-friendliness.
Other Key Features:
- Over 250 pre-made templates for displaying up to six scenes on one screen effortlessly.
- Supporting picture-in-picture effects, which allow you to overlay one video or image onto another within your project.
- A wide range of filters, effects, and stickers to creatively enhance your videos.
- Auto Synchronization tools that ensure audio and video tracks sync seamlessly for split-screen effects.
- Compound Clip tools to combine multiple clips into a single, easy-to-manage clip, streamlining your editing process.
To access the split-screen feature in Filmora, you can download it through its website. Filmora runs on both Windows and macOS. You can start with a free version.
- Superb video stabilization with low distortion.
- Vast video/audio effects and creative assets.
- Powerful AI for effortless content creation.
- Intuitive, professional yet beginner-friendly.
- Works on Mac, Windows, iOS, and Android.


How to Use Split Screen Effect With Templates
Step1Import footage to Filmora
After picking up the best footage of every character, download the Wondershare Filmora (if you have not already). Then to import the clips, perform the following steps:
First, click on the "Click here to Import Media" button, as shown below.

Then, select the clips you want to edit from your PC, and then they'll be shown in the media section of Filmora.
Step2Add split screen effect to the timeline
Before adding the clips to the timeline, click on the two-headed arrow at the upper tab. Then the drop-down list of two options will pop up, as shown below.

Click on the Split Screen option, and it will show many split screen effects.

Select the effect, whatever suits you, and download it then. After downloading, drag and drop the effect on the timeline section.

Step3Add clips to the effect
After adding the effect to the timeline, drag and drop the clips based on your storyboard in the required section, then import the takes wherever and however you want, according to the storyboard.

If you don't want any templates to be used in your video, then you can manually make a screen split layout. To do this, check the below section.
Manual Split Screen Layout
If the storyboard is organized in such a way that you can't find out any of the templates suitable, then you can easily create a customized one for your video. In a customized split screen, you can set the duration and adjust the frame rate according to your choice.
Step1Import the clips
First, you must create a timeline to edit your split-screen video. Click on the Import icon in the main preview when you open Wondershare Filmora, import all the clips or footage you want to edit.

Step2Add all footages to the timeline
After importing all the clips of interaction videos into Filmora, simply click on the imported clips present in the project media section.
Then drag it to the timeline below and drop it in the required track of videos. Do the above-mentioned steps with all the clips present in the project media block.

Doing so will create a working timeline you can view and edit as you go along the editing process.
Step3Adjust the frame rate of all clips
First, double-click on the clip you want to edit in the timeline. Click on the Transform option, and its setting will pop up on the top left side.
Find out the Scale option from the settings and check out its range.

Adjust the scale rate according to your choice by sliding from its section.


Step4Adjust the timing of clips
Arrange and move around the clips on the timeline so that the timing of the scene lines up between each shot. Drag the edge of the clip to the right side if you want to increase the timing and duration.
While dragging the edge of the clip to the left side, if you want to decrease the timing of the clip.
What to do if there is any lag in the preview?
If you're experiencing lag during the preview, click on the "render" button on the top right of the timeline. It will help to render for a smooth preview.

Step5Splitting the clips
If the timing in your scene starts to fall out of sync, try splitting all of the clips, ensure to split before they start to fall out of sync.

Step6Full-screen moment
After splitting the clips according to adjustments and storyboard, you can now make one of the characters' videos in full screen. First, make another cut in the clips before the next hand-crossing action. Take one of the characters' videos from clips in-between moment and make them full screen.


Final Results
You're now free to re-adjust your clips in the next part back into sync. If you still want to make any adjustments in duration or cutting or sizing, you can do it easily. Because it's a customizable effect. Give a pat on your Back! You did a great job and accomplish the results!

Part 3. Common Challenges and Solutions in Creating Split-Screen Videos
While split-screen videos can be beneficial for displaying multiple viewpoints in one video, they can sometimes present challenges that impact efficiency and the overall editing experience. To help you out, we have listed some of the common challenges when creating split-screen mode videos, along with effective solutions to resolve them:
Inconsistent Video Quality
When you create split-screen mode on your video, the video clips might look different in quality, making the overall view uneven. This difference can stand out and lessen how well viewers can see things, especially when comparing or putting different clips next to each other.
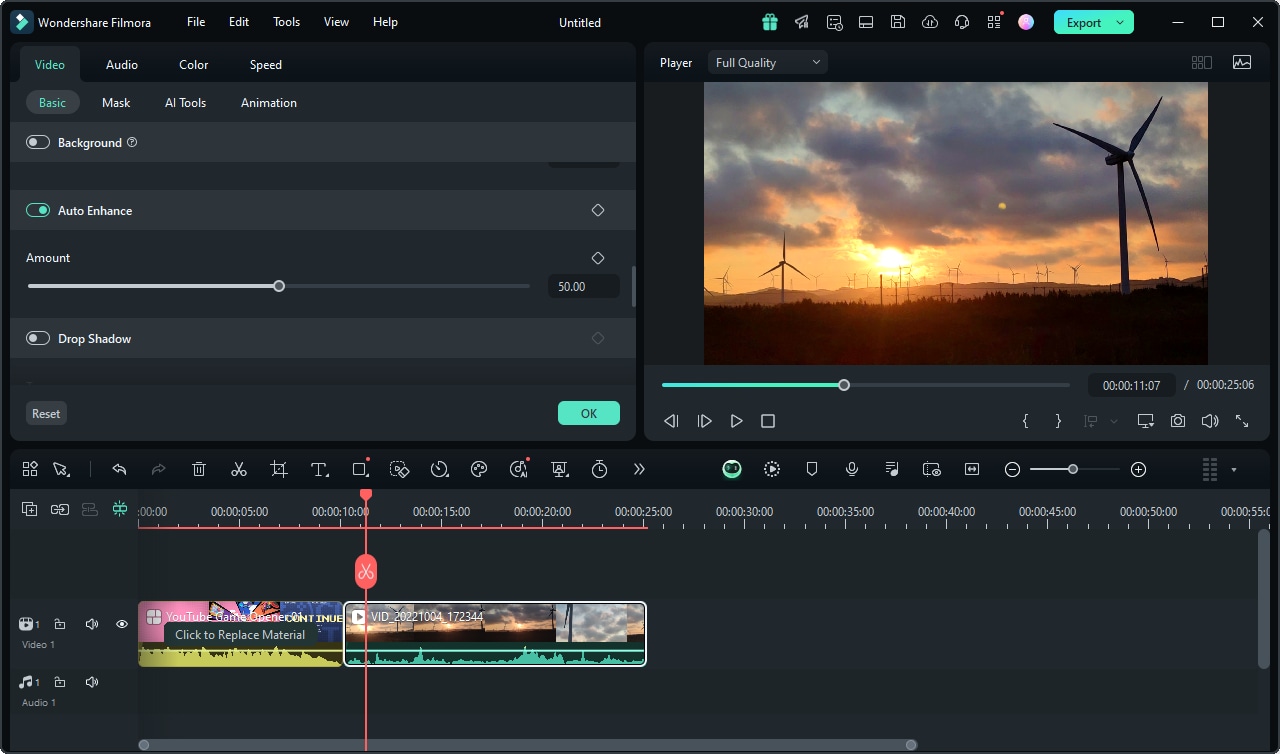
Solution: Fortunately, Wondershare Filmora has an AI Video Enhancement feature that makes adjusting video brightness and sharpness easy. Just go to Video > Basic tab, and click the Auto Enhance button. You can fine-tune the effect using the slider and preview it in real time. Click OK to apply and save your changes.
Audio Issues
When you play audio tracks from different video clips together in split-screen mode, they might not sync up properly. This can create a disjointed listening experience where sounds don't match the action or dialogue as intended.
Solution: Use the AI Vocal Remover on Filmora that uses smart technology to separate vocals from background music with high quality. To use it, click the music clip in the timeline, and go to Tools > Audio > AI Vocal Remover.

Aspect Ratio Mismatch
When you use video clips with different aspect ratios in split-screen mode, it can lead to distorted or cropped images. This happens because each clip may not fit properly within the split-screen layout, affecting how they appear side by side.
Solution: To avoid these issues, you can use Filmora's Auto Reframe feature to automatically adjust the focal point of your video or select an aspect ratio suitable for the social platform where you plan to share the video. Below, we'll guide you through using Filmora's Auto Reframe option and manually adjusting your video as needed.
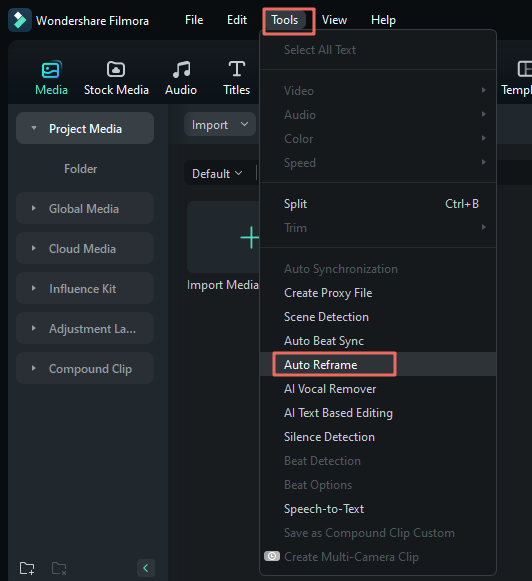
Step1Right-click on your video and select the Auto Reframe feature
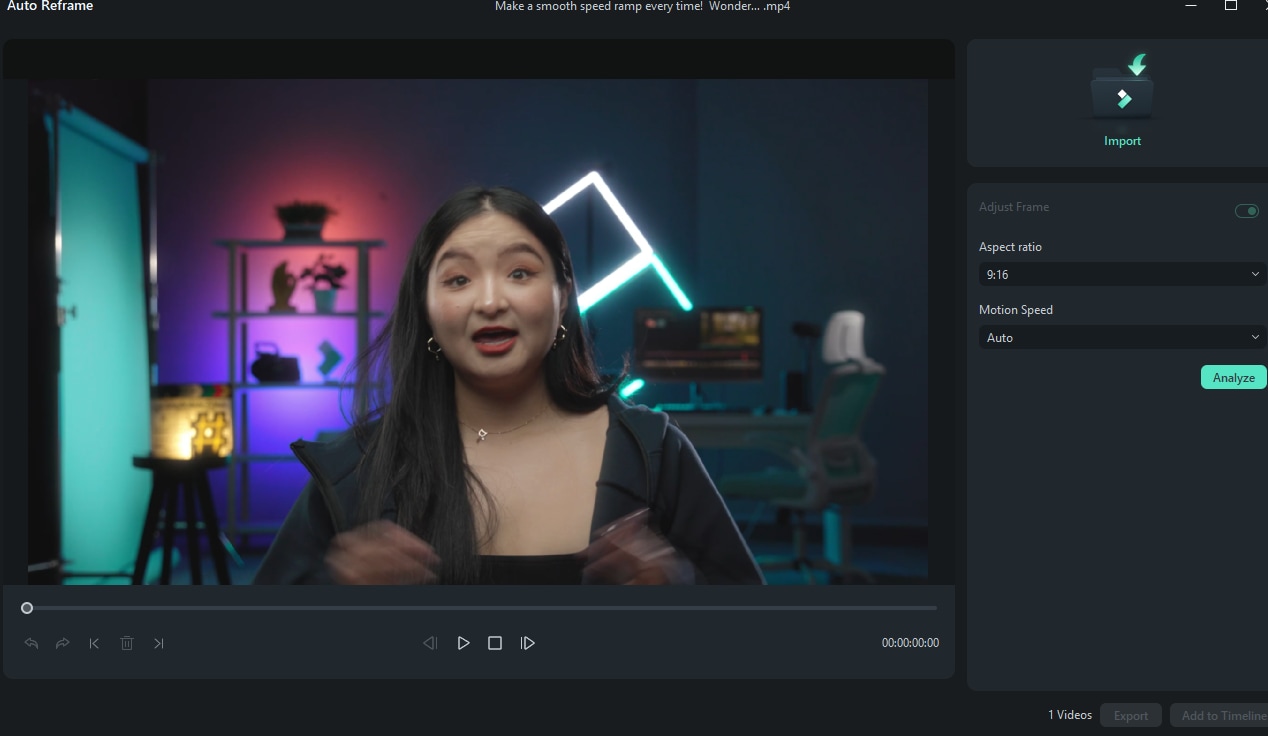
Step2Adjust the aspect ratio and motion speed
After selecting Auto Reframe, a new dialog box will open. You can select from various aspect ratio templates like square (1:1), vertical (9:16), standard (4:3), widescreen (16:9), and cinema (21:9). Pick the ratio that suits your preference and the platform where you'll upload the video.
For adjusting motion speed, you have several options: you can leave it on Auto, or set it to Fast or Slow.
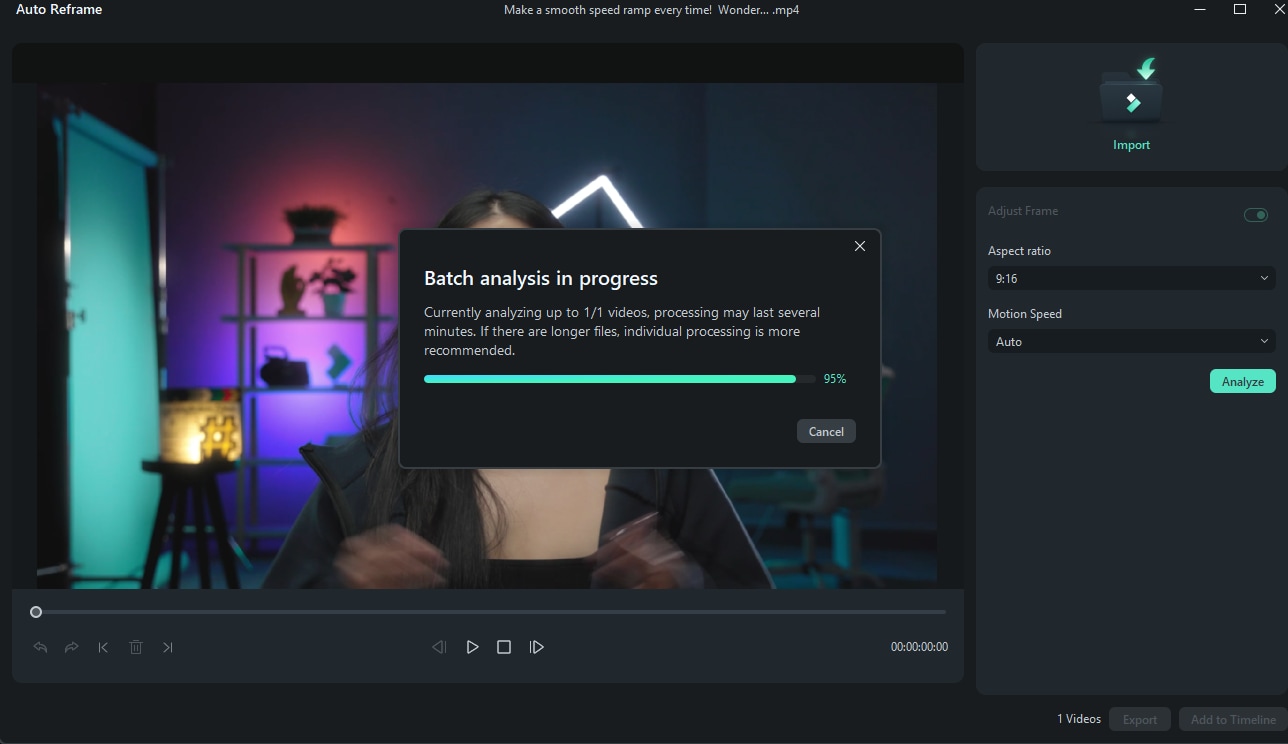
Step3Analyze and Auto Reframe the Video
After adjusting the settings, click on the "Analysis" button. Filmora will take a few moments to analyze your video. Once complete, the video will automatically reframe to your chosen aspect ratio and speed settings. You can experiment with different aspect ratios and motion speeds by adjusting the settings accordingly.
Conclusion
The split-screen mode has proven to enhance content by adding dynamic and engaging visual elements, which emphasize contrasts and depth in various video formats. Hence, this article has explored how to activate split-screen mode on different devices such as Android, iPads, Windows, and Mac.
And if you are a content creator, you can also make a split-screen video that helps you show multiple perspectives at once. One effective way to do it is using Wondershare Filmora's extensive split-screen templates.
