


 ChatGPT
 Perplexity
 Gemini
 Claude
 Grok
Grok
Protecting the privacy of the people featured in your videos can be important and in some situations, it may even protect their safety. Blurring the faces of the people in your videos is the most common way of protecting and concealing their true identity.
In this article, we will show you how to blur faces in videos with Adobe Premiere Elements and we will also provide you with a tip for an alternative software that doesn't require as much time and effort to produce this effect.
In this article

Part 1. How To Blur a Face With Adobe Premiere Elements
Blurring a face with Premier Elements requires some previous knowledge of this editing software as well as an understanding of the concept of keyframes. Let’s first have a look at the steps you'll need to take in order to blur a face on a still subject.
Section 1. How To Blur a Face in Premiere Elements
After you added the video clip to the 'Project Assets' folder, drag the clip to the timeline and make sure that the software is in the Expert mode. Right-click on the video clip, select the 'Effects mask' option from the drop-down menu, then click on the 'Apply' feature in the sub-menu. A rectangle will appear in the preview window, drag it over to the face you would like to blur and adjust the rectangle's size by dragging one of its corners so it covers an entire face.

After applying the 'Effects mask' you will see that a new video clip or the so-called 'Adjustment Layer' is now positioned over the original clip in the second video track. Click on 'Effects' button on the Action bar and look for blur effects such as ''Zoom Blur', 'Gaussian Blur' or 'Fast Blur', and drag and drop the Gaussian Blur to the original video clip.
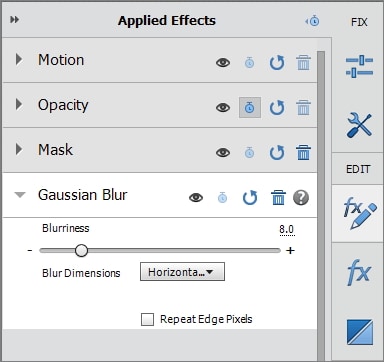
Click on the 'Applied Effects' button to adjust the' Gaussian Blur' effect settings and increase the 'Blurriness' as much as necessary to blur the face. If the amount of 'Blurriness' provided by the slider isn't enough to cover the face, increase the 'Blurriness' value on the number located above the slider. You can also use the 'Mosaic' effect equally effectively because all you need to do in order to apply it is to go to the 'Effects' tab and drag and drop it to the original clip. Afterwards, click on the 'Applied Effects' panel and adjust 'Horizontal Blocks' and 'Vertical Blocks' values so that the face covered by the mask cannot be recognized.
Section 2.How to Blur a Face in Motion with Premiere Elements

People in videos are rarely perfectly still, which means that the 'Mask Effect' you just applied will only work for a single on-screen position. Once the person moves, it will go out of the blurred area of the frame and the face will become visible once again. In order to avoid this, you need to head back to the 'Applied Effects' panel and click on the 'Show/Hide keyframe controls' icon located at the top of the panel.

In the next step, you need to click on the 'Toggle Animation' icon, which looks like a small blue stopwatch located at the right corner of the 'Mask' effect, and then extend the 'Mask' effect so you can see the effect settings. These actions will enable you to see four keyframes on the keyframe timeline, each keyframe represents a corner of the preview window. Next, to the Keyframe timeline, you will be able to see 'Top Left', 'Top Right', 'Bottom Left', and 'Bottom Right' options, and located next to it you'll be able to see 'Add/Remove Keyframes' button.
Place the playhead at the beginning of the video and add keyframes on each of the four corners of the video by clicking on the 'Add/Remove Keyframes' button. Afterward, you need to find the position on the timeline where the face leaves the 'Effects Mask' you already applied and set four keyframes at that position. Four more keyframes should be added at the position where the object's on-screen movement ends, and then you need to right-click on the original video clip, go to the 'Effects Mask', and select edit. Once more you will be able to see a rectangle on the preview screen, adjust its position, and move the mask to the position at which the object's movement ends. You can repeat this process if the subject in your video changes the on-screen position more than once in order to make sure that its face stays covered throughout the video.
Part 2. An Easier Way to Blur a Face in a Video with Filmora
Do you want a simpler solution to blur the faces in your videos? No need to worry, as Wondershare Filmora brings an intuitive and easy-to-use interface that allows you to blur the faces with few clicks. It's one of the most reliable platforms that you can come across to edit and modify your videos. It also offers preset templates and an Instant Mode that can help you create a video from scratch efficiently. Also, it provides fast rendering speed so that you can see your final results instantly.
3 Methods To Blur Faces Using Filmora
There are three major and easy ways to blur faces in videos using a desktop app. These methods include using the AI face mosaic, the face-off effect, and motion tracking. In this section, you will discover how to blur people’s faces in videos using both methods.
How To blur faces using the AI Mosaic feature
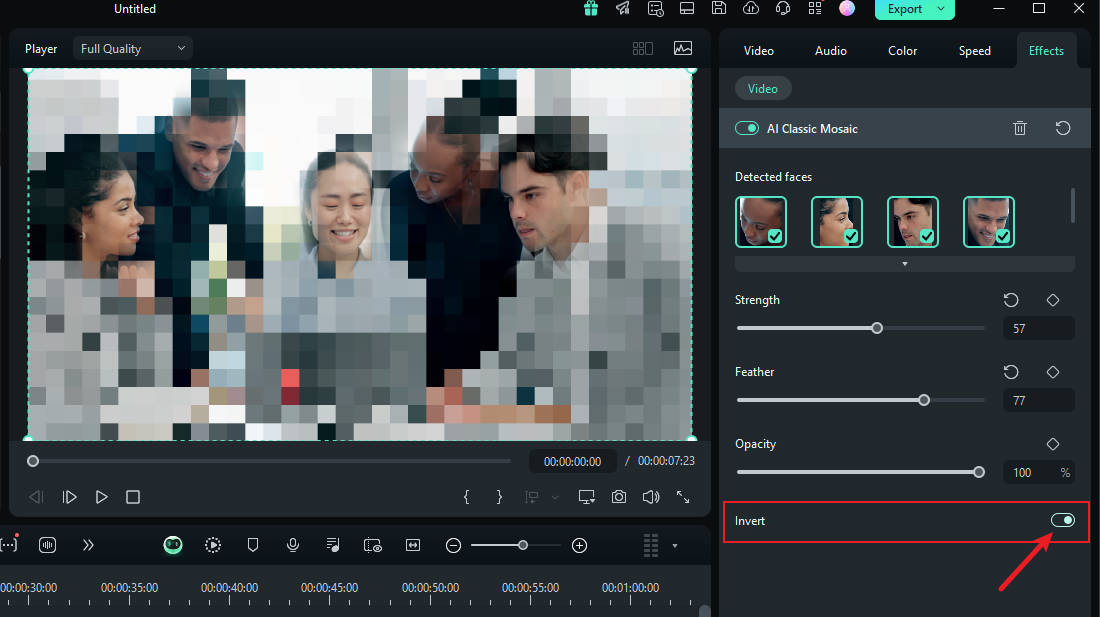
AI Face Mosaic is a new feature available in Filmora version 14 and above. It helps users quickly apply mosaic coverings to sensitive individuals who should not appear on screen, especially in scenes with multiple people. Let's take a look at the steps to use this feature.
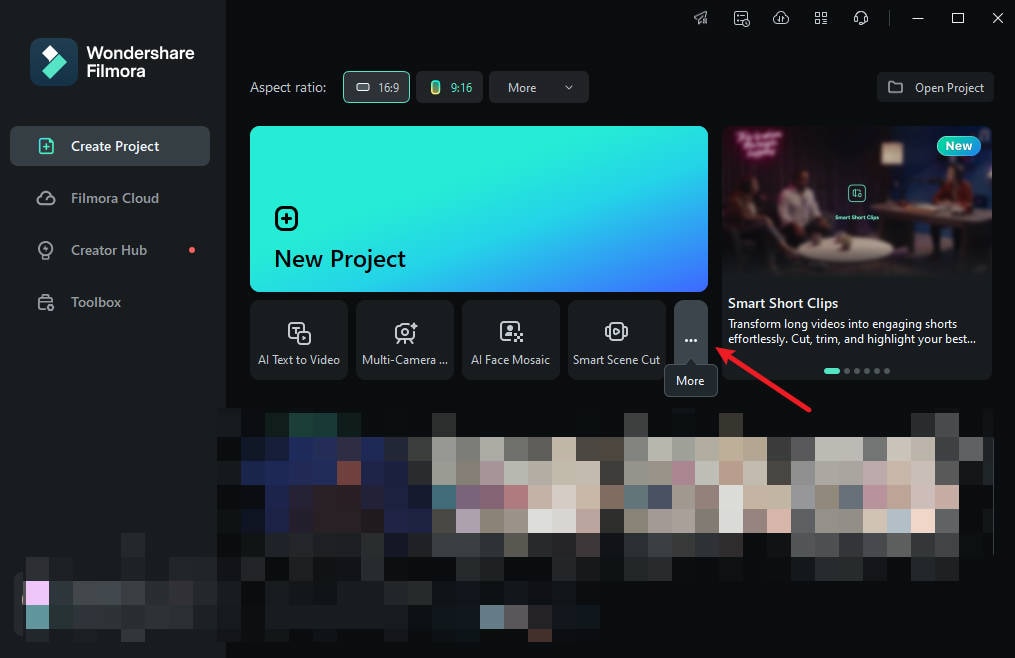
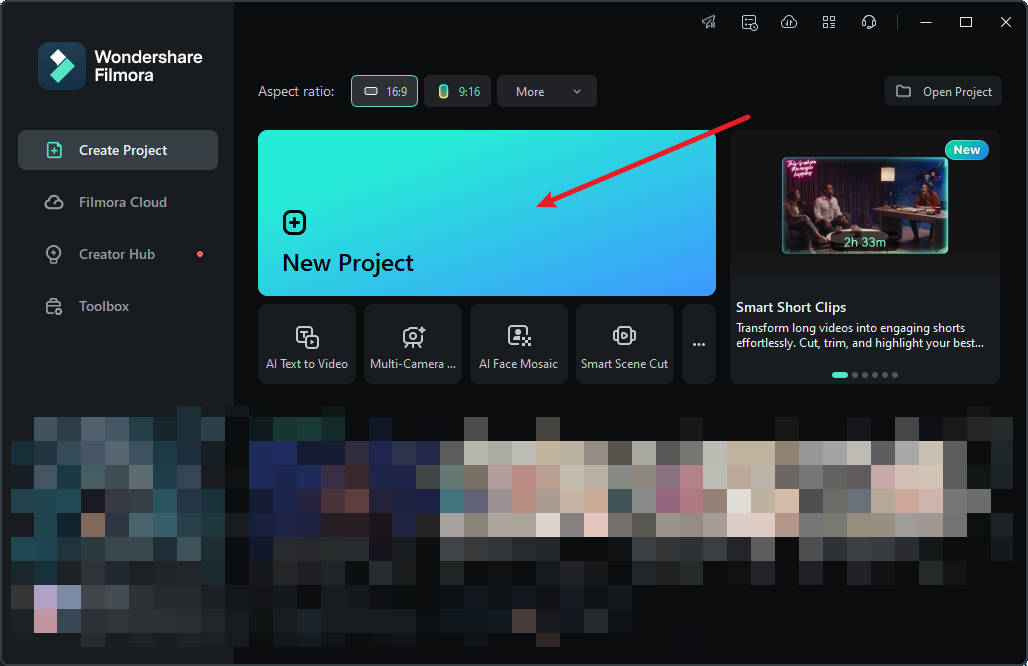
Step 1: Launch Filmora on your PC and go to "More" or select the three dots at the end of the editing options.
Step 2: Click on "AI Face Mosaic". Then, import your media for editing.

Step 3: Filmora will automatically analyze the video to apply the blurring effect to faces throughout the footage. Once the analysis is done, each face will have the mosaic effect.

Step 4: To choose a face to remove the mosaic effect, deselect it from the right-hand panel.
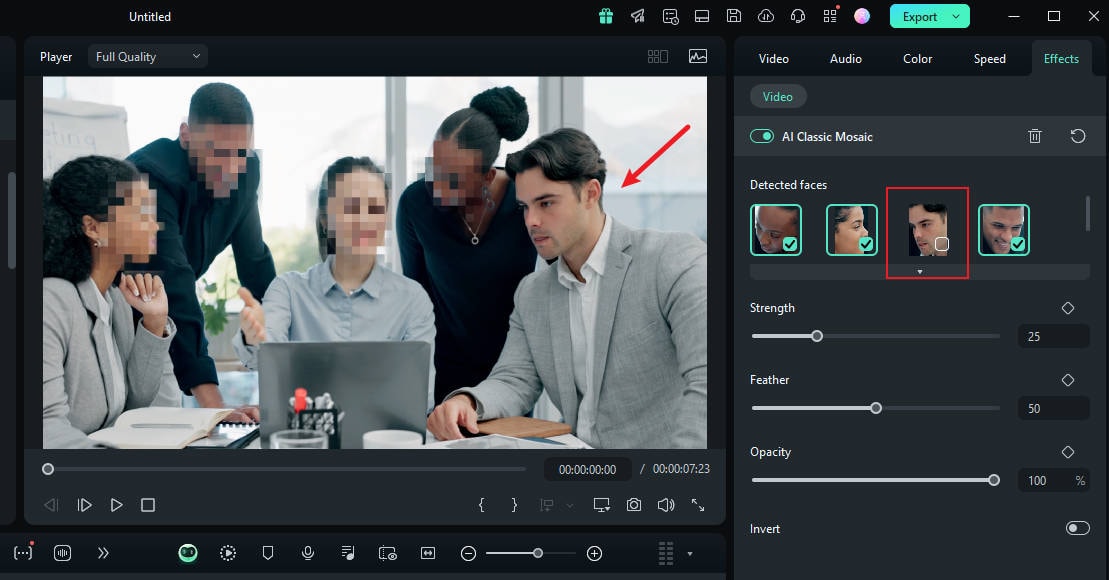
Step 5: You can also use the grader to adjust the strength, feather, and opacity of the blur.
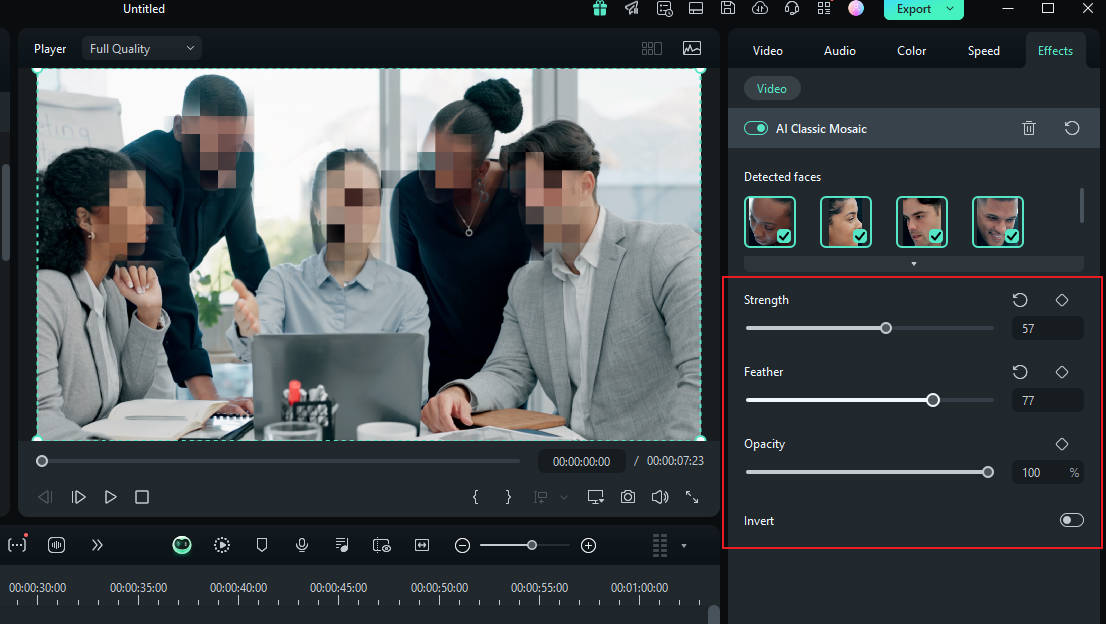
Step 6: You can also invert the mosaic by clicking "Invert". This makes everything else, except the faces, have the mosaic effect.
And that's it! Once you're done, preview your video and export it.
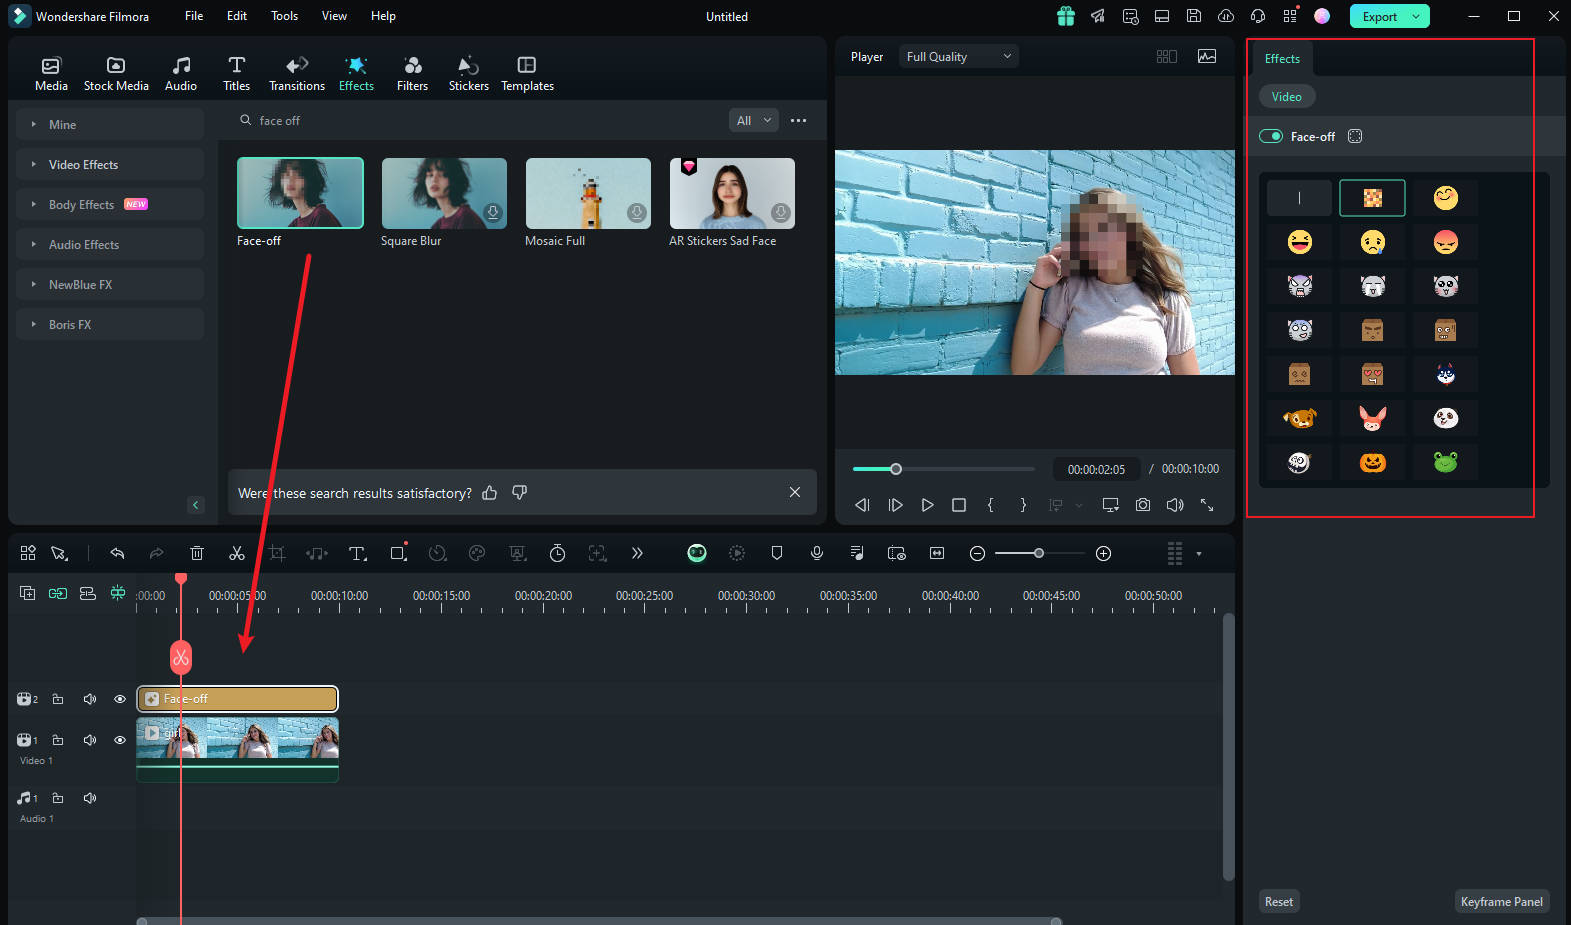
How To Blur Faces Using the Face-off Effect
Another quick and easy way to blur faces in Filmora is by using effects from the editing suite. You only need to select the face blur effect to add a mosaic to a person's face. Here is how to blur someone’s face in a video using Face-off:
Step 1: Launch Filmora on your PC and click on "New Project".
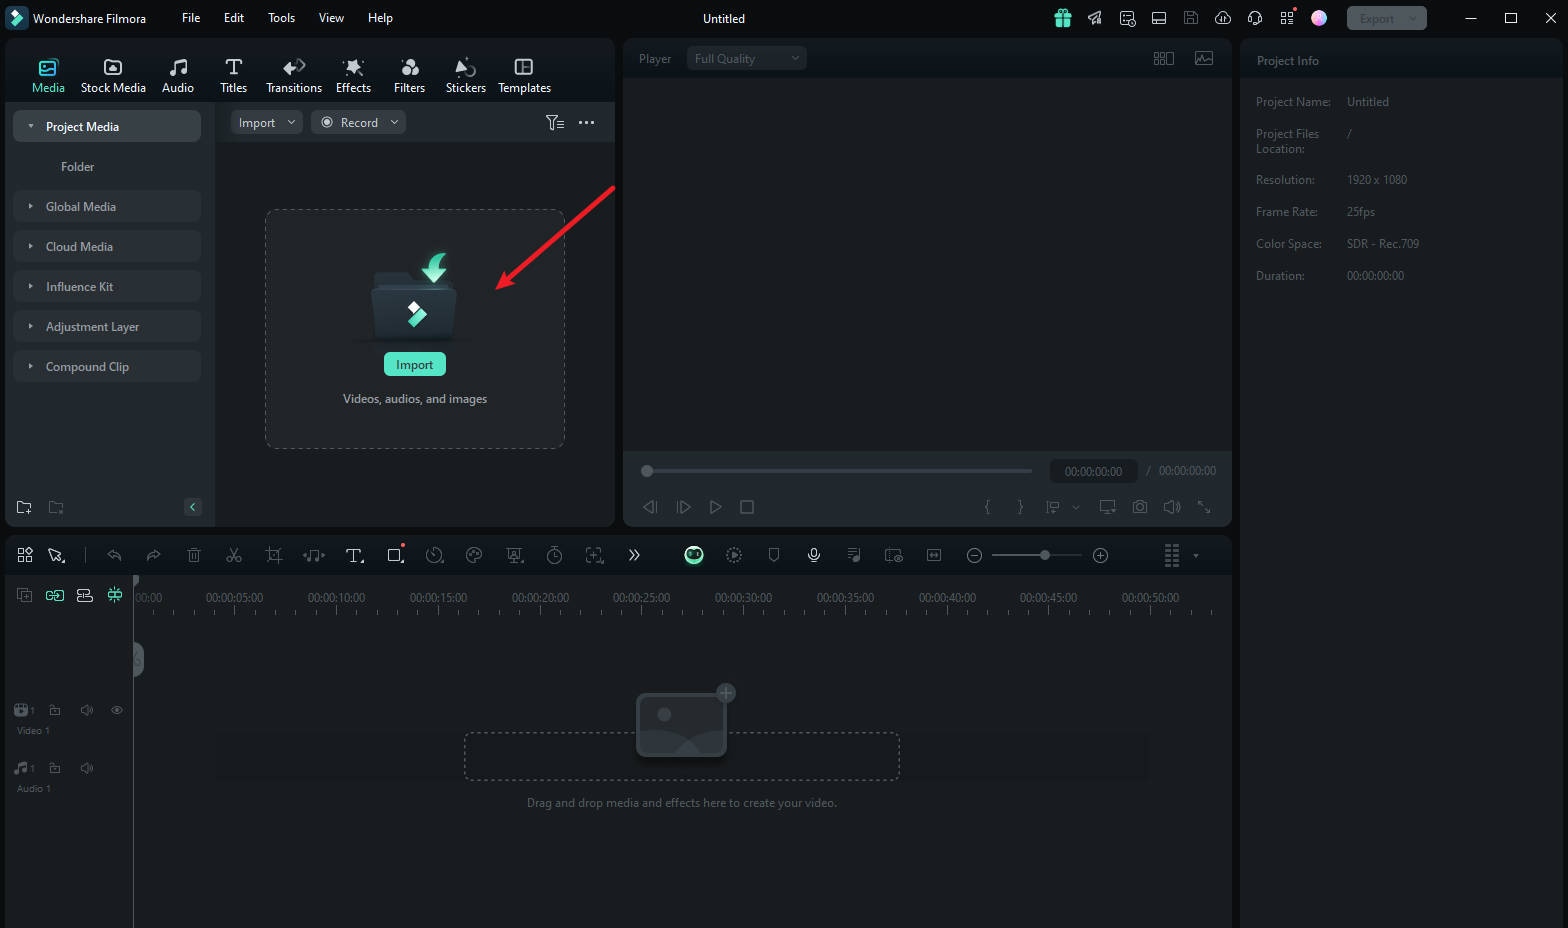
Step 2: To import your media, drag and drop it into the editing suite or click "Import".
Step 3: Tap "Effects" from the main menu at the top of the suite.

Step 4: If you don't see the Face-off effect on the first effects page, search "Face-off" in the search bar.
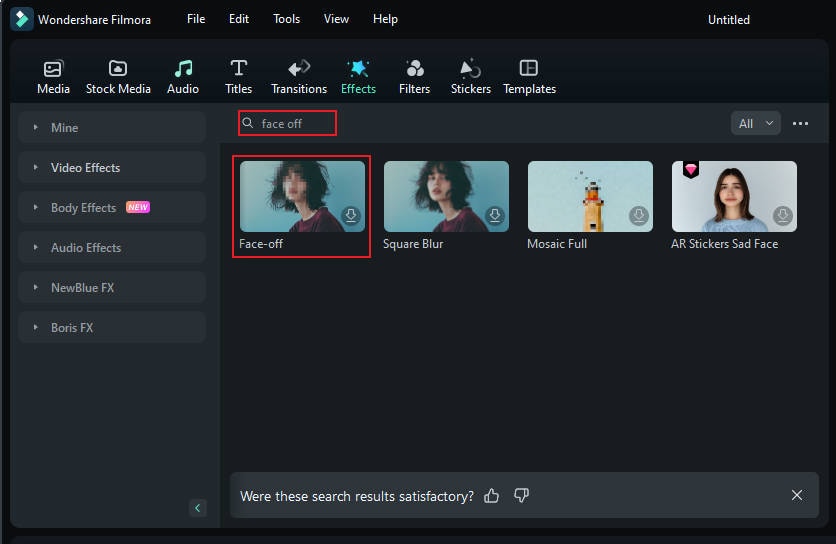
Step 5: Click on the "Face-off effect" to download it. Then, drag and drop it onto your media in the timeline. Next, preview the video to ensure the blur is in the right spot throughout it and export it.
How To Blur Faces Using the Motion Tracking
If you want to apply a mosaic to a moving person's face, the motion tracking feature in Filmora is your best choice. Let's take a look at how this feature can be used to mosaic a face.
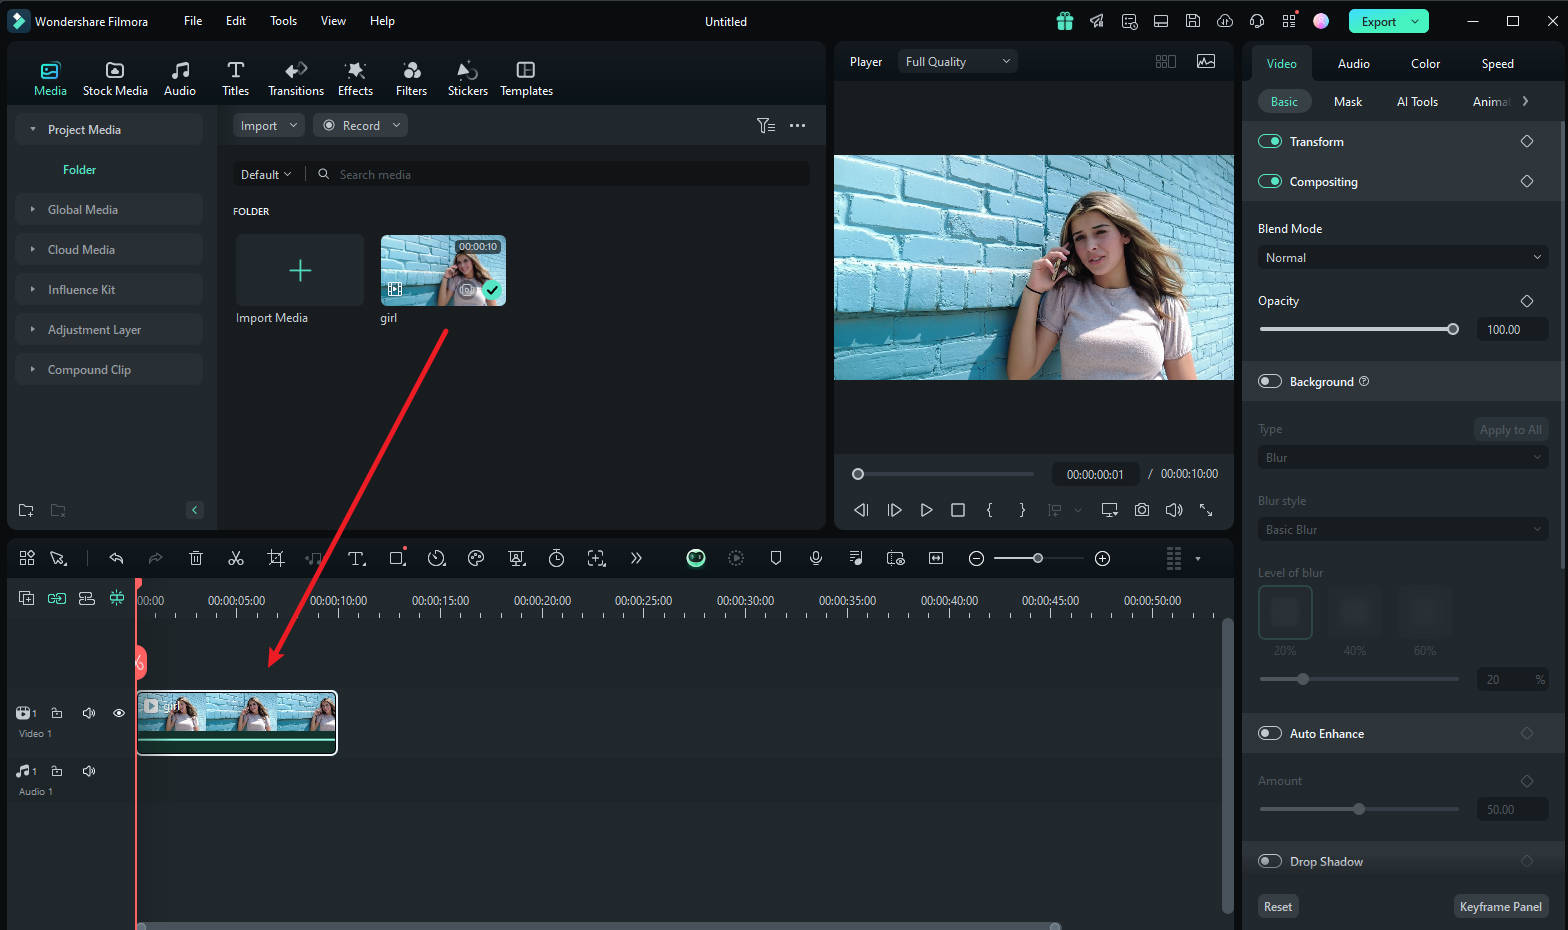
Step1 Import the Video and Drag It to the Timeline
Once you are done launching Filmora, select "Create New Project". Afterward, import and drop the video into the timeline.
Step2 Adjust the Motion Tracking Space
Now place the play head at the start and proceed with the "Motion Tracking" tool, and adjust the motion tracking space from your preview window.
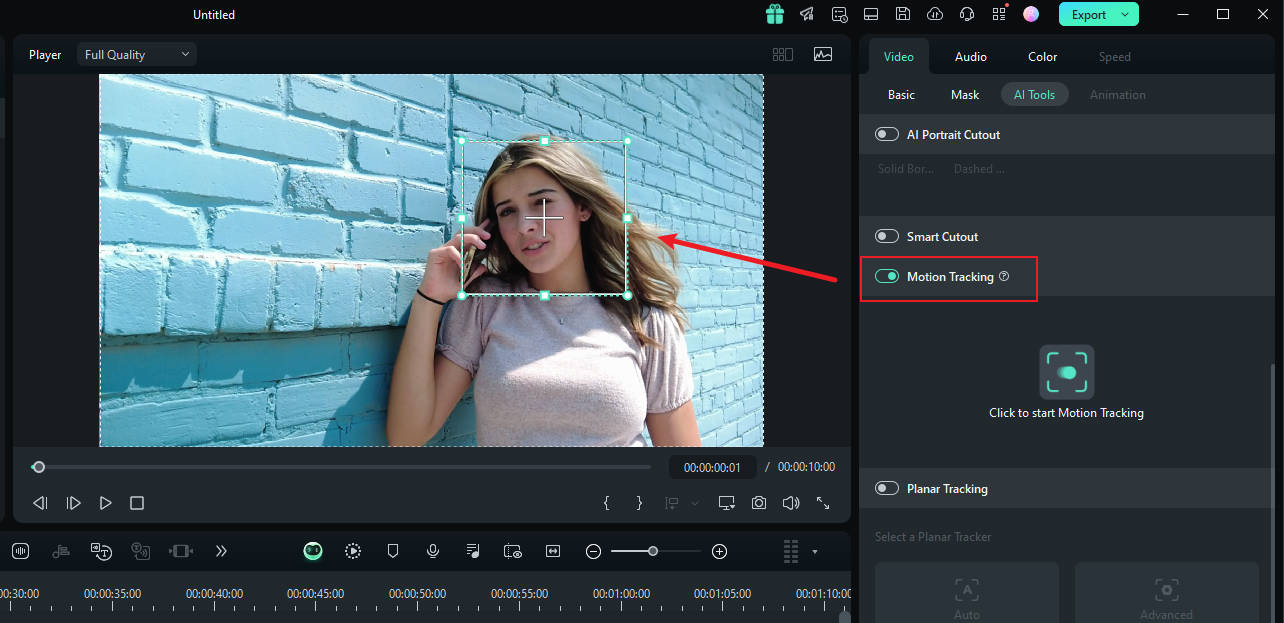
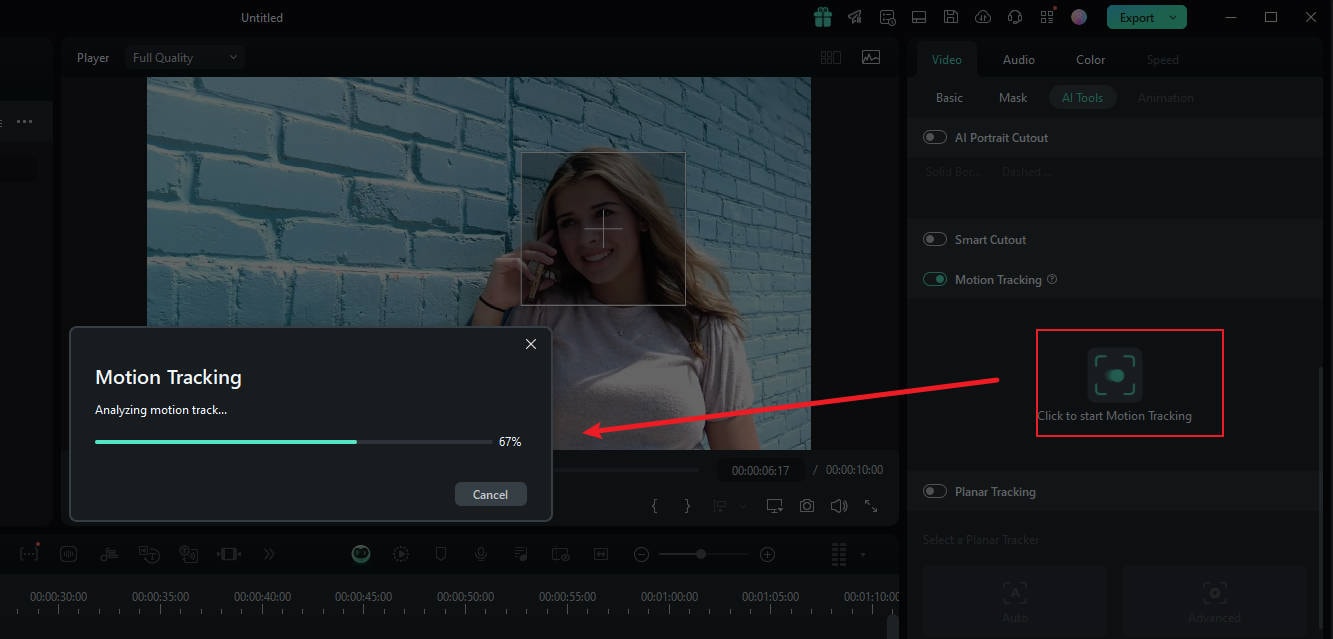
Step3 Start the Motion Tracking Process
Once done, hit the "Start Tracking" button. Within a few minutes, you will be able to finish this process.
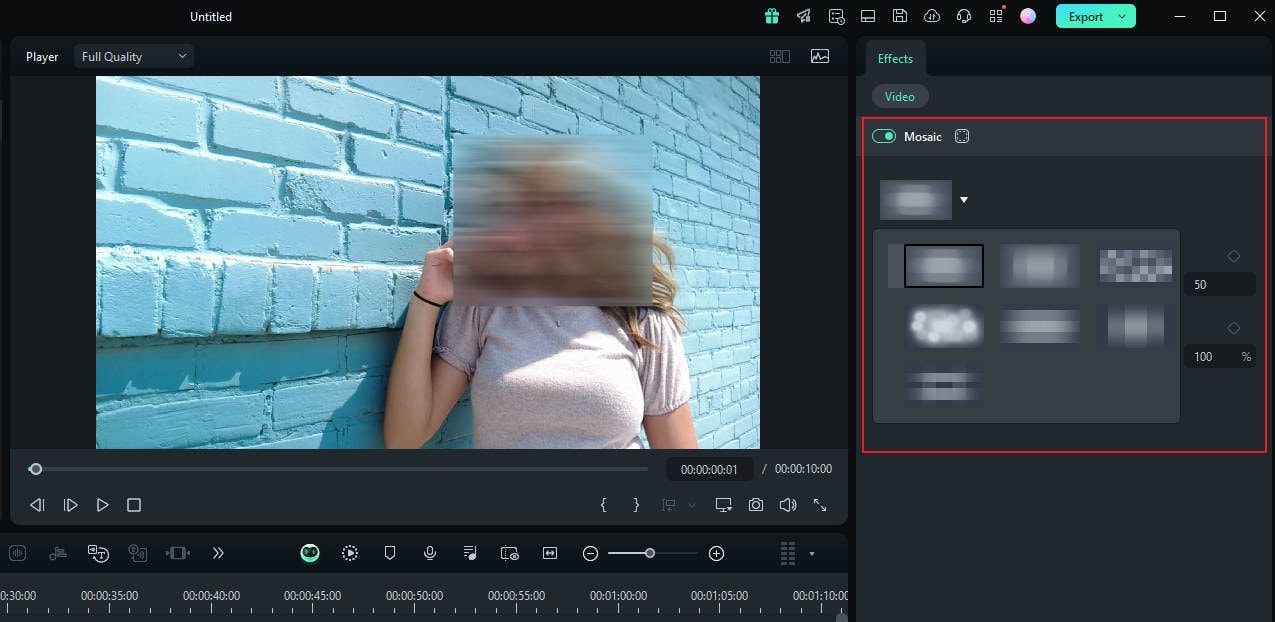
Step4 Customize the Blur Settings
Now, click the video on the timeline. In the pane on the right, under the "link element" option, you can select the overlay element you want, such as an image or mosaic.
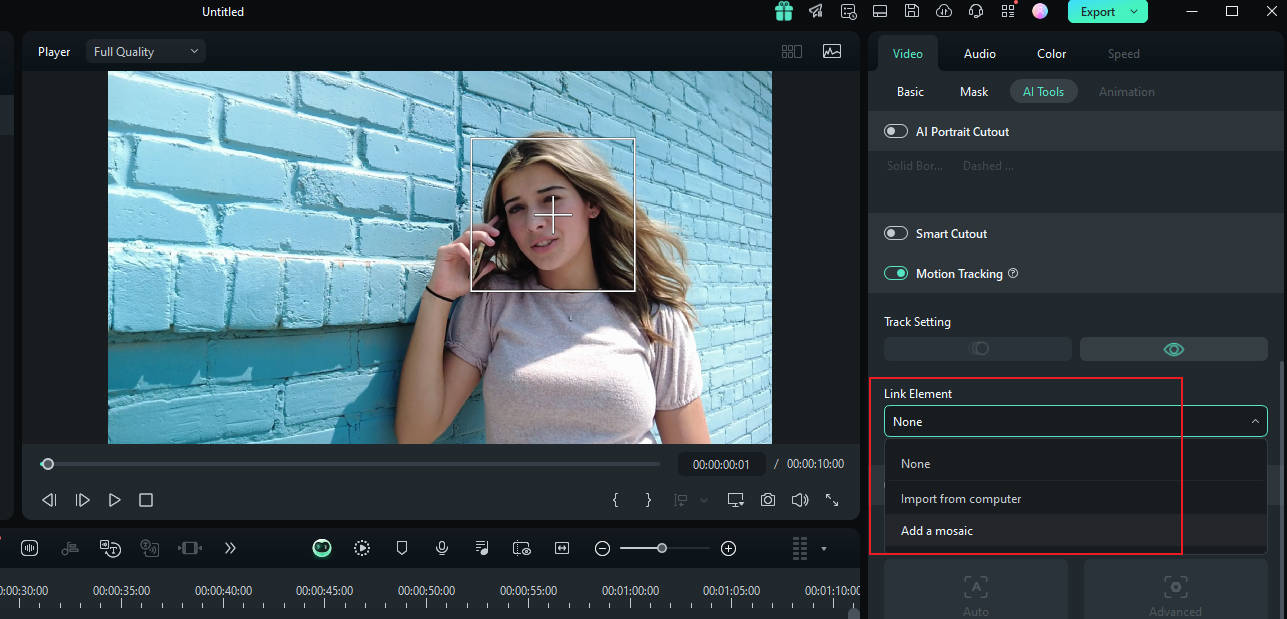
Step5 Choose Mosaic in Motion Tracking
If you choose the mosaic, a mosaic will appear over the person's face. Also, you can change the blur amount and blur opacity. Afterward, adjust the blurred space on your preview window. Once confirmed, you can export the video.
Filmora vs. Premiere Elements: Face Blur Comparison
| Feature | Filmora | Premiere Elements |
| Ease of Use | Intuitive design, simple blur process. | Requires prior knowledge, keyframe concepts. |
| Main Blur Method | AI Face Mosaic, Face-off effect. | Effects mask, Gaussian Blur/Mosaic. |
| Motion Blur | Motion tracking for moving faces. | Manual keyframing for motion. |
| AI Tools | AI Face Mosaic, automates detection. | / |
Conclusion
Mastering how to blur a face with Adobe Premiere Elements can enhance your video editing skills, offering precision and control. However, for those seeking a more user-friendly alternative, Filmora is highly recommended. Its intuitive design and powerful features make it ideal for both beginners and experienced editors. Filmora simplifies the process while delivering professional results, making it a top choice for anyone looking to elevate their video projects effortlessly.
