Imagine you are editing an existing routine vlog. You want to add stylish text but don't know how to change font in Adobe Premiere. Exhausting, right? Text fonts matter the most in conveying the right tone and message. Make your text more engaging by changing to the correct fonts.
Knowing how to change font in Adobe Premiere Pro is a life hack. It can smoothly upgrade the quality of all your videos. This guide will explain to you in detail how to change fonts. We will ensure that you learn all the impressive tools.
Get ready to create stunning text fonts. Let's jump in!
In this article
Part 1. How to Change Fonts in Adobe Premiere Pro
It is quite helpful to know how to change the font in Adobe Premiere Pro. You can easily change fonts according to the video theme. It will have a great impact on the overall video. For example, if you want to add bold and creative fonts while editing a music video, you can easily do it.
As a video editor, you will love to change text fonts. These steps will show you how to use the Essential Graphics Panel. We will also see how to add custom fonts.
Steps on How to Change Font in Adobe Premiere Pro
Here are the detailed steps on how to change fonts in Premiere Pro:
Step 1. Open Your Project
Open Adobe Premiere Pro and the project where you want to edit the text.
Step 2. Select the Text
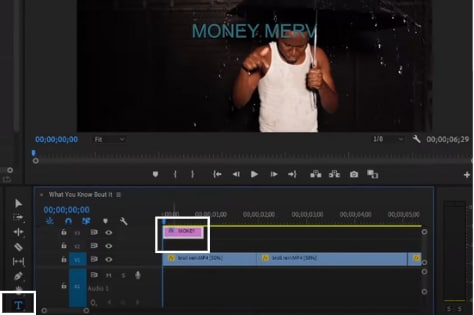
Click on the text layer in the timeline or the Program Monitor. Use the Type Tool (T) to modify text.
Step 3. Access the Panel
Access the Essential Graphics Panel or the new Properties Panel (v24.x+). Most text editing can now be done directly in the Properties window for a faster workflow.
Step 4. Change the Font
- In the Essential Graphics panel, ensure the text layer is selected.
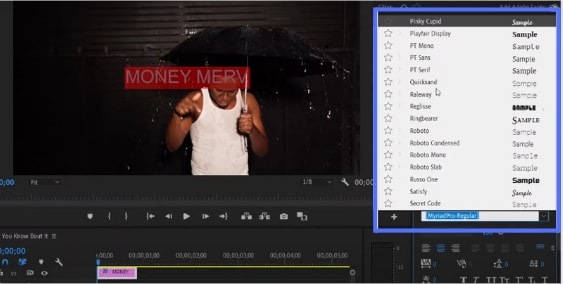
- Under the Text tab, find the Font dropdown menu.
- Click on the dropdown and select your desired font. Changing the text font style, size, and color is also possible.
Step 5. Apply Changes
Your Program Monitor will automatically update once you've selected the new font.

Step 6. Export Your Project
After making all your changes, export your video project to File > Export > Media.
We have learned how to change the font in Adobe Premier Pro. If you follow the steps correctly, it is effortless.
How do I Add Custom Fonts to Premiere Pro
Adding custom fonts to Premiere Pro is very easy. It will take you a few minutes. Video editors or professionals always want to add custom fonts. It makes the videos visually appealing. Follow the following steps and add your favorite custom fonts.
Steps on How to Add Custom Fonts to Premiere Pro
Let's learn the steps for adding custom fonts to Premiere Pro:
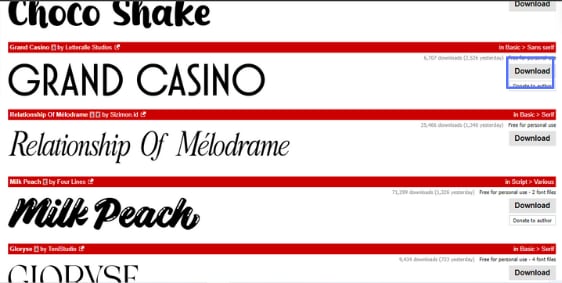
Step 1. Download your required font from Dafont.
Step 2. Then, unzip the zip font file.
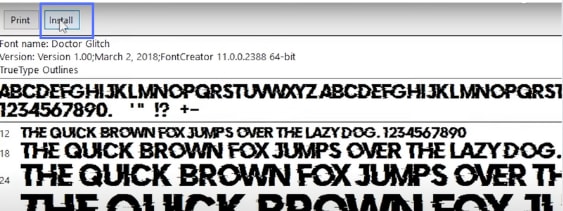
Step 3. Open the file. Click on "Install" to install the font on your local computer.
Step 4. Make sure to restart Premiere Pro to have it appear in the font list.
Step 5. You can select it to change the font of any text you want on Premiere Pro.
How do I Import Fonts from Adobe Fonts into Premiere Pro
To import fonts from Adobe Fonts, follow the steps given:
- Go to Graphics > Add Fonts from Adobe Fonts to access Adobe Fonts.
- Select and activate the desired font. After activation, it should appear in the font options within Premiere Pro.
This is how you can import fonts from Adobe Fonts efficiently. These steps will guide you on "how to change the font in Adobe Premiere."
Part 2. How to Change Font Size in Adobe Premiere Pro
Attention!! Now, you can make your text font visible in Adobe Premiere Pro. Imagine making a University presentation and needing to change the font size. Worry not!
Learning how to change font size in Adobe Premiere Pro will benefit you.
Steps on How to Change Font Size in Adobe Premiere Pro
Please carefully follow these steps to change font size:
Step 1. Select the project where you want to modify the text size in Adobe Premiere Pro.
Step 2. Click on the text layer. You can click the text layer in the timeline or the Program Monitor.
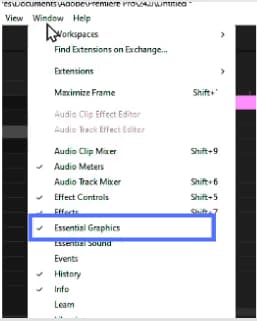
Step 3. Click Windows > Essential Graphics Panel.
Step 4. Under the Text tab in Essential Graphics, you will see a slider. You can change the font size using the slider or manually typing a specific value.
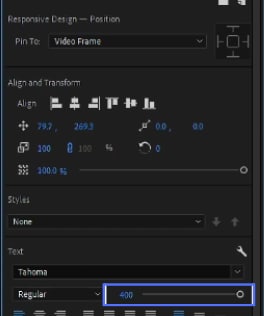
Step 5. Check the font changes in the Program Monitor. The new font size will appear and update in real time.
This is an effective way to learn how to change font size in Adobe Premiere Pro.
Part 3: [Limitations & Problems] Why I can't Change the Font for any Text in Premiere Pro
There can be limitations while using Adobe Premiere Pro. For example, you spent a lot of time installing a new font, but it's not working. The following are some common problems:
- Unsupported Fonts: Some fonts might not be supported by Adobe Premiere Pro.
- Locked Layers: If the text layer is grouped with other elements, font change may not be possible.
- Compatibility Issues: Some text layers might not be editable in Adobe Premiere Pro.
- Corrupted files: Sometimes, project files can be corrupted. It may not allow font change.
- Limited System Resources: Your system can have low memory or performance, which can cause problems when changing the font.
We have a reliable solution for you if you face these complications.
🤩 Posts You Might Be Interested In: Adobe Premiere Pro Tutorial for Beginners: Learn the Basics Step-by-Step >>
Part 4: An Easier Way To Change Fonts and Text
Some users find it challenging to understand Adobe Premiere Pro. Let us introduce you to the best video editor- Wondershare Filmora. Get ready to have a flawless experience with Filmora. It has incredible editing features and excellent user experience. Changing fonts and text using Filmora is as smooth as butter.
To compare how Filmora's text editing features cater to diverse creators versus Premiere Pro, here's a detailed comparison:
| Feature | Filmora | Premiere Pro |
| Target User | Versatile for diverse creators. | Preferred by most professionals. |
| User Interface | Intuitive, excellent user experience. | Designed for professional editors. |
| Font Management | Wide selection, easy customization. | Custom, Adobe Fonts integration. |
| Text Effects Library | Abundant templates, advanced effects. | Essential Graphics panel. |
| Advanced Text Options | Keyframe, motion tracking, 3D. | Keyframes for animation control. |
Filmora always brings out the best features for you.
- Extensive font library to best fit your video's theme.
- Customize font attributes such as size, color, etc.
- Seamlessly integrated with various text animations.
- Dynamic effects that can be applied to texts.
- Save customized text styles as presets.

Key Features of Changing Fonts Using Filmora
Although Filmora has endless features, these are some of them:
- Wide Font Selection: Filmora provides over 100+ fonts. These fonts are easy to access and make text customization reliable.
- Real-time Updation: You can instantly see changes in the size, color, and style you make on the text. It ensures perfect font changes.
- Advanced Text Effects: Filmora offers basic to advanced text effects. These advanced effects include animations, shadows, and 3D text.
- Text Templates: Filmora has high-quality text templates. You can quickly add stylish text to your videos.
- Customizable Text Animations: Filmora offers smooth text animations. You can easily customize font attributes such as size, color, boldness, and italics, ensuring that the text aligns with their creative vision.These give your videos a unique look and stylish touch.
- Multi-Layer Text Editing: It allows adding multiple text layers, enhancing customization options.
Step-by-Step Guide to Changing Font in Filmora
Step 1. The first step is to download Filmora software on your computer.
Step 2. Open the project in Filmora in which you want to change the font.
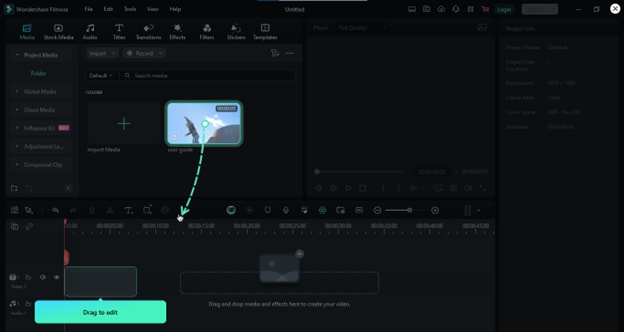
Step 3. Click on the text you want to edit. You can access the text in the timeline or the preview window.
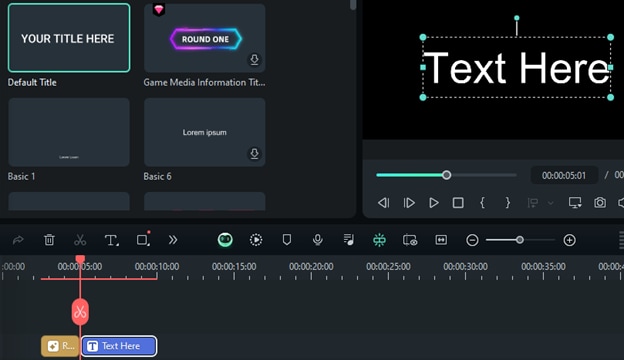
Step 4. From the text editing panel, select your desired font style.
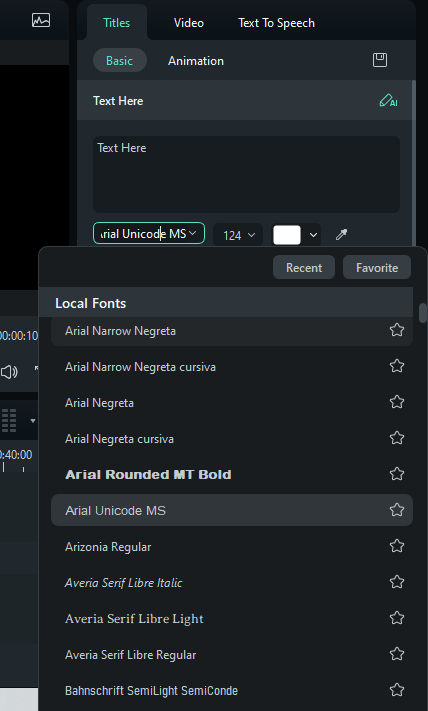
Step 5. Apply the changes to the text and preview the updation in real time.
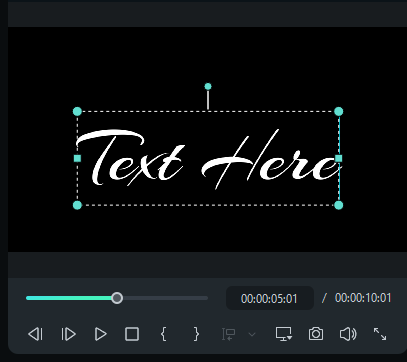
Step 6. After updating to your desired font style, export the video by clicking the "Export" button at the top right corner.
This is how you can change the font in Filmora within seconds. Exploring Filmora is easier than learning how to change the font in Adobe Premiere Pro.
More Text Editing Options in Filmora
Want to create engaging videos but don't know about advanced editing options? Worry not! Filmora is the happy solution to all your worries. Let's explore more editing options in Filmora:
- Keyframe Animation: You can control text movement, opacity, and dynamic animations.
- Text Backgrounds and Borders: You can enhance the visibility and beauty of your text.
- Custom Text Shadow: You can give a 3-dimensional look to your text using various text shadows.
- Custom Outline Effects: It will make your text pop off the screen, giving a viby feel.
- Text Alignment: You can fit your design needs by adjusting line spacing and text alignment.
- Motion Tracking for Text: You can interactively attach text to any moving object in the video.
- Handwriting and Typewriter Effects: These unique effects add a personal touch and convey messages.
In the era of AI, Filmora is always ahead. You can instantly edit your top-quality videos. It has various impressive AI features. It has cut down hours of editing within seconds. These features are:
- AI Copilot Editing
- AI Text-Based Editing
- AI Smart Masking
- AI Vocal Remover
- AI Music Generator
- AI Thumbnail Creator
- AI Video Translation
Conclusion
Knowing how to change fonts in Premiere Pro is essential. You can confidently edit visually appealing videos. This guide has covered multiple methods and steps on how to change the font in Adobe Premiere Pro. We have also explored Filmora, which is a reliable solution. Filmora provides a quicker way to edit text with various customization options. Are you looking for advanced and easy-to-use software? Filmora is the one for you! Try it today to enhance your editing experience and video quality!


