

 100% Security Verified | No Subscription Required | No Malware

CapCut gives you plenty of options for improving the look of your footage. Basic adjustments, HSL, Curves, LUTs, and Color Match are just some of the tools available for fine-tuning your video color. If you’re wondering how to color grade video in CapCut, the process is slightly different on PC and mobile, and the tools you use will depend on how much control you want over the final result.
To cover both platforms, we’ve put together this guide with step-by-step instructions and practical tips for getting better color from your footage. Follow along to learn the basics of color grading in CapCut and make your videos look better without making the process complicated.
Part 1. How to Color Grade Video in CapCut Desktop
To learn how to color grade video in CapCut PC, we’ll start with color correction and then move on to color grading. Color correction is the process of fixing issues such as exposure, white balance, contrast, and color balance to make the footage look natural. Color grading comes next, where you adjust the colors to create a specific style, tone, or mood.
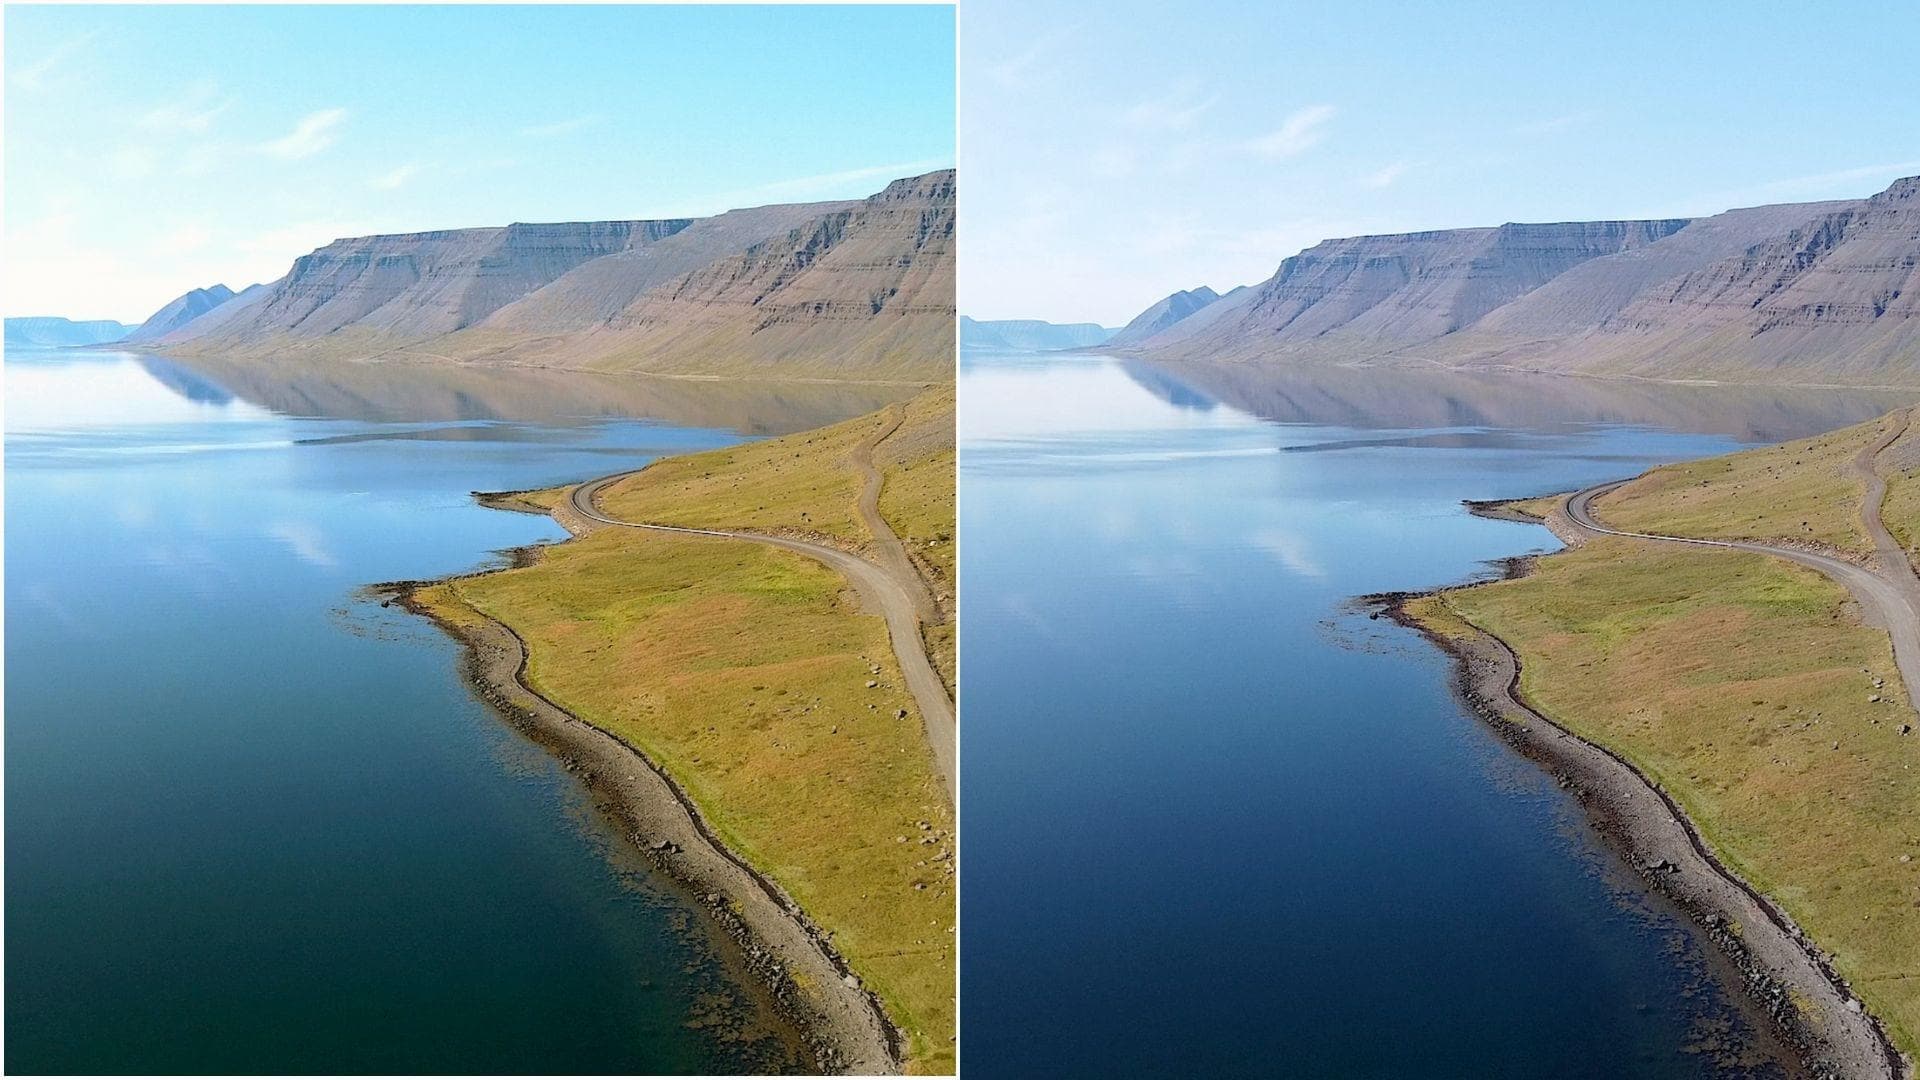
How to Color Grade Video in CapCut PC
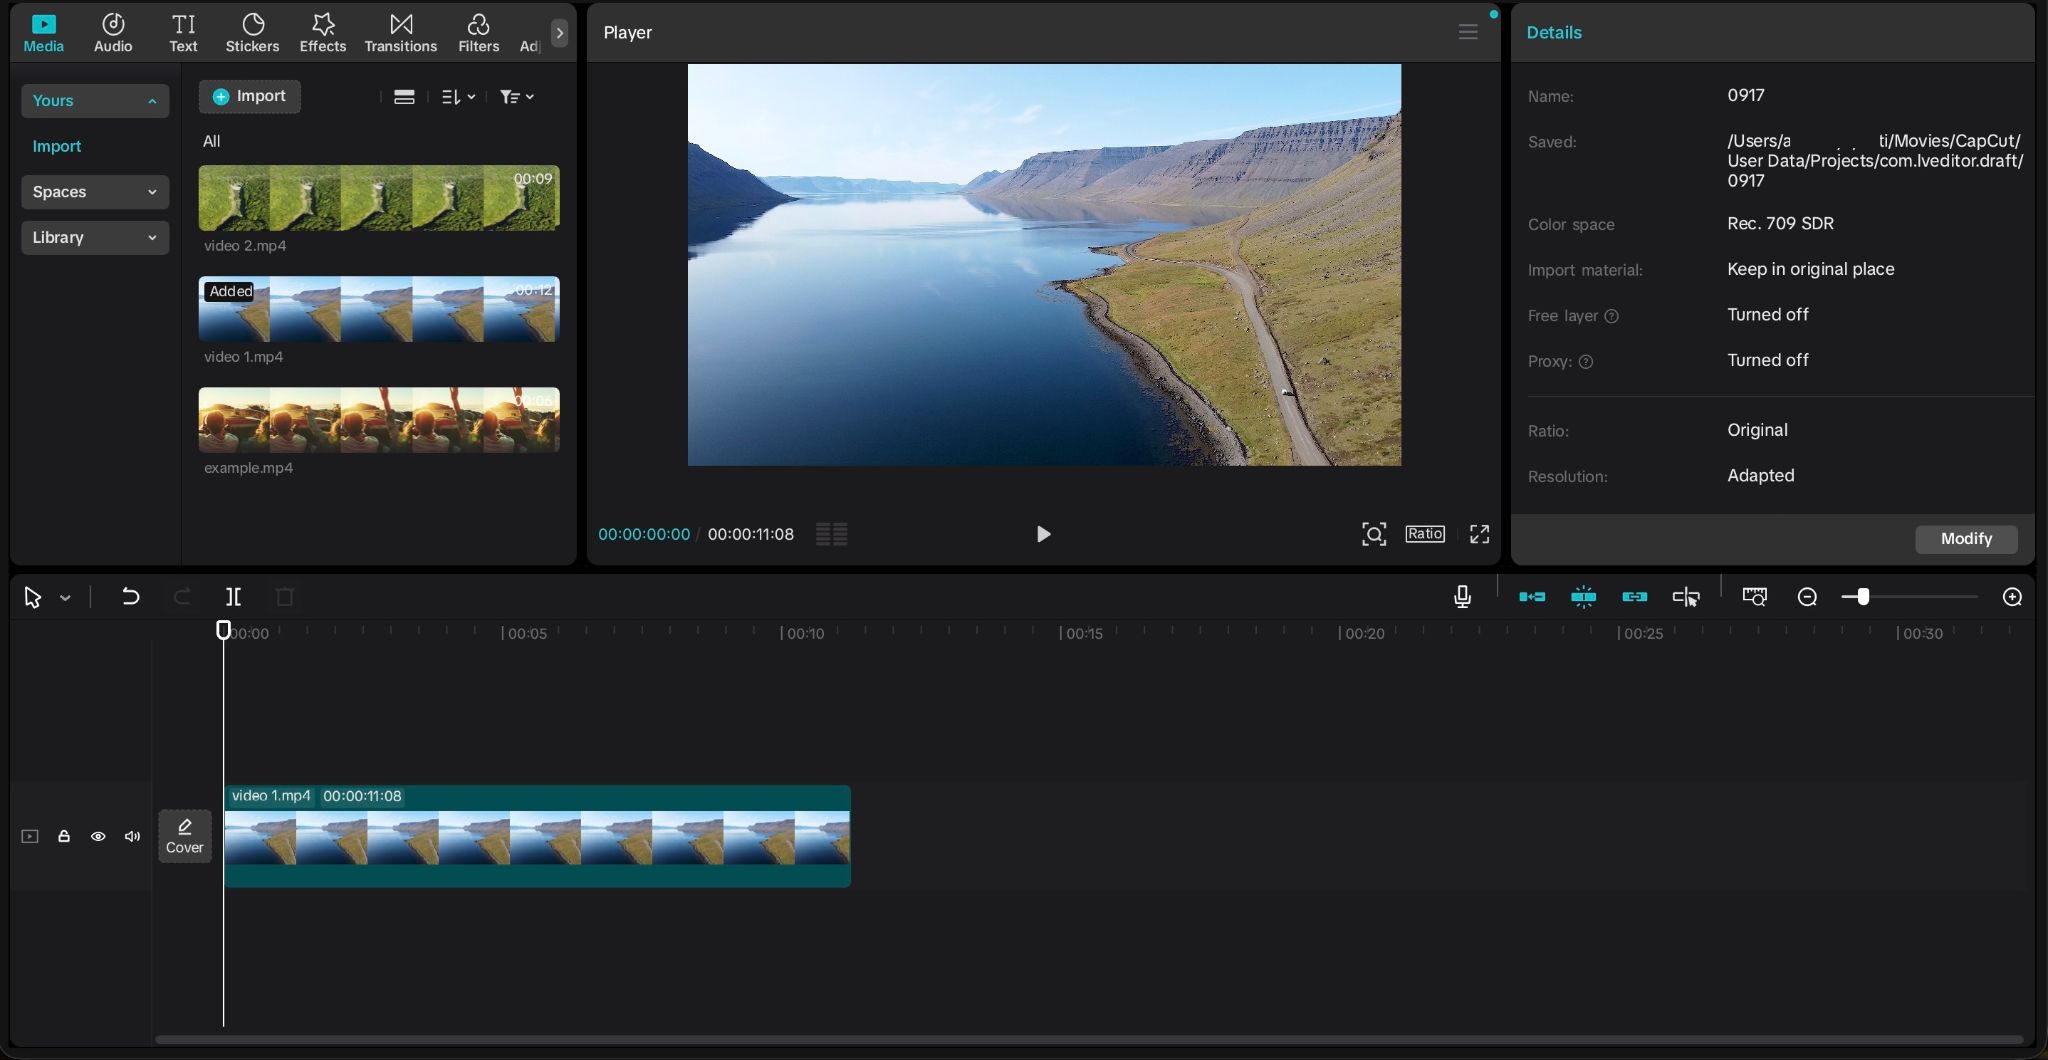
Step 1. Open CapCut Desktop, create a project, and click Import. Drag your video to the timeline and select it.
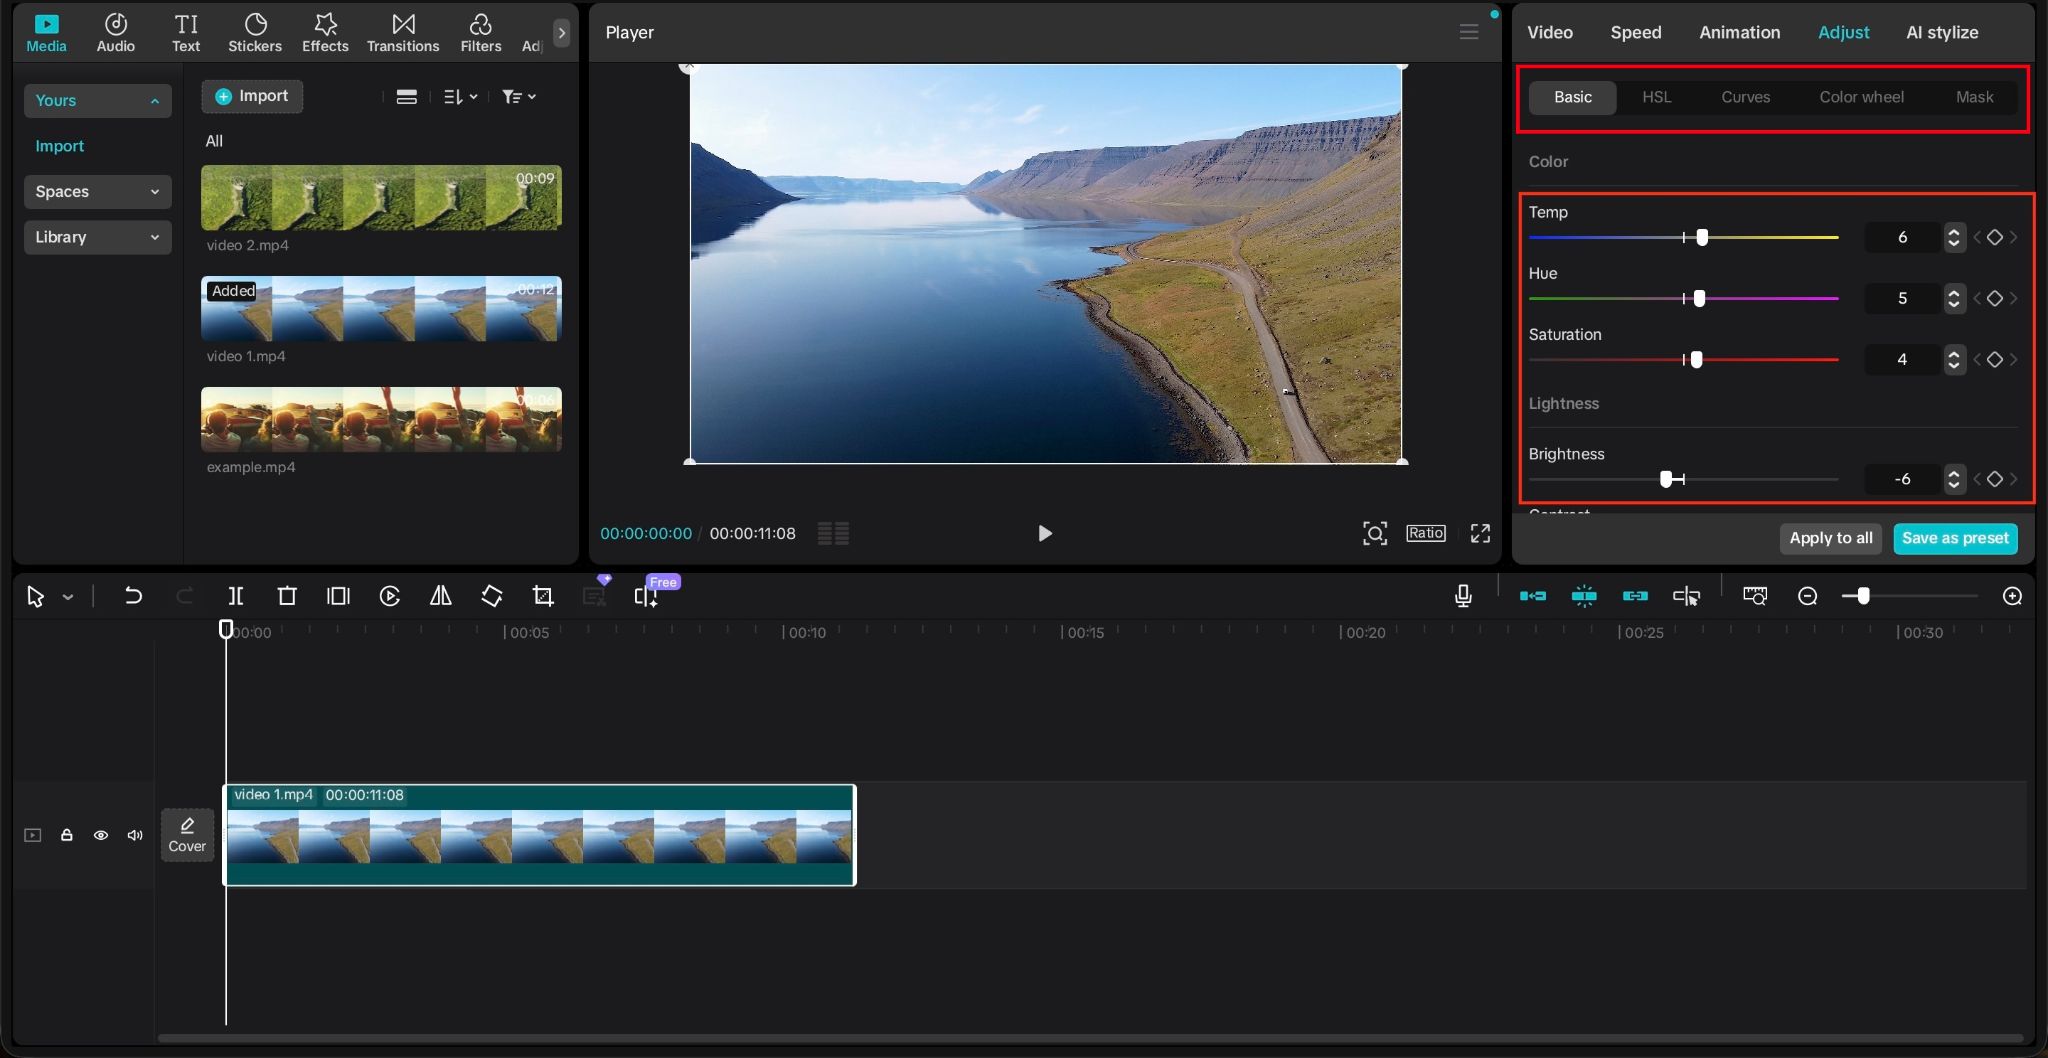
Step 2. Open Adjustment and fix exposure, brightness, contrast, temperature, and tint. Aim for balanced, natural-looking footage before moving on to creative grading.
- Basic: Fine-tune color, highlights, shadows, saturation, and vibrance to create a balanced base.
- HSL: Adjust individual colors without affecting the entire clip.
- Color Wheels: Fine-tune the shadows, midtones, and highlights separately.
- Curves: Get more precise control over brightness, contrast, and individual color channels.
Step 3. Apply a filter or LUT to create a specific look. CapCut supports LUT files such as .CUBE and .3DL. Adjust the intensity so the result does not look too strong.
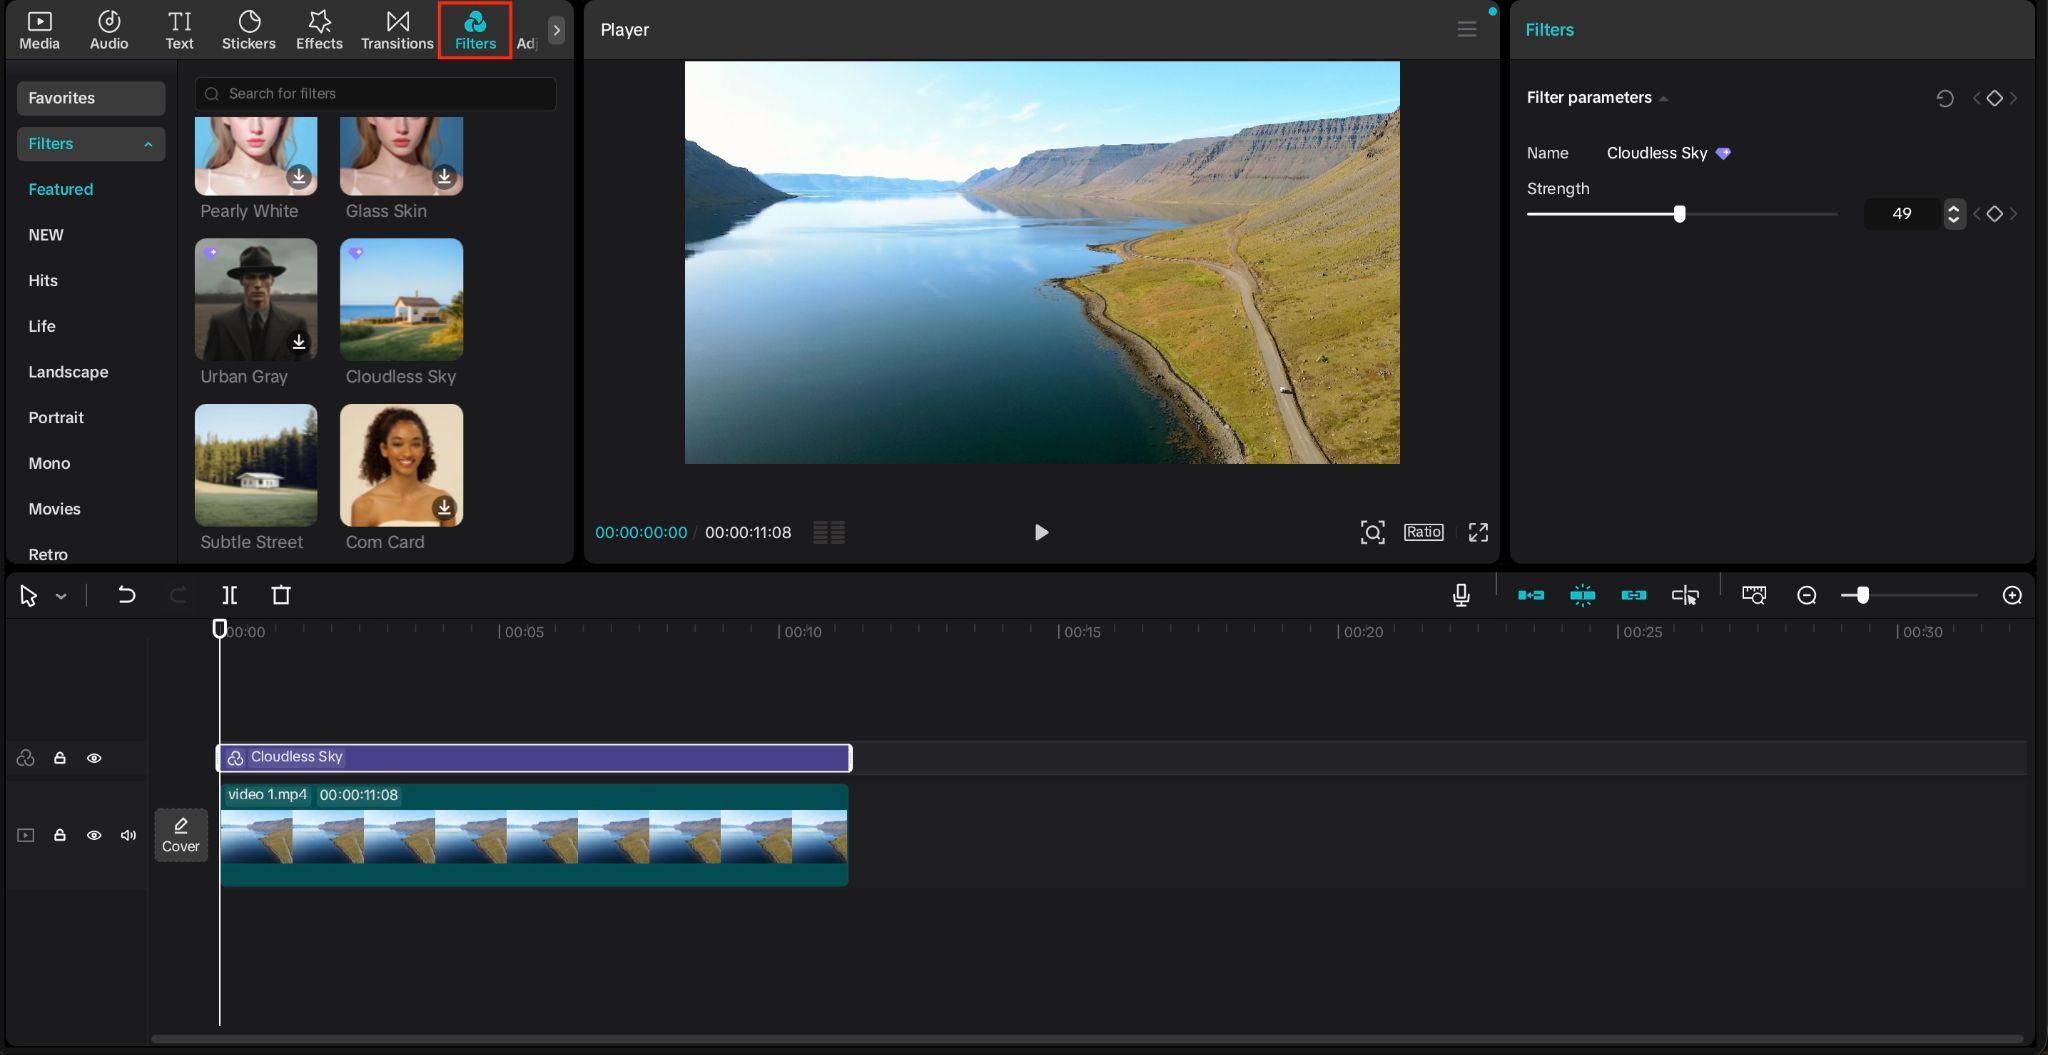
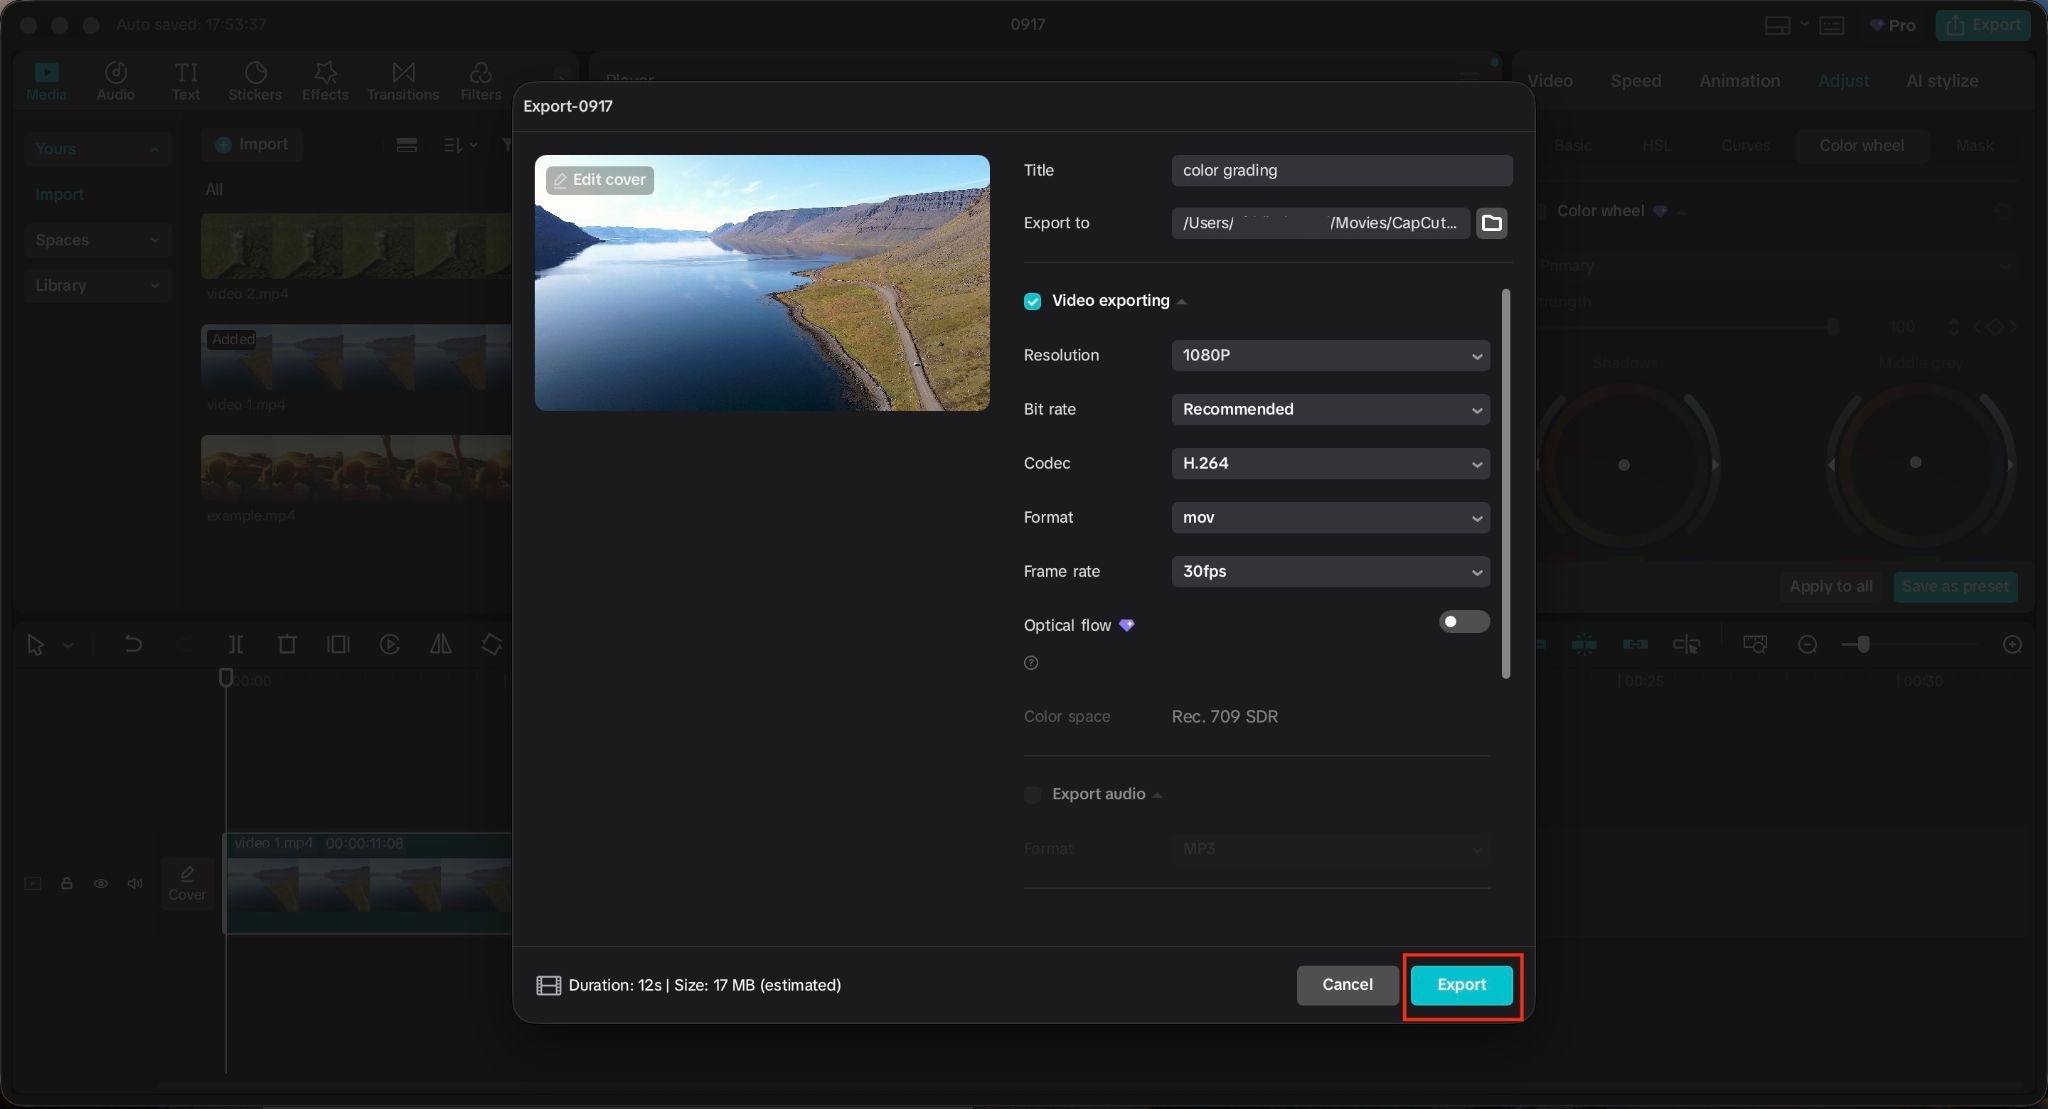
Step 4. Check the footage for inconsistent colors, unnatural skin tones, or overly strong contrast. When you're happy with the result, click Export and choose your preferred settings.
Part 2. How to Color Grade in CapCut Mobile
Color grading in CapCut mobile starts with basic adjustments before moving to more specific color controls.
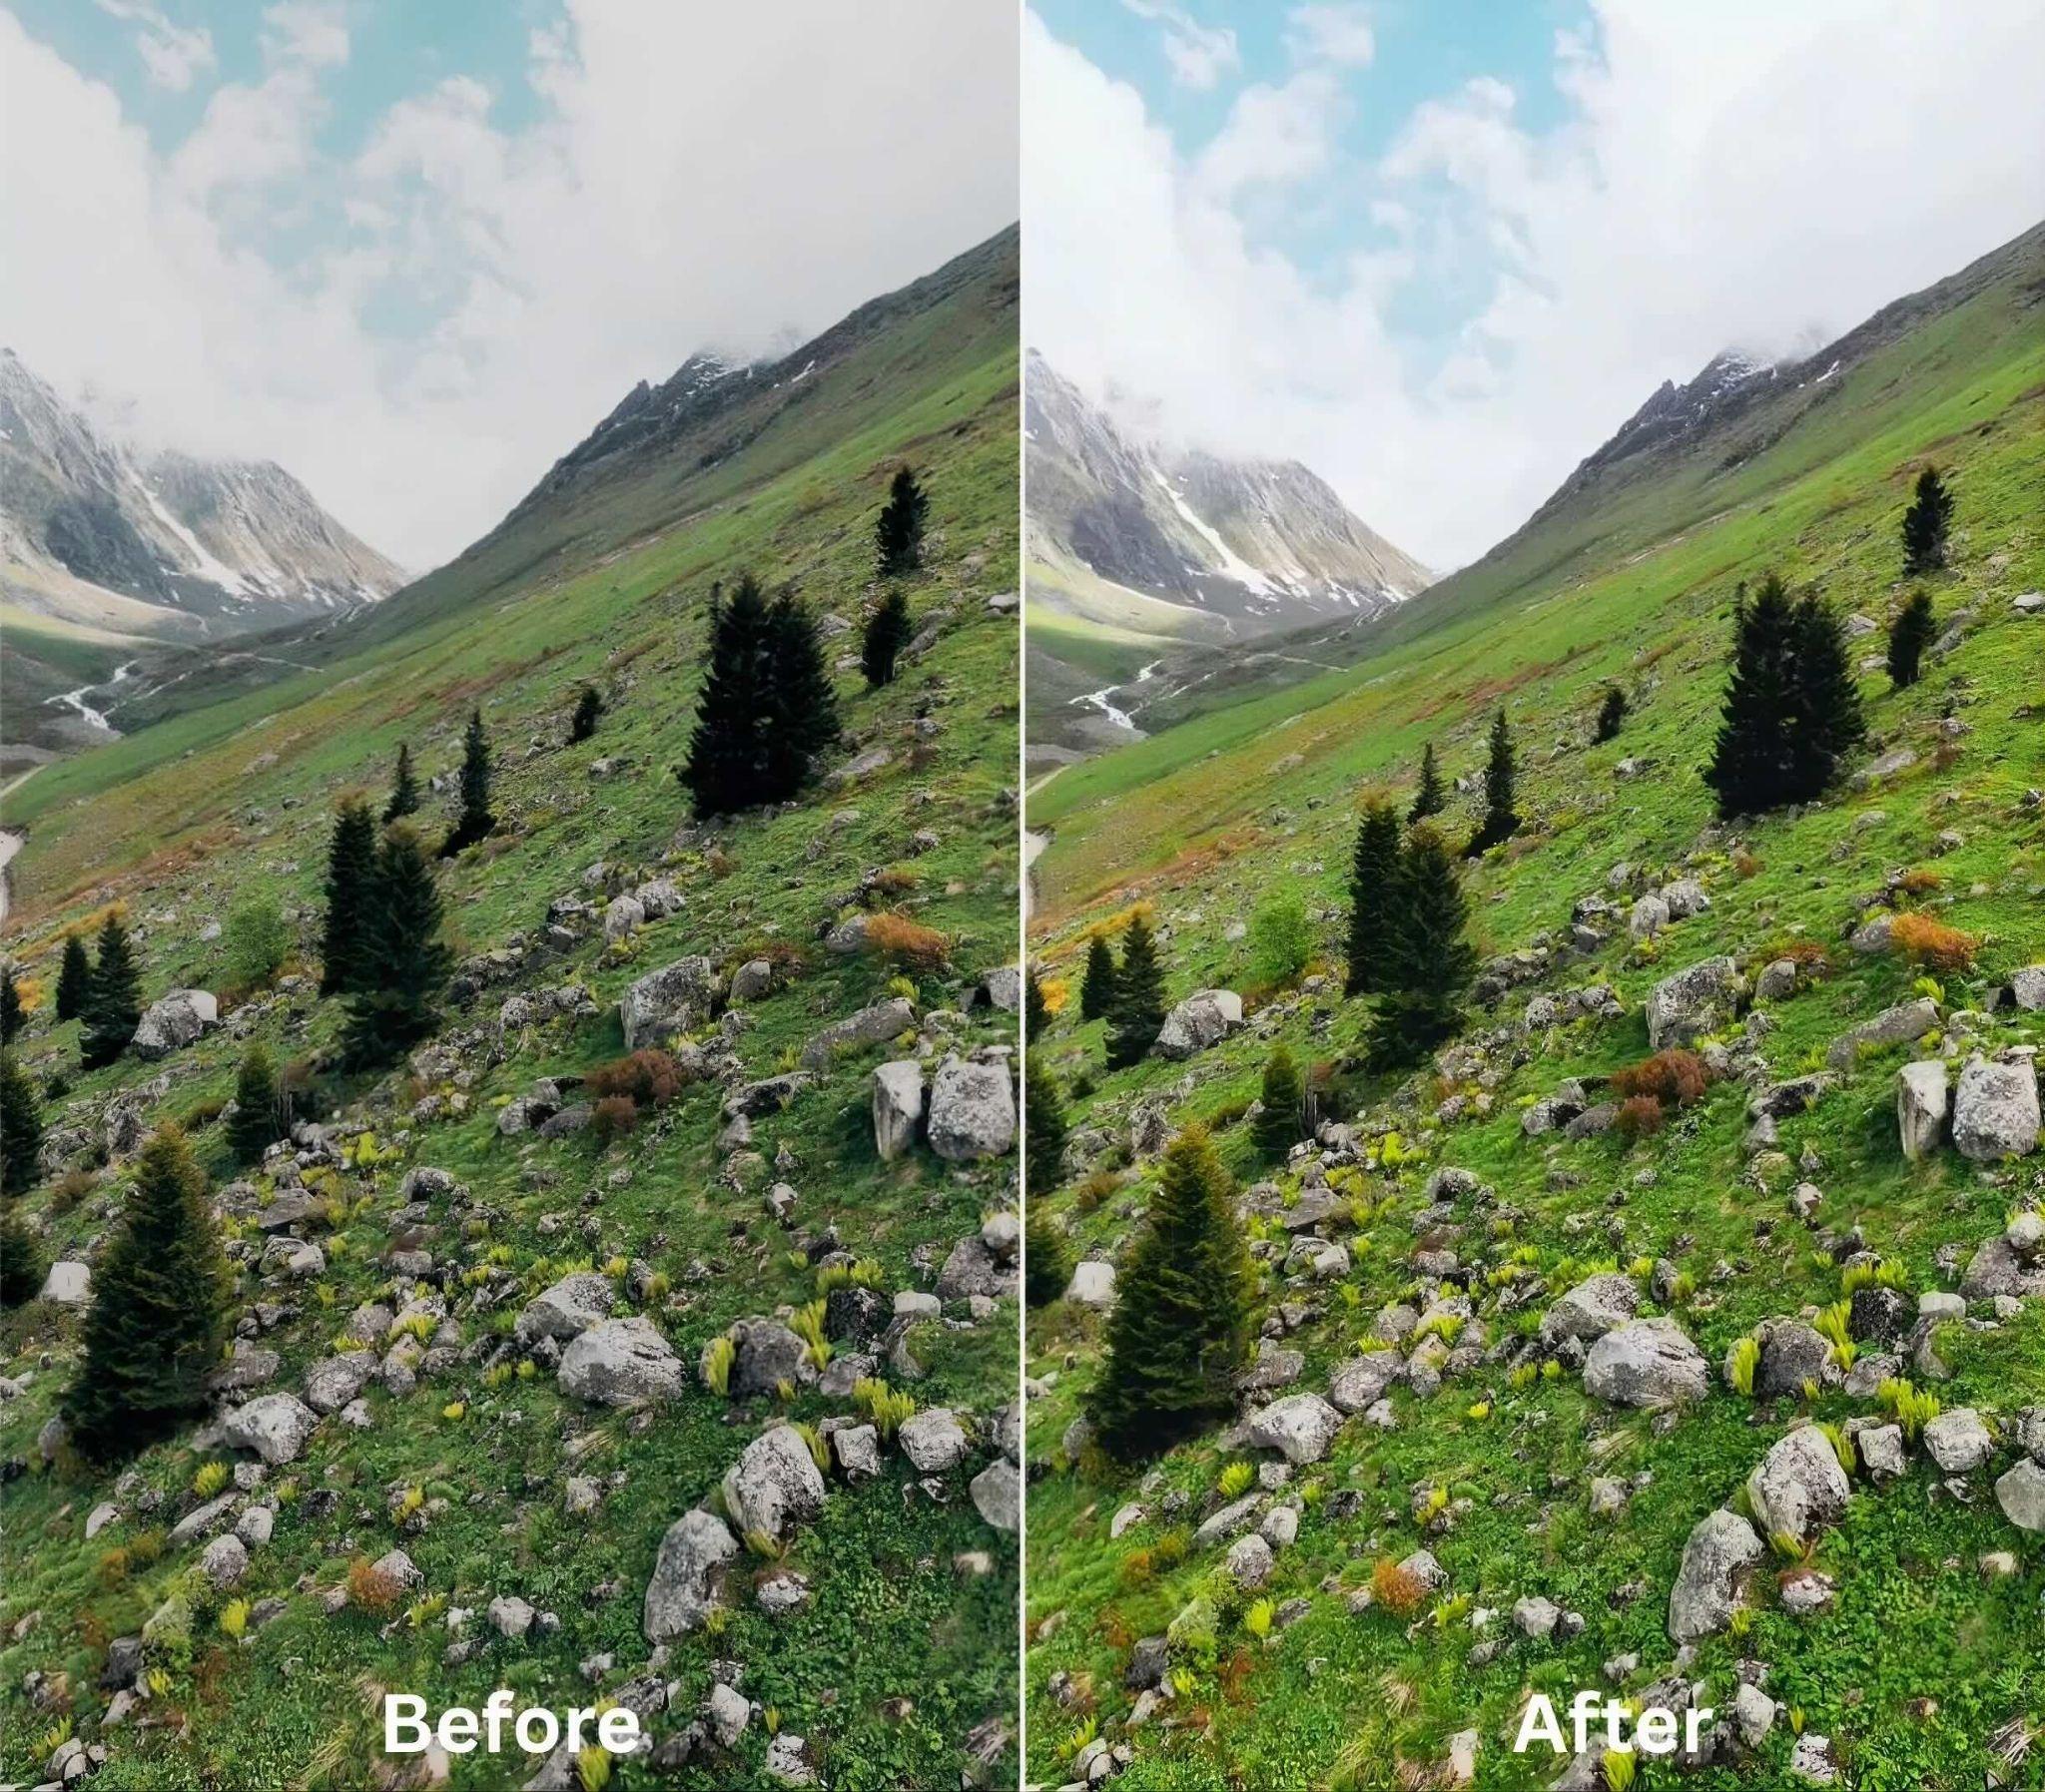
How to Color Grade Video in CapCut Mobile
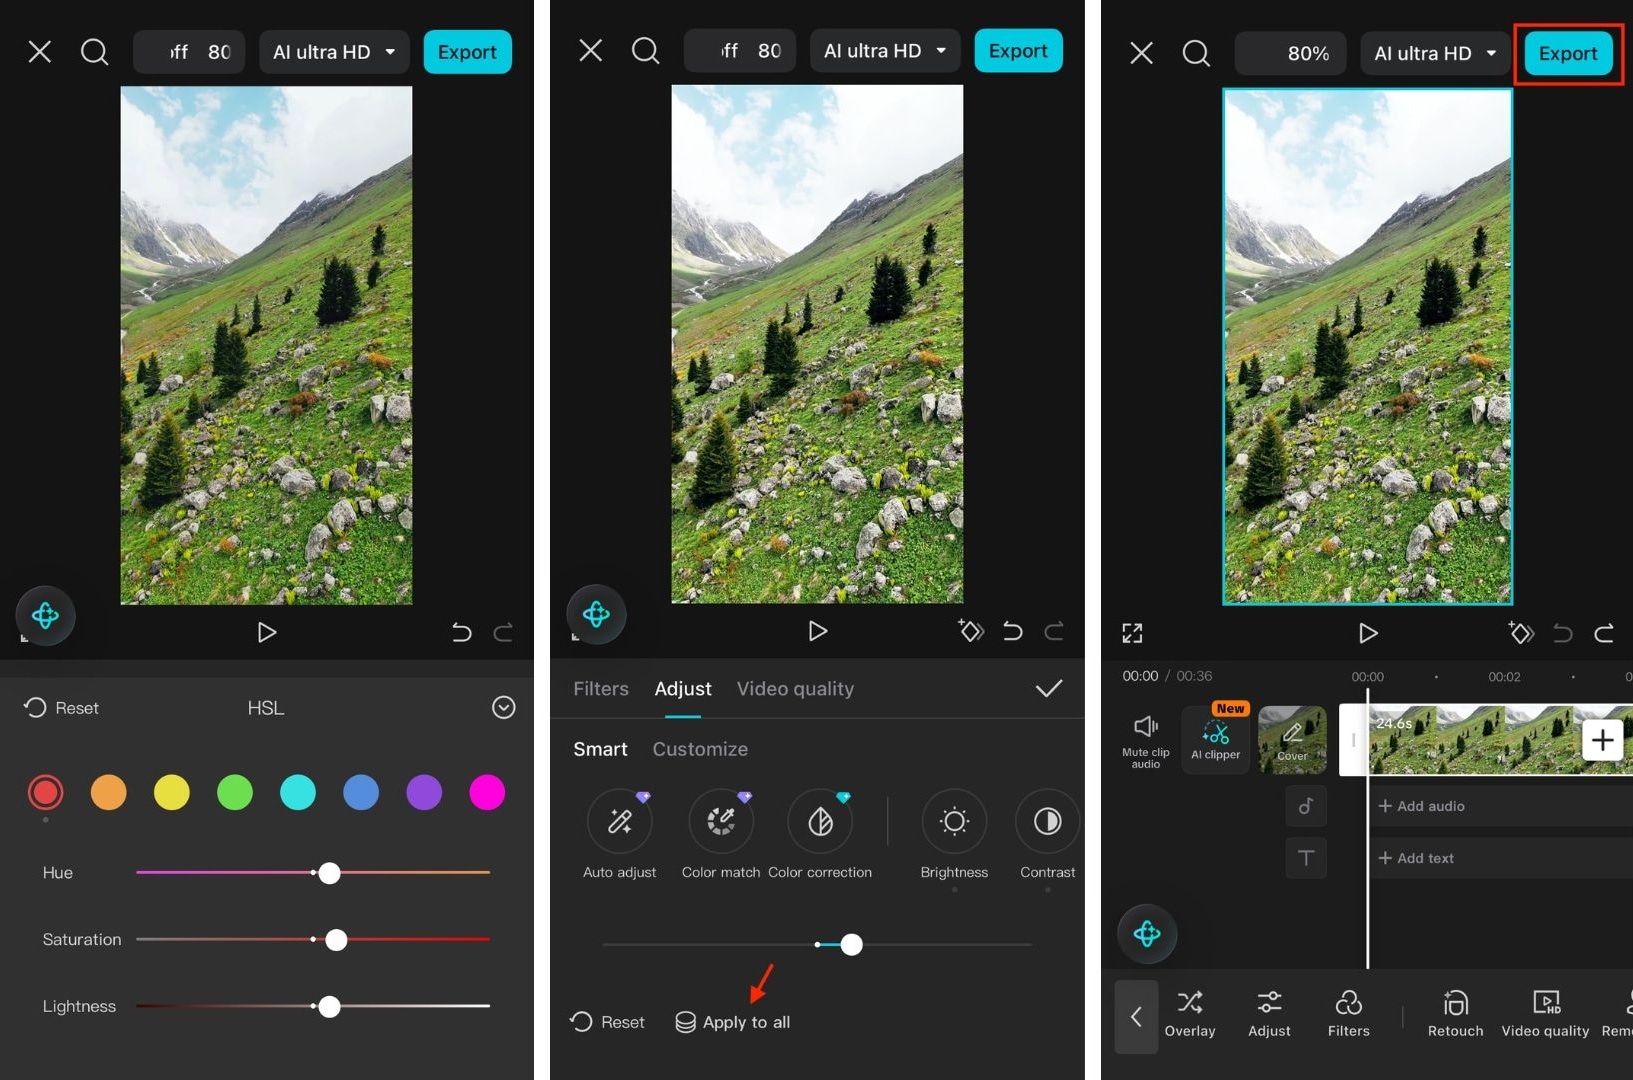
Step 1. Open CapCut, tap New project, and add your video. Select the clip on the timeline to access the editing tools.
Step 2. Tap Adjust to access the color controls. Start with brightness, contrast, saturation, temperature, and tint to balance the footage.
Step 3. Adjust saturation and other available color settings to create the look you want. Keep changes subtle to avoid unnatural colors.
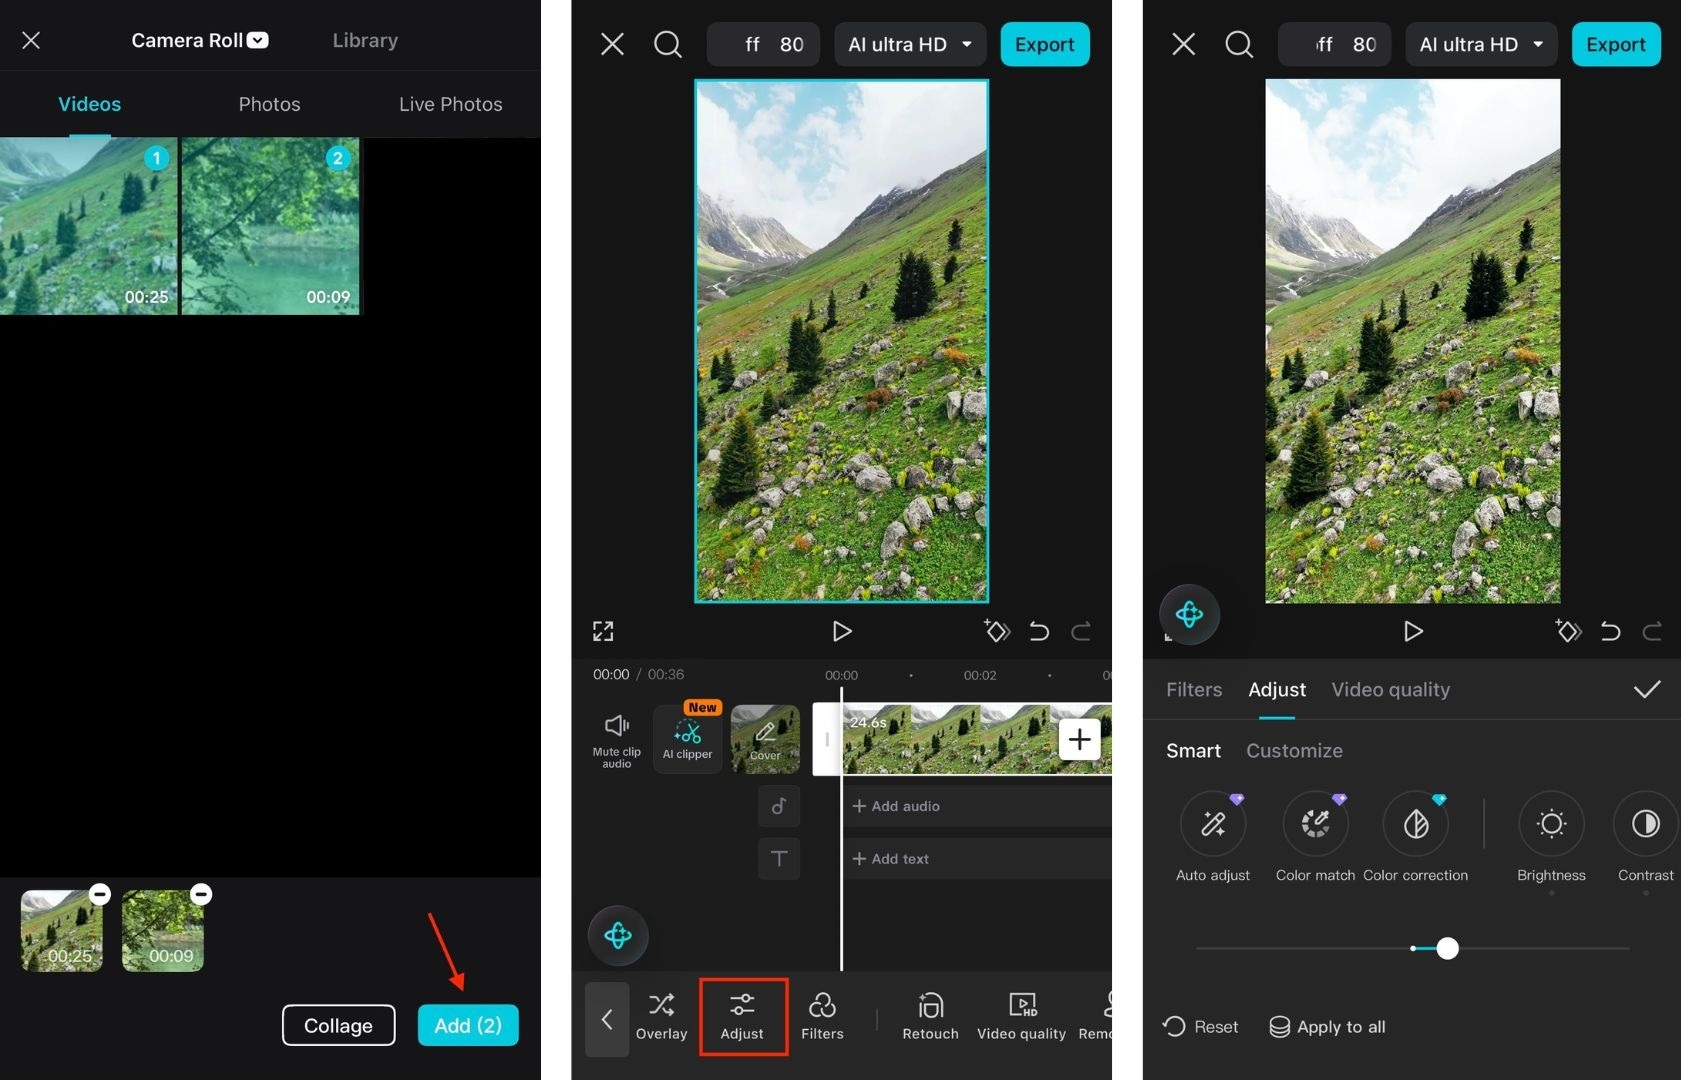
Step 4. Use HSL to adjust specific color ranges such as greens, blues, or skin tones. Use Apply to All to copy adjustments to similar clips.
Step 5. Once the colors look consistent, tap Export and choose your preferred resolution and frame rate.
Part 3. How to Color Grade Smartly in CapCut Using Color Match
If your clips look different because they were shot under different lighting conditions or with different cameras, CapCut’s Color Match can help bring them closer together. You can also use it when you want to recreate the look of a specific frame or clip.
The Color Match feature is available on both CapCut mobile and desktop. It requires an image or video clip as a reference, which CapCut uses to analyze the colors and apply a similar look to your selected footage.
How to use Color Match in CapCut
Step 1. Select a clip with the color and exposure you want to use as your reference. A well-balanced shot usually works better than one with extreme lighting or heavy color effects.
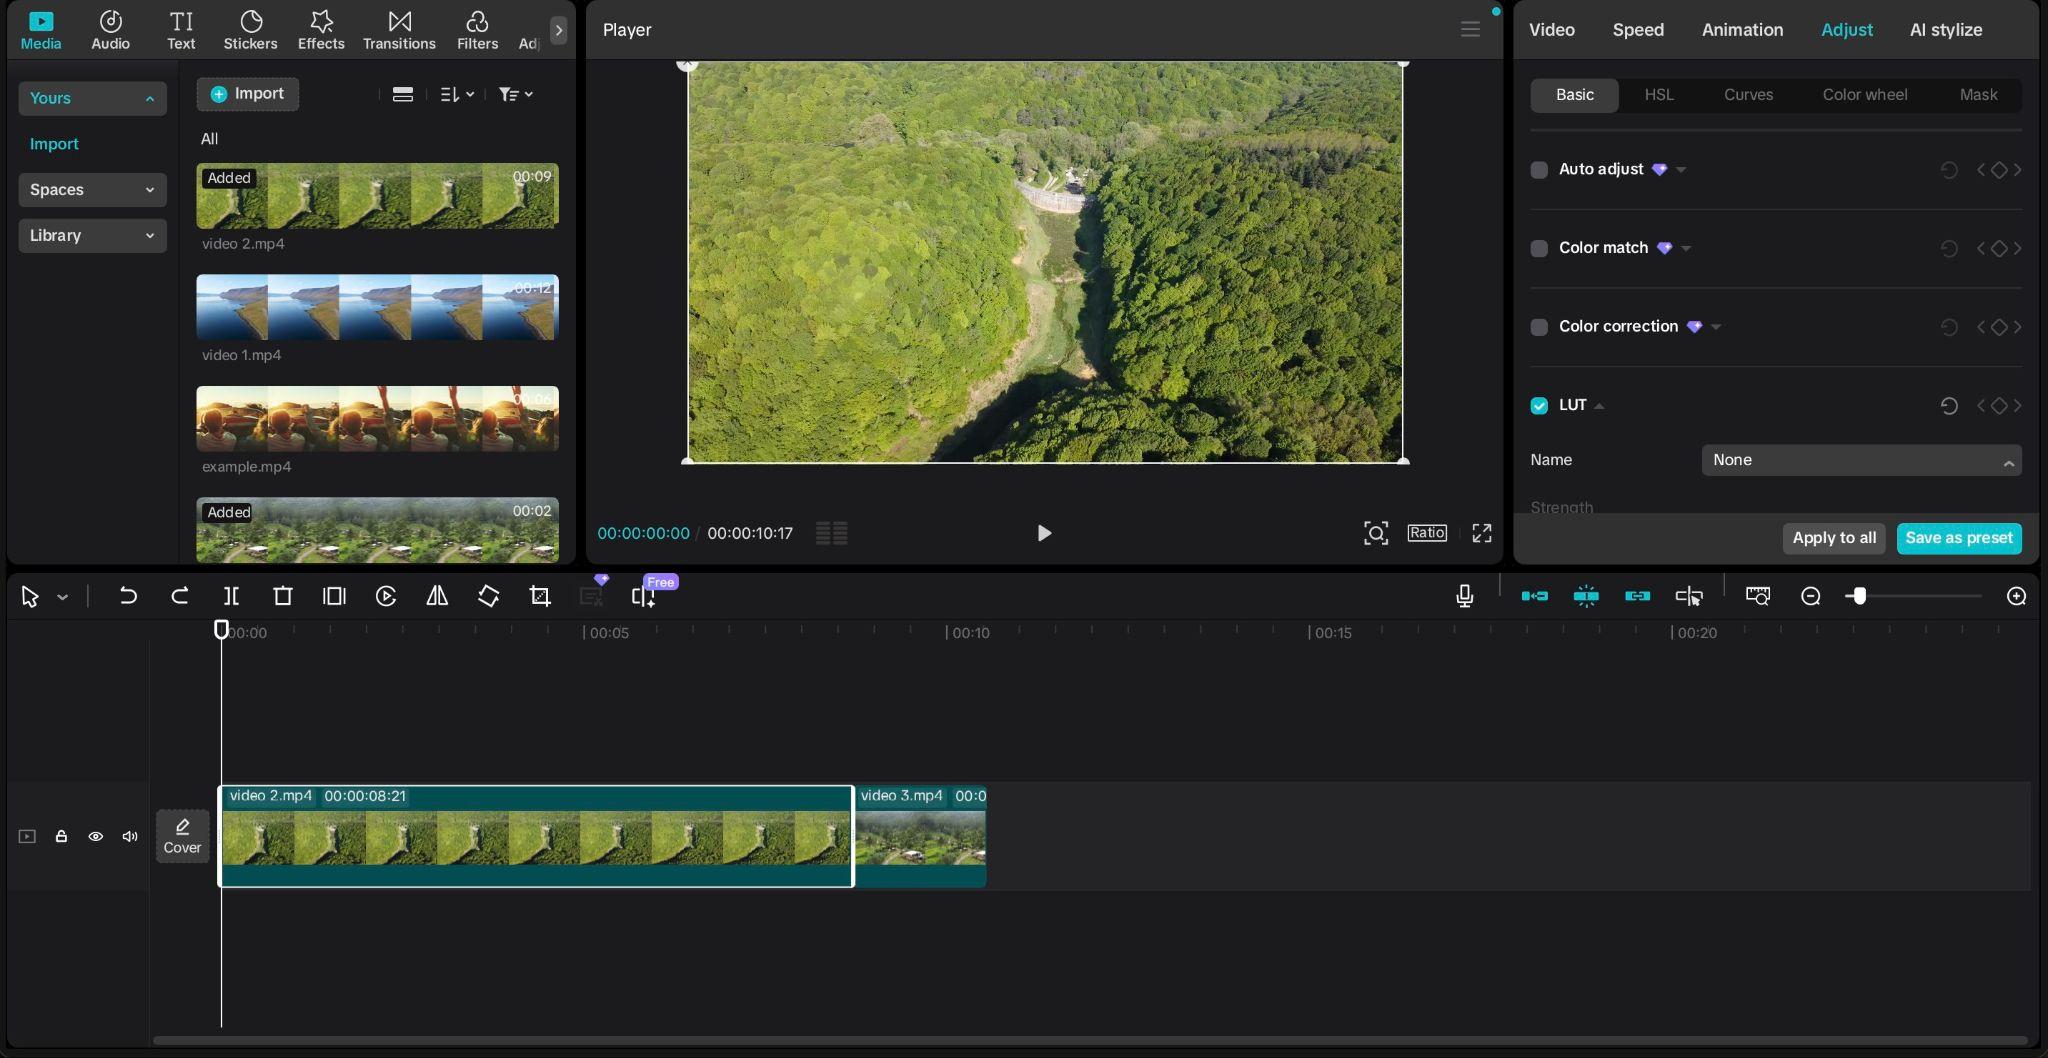
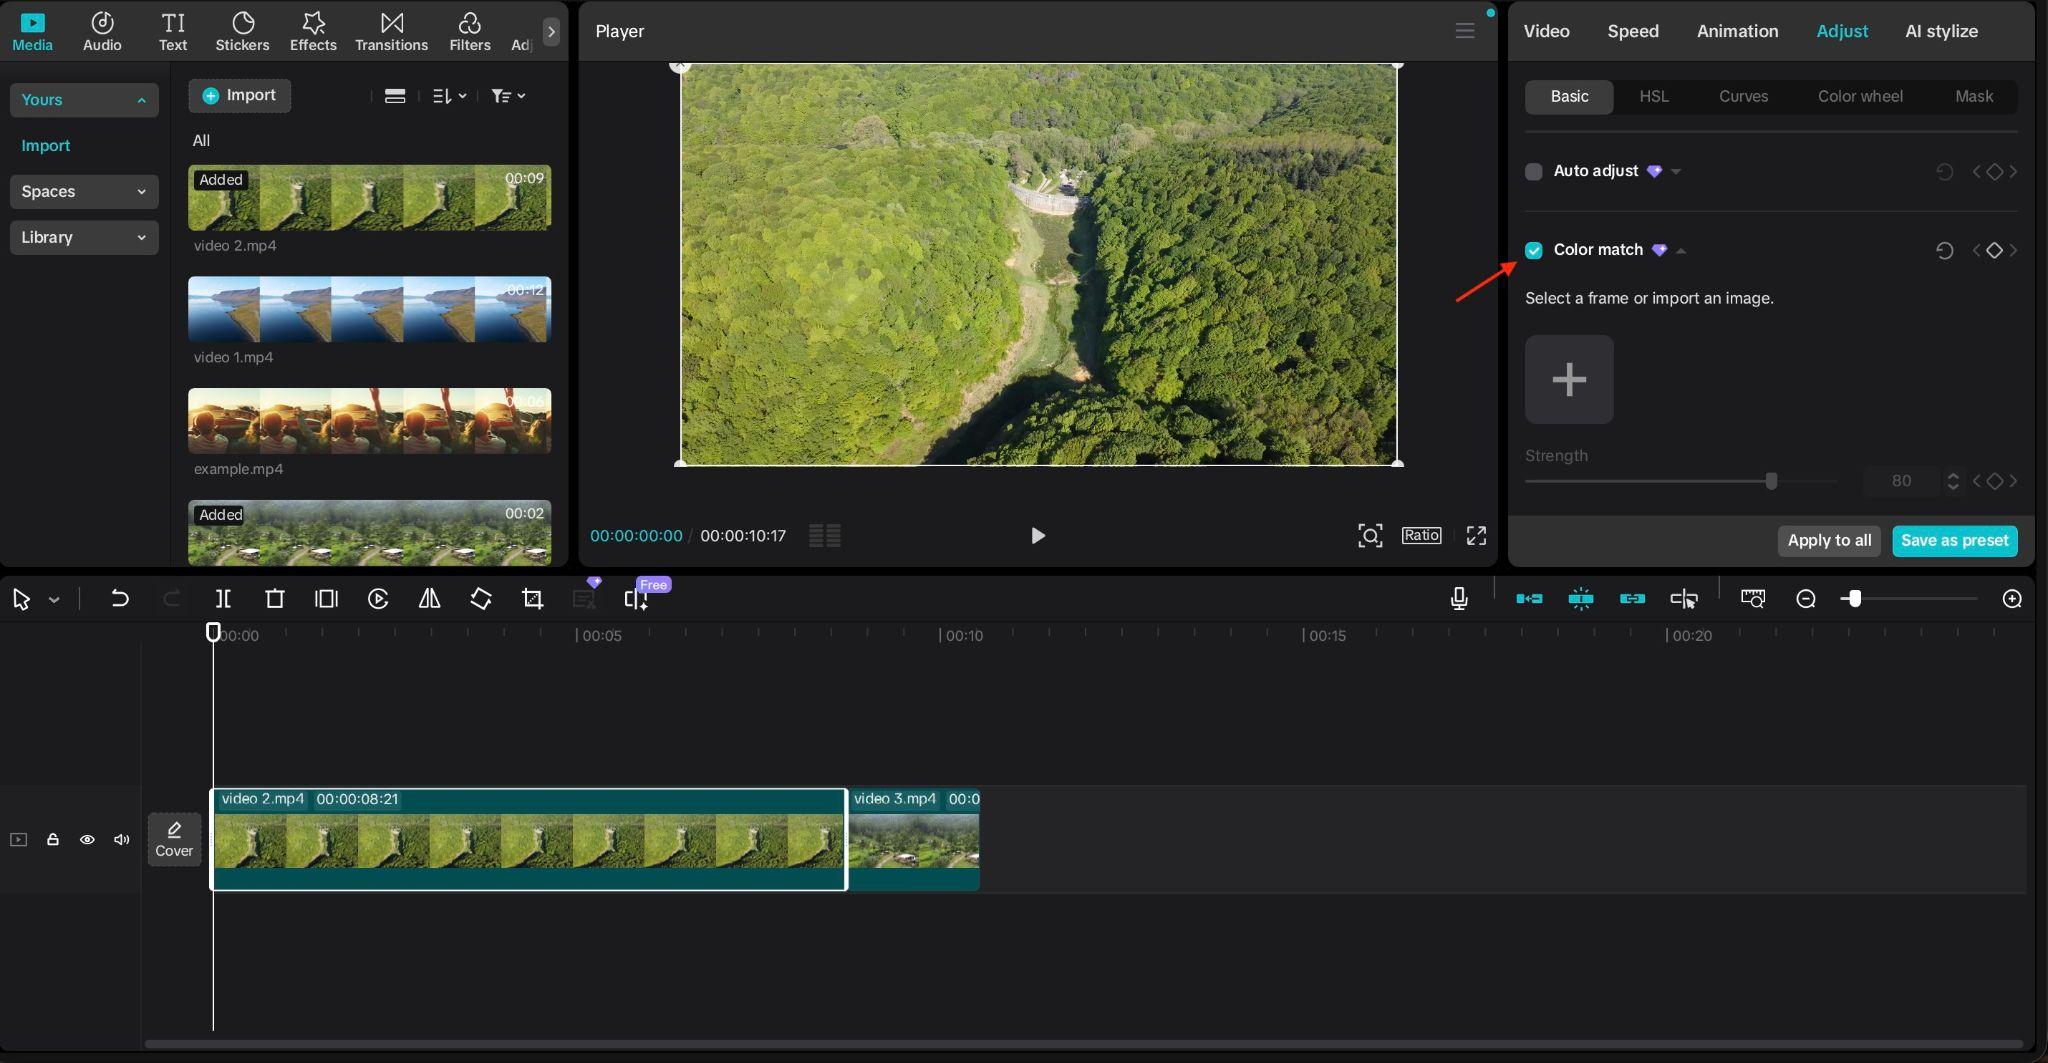
Step 2. Select the clip you want to adjust, open Color Match, and choose the reference frame or clip. You can also adjust the intensity when available.
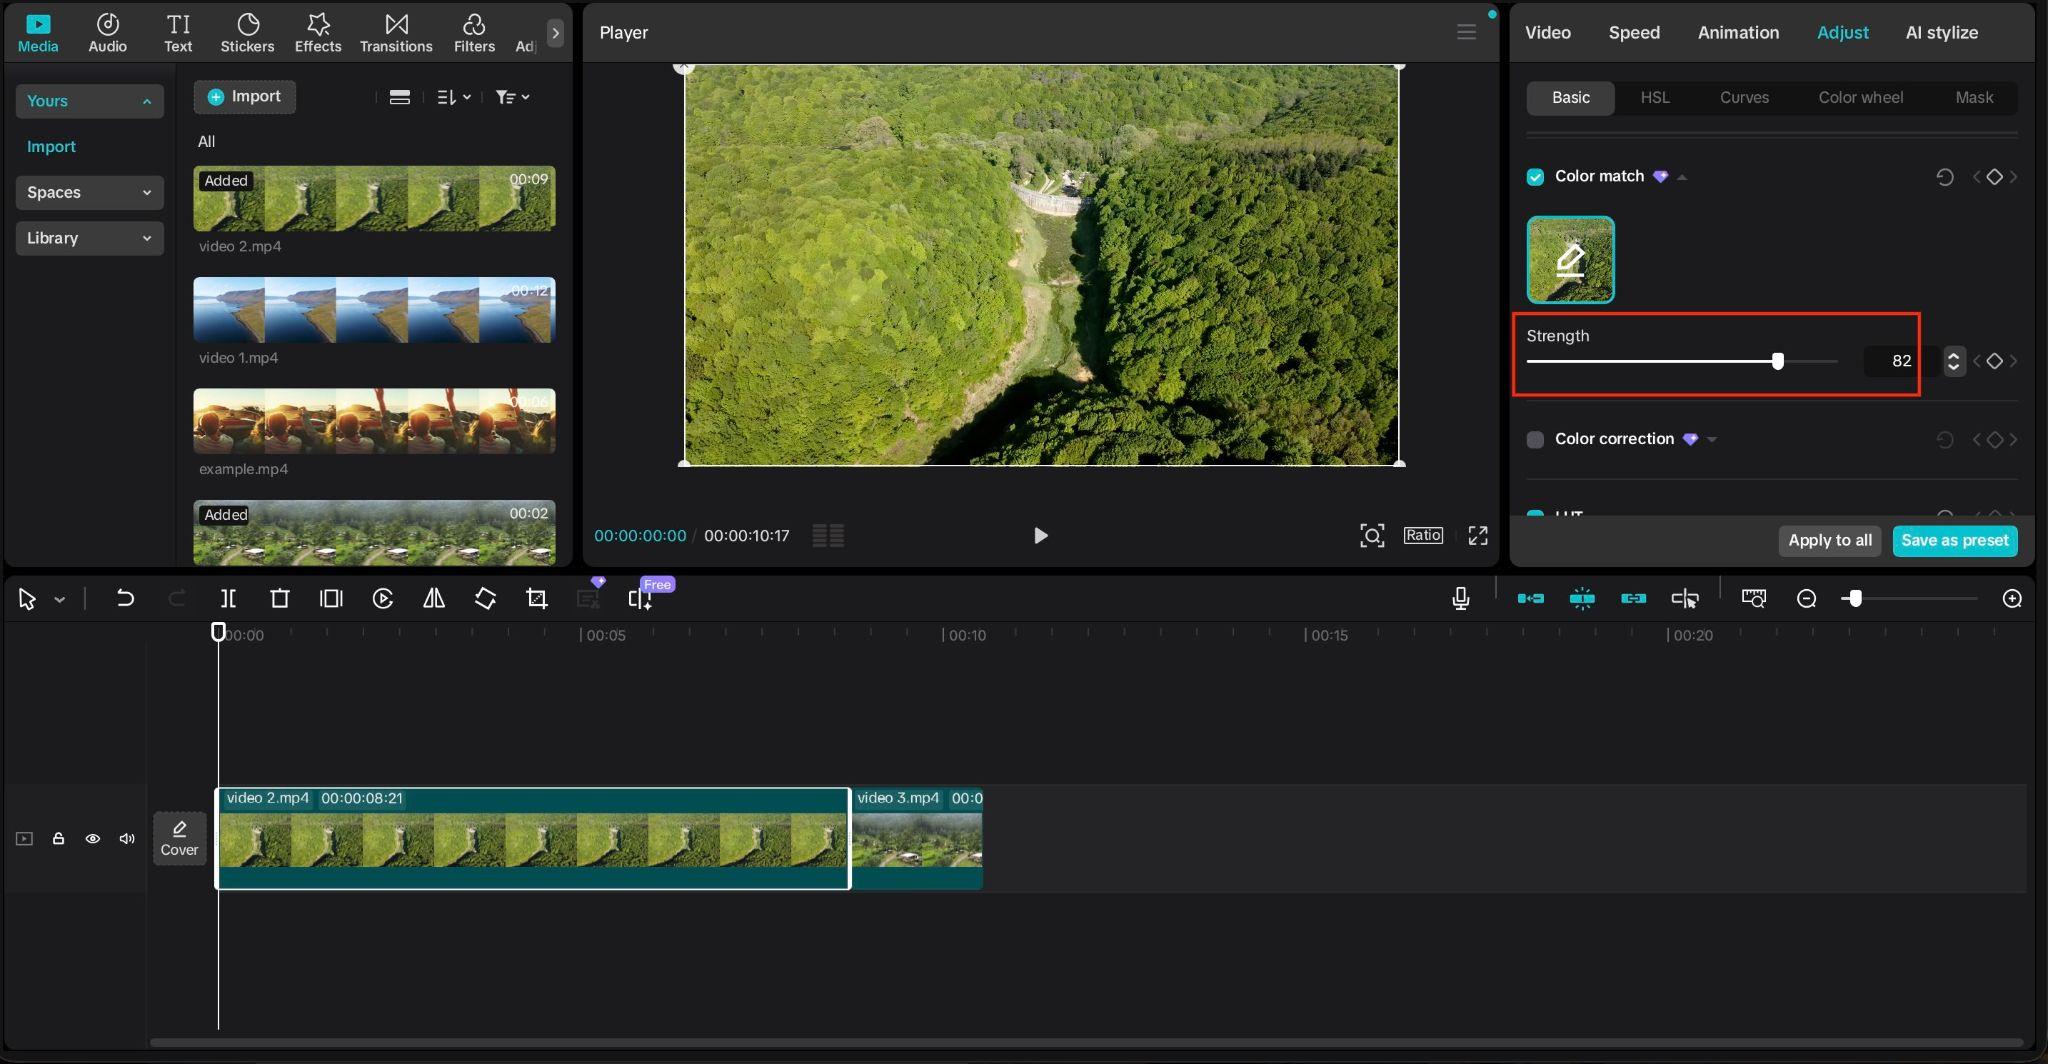
Step 3. Color Match makes the clips more similar, but it may not make them identical. Adjust the strength, check exposure, skin tones, contrast, and saturation, then make manual adjustments if necessary.
Part 4. CapCut Color Grading Tips for RAW, Log & Underwater Footage
After you’ve got the basic color adjustments down, let’s move on to footage that can be more challenging to grade. RAW, Log, flat, and underwater footage can look dull, washed out, or noticeably different straight out of the camera.
If you’re working with these types of footage, the tips below explain what causes these color issues and which adjustments you can use in CapCut to improve them.
How to Color Grade RAW and Log Footage on CapCut
RAW retains multiple image data for post-production, while Log footage uses a flat profile to preserve dynamic range. Flat footage has lower contrast and saturation. These formats can look washed out before correction, but they need slightly different workflows.
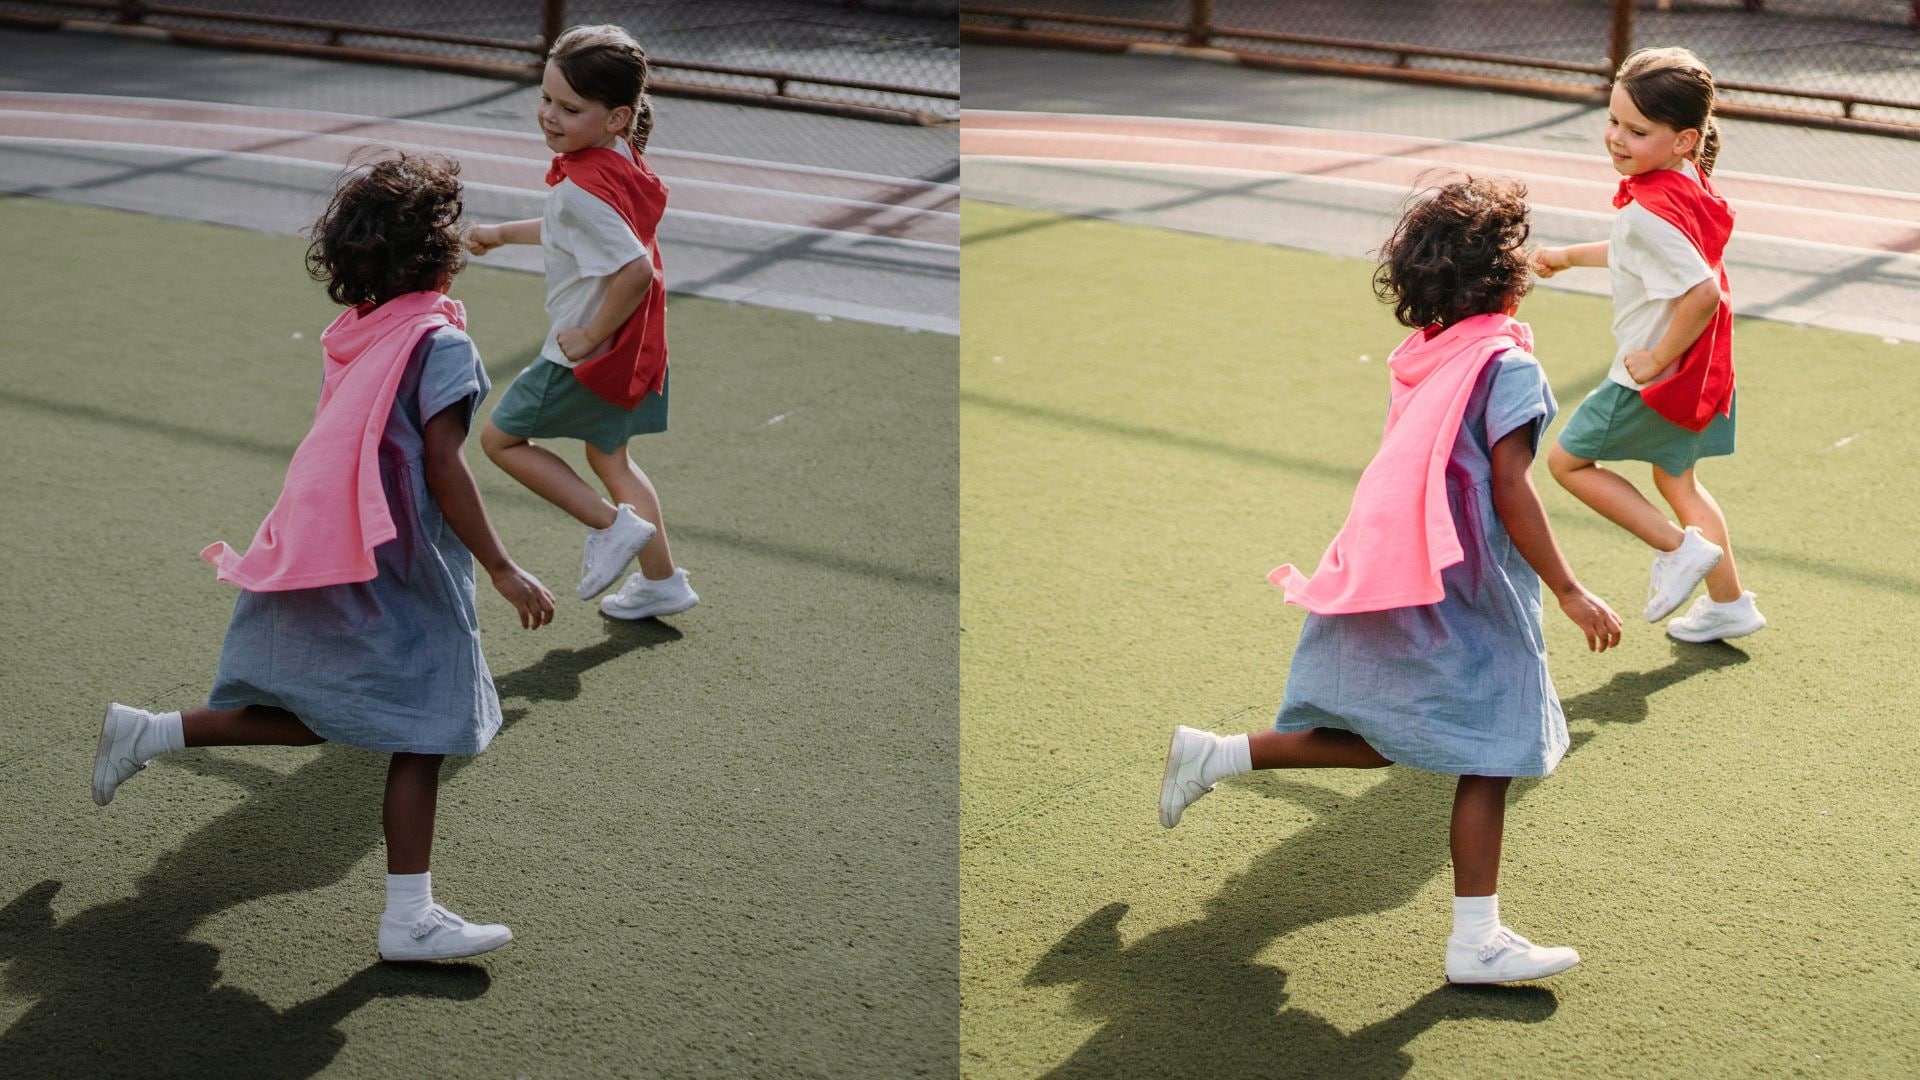
To color grade RAW video in CapCut, start with the basic image before adding a creative look:
- Correct exposure: Balance highlights, shadows, and brightness
- Fix white balance: Adjust temperature and tint to remove unwanted color casts
- Restore contrast: Add definition to flat-looking footage
- Restore saturation: Increase it gradually to avoid oversaturated colors
- Add a LUT: A compatible LUT can quickly give Log or flat footage a more natural starting point. CapCut supports LUT formats such as .CUBE and .3DL
- Make manual adjustments: Fine-tune the result with HSL, Curves, or other color controls instead of relying entirely on the LUT
How to Color Grade Underwater Video on CapCut
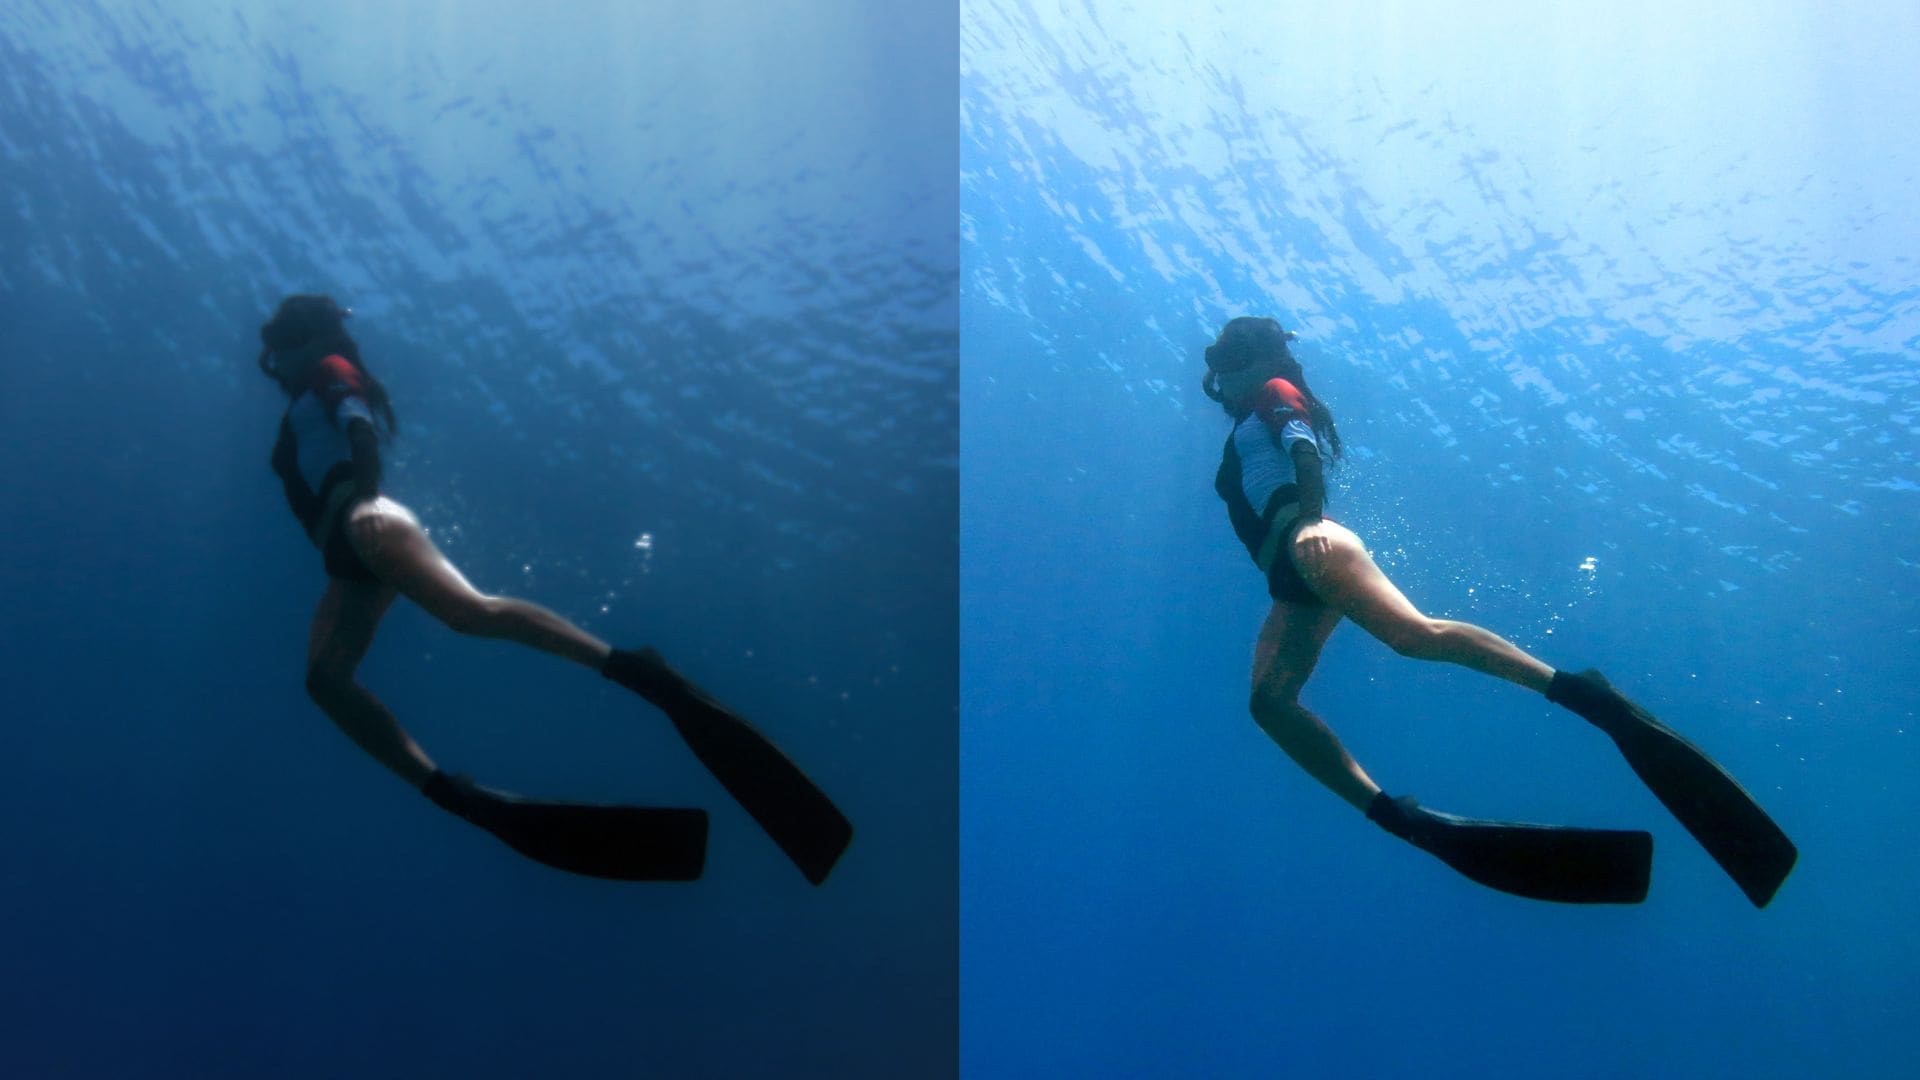
Underwater footage often has a blue or green cast because water absorbs warmer wavelengths of light. The aim is to restore some warmth and contrast while keeping the water and subjects believable. Use these adjustments:
- Temperature and tint: Reduce unwanted blue or green tones
- Contrast: Add depth to footage that looks blurry
- Saturation: Restore faded colors without making them too intense.
- HSL: Target blue, cyan, or green tones more precisely
- Skin tones: Pay attention to faces when people are in the shot. Strong color corrections can easily make skin look too orange, red, or saturated
How to Color Grade Specific Areas in CapCut
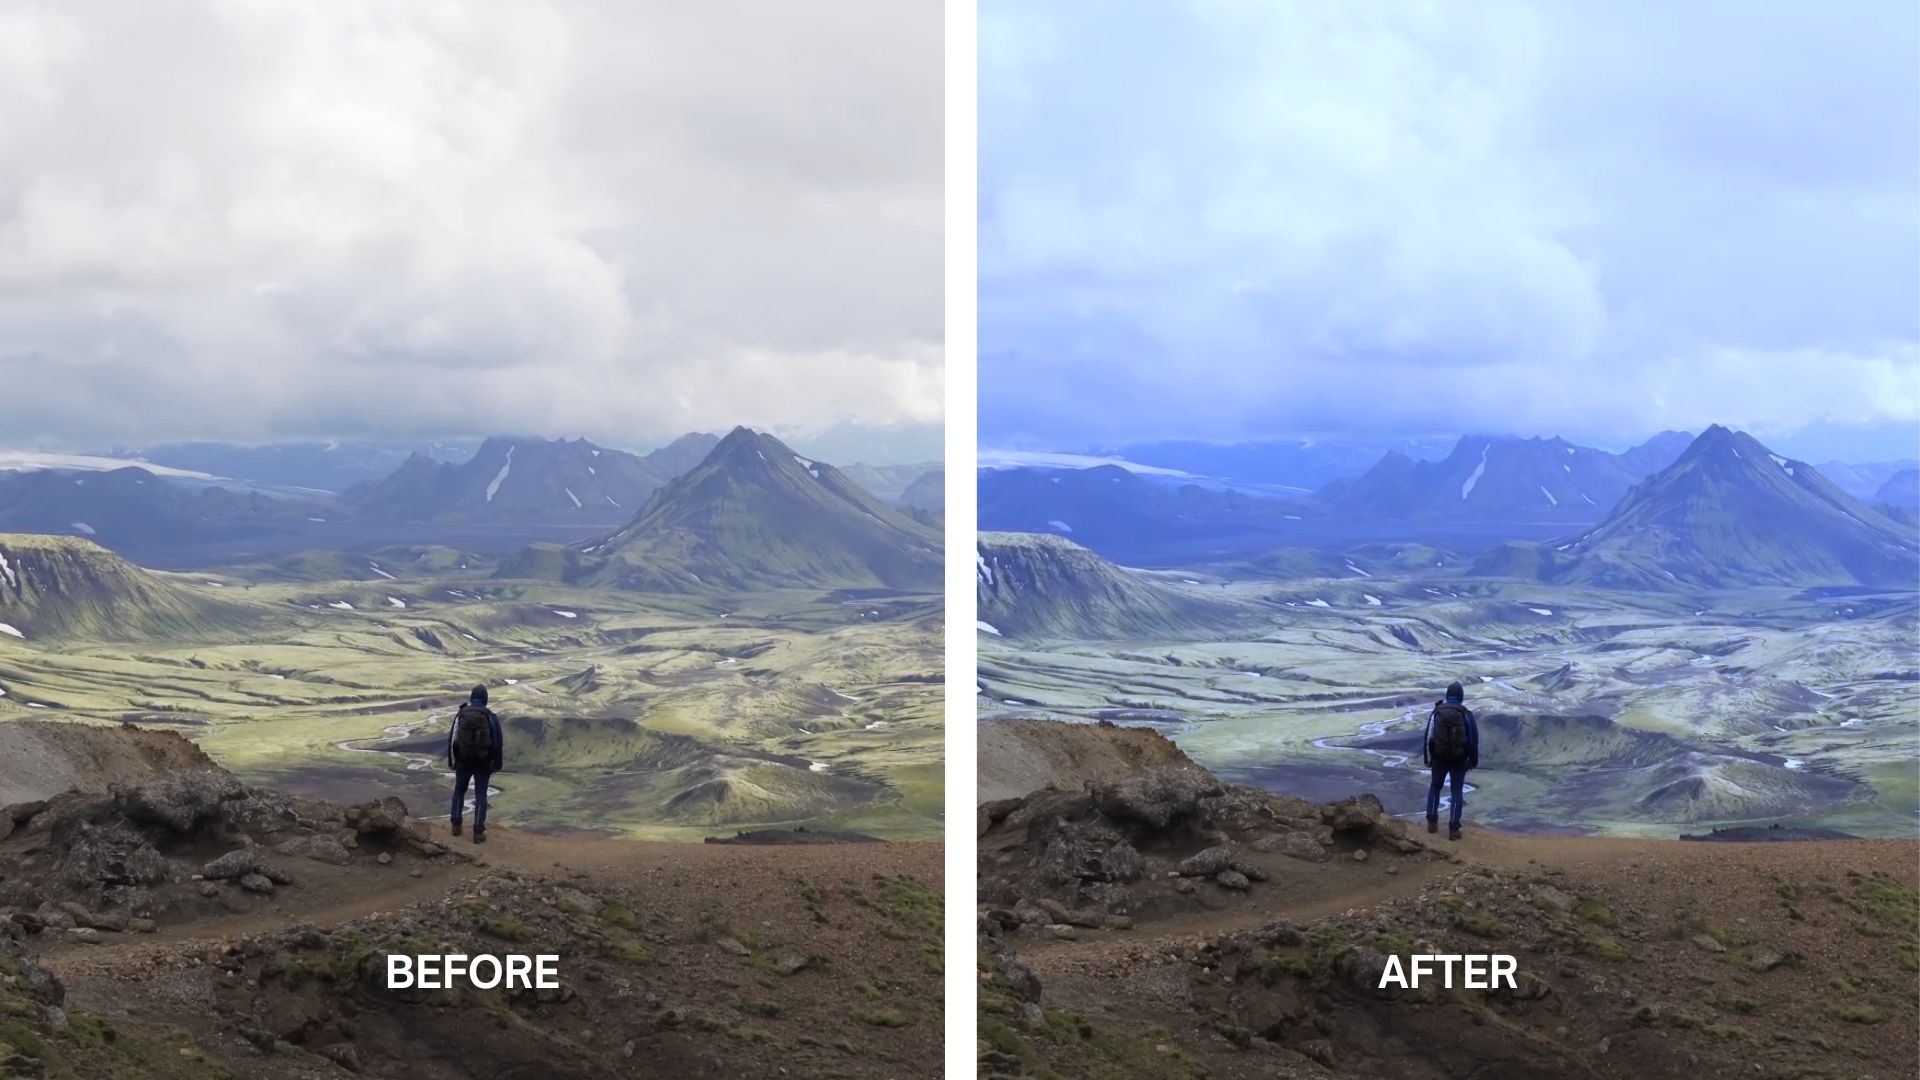
Now, what if you only want to change the color in one part of a shot without affecting the rest of the frame? CapCut also supports masking within its Adjustment tools, which helps you isolate a specific area and apply color adjustments to it.
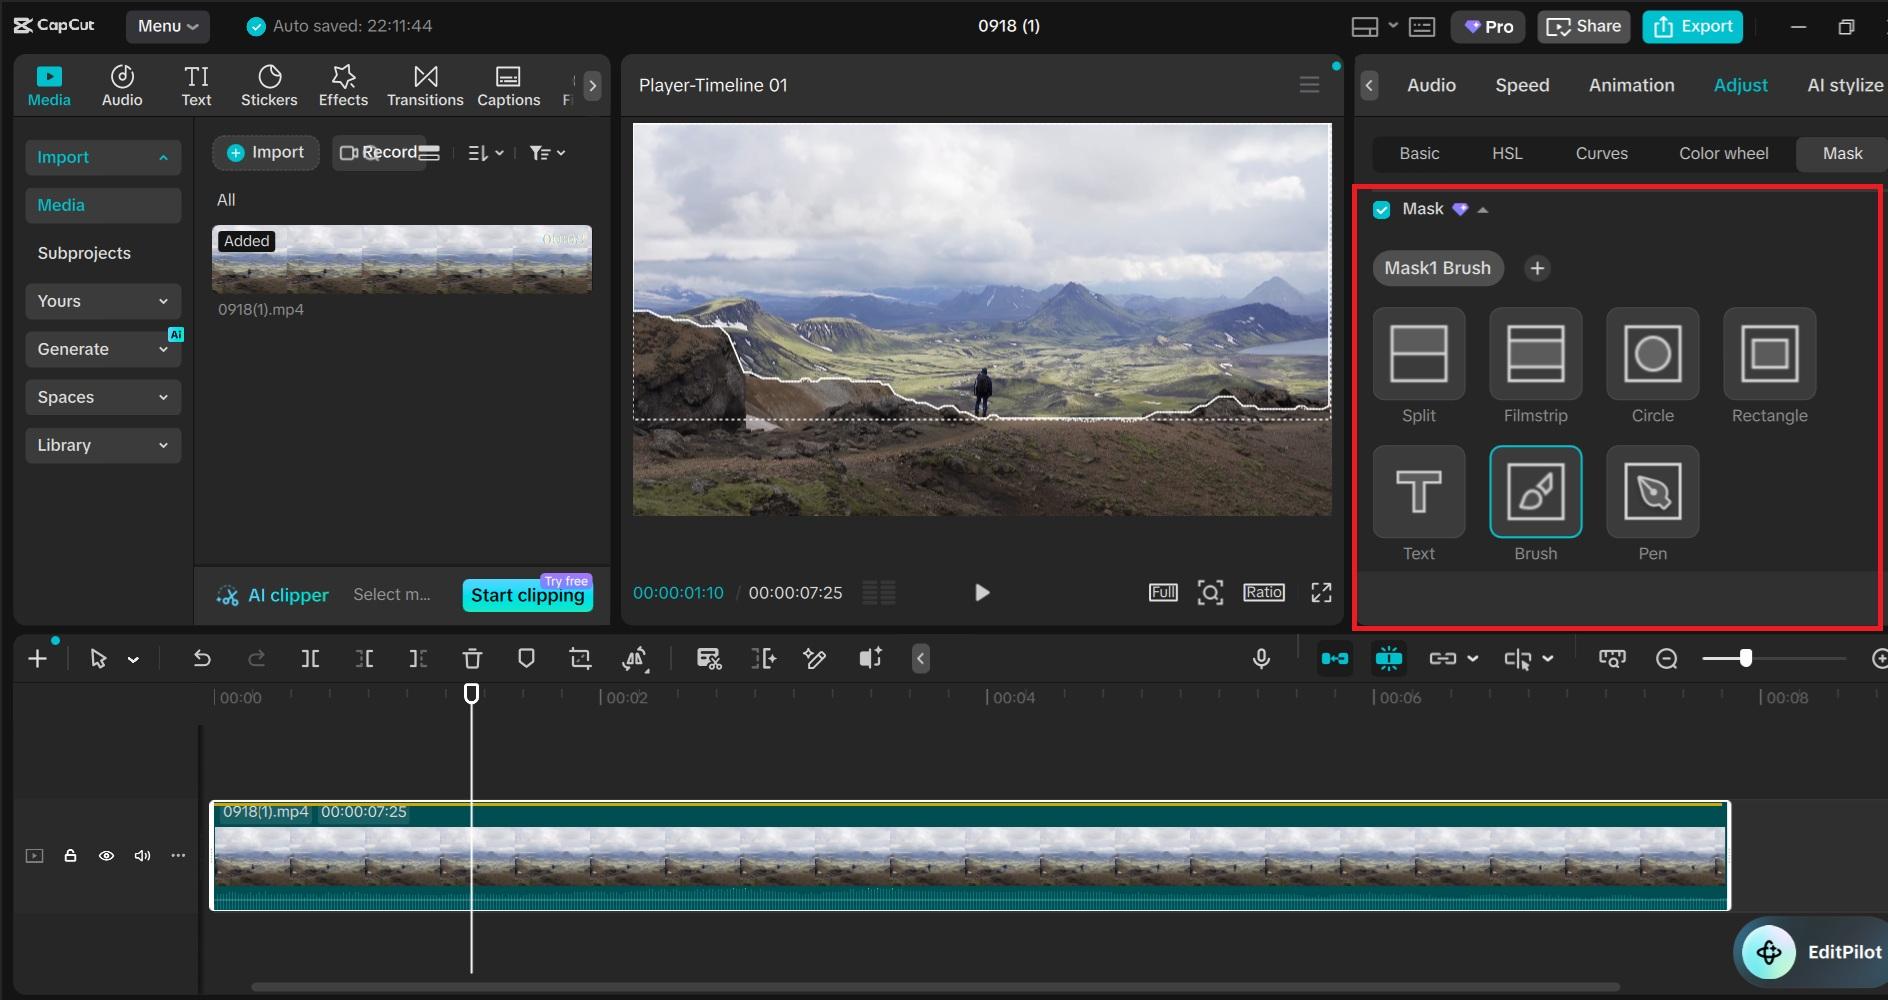
By selecting the Mask option, you can choose a shape such as a circle, rectangle, brush, or pen to isolate the area you want to edit. You can then adjust its color without changing the rest of the frame.
Part 5. Alternative to CapCut for Selective Color Grading
CapCut is not the only video editor that supports color correction and grading, including tools for selective color adjustments. If you want to try another editor with a similar range of color tools, you can consider using Wondershare Filmora.
Filmora offers Color Mask for targeted color grading, as well as HSL, Color Wheels, Curves, and LUTs for more precise color adjustments. The color grading tools are quite similar to those in CapCut, but Filmora offers a different interface and workflow that may suit your editing style better.

How to Color Grade with Filmora Using Color Mask
Step 1. Import your footage into Filmora and drag the clip to the timeline.
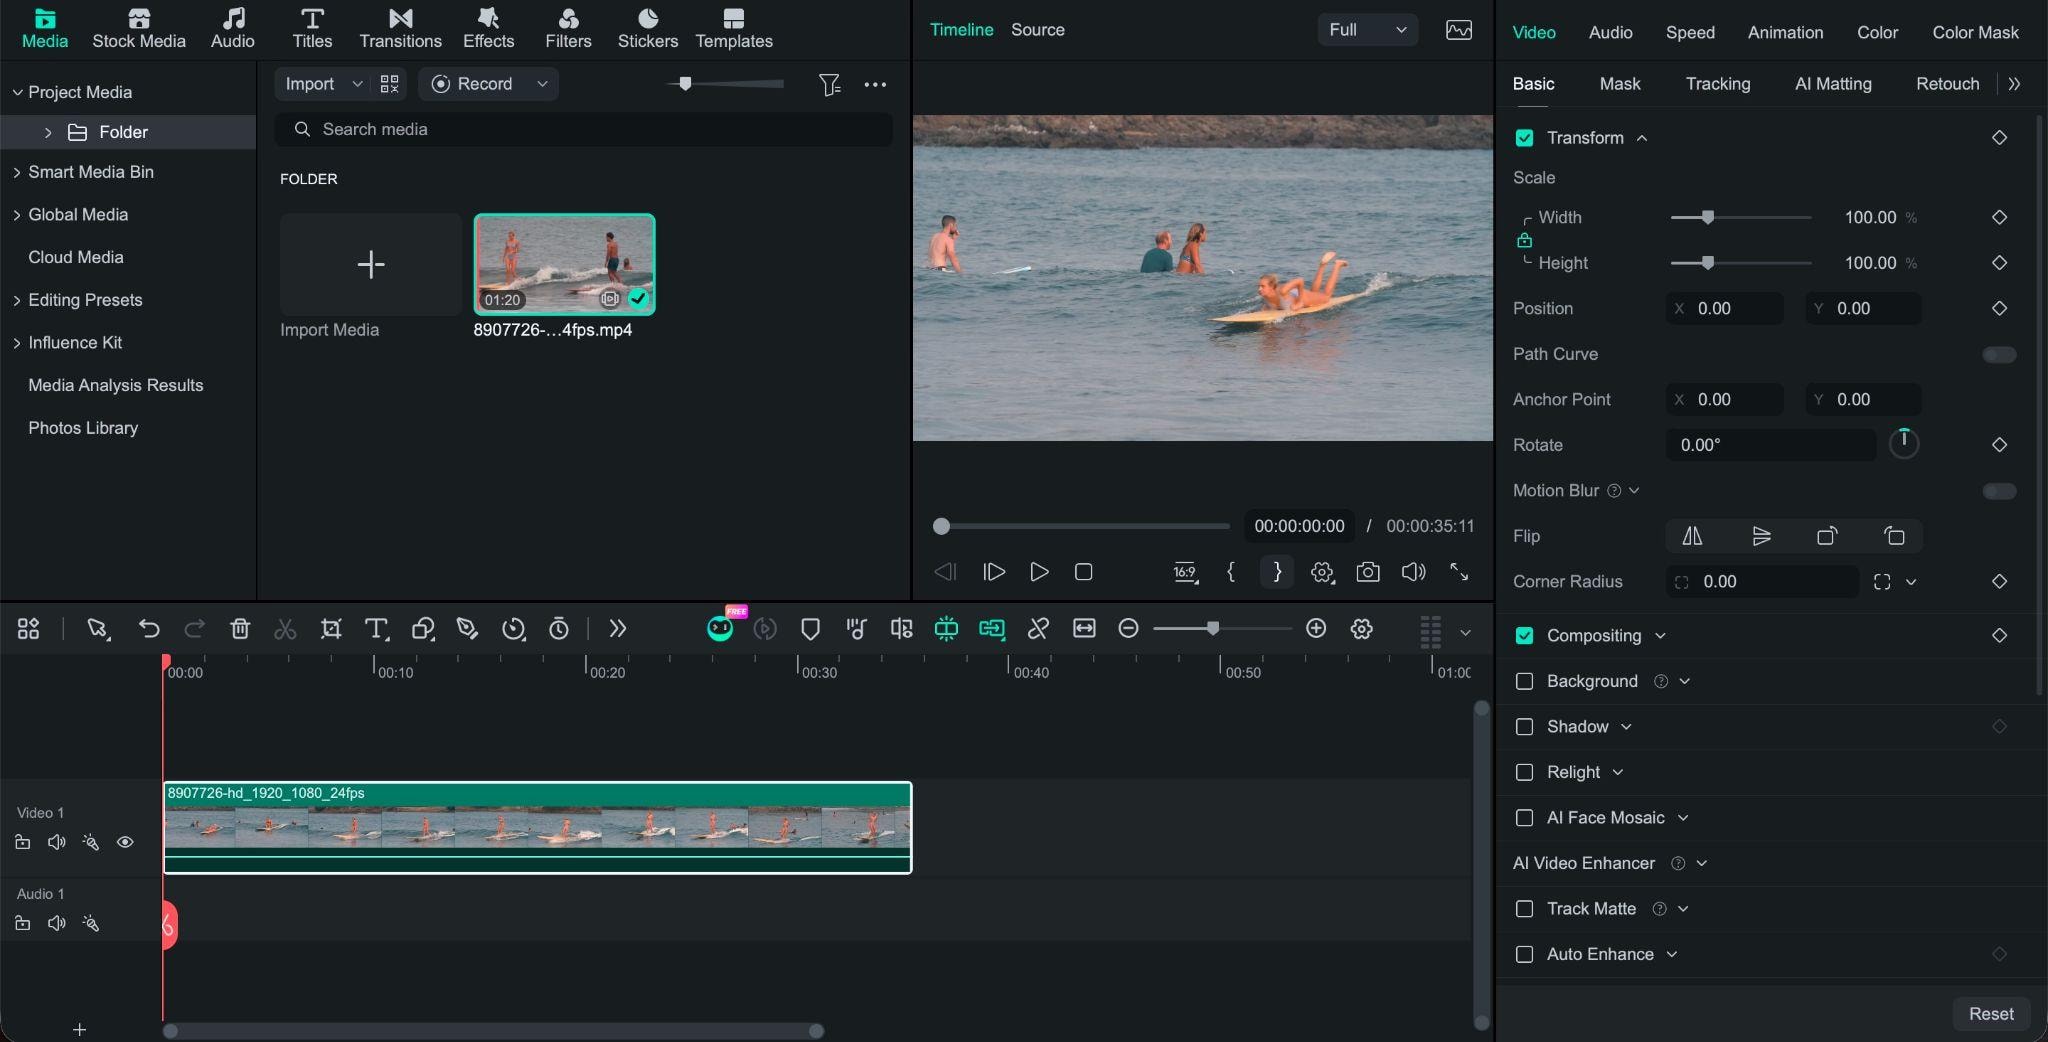
Step 2. Select the clip and go to the Color Mask tab.
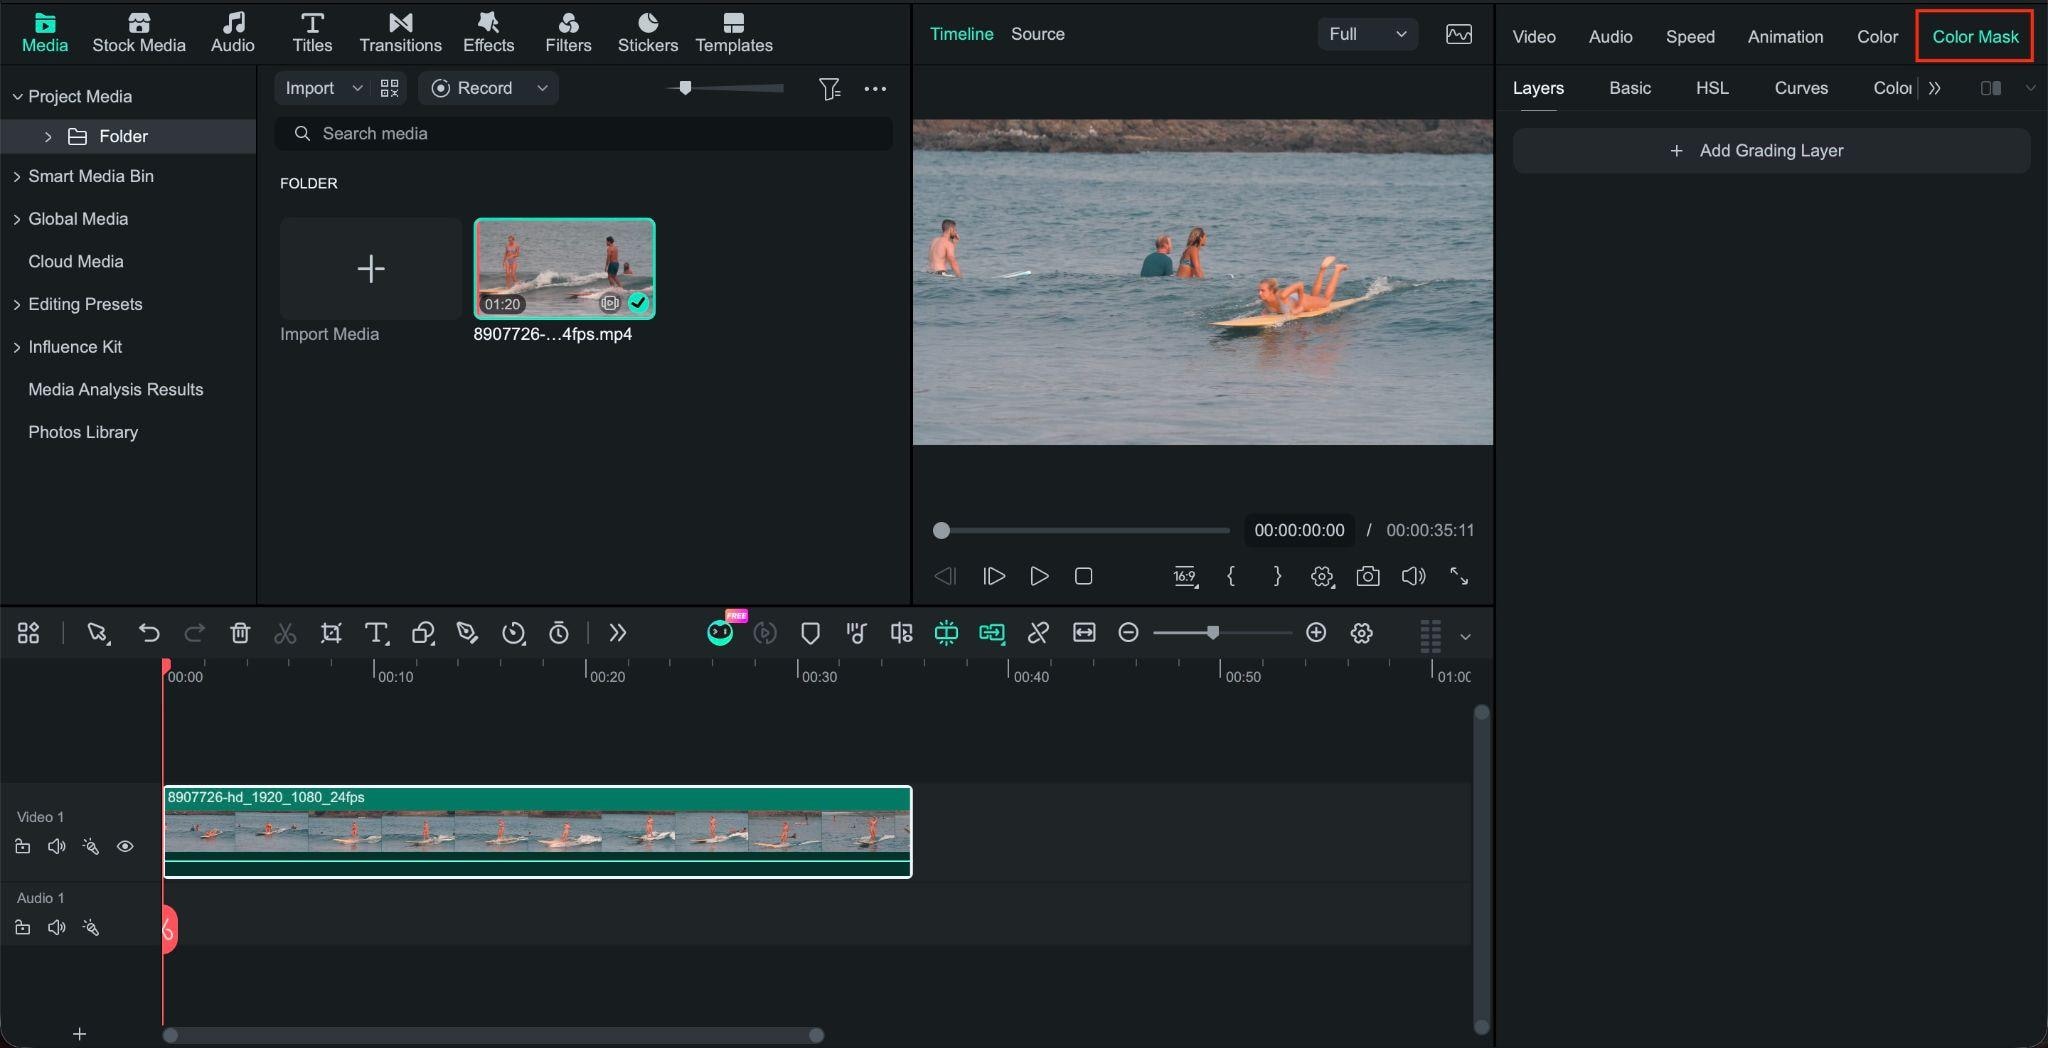
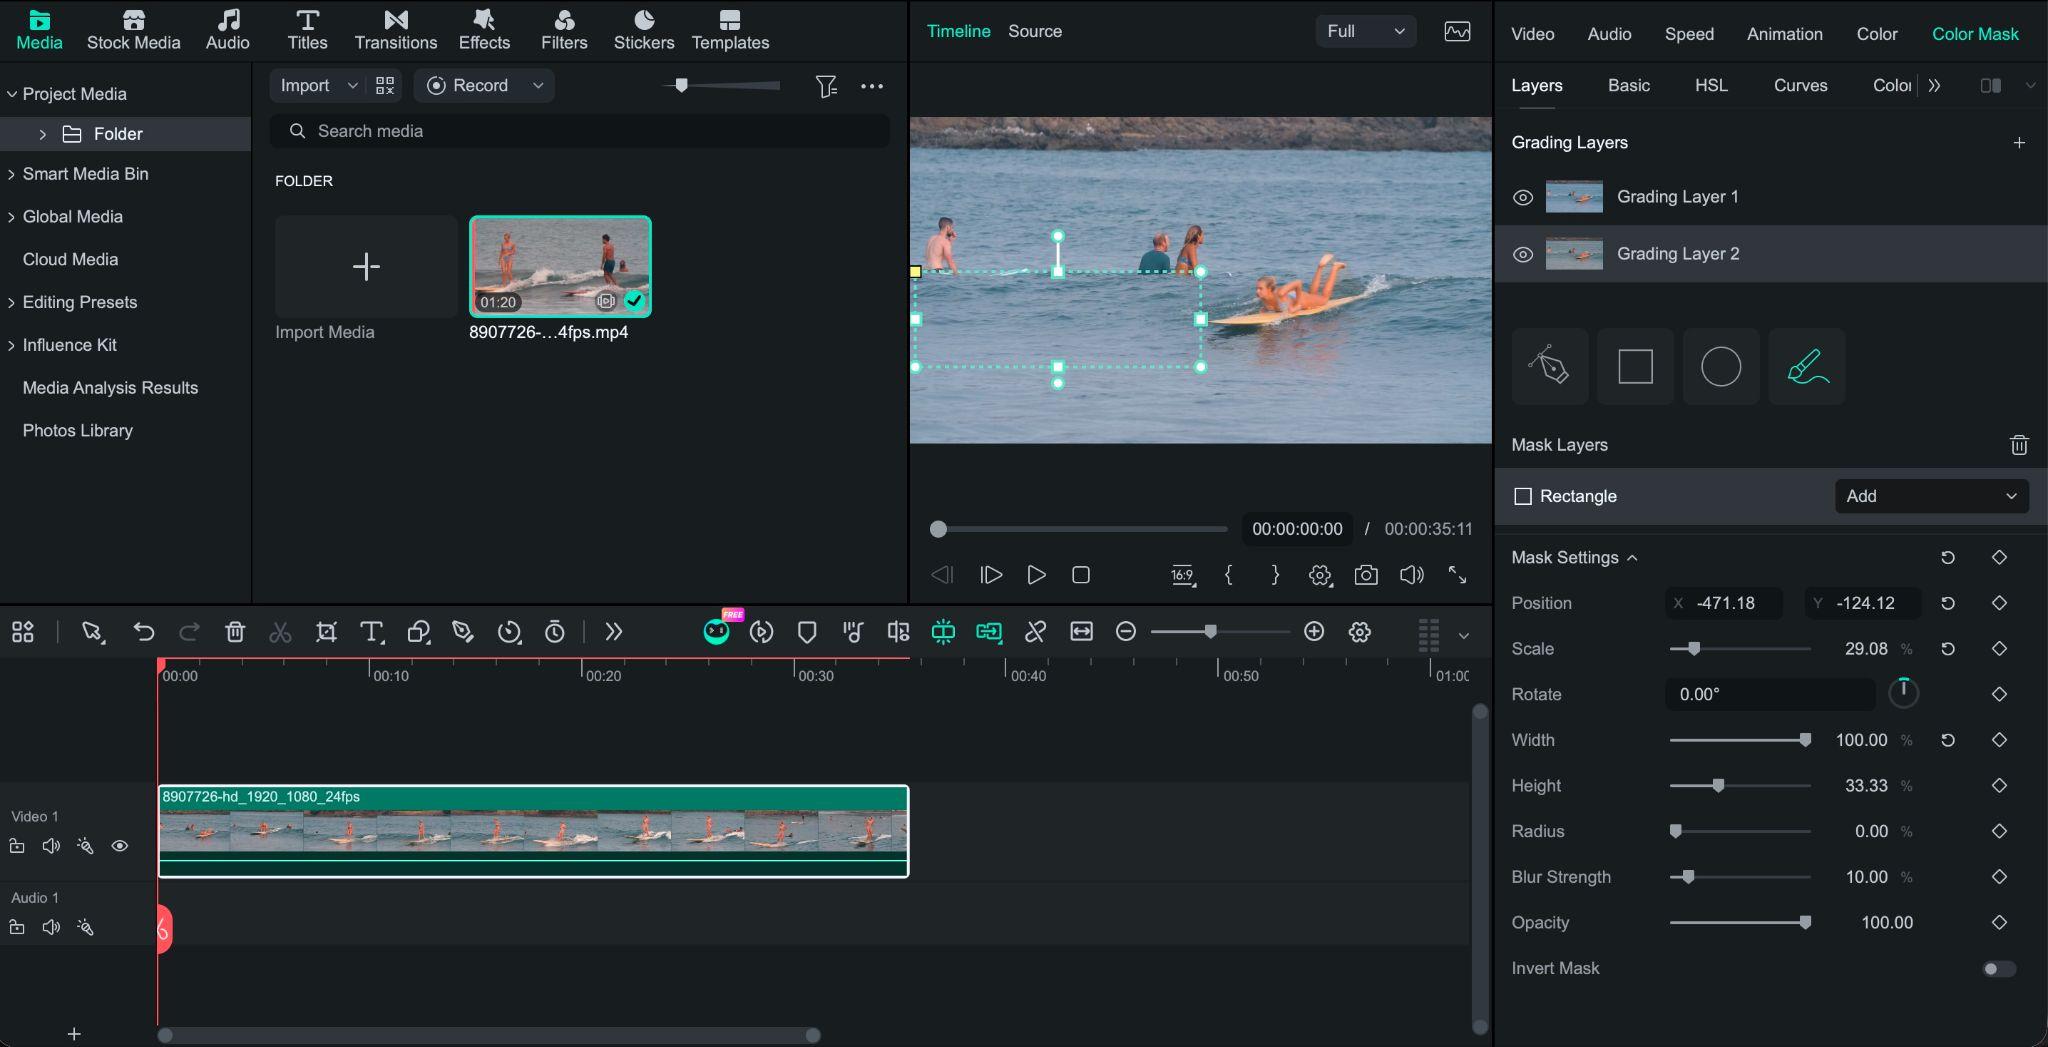
Step 3. Add a new Grading Layer. This layer will contain the color adjustments and mask for the area you want to edit.
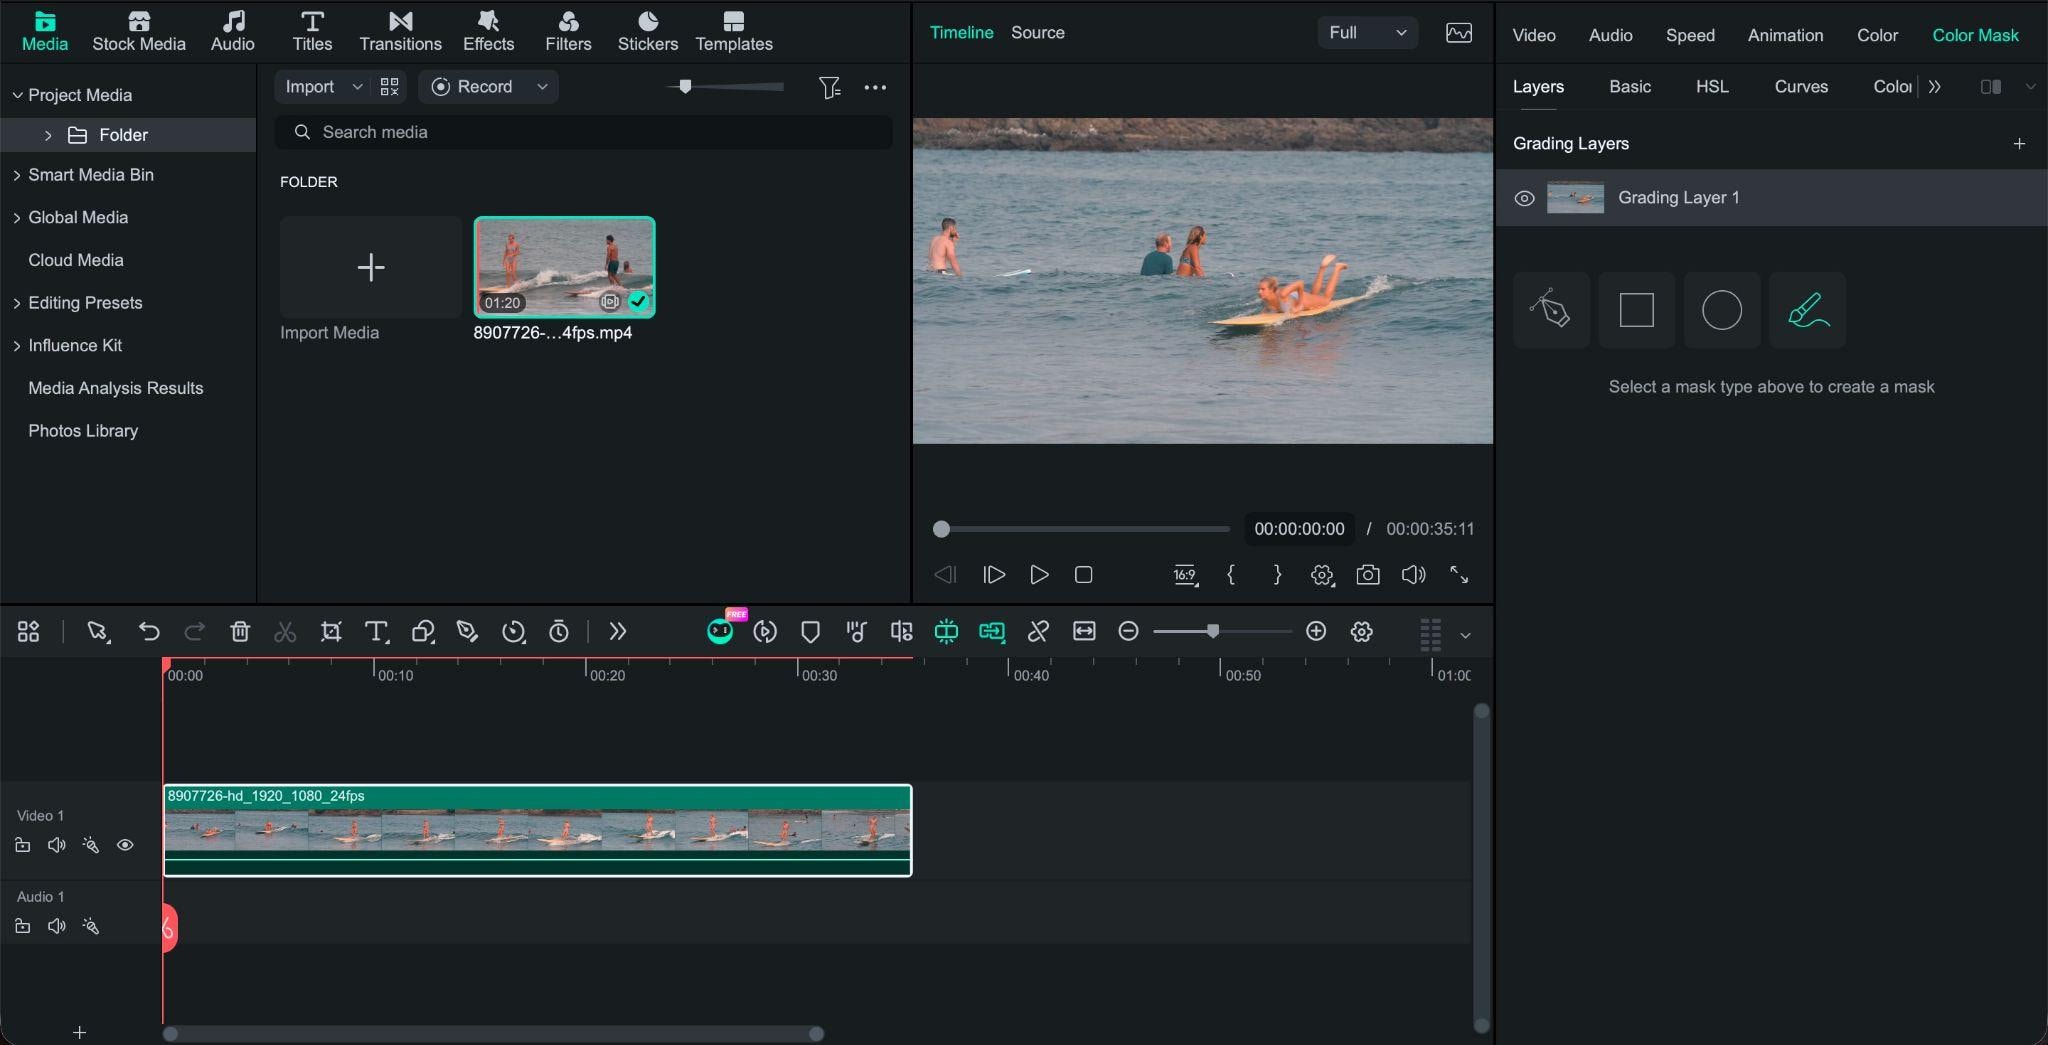
Step 4. Choose the Pen Tool, Rectangle, Circle/Ellipse, or AI Mask to isolate the area you want to edit.
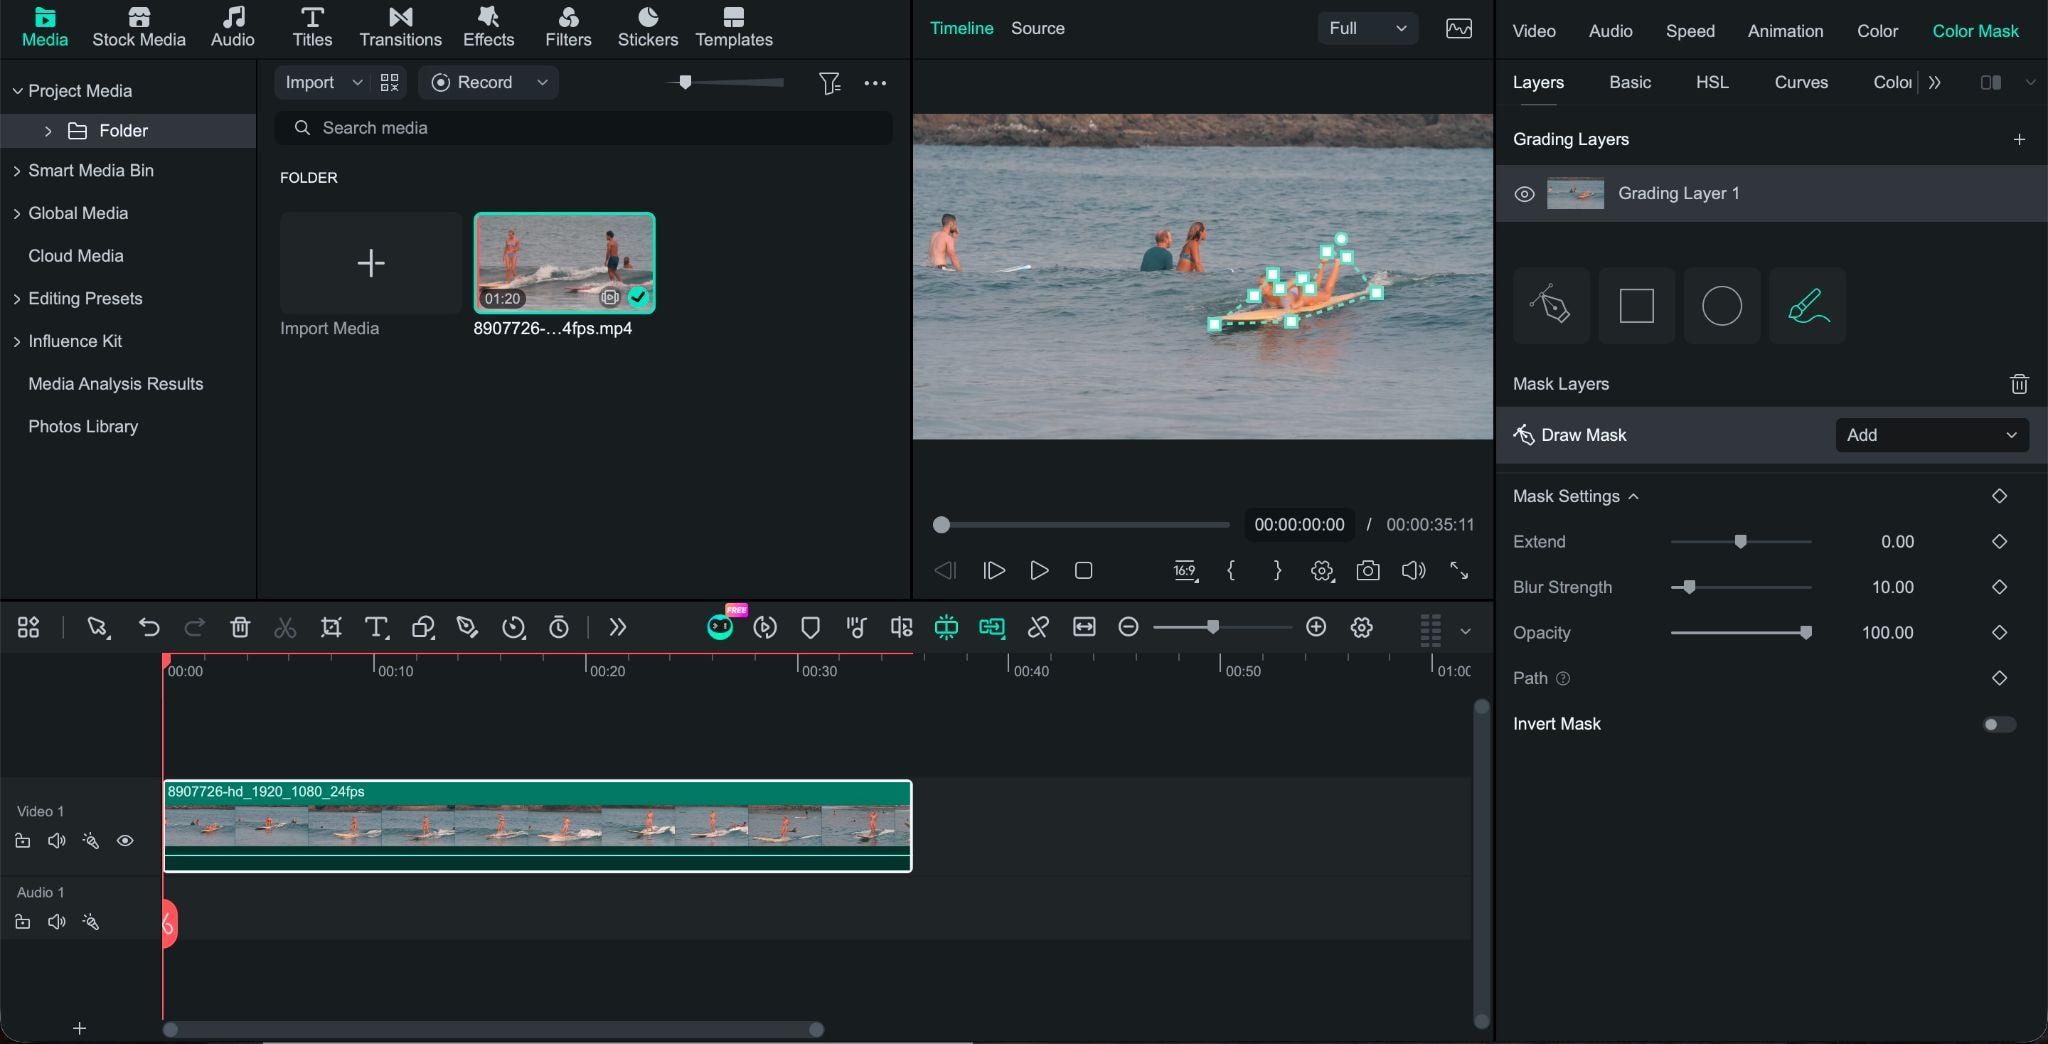
Step 5. Adjust the mask's position, size, rotation, feathering, and opacity. Use Invert or combine masks with Add, Subtract, or Intersection if needed for a more precise selection
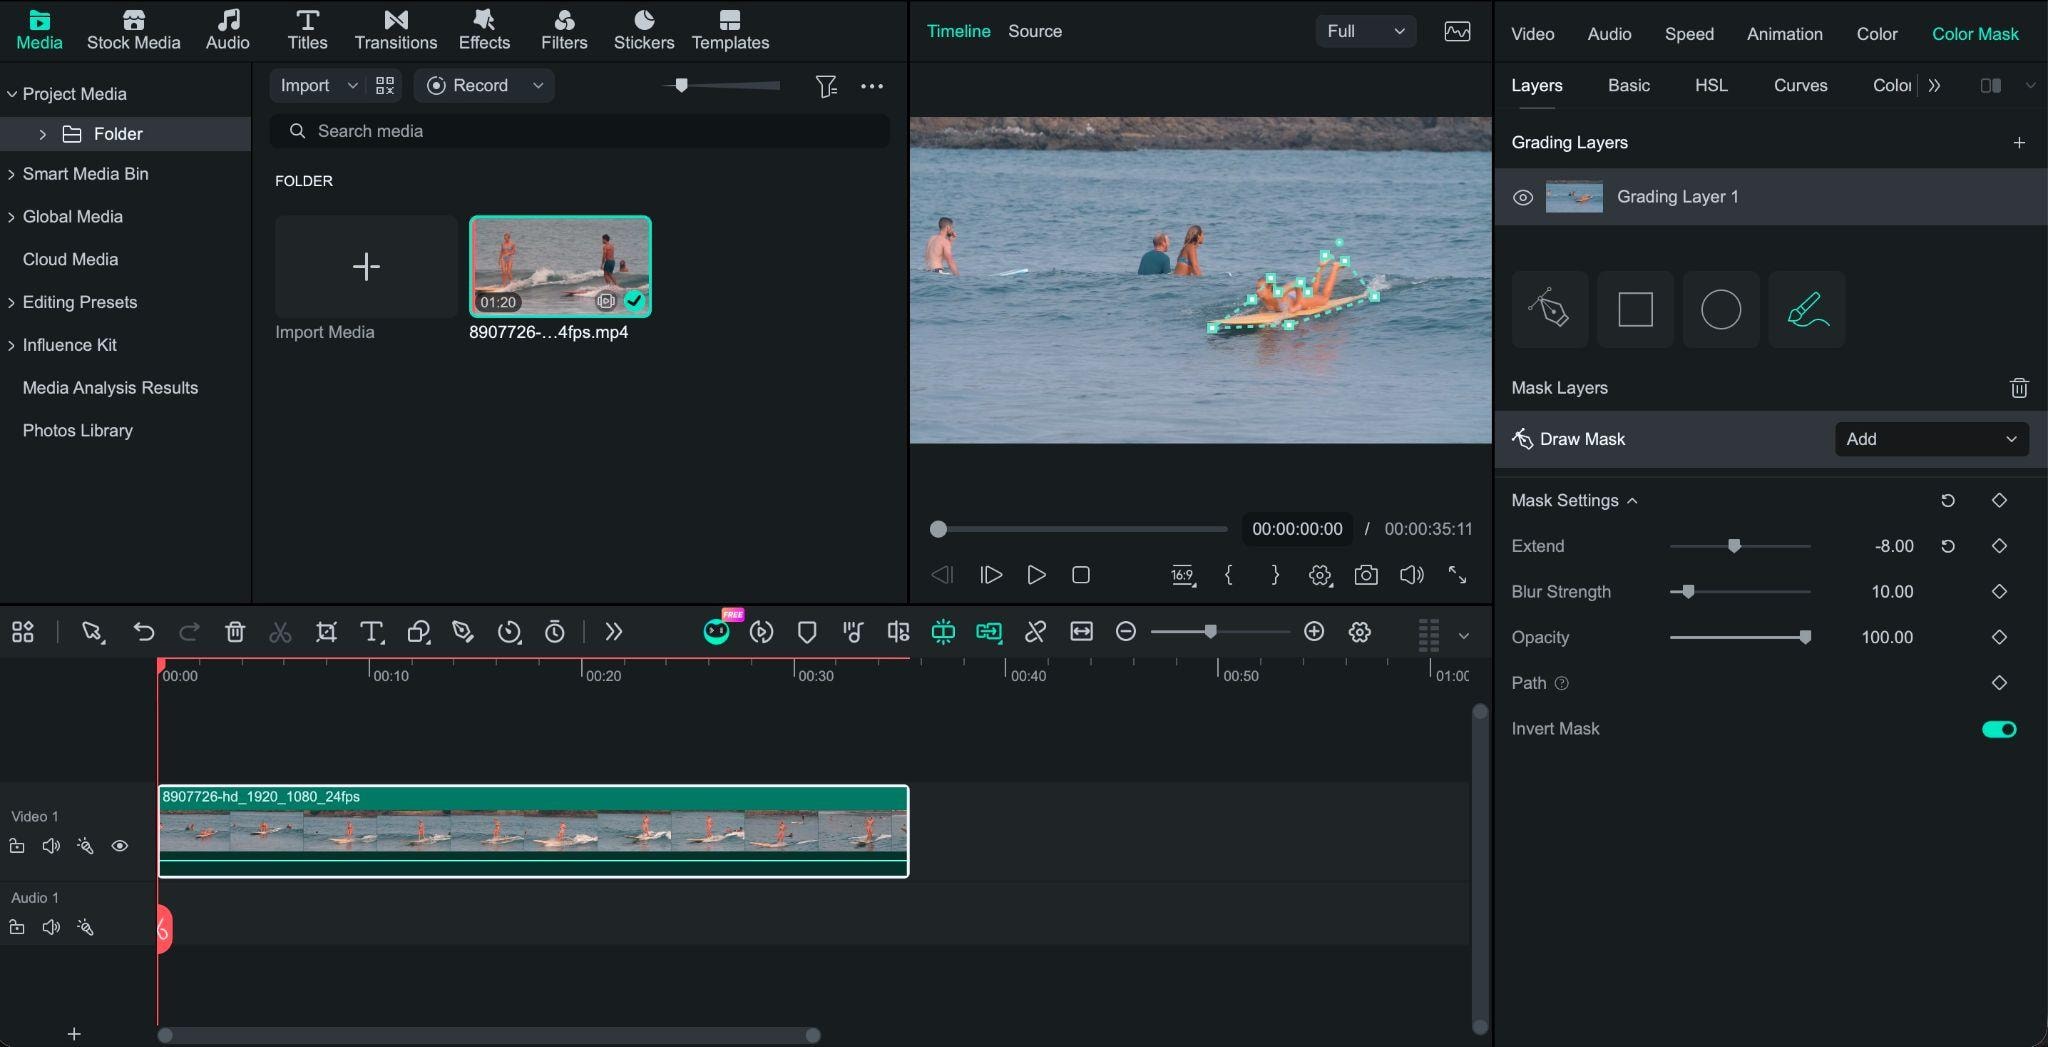
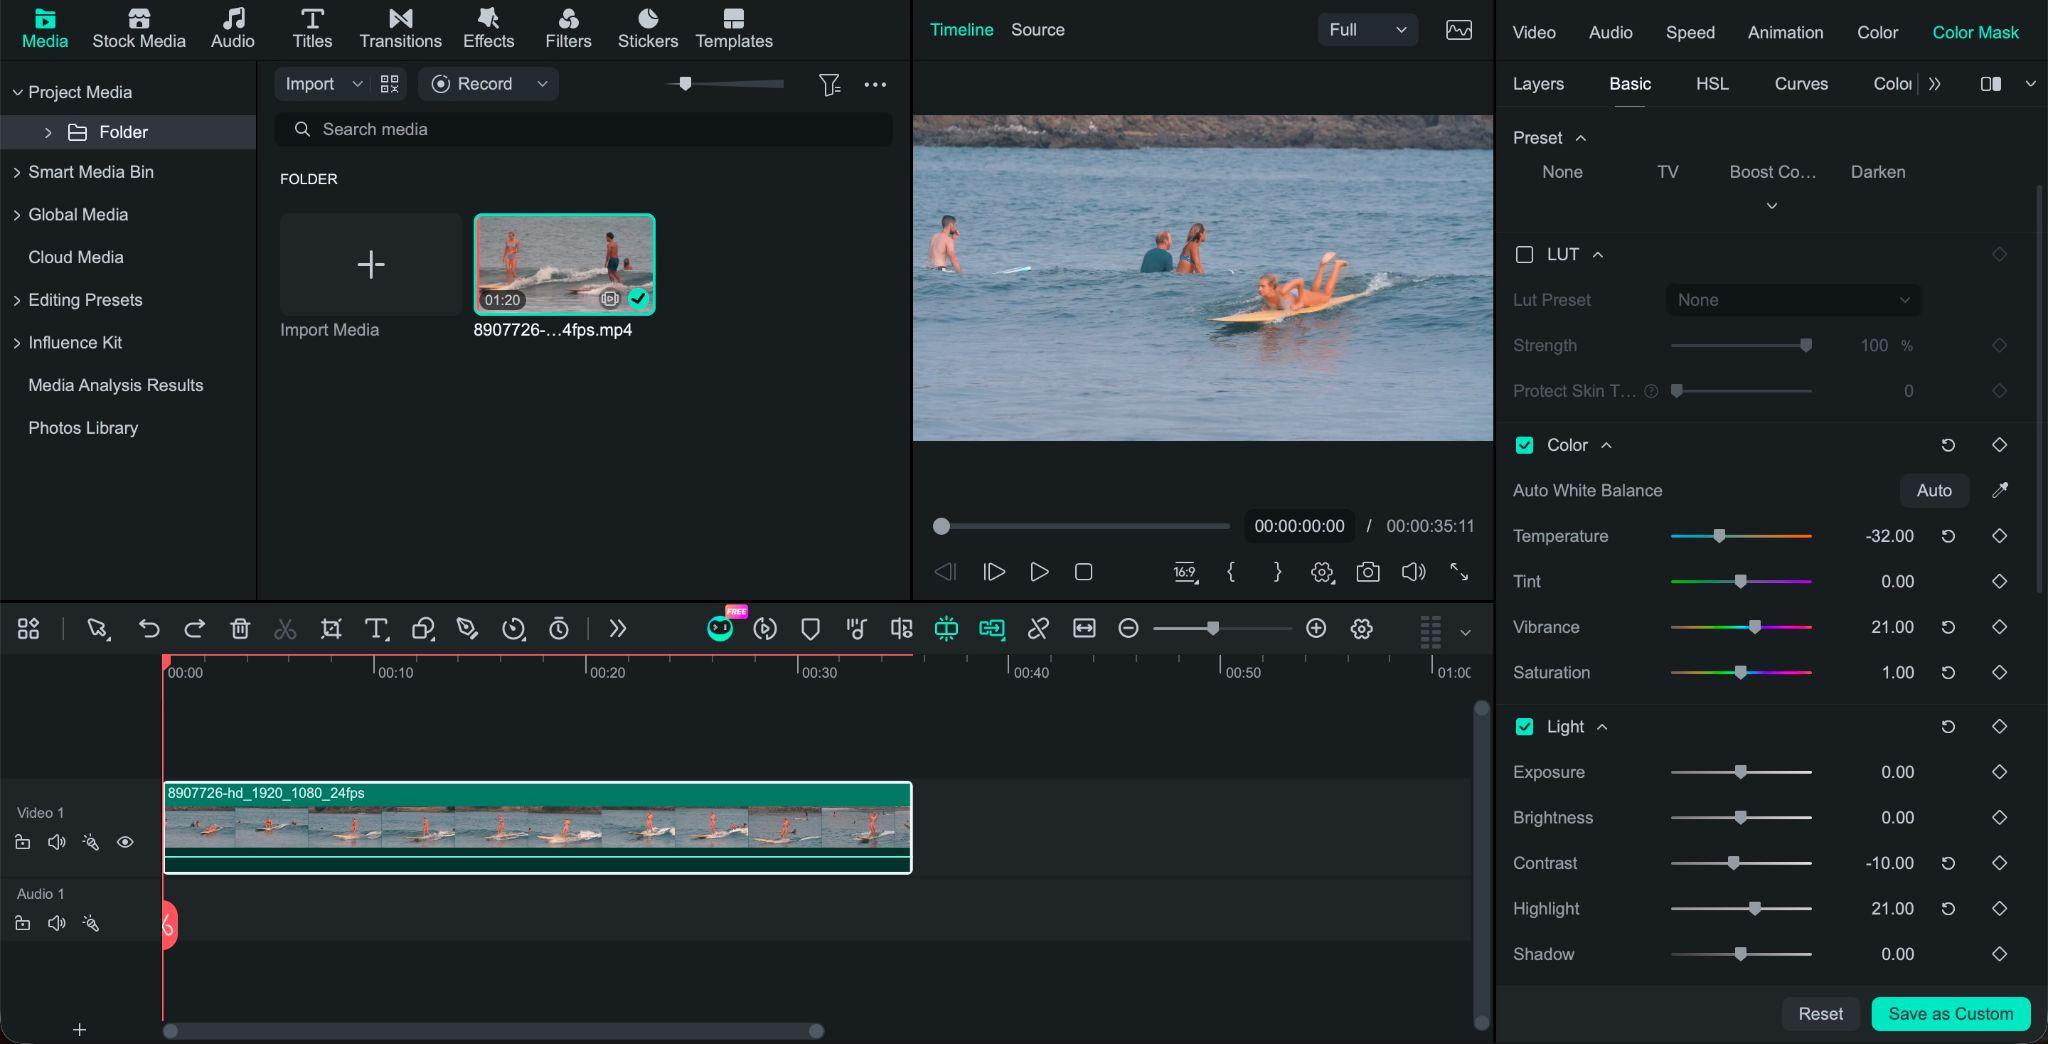
Step 6. Select the Grading Layer and use Basic, HSL, Curves, Color Wheel, or HDR under the same Color Mask tab to change the color of the masked area.
Step 7. Create additional layers when you want different areas to have different adjustments. For example, you could use one layer for the sky, another for the subject, and another for the background.
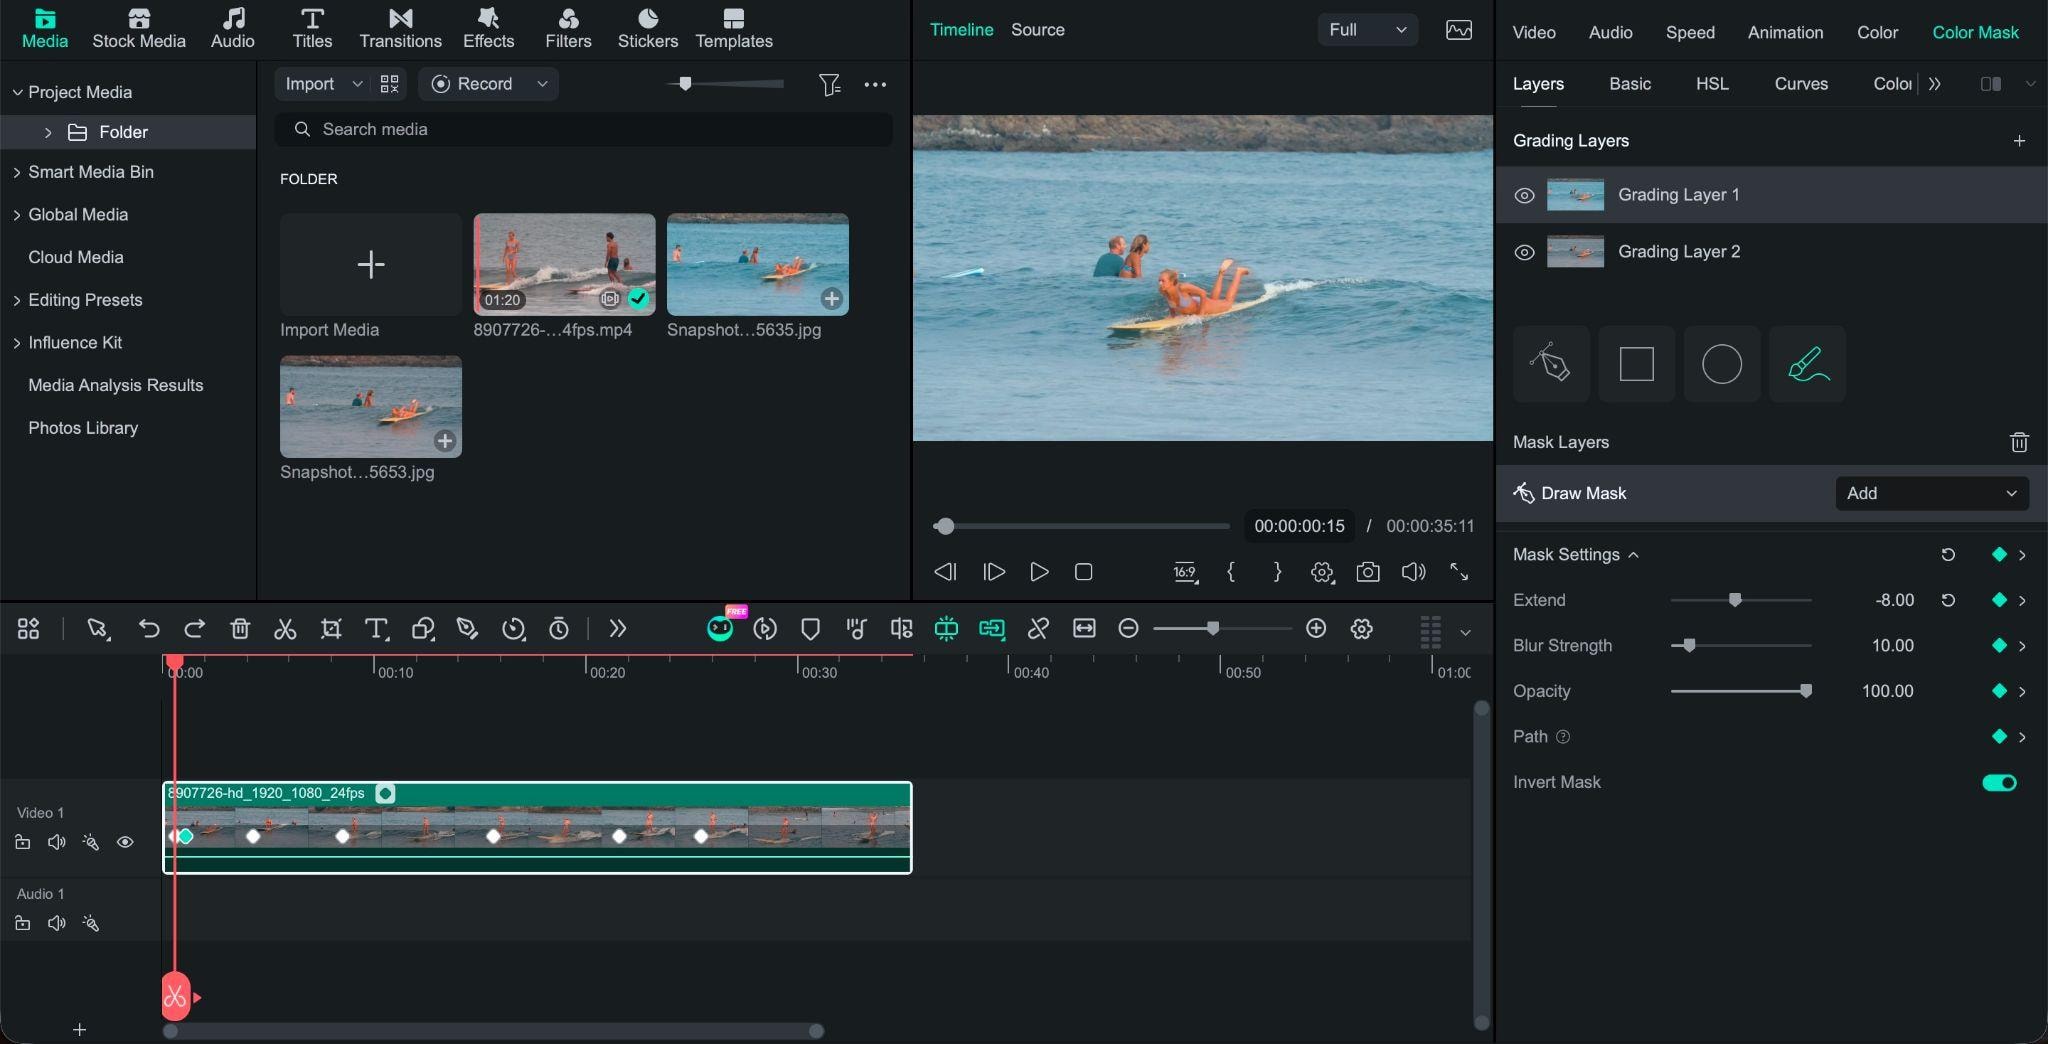
Step 8. Play the clip to check the result. Add keyframes when the mask or color adjustment needs to follow movement in the shot.


Part 6. CapCut vs. Filmora for Color Grading
Both CapCut and Filmora offer tools for color correction and creative grading. As you learn how to color grade video in CapCut, you’ll discover common settings like HSL, Curves, Color Wheel, LUTs, and Color Match. Filmora offers similar grading tools, with a layered workflow for organizing selective adjustments.
| Editing Needs | CapCut | Filmora |
| Basic color correction | ✔️ | ✔️ |
| Auto Color | ✔️ | ✔️ |
| HSL adjustments | ✔️ | ✔️ |
| Curves and color controls | ✔️ | ✔️ |
| LUT support | ✔️ | ✔️ |
| Color Match | ✔️ | ✔️ |
| Mask-based adjustments | ✔️ | ✔️ |
| Selective color grading | ✔️ | ✔️ |
| Adjustment layers | ✔️ | ✔️ |
| PC editing | ✔️ | ✔️ |
| Mobile editing | ✔️ | ✔️ |
To sum up:
- Both CapCut and Filmora cover the main color correction and grading tools to help you handle basic corrections, creative looks, and selective color adjustments in either editor.
- CapCut’s masking tools support selective color edits. You can add a mask within the Adjustment controls, then adjust the selected area without changing the rest of the frame.
- Filmora’s Color Mask and grading layers also provide another way to organize selective color work. You can create separate grading layers for different adjustments, making it easier to manage multiple color treatments in the same project.
- CapCut’s Color Mask feature is available as a premium feature, but free users can still preview the effect before deciding whether to upgrade.
- Filmora’s Color Mask is available in the free version, but exported videos include a watermark unless you use a paid plan.
Conclusion
Color grading can change the overall feel of your footage, even when the original shots are already well composed. If you're figuring out how to color grade video in CapCut, start by fixing exposure and white balance, then adjust contrast, saturation, and individual colors. Color Match can also help keep shots from looking too different from one another.
For straightforward grading on PC or mobile, CapCut provides the essential color tools in an accessible workflow. For more targeted adjustments, you can also use Filmora, which offers Color Mask and Grading Layers to apply different color treatments to separate areas. Once the footage is balanced, small creative adjustments are often enough to give the whole video a more polished look.
FAQs
-
1. How do I color grade in CapCut?
To color grade in CapCut, you can start by correcting your footage with Basic Adjustment tools or use the Auto Color option for a quick correction. Then, give your footage a more stylized look with HSL, Curves, LUTs, or Color Match, depending on the look you want. -
2. What is Color Match in CapCut?
Color Match uses a reference frame or clip to match the colors and tones of other shots. This feature is useful when clips from different cameras or lighting conditions don't match. -
3. Can I color grade RAW and Log footage in CapCut?
Yes, but RAW and Log footage may need more correction before the final grade. Start with exposure and white balance, then restore contrast and saturation. A suitable LUT can provide a starting point for Log footage, followed by manual adjustments to match the specific clip.
