

 100% Security Verified | No Subscription Required | No Malware

DJI footage can look great straight out of the camera, but those raw clips often need some editing before you can share them. How you edit DJI videos depends on the camera and the result you want.
A drone video may need tighter cuts and color correction, while footage from the Osmo Pocket 3 or Action series may need stabilization, framing, and audio adjustments. This guide covers how to edit DJI videos on PC or Mac with Wondershare Filmora, and when tools such as DJI Mimo and DJI Studio are useful.
Part 1. What You Need Before Editing DJI Videos
Before you start editing, prepare your footage and decide how you want to work with it. it. A few checkpoints can make the DJI video editing process easier, especially when working with high-resolution footage, Log format, or 360° footage.
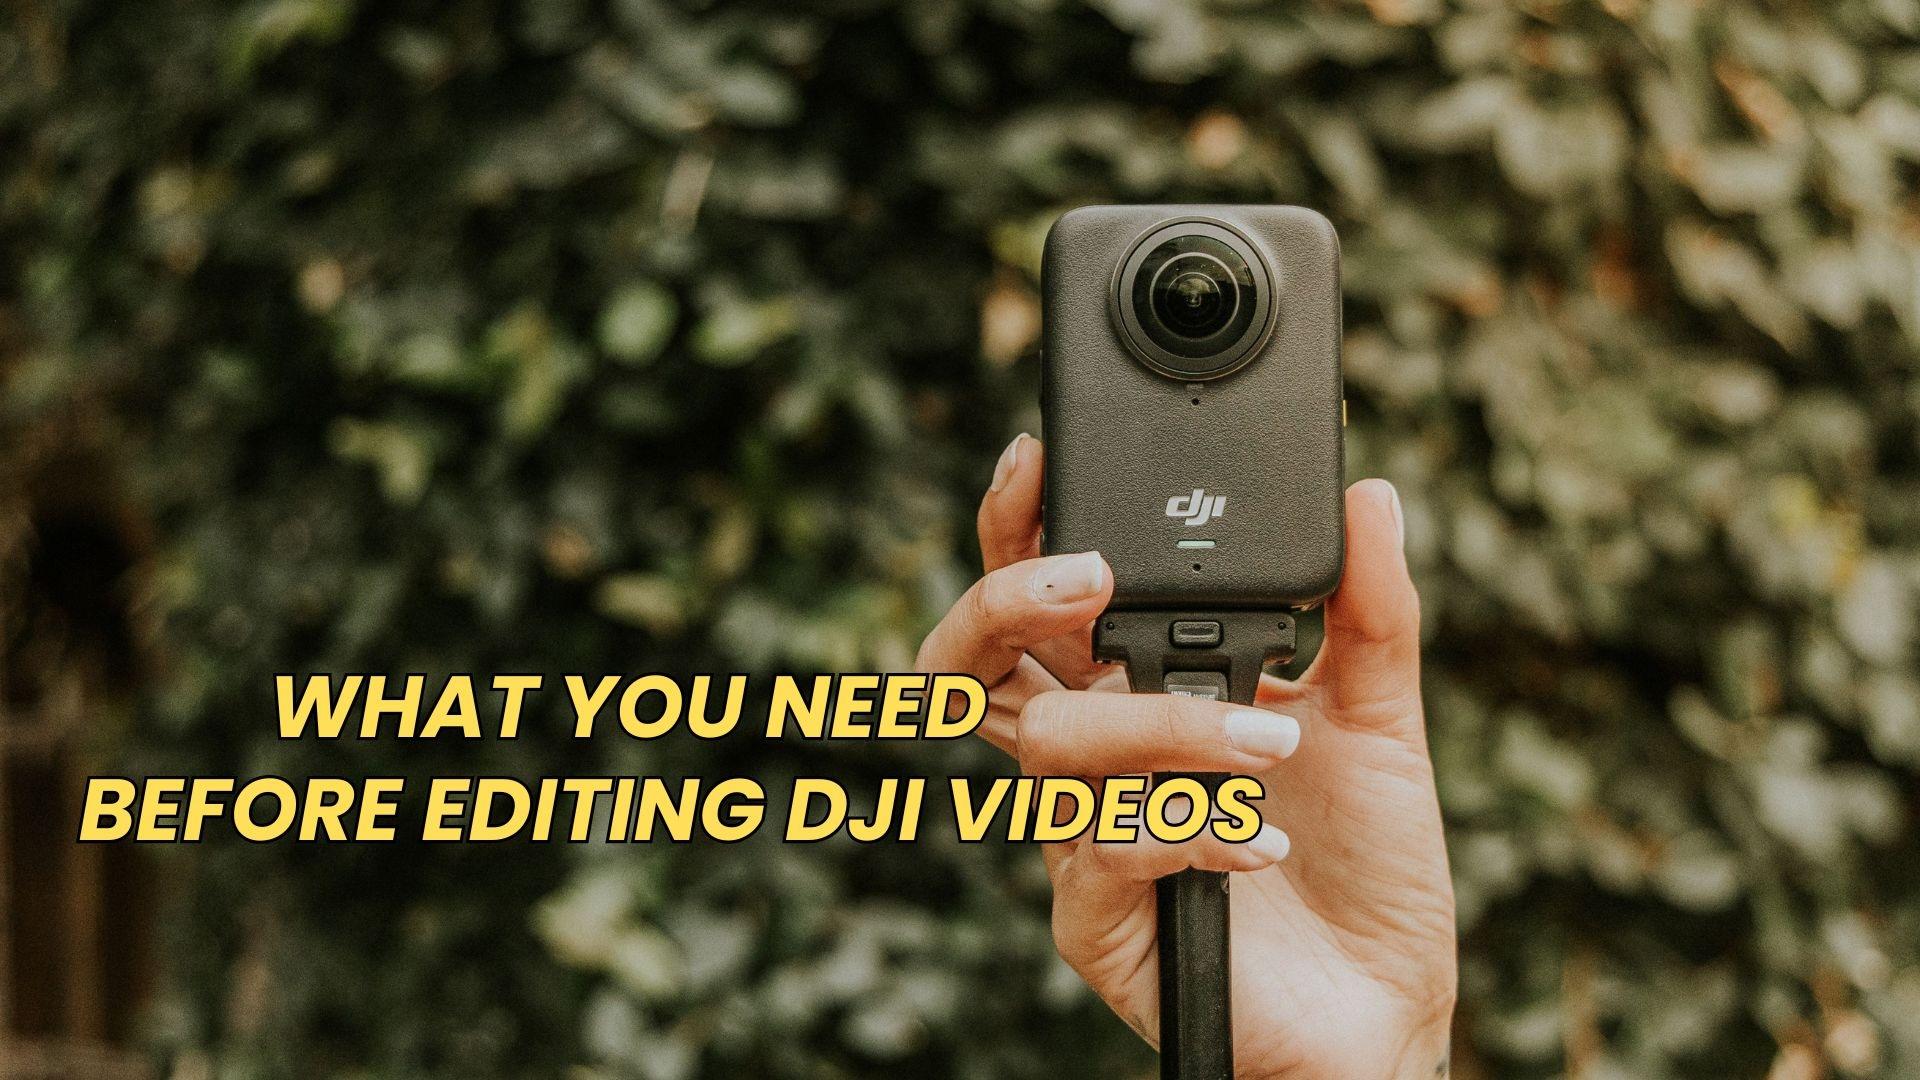
Transfer your DJI footage to your computer
Start by moving your original DJI clips to your computer so they’re ready to import into your editor. For large or high-resolution files, make sure your computer has enough storage. Then, check whether the footage uses a standard profile, D-Log, or D-Log M so you can choose the right color correction settings before you’re learning how to edit DJI 360° videos.
Choose the right editing workflow
The best workflow depends on your DJI camera, footage type, and how much editing you plan to do. For DJI 360° footage, use an editor that supports 360° video and reframing.
- If you’re learning how to edit DJI videos on PC or Mac, Wondershare Filmora offers an easy, full-featured way to edit 360° videos, with tools for trimming, effects, color adjustments, reframing, and more.
- If you are working on mobile, you can use tools like DJI Mimo or LightCut for quick edits, basic adjustments, and sharing your videos directly from your phone.
Part 2. How to Edit DJI Videos on PC or Mac
For detailed DJI video editing, a PC or Mac editor like Filmora gives you more control over color, audio, framing, and the final export. Follow these steps for regular DJI footage from drones, Osmo Pocket, and Osmo Action cameras.
How to Edit DJI Videos in Filmora
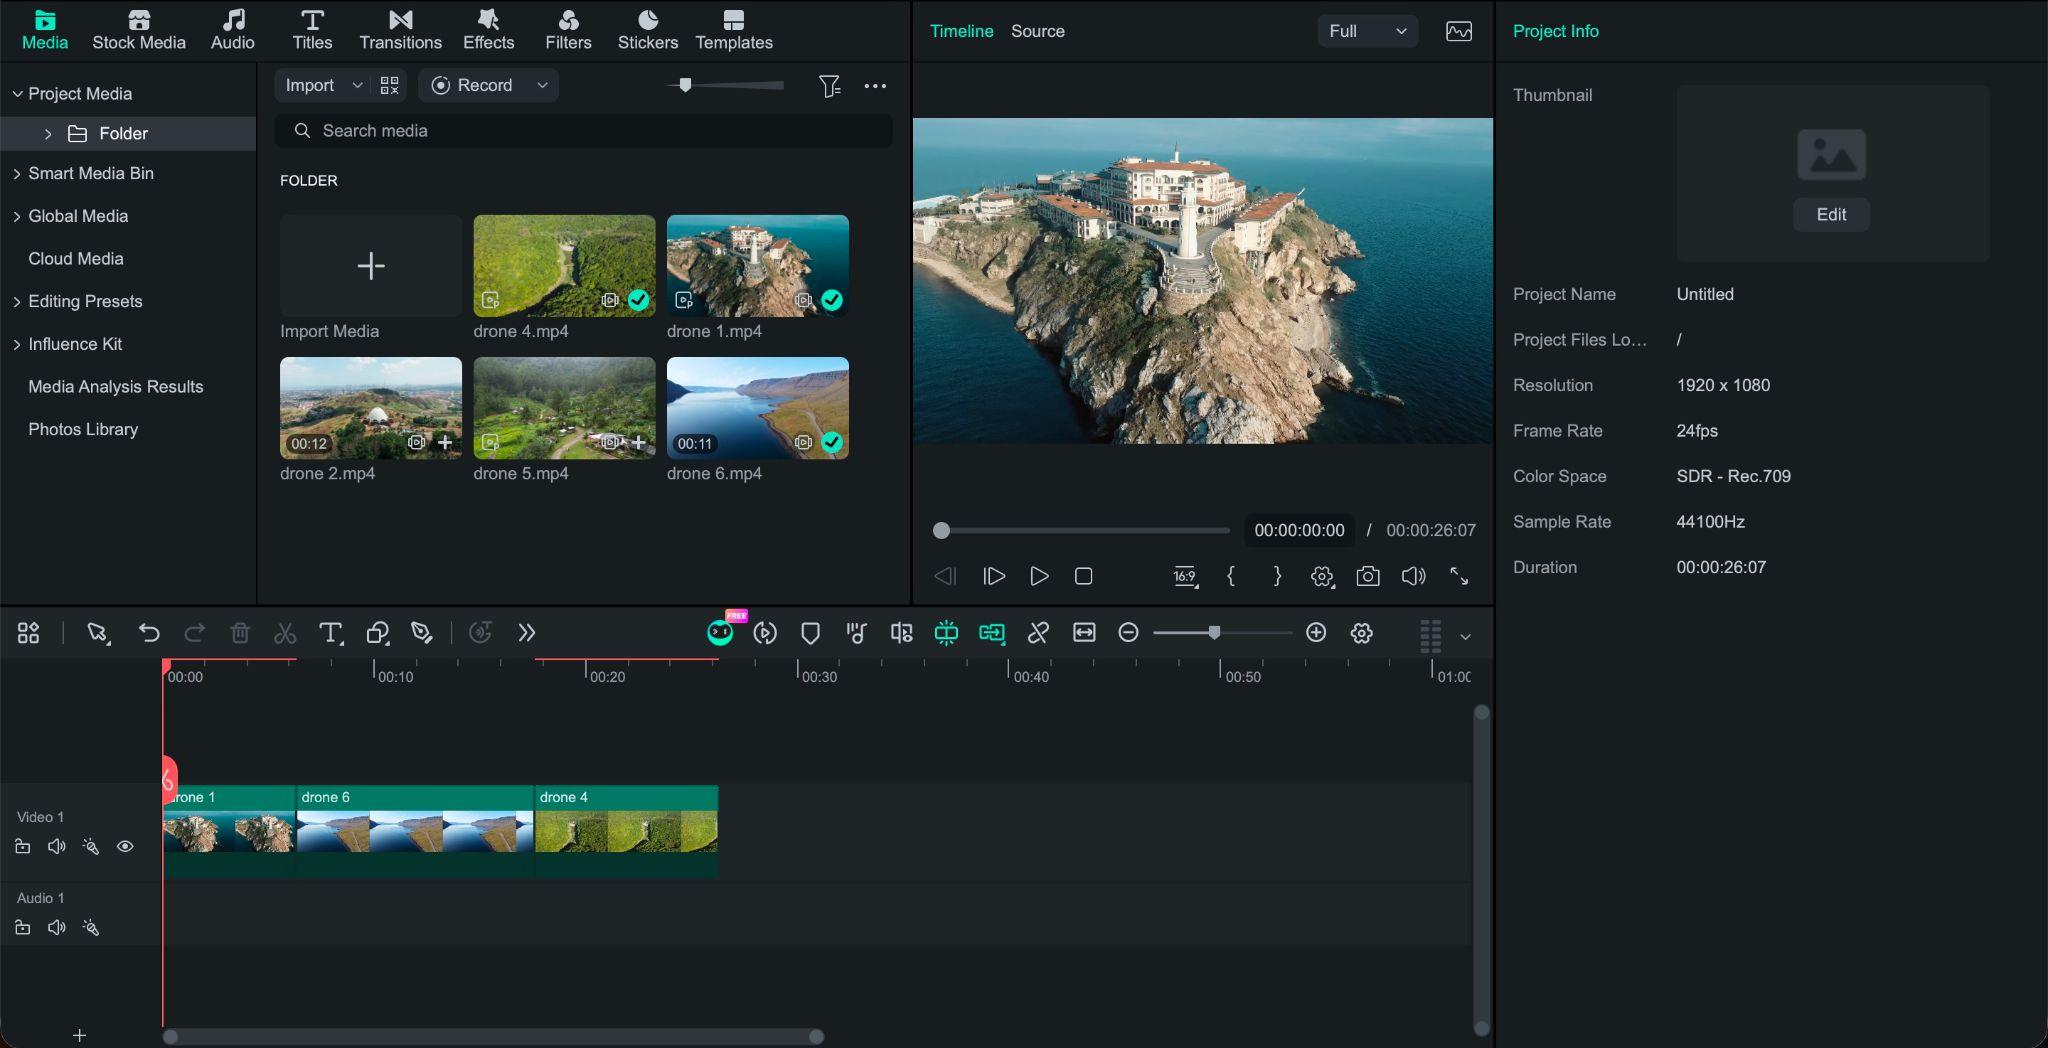
Step1Import your DJI footage
Import your clips into a new Filmora project. Bring the video to the timeline.
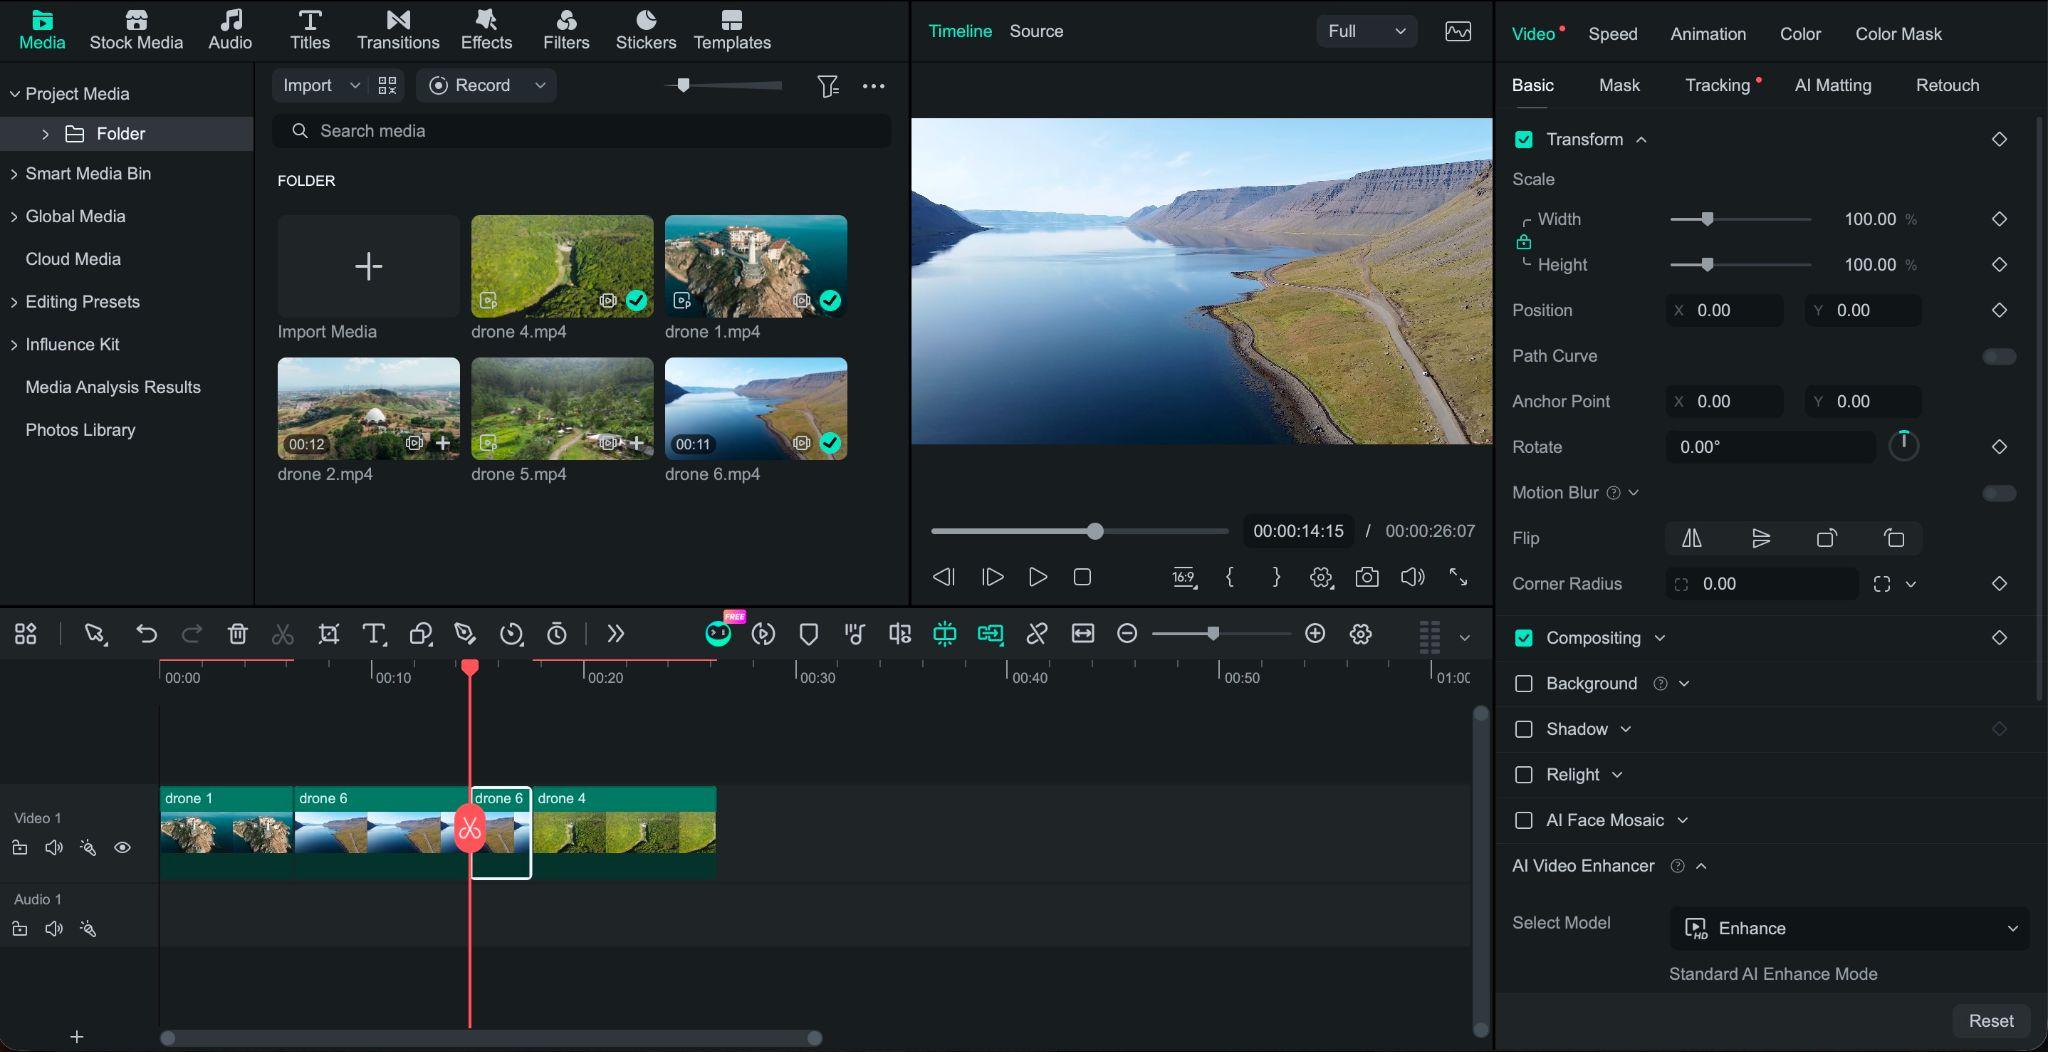
Step2Trim and arrange your clips
Remove unwanted takes, long pauses, and repetitive shots by cutting and trimming your clips. Then, arrange the best footage into a clear sequence.
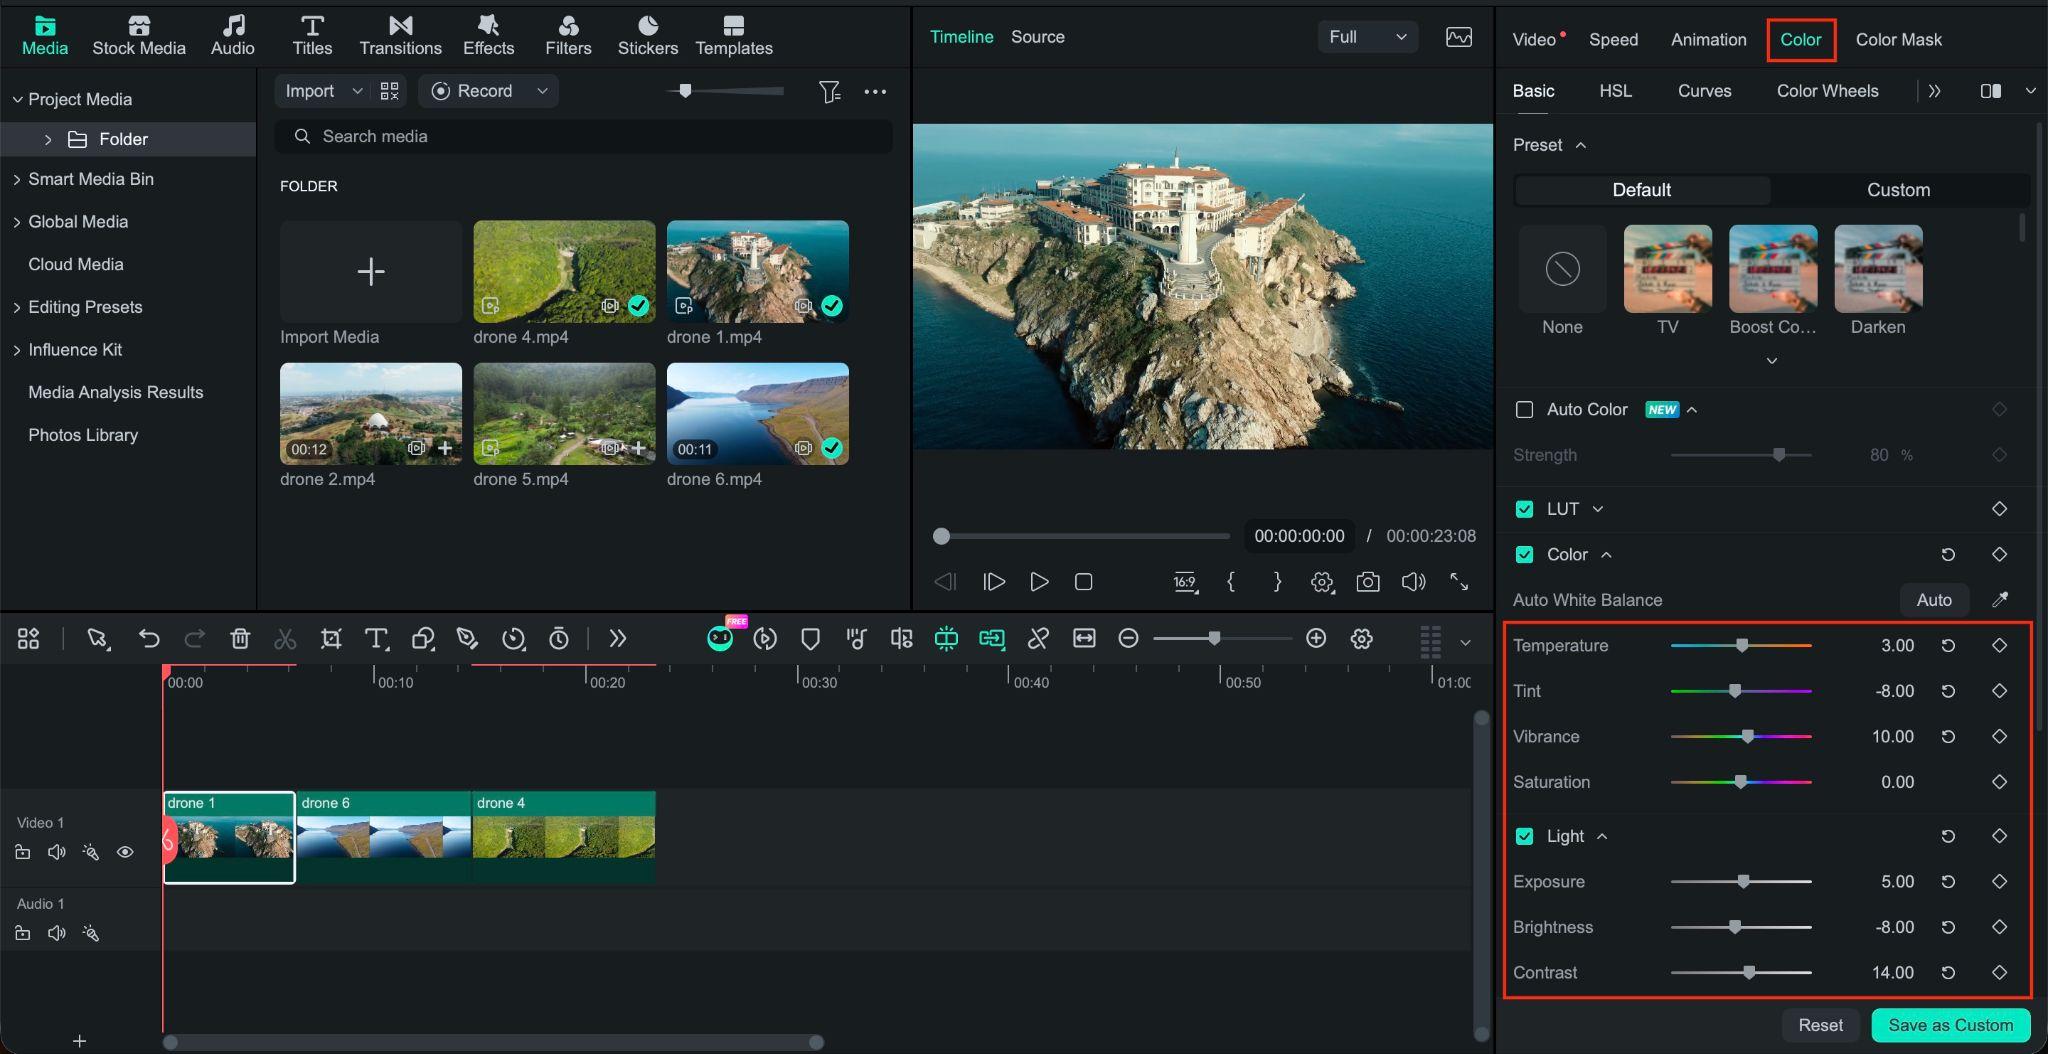
Step3Adjust the color
For D-Log or D-Log M footage, use Filmora’s color correction tools to restore contrast and natural-looking colors before applying a creative look. Use Auto Color for quick adjustments or Color Mask to isolate specific colors and fine-tune them.
Step4Fix framing and motion
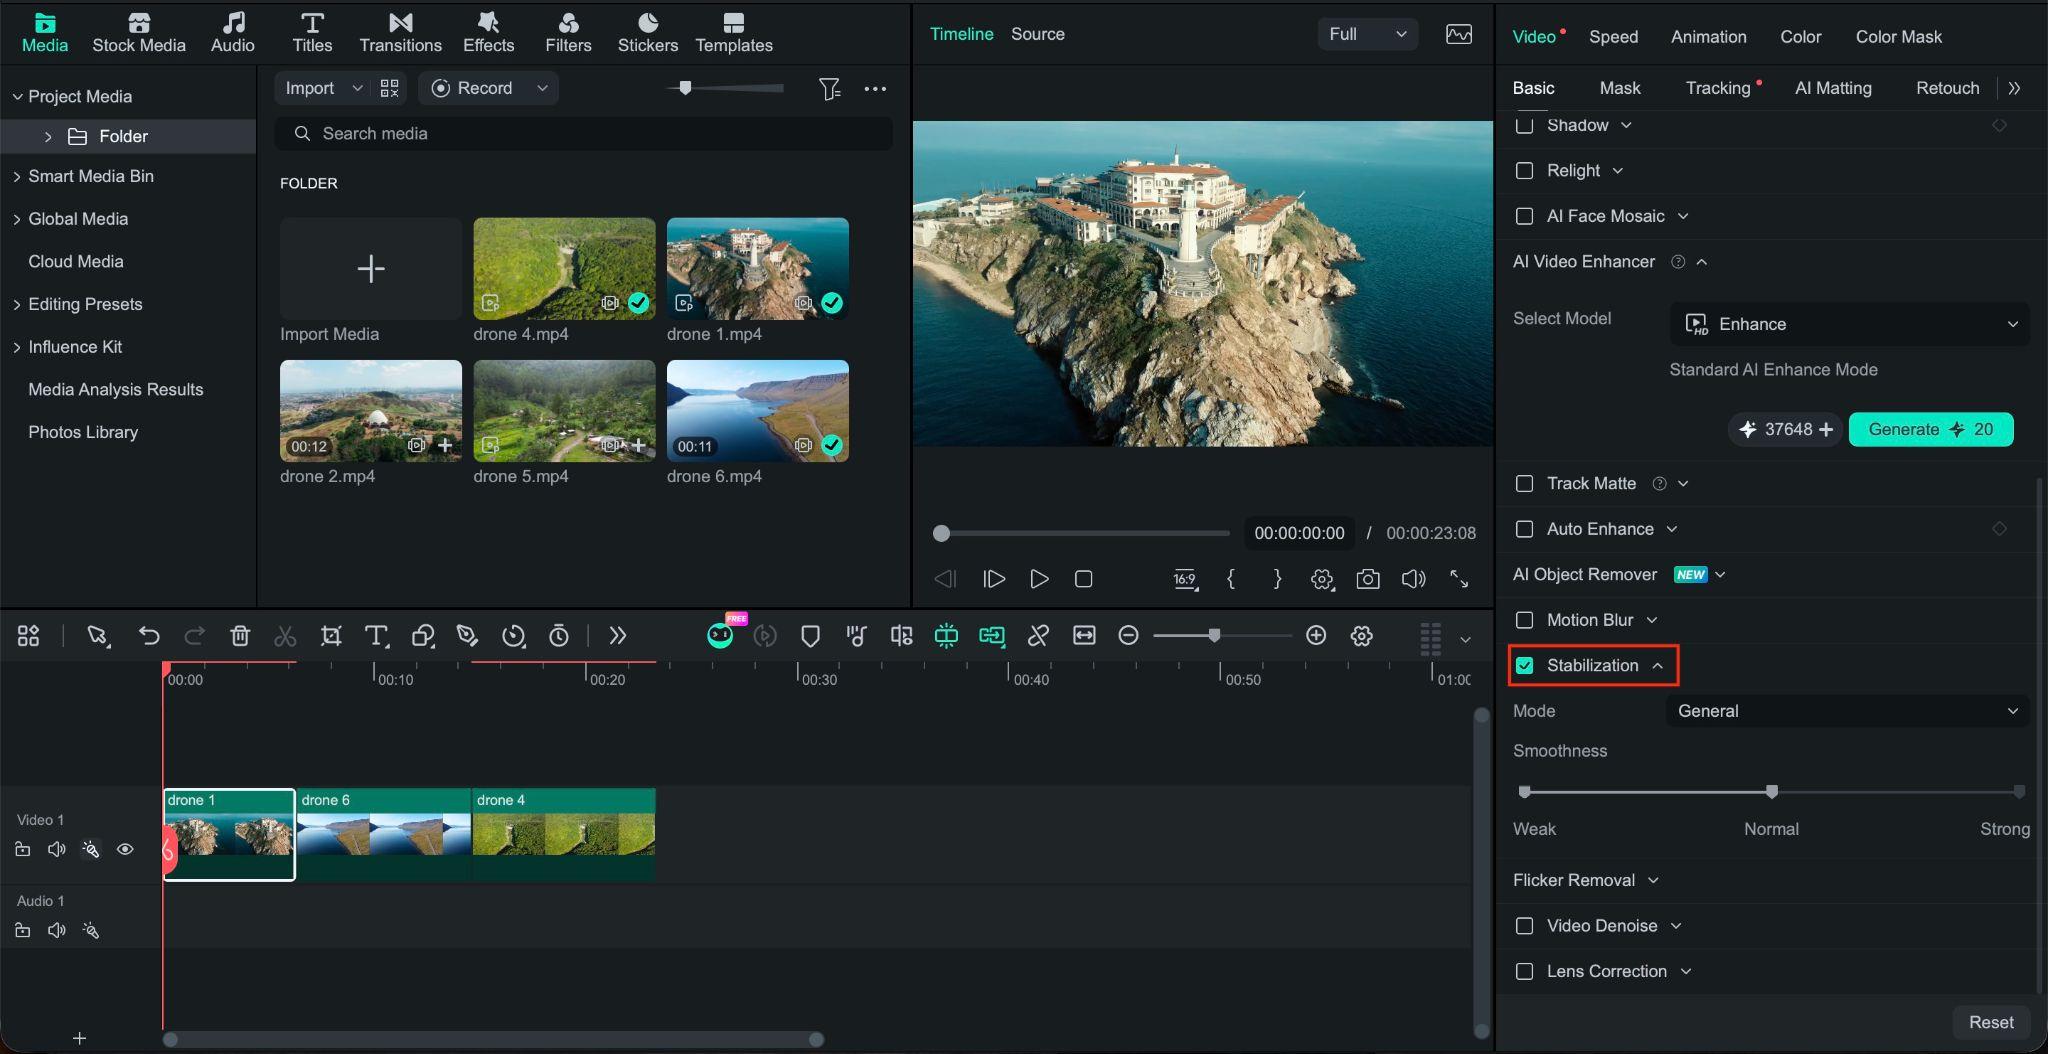
Crop or resize footage for your target aspect ratio. Use stabilization when needed.
Step5Edit the audio
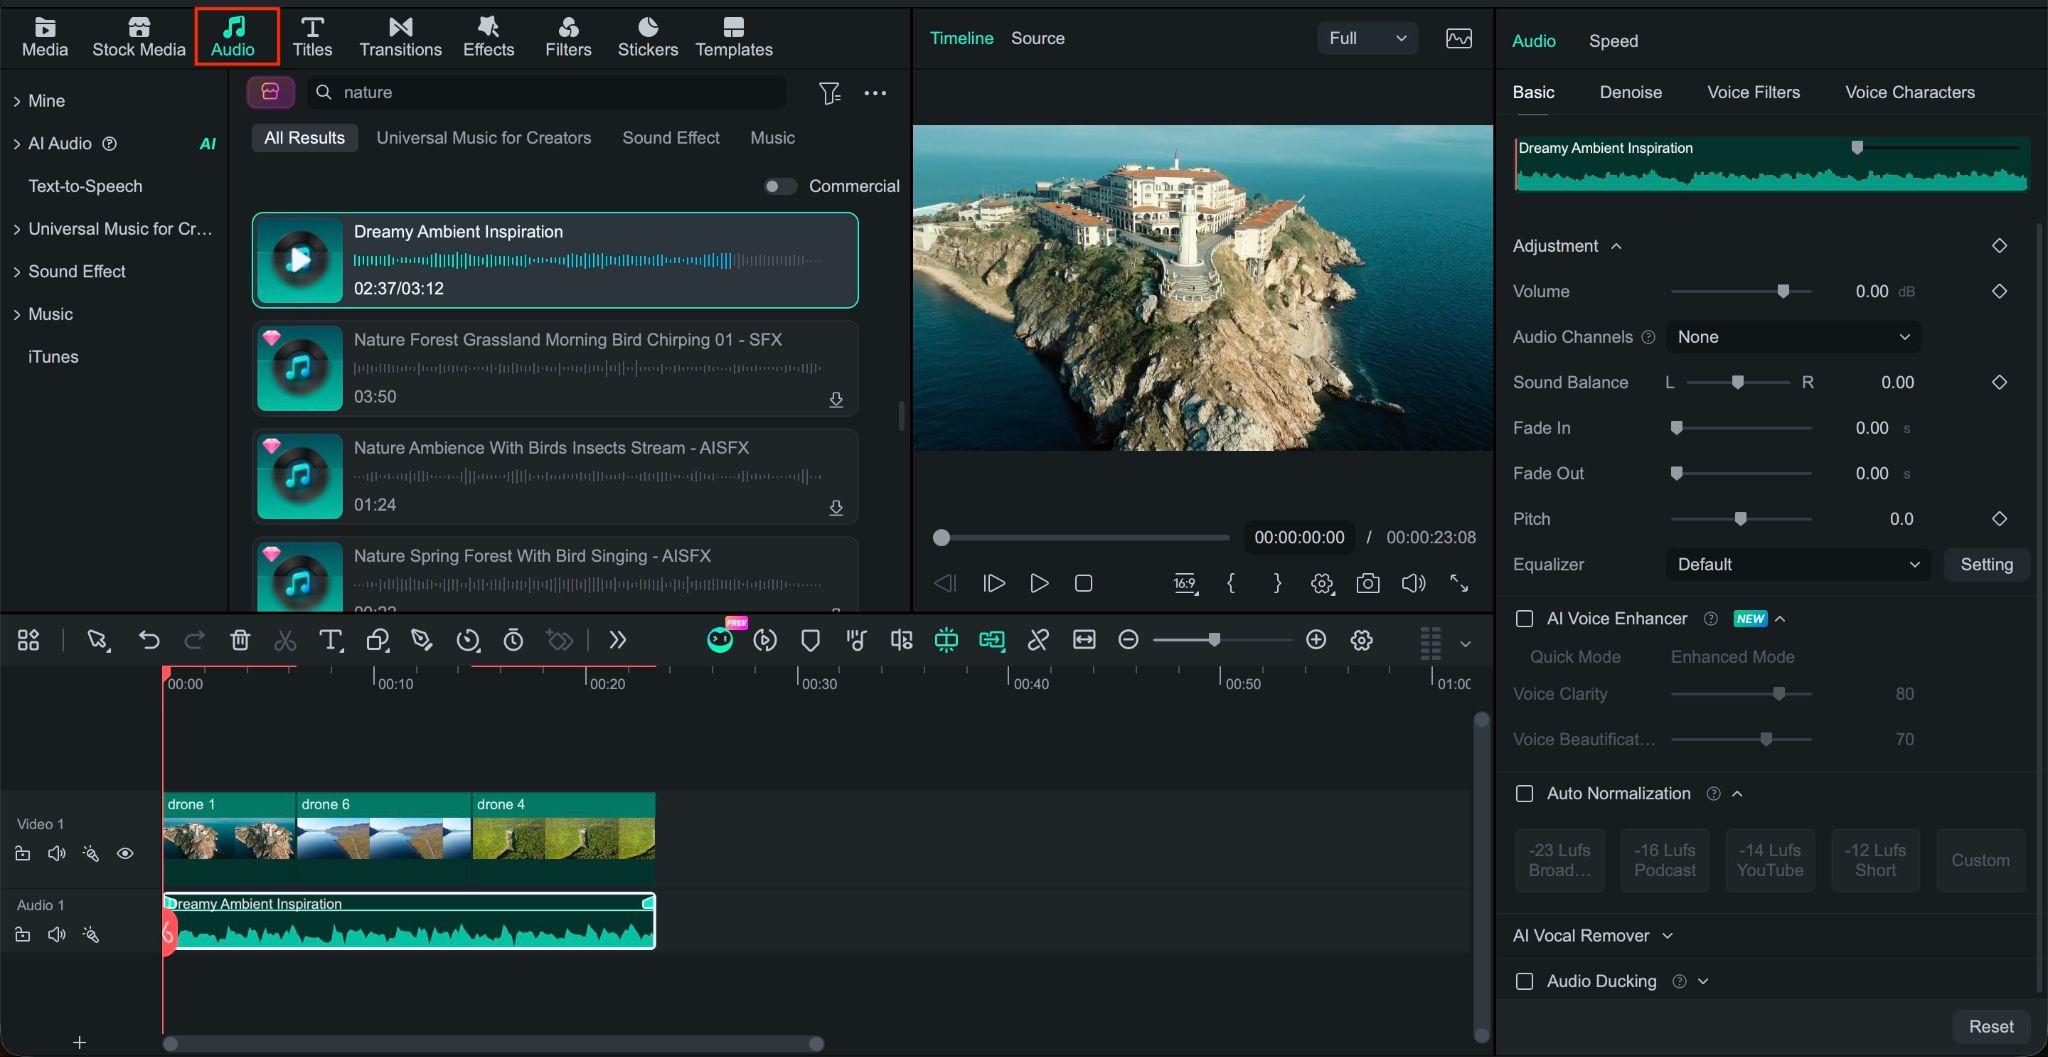
Reduce unwanted noise and adjust audio levels using Filmora’s audio tools. You can also choose music and sound effects from its built-in audio library to complement your video.


How to Edit DJI 360° Videos?
Editing 360° footage is a little different from regular DJI video. The camera captures the scene in every direction, which means you can choose the angle and perspective later during editing. To edit DJI 360° footage, Filmora introduces the 360° Video Editing feature that lets you reframe 360° footage, adjust the viewing angle, and continue editing it on the standard timeline.
Step1Import your 360° footage
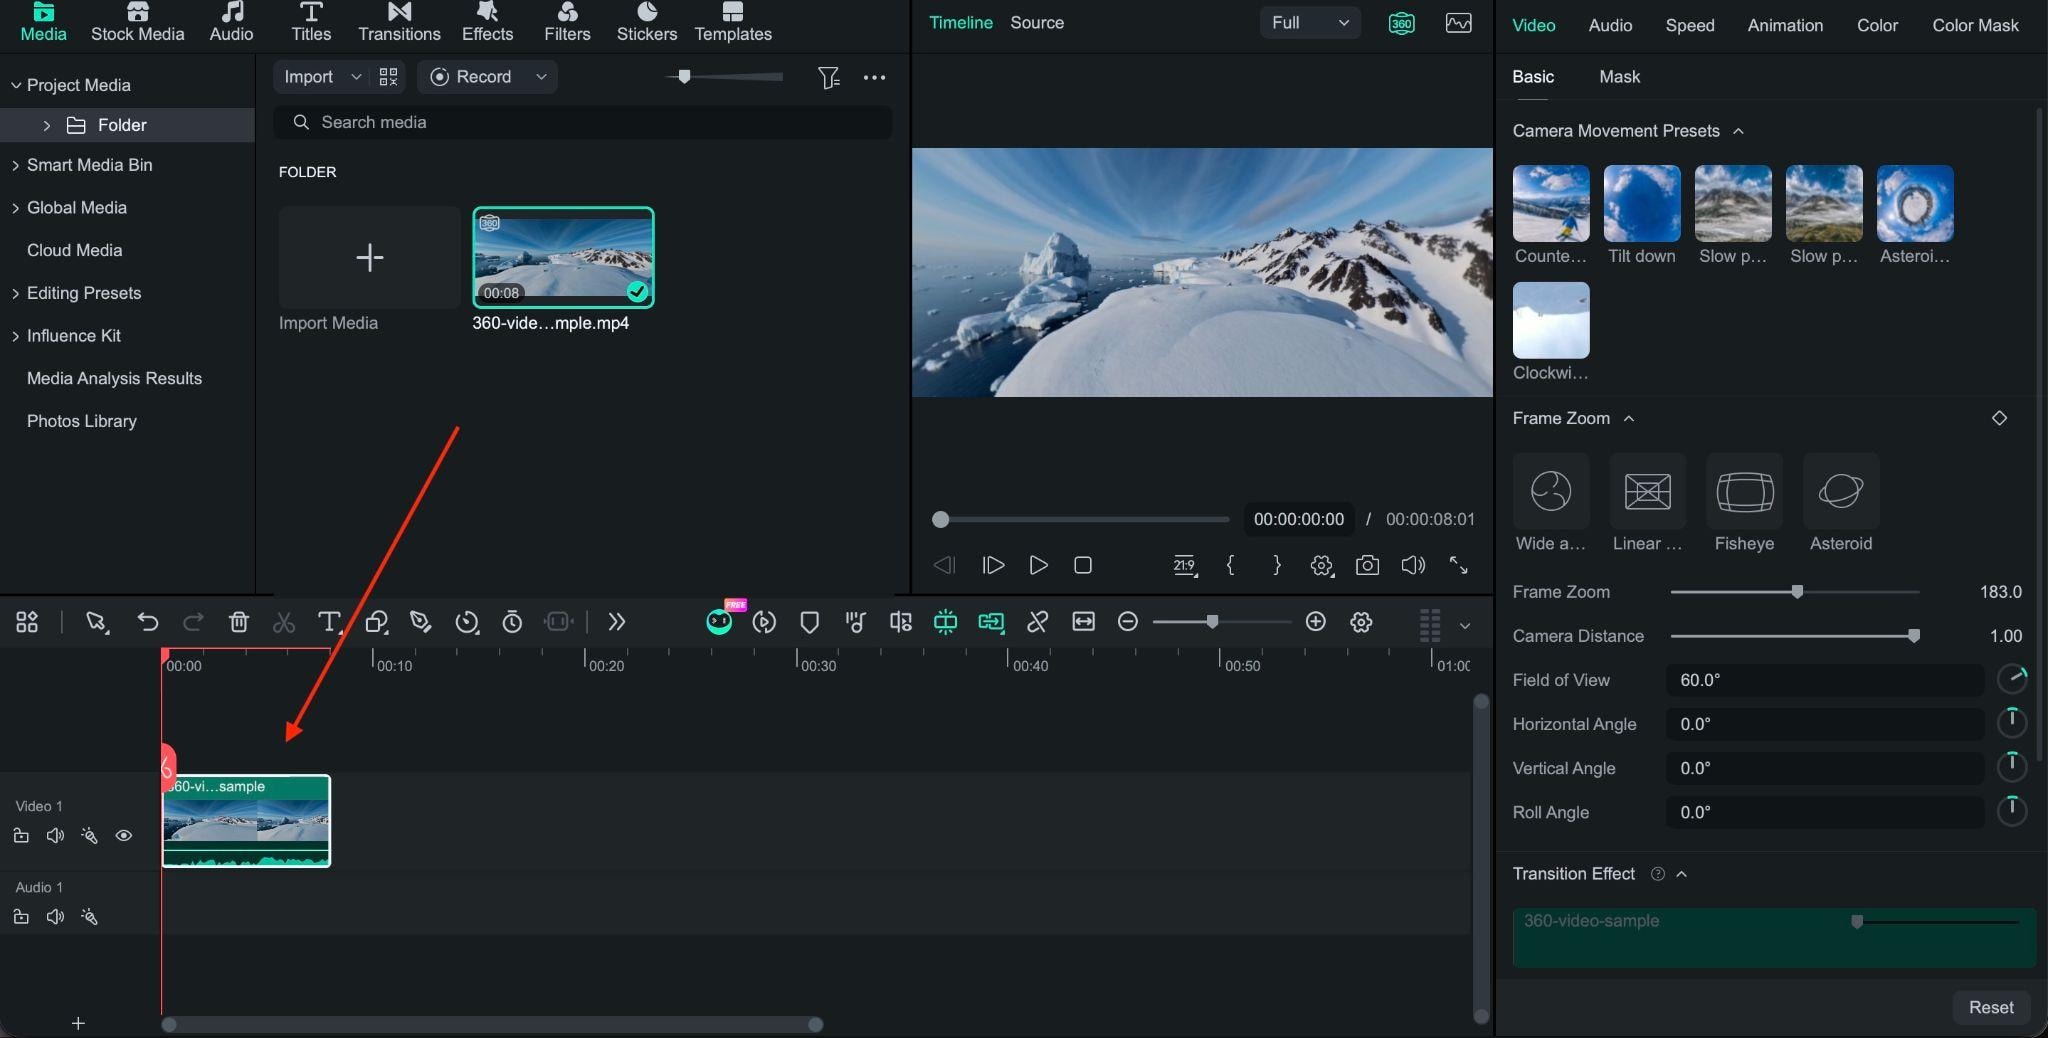
Open Filmora and import your DJI 360° clip. Drag the footage to the timeline to start editing. If you're using DJI Osmo 360 footage, convert .OSV files to MP4 with DJI's official tools first.
Step2Set the viewing angle
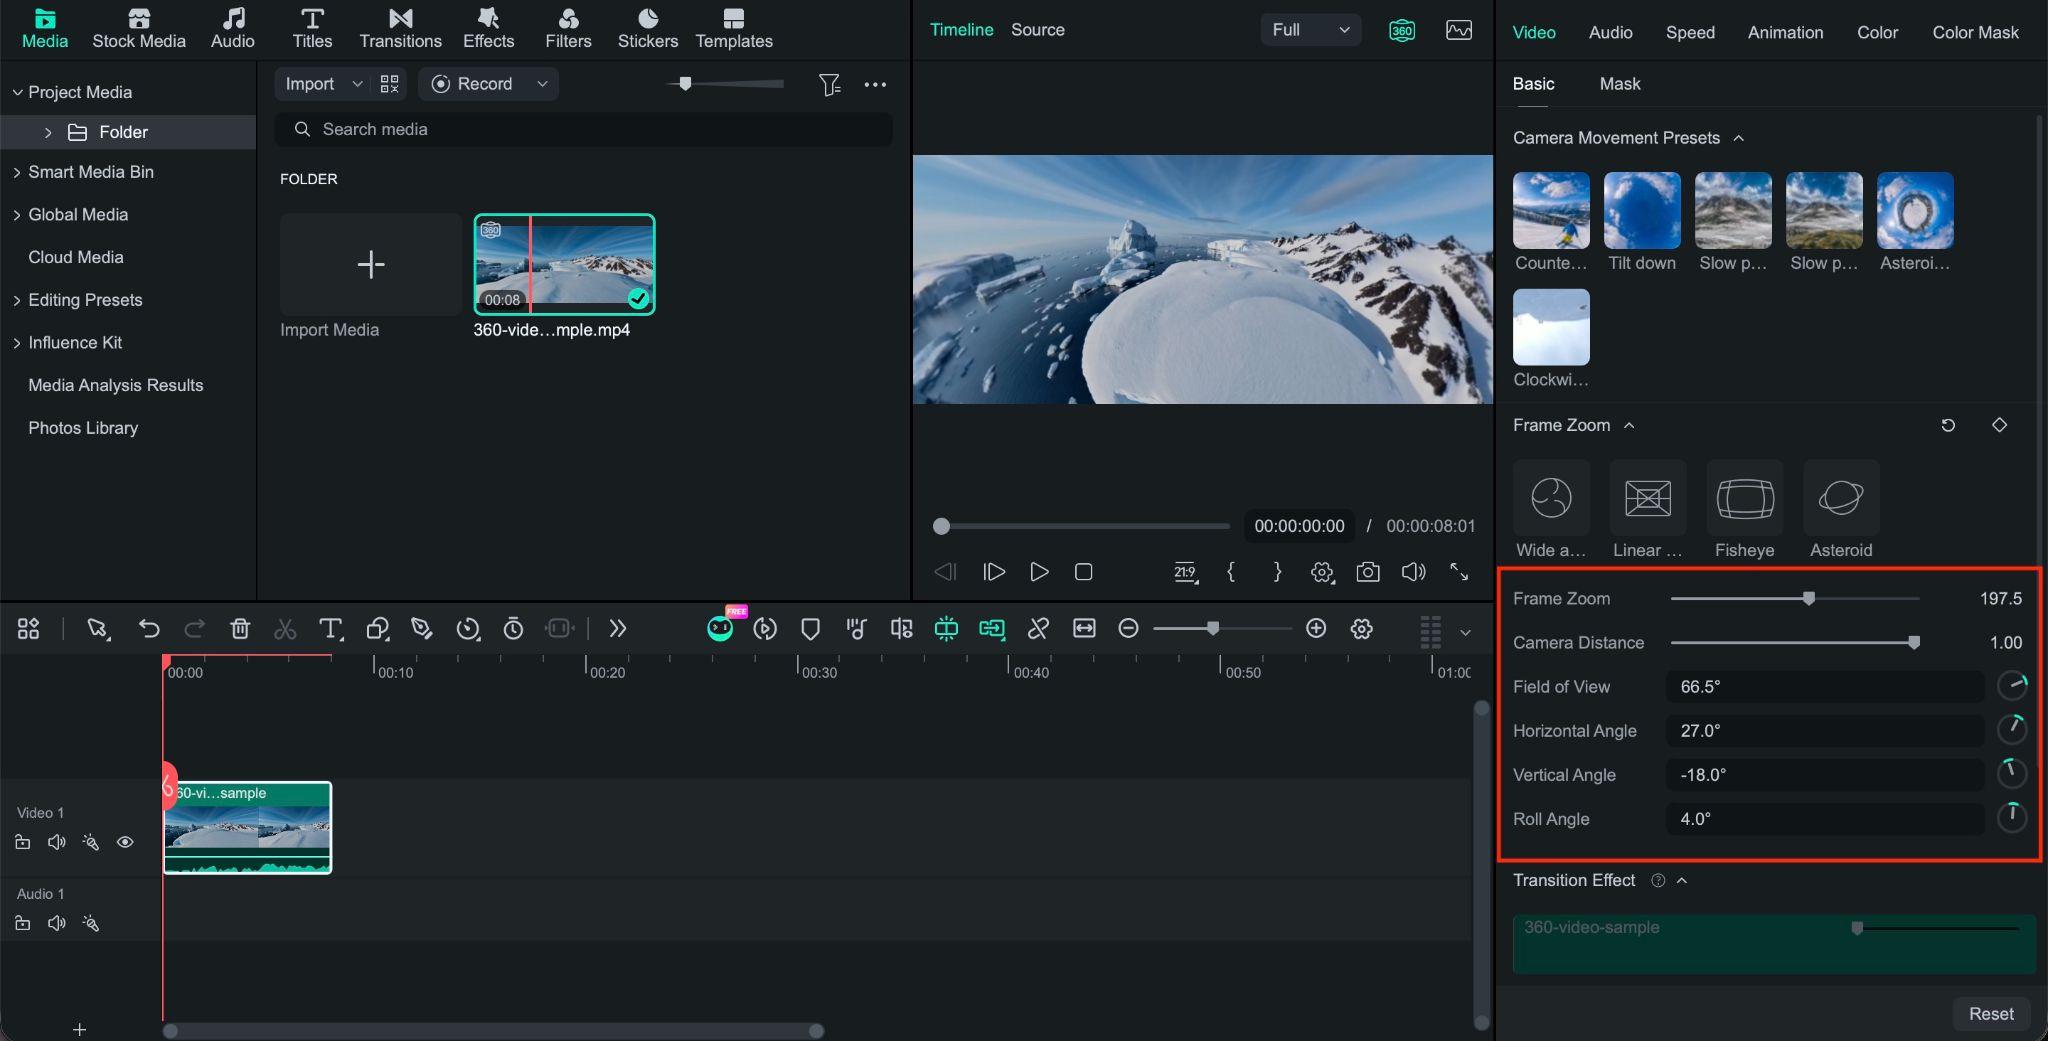
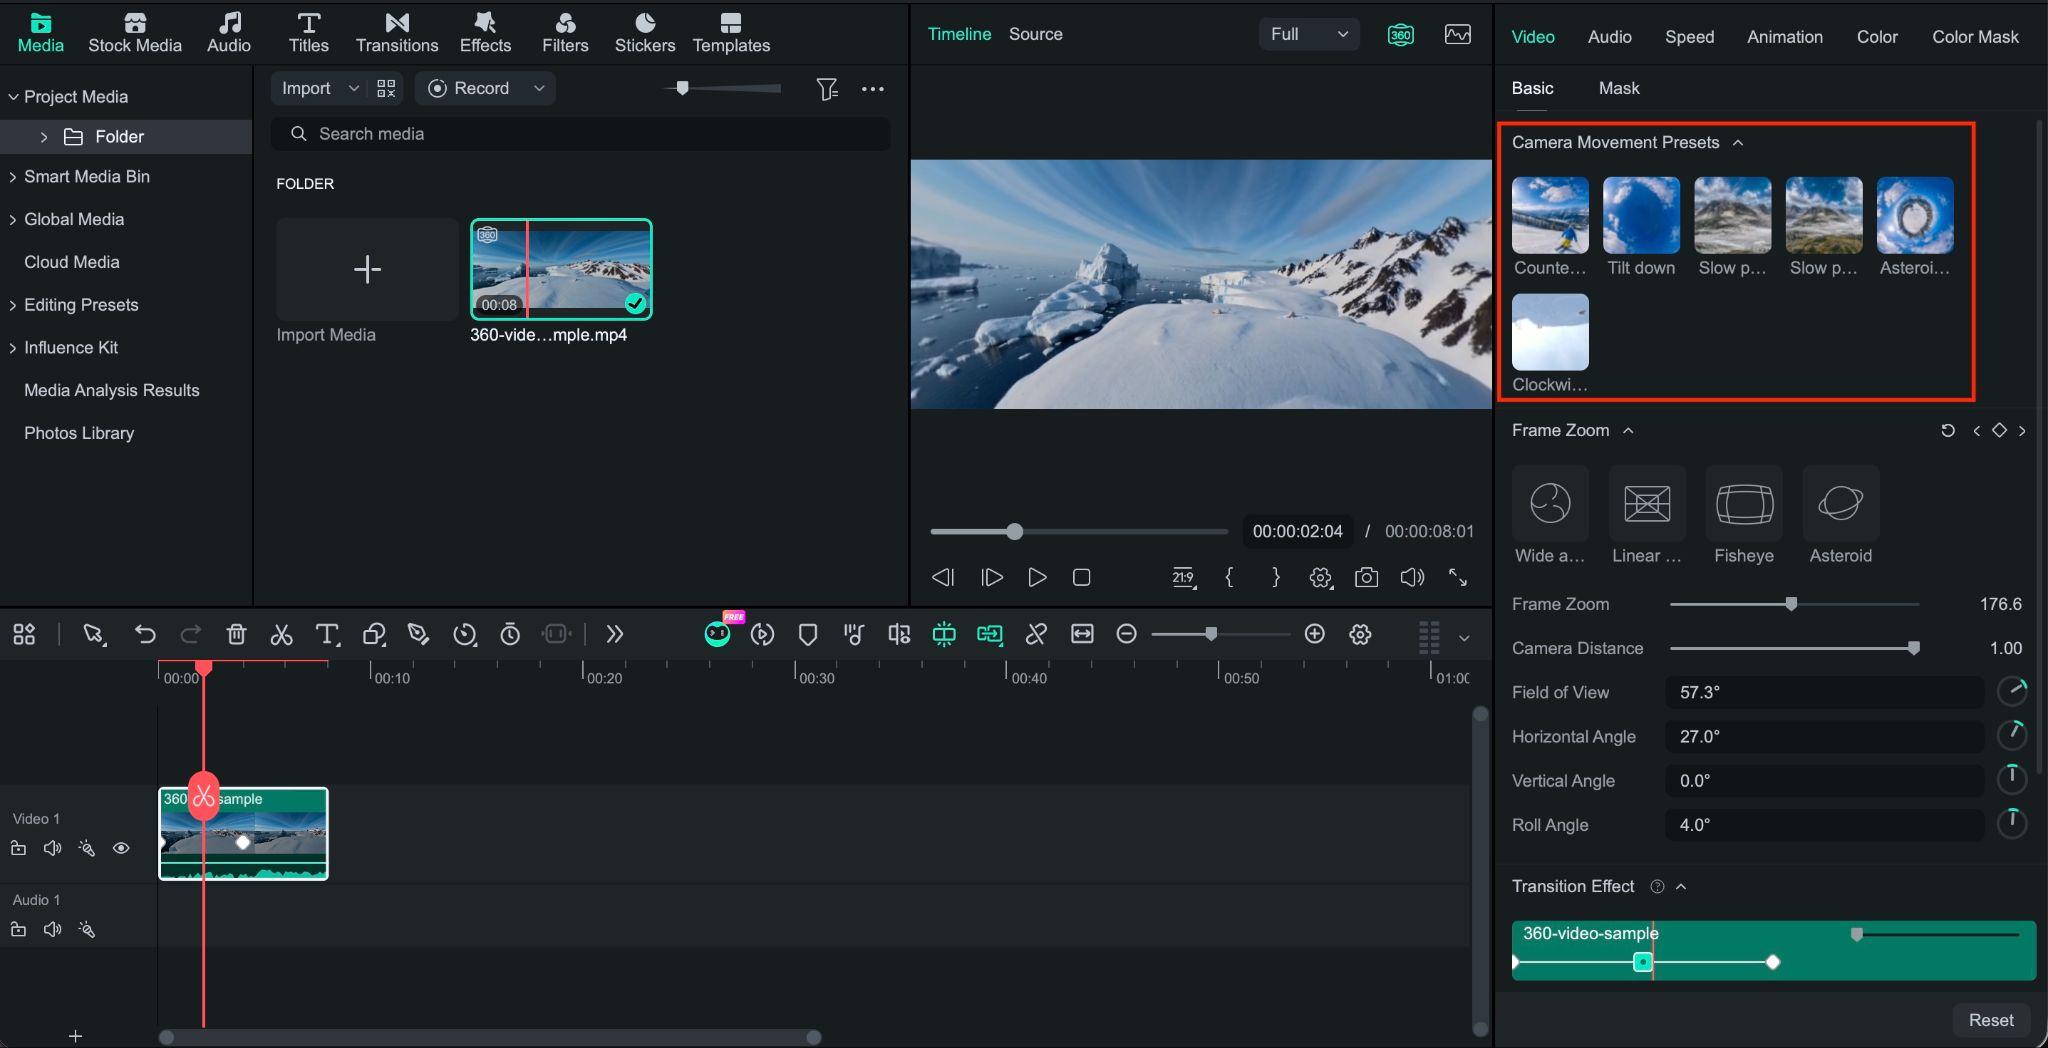
Select the clip and go to Video > Basic. Drag the preview to look around the scene, then adjust the panoramic settings (Horizontal/Vertical Angle, Roll Angle, and Field of View) to set the framing you want.
Step3Add camera movement
Use camera movement presets such as Orbit/Pan, Slow Push/Pull, or Sky Flip to create motion between different views. You can also use keyframes to control how the camera moves through the 360° scene.
Step4Continue editing the clip
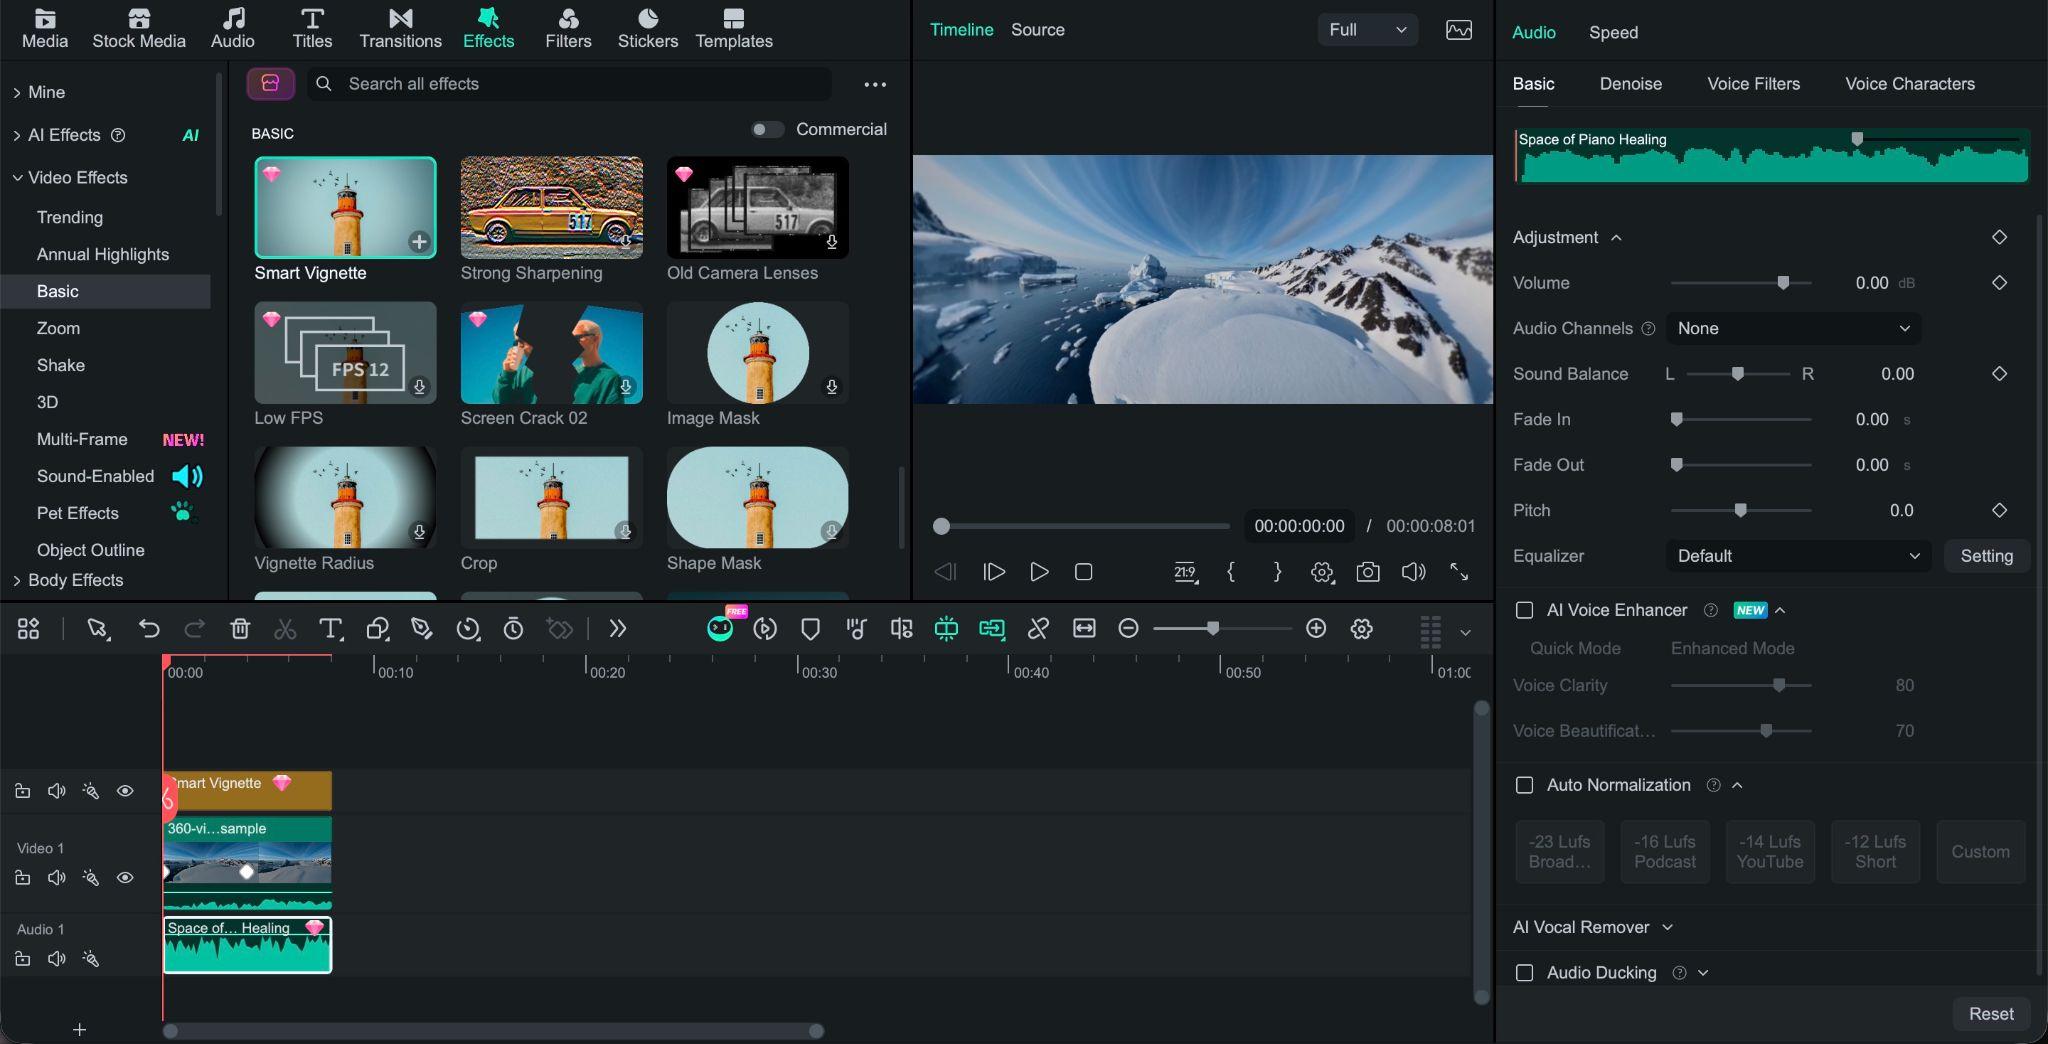
Once the perspective is set, continue editing the clip like a regular video. Trim or split the footage, adjust the speed, add transitions and effects, and make color or audio adjustments as needed.
Step5Choose your export format
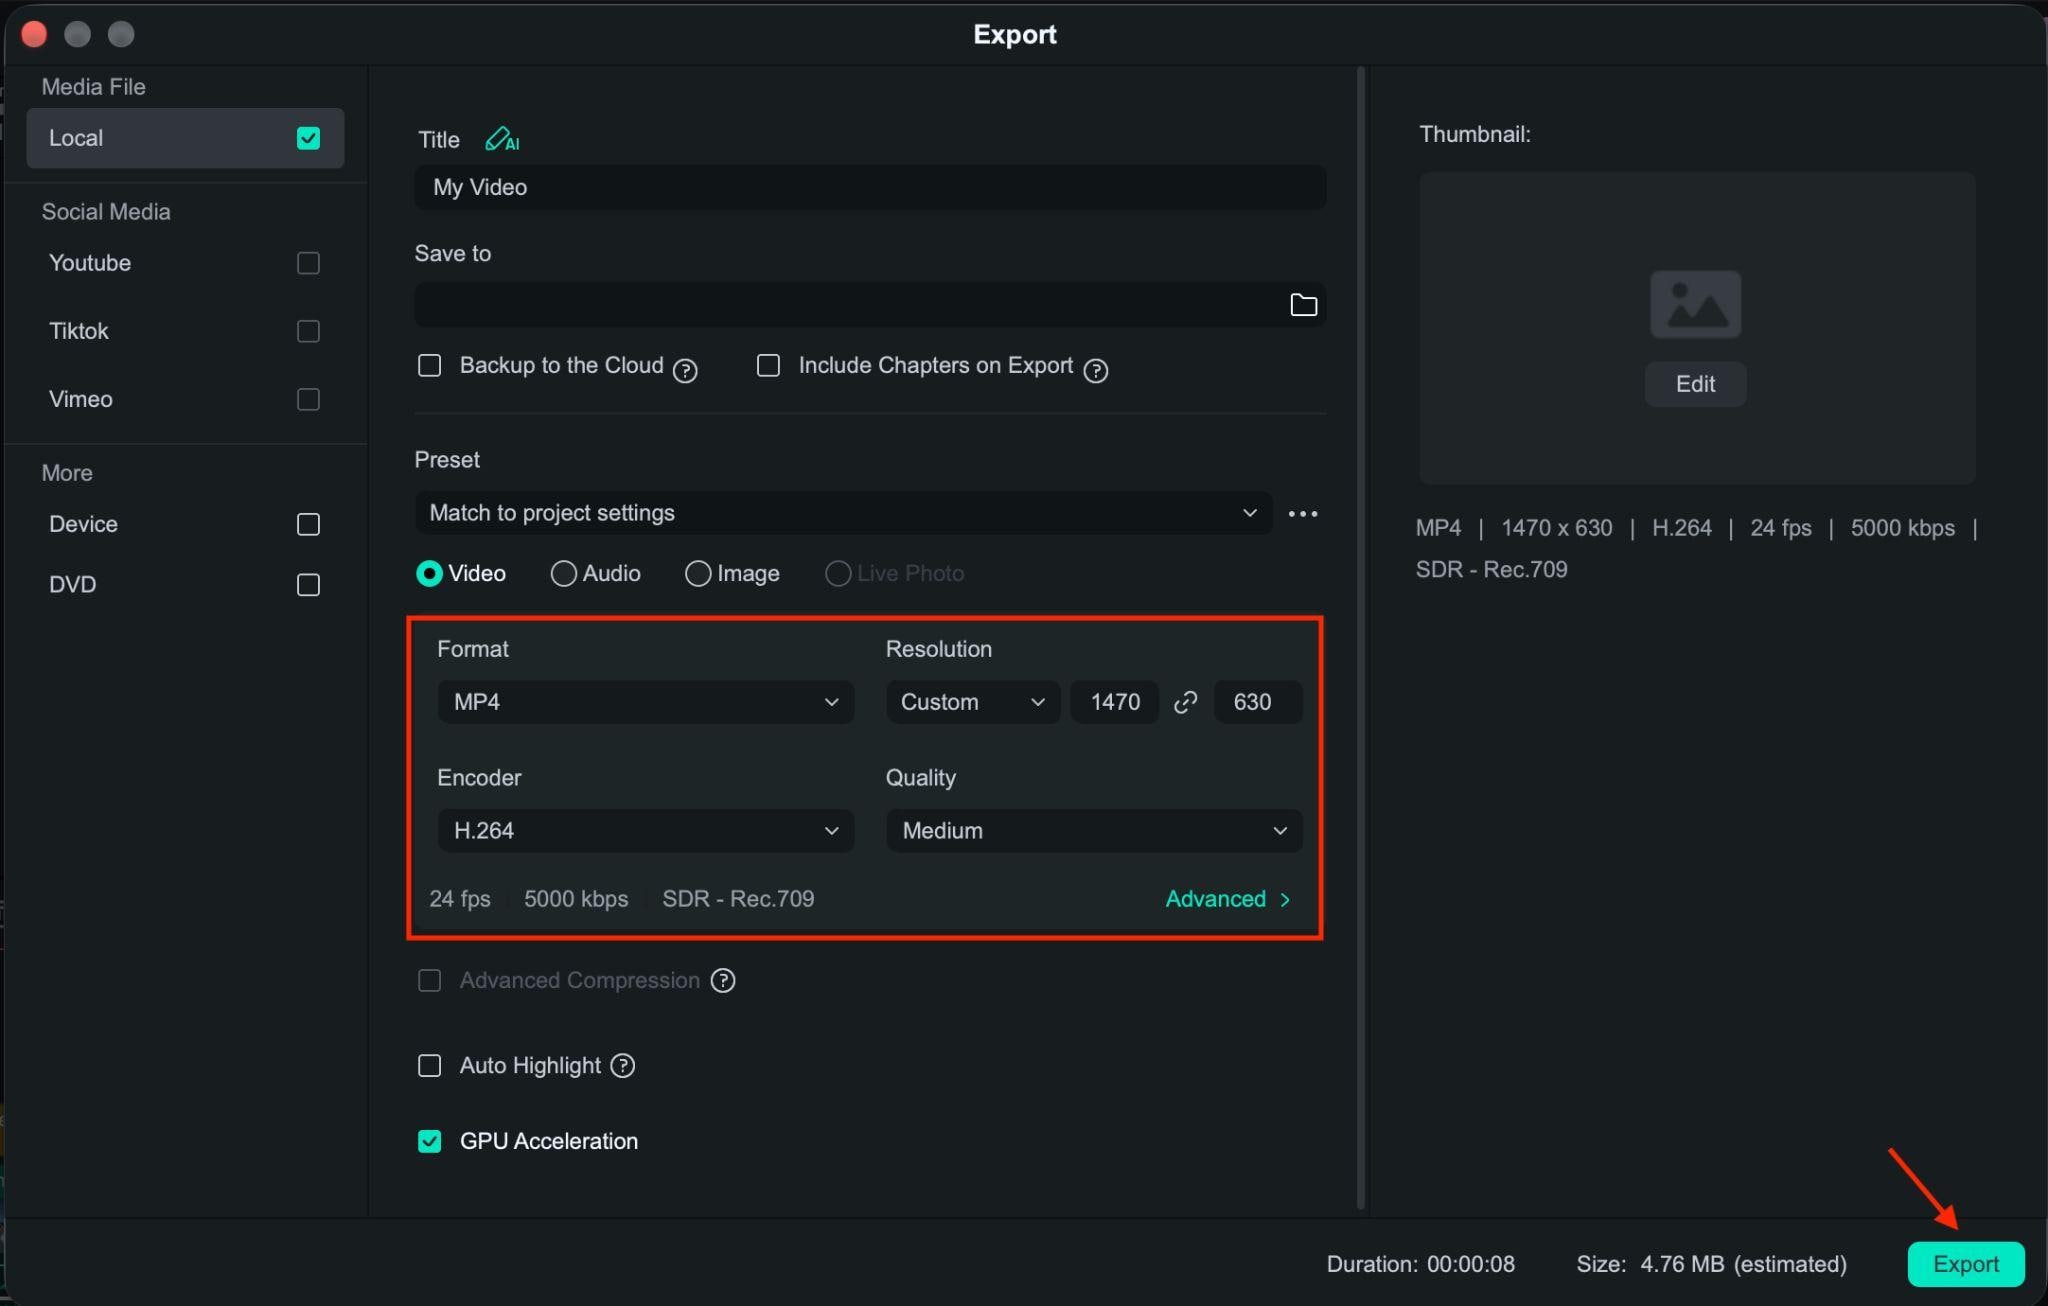
Click Export when your edit is ready. Filmora lets you save the reframed 360° footage as a regular 2D video and choose settings such as resolution, frame rate, and format before saving.
DJI Camera Considerations
Different DJI cameras produce different types of footage, so the editing process may vary slightly depending on the camera you use. Here are some key things to check:
- Edit DJI drone videos: Focus on trimming long flight clips, color correction, stabilization, and creating a more compact sequence of scenes.
- Edit DJI Osmo Pocket 3: Focus on framing, skin tones, stabilization, and audio.
- Edit DJI Osmo Action 4 / Action 5 Pro: Check stabilization, lens distortion, color, and fast-moving footage.
- Edit DJI Osmo 360 / Osmo 360 II: Prepare the footage in MP4, then use Filmora's 360° tools to choose the perspective and create a flat 2D video.
Part 3. How to Edit DJI Videos on Mobile
If you only need to turn a few DJI clips into a short video, you probably don’t need a computer. DJI offers mobile apps that can handle quick edits, especially for footage from its handheld and action cameras.
Edit DJI Videos with DJI Mimo
DJI Mimo is designed for DJI handheld and action devices and includes editing tools such as trimming, transitions, effects, text, subtitles, speed adjustments, and templates. Watch the video below for a tutorial:
How to Edit Video in DJI Mimo
- Select the footage you want to edit and add it to a new project
- Trim unwanted parts and keep the clips you want to use
- Add music, text, transitions, or effects to your video
- Preview the result, then export the video for sharing
For editing videos in DJI Mimo, the workflow is best suited to short, straightforward edits on your phone.
Edit DJI Videos with LightCut
LightCut is useful when you want a faster edit with less manual work. DJI supports LightCut with several of its cameras and drones, and its One-Tap Editing feature can automatically select clips and create a short video.
How to Edit DJI Drone Videos in LightCut
- Open LightCut and connect your DJI device or import your footage
- Select the clips you want to use and tap One-Tap Editing
- Choose a template and let LightCut create the video automatically
- Preview the result and make any quick adjustments before exporting
Part 4. Best Export Settings and Tips for Editing DJI Videos
Even a good edit can lose quality during export if the settings do not match the original DJI footage or the platform you’re posting to. After learning how to edit DJI videos on PC, check the resolution, frame rate, aspect ratio, and format before exporting.
Choose the Right Resolution and Frame Rate
- For the best detail: Keep 4K when your footage was recorded in 4K.
- For smaller files: Choose 1080p when Full HD is enough.
- For frame rate: Keep the original 24, 30, or 60 fps setting when possible.
Don’t increase the frame rate during export if the original footage was recorded at a lower rate.
Export DJI Videos for YouTube, TikTok, Reels
| Setting | Recommended |
| Aspect ratio | 16:9 (Standard), 9:16 (Shorts, TikTok, Reels) |
| Resolution | 4K (3840x2160), Full HD (1920x1080) |
| Frame rate | Match your source footage |
| Format | MP4 |
Note: If your DJI footage was shot horizontally, reframe or crop it before exporting to ensure the main subject remains visible.
💡Tips for Better DJI Video Quality
- ✅ Keep the original footage so you always have the highest-quality source.
- ✅ Correct D-Log or D-Log M footage before applying a creative look.
- ✅ Avoid excessive stabilization, as it can cause unwanted cropping or distortion.
- ✅ Choose your aspect ratio early, especially when converting drone or action footage into vertical videos.
- ✅ Review the final export before uploading it to check for framing, color, or audio issues.
Conclusion
DJI footage gives you plenty to work with, but good editing comes from knowing what each clip needs. For drone footage, trim out repetitive flight scenes and correct the colors before applying visual effects. For Pocket and Action footage, check stabilization, framing, and audio. If you’re learning how to edit DJI videos on PC or Mac, Filmora gives you the tools to handle these edits in one project.
To edit DJI 360 video, Filmora adds reframing, perspective presets, and camera movement controls to transform 360° footage into flat 2D videos. For quick edits, DJI Mimo and LightCut can handle basic projects on your phone.
FAQs
-
How do I edit DJI videos on PC?
Transfer your DJI footage to your PC, then import it into a video editor like Filmora. Trim clips, adjust colors, fix framing, edit audio, and add captions or effects. Then export in the resolution and frame rate you need. -
What is the best software to edit DJI videos?
It depends on your editing needs. Wondershare Filmora works well for detailed edits on PC or Mac, while DJI Mimo and LightCut are handy for quick mobile edits. For 360° footage, choose software with 360° reframing tools. -
How do I edit DJI Osmo 360 videos on PC?
Export your Osmo 360 footage as an MP4 using DJI's official tools, then import it into Filmora. Use 360° tools like Filmora to choose your view, adjust the perspective, and add camera movement. Export the finished video in 16:9 or 9:16.
