The perfect, if not the best, place to begin cartoon drawing style as an artist is drawings or sketches, since you don't need a lot of drawing equipment to start this type of drawing. What you chiefly need is just your pen and paper to begin.
So, let's move ahead as this content will show you different cartoon drawing styles, and in no time, you'll master the art.
Part 1 Classic & 20th Century Cartoon Styles
These are the foundational styles that paved the way for modern animation. They are defined by their historical significance and groundbreaking techniques.
01Old Cartoon Drawing Style
This drawing style is mostly in black and white format, with very high contrast body parts. The features of this style are having short bodies and long limbs. Sometimes, this type of drawing is referred to as Noodle drawing because the character's body moves as if there are no bones in their body.
Key Characteristics:
- High-contrast black and white palettes.
- Characters with long, flexible limbs that move as if they have no bones.
- Simple, circular eyes (often called "pie-eyes").
- A primary focus on motion and rhythm over realism.
Some examples of this cartoon drawing style include:
● Early Mickey Mouse
● Betty Boop
02Classic Animated Style
Starting in the late 1930s, animation studios pushed for more realism in their art. While still stylized, characters began to have more weight, structure, and followed anatomical principles more closely. This style focused on expressive faces and believable movement.
This drawing style became a major trend for years, although it has evolved over time.
Key Characteristics:
- More realistic proportions compared to the Rubber Hose style.
- Soft, rounded shapes.
- Highly expressive faces and body language.
- A focus on creating appealing and believable characters.
Some examples of this cartoon drawing style include:
● Early Animated Classics
● Timeless Animation Films
03Mid 20th Century Disney Style
Disney upped their game during the mid 20th century and started working more with live actors, drawing from references, and filming shots before drawing the cartoons.
Key Characteristics:
- Sharper, more angular lines compared to the classic era.
- Elegant and graceful character movements.
- Detailed and lushly painted backgrounds.
- Continued use of live-action reference for realism.
Some remarkable examples of this cartoon drawing style are
● Alice in Wonderland
● Cinderella
● Beauty and the Beast
Part 2 Modern Western Animation Styles
These styles are what many of us grew up with on television. They are often designed for faster production schedules but are no less creative or iconic.
04Modern Cartoon Style
This style is currently the most common art style displayed on TV channels like Cartoon Network.
Note that this cartoon-style drawing's main features are the thick outlines, geometric shapes, and bright colors.
One of the significant reasons this drawing style is this way is that using simple shapes without much detail makes the overall animation process much faster and saves resources for the studios. Nonetheless, it is a beautiful and captivating cartoon drawing style!
Key Characteristics:
- Thick, clean outlines.
- Character designs based on simple geometric shapes (circles, squares, triangles).
- Bright, saturated, and often flat color palettes.
- Simplified details, making animation more efficient.
This drawing style is used by many modern cartoons. Here are a few examples:
● The Powerpuff Girls
● Dexter's Laboratory
● Codename: Kids Next Door
● Gravity Falls
05The Simpsons Cartoon Drawing Style
This cartoon-style drawing is widely famous. Though this style has undergone some evolution throughout the years, the main features remained constant! That is to say, the yellow bodies and big and white sphere-like eyes remained.
Key Characteristics:
- Yellow skin tone for main characters.
- Significant overbites on most characters.
- Large, white, sphere-like eyes with simple black dots for pupils.
- Four-fingered hands.
Some remarkable examples of this cartoon drawing style are
●The Simpsons
●Futurama (by the same creator)
06South Park Style
South Park cartoon drawing style is aptly geometric and has little depth. Shadows or highlights in this cartoon-style are rare. The colors are pretty solid and clean.
Key Characteristics:
- Extremely simple, geometric construction (mostly circles and lines).
- Minimal to no depth, shadows, or highlights.
- Solid, clean color fills.
- Stiff, limited character movement reflecting its cut-out origins.
The remarkable example of this cartoon drawing style is
●South Park
07Adventure Time Style
Adventure Time's art is incredibly geometric, and its characters are nearly boneless, making it a more current example of a cartoon drawing style.
More fluid animation is possible as a result of this. The art is also quite brilliant, with vibrant hues that leap off the screen.
Aside from that, the characters' eyes are usually tiny (with a few exceptions), and the lines are skinny.
Key Characteristics:
- Extremely flexible, "noodly" limbs.
- Simple, often tiny dot eyes.
- Thin, consistent line weight.
- Bright, imaginative, and often pastel color schemes.
Here are some examples of this cartoon drawing style:
●Adventure Time
●The Regular Show
Part 3 Japanese Anime & Manga Styles
Originating from Japan, anime and manga styles are beloved for their emotional depth, dynamic action sequences, and distinct character designs.
08Classic Manga Style
The old Japanese manga characters tend to possess human-like attributes (proportions) in terms of the body. The difference is the big eyes they have the most time.
Generally, this cartoon drawing style focuses more on feminine bodies, possessing angular chins and thin bodies. Some drawing styles tend to make some parts of the body overtly long compared to the rest of the body; for instance, the legs are mostly longer than other parts.
Key Characteristics:
- Very large, vertically-oriented, and highly detailed eyes.
- Sharp, angular chins.
- Relatively realistic body proportions, often elongated for dramatic effect.
- Intricate, flowing hair.
A few examples of classic manga possessing this cartoon style drawing are:
● Oh My Goddess
● Urusei Yatsura
● Sailor Moon
● Hellsing
09Modern Anime Style
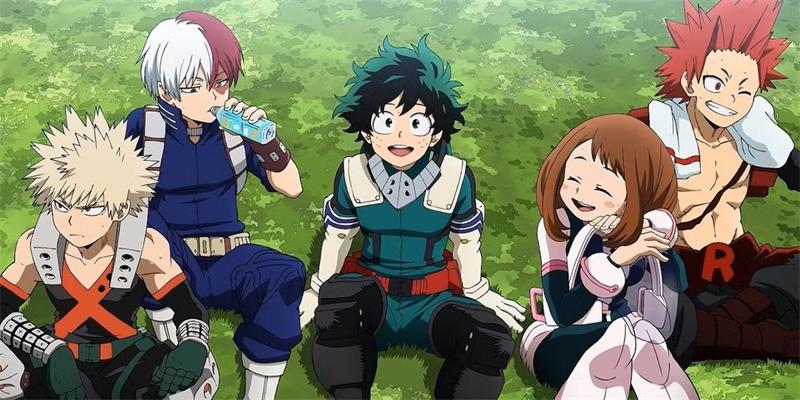
This style tends to be more complex, primarily seen in drawings where the characters seem to be in motion, like in comic books. Modern-day drawings of this style have a lot of shadows and highlights in their character and environment, giving them a relatively new level of complexity.
Key Characteristics:
- Slightly smaller, but still very expressive eyes compared to classic manga.
- Complex shading, highlights, and lighting effects.
- Sharp, clean lines and detailed character designs.
- Focus on dynamic camera angles and fluid action sequences.
Here are a few examples of modern animes that follow this Japanese cartoon drawing style.
● My Hero Academia
● Sword Art Online
● Attack on Titan
● Fullmetal Alchemist Brotherhood

10Chibi Drawing Style
The Chibi Cartoon Drawing Style mainly focuses on making the characters into a tiny version of themselves as if being compressed or compacted into a small container.
Key Characteristics:
- Oversized head, typically 1/2 to 1/3 of the total body height.
- A small, compacted body with stubby limbs.
- Simplified and exaggerated facial features for maximum cuteness.
- Often used for comedic effect or merchandise.
Examples of where this drawing style is used:
● Lucky Star
● Bottle Fairy
● Himouto! Umaru-chan
Tool Tip: Recreate This Look with Filmora!
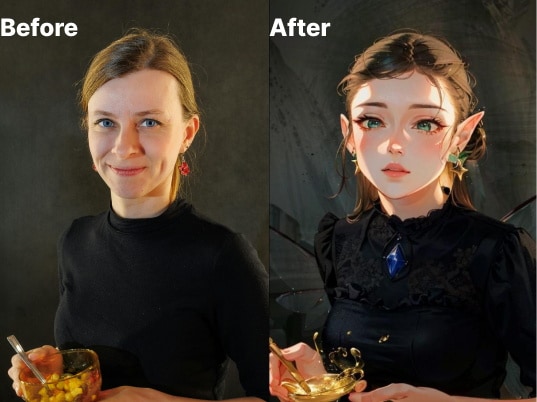
Want to turn a photo of yourself or a friend into a funny Chibi-style character? Use Filmora's image stylizer to instantly get a similar look for comedic and cute photos.
Part 4 Unique & Artist-Specific Styles
Some styles are so unique they are synonymous with their creator or a specific show.
11Chrono Trigger/ Dragon Ball (Akira Toriyama)
Akira Toriyama's cartoon drawing style characterizes having big and almost rectangular eyes and a lot of geometric shapes and definitions in the muscles.
12Realistic Cartoon Style
This cartoon drawing style is more quirky since, generally, cartoon drawing is more likely to simplify shapes. The realistic cartoon-style drawing adds more details and keeps figures much more in line with reality. This drawing style is typical among artists who vectorize people's photographs.
You can also, to some extent, include Caricatures in this category. Caricatures are generally very realistic besides the whole enlargement and shrinking of specific body parts!
Few examples of realistic cartoon drawing styles:
● Ugly Americans
● General Caricataures
● Archer
13Crayon Shin-Chan
This cartoon-style drawing is effortless. An exciting aspect of this style is that it doesn't mind pushing the limits of the character.
The lines generally are thin, and the eyes are prominent in black and white colors.
14Modern Disney Drawing Style
This cartoon-style drawing is an immediate improvement of the mid-20th 20th drawing style. This cartoon style is brighter, more detailed, and more complex generally.
Although Disney has stopped creating 2D cartoon drawings, there are still some examples of this more refined art style:
● The Princess and the Frog
● Lilo and Stitch
15Betty Boop
Betty Boop's cartoon drawing style possesses contrasting black and white colors. Fragile lines with the characters contain a very high amount of black shapes.
Part 5 How to Find and Develop Your Own Cartoon Style
Seeing all these styles is inspiring, but the real goal is to develop your own! Here’s how:
- Study the Masters: Don't just look at these styles—analyze them. What makes them work? Sketch your favorite characters to understand their underlying shapes and lines.
- Combine and Exaggerate: Take elements you love from different styles. What if you combined the big eyes of Manga with the simple shapes of the Modern Cartoon style? Exaggerate features you find interesting.
- Draw from Life: The best cartoonists are masters of real-world anatomy. Practice drawing real people and objects, then simplify and stylize them. This will give your cartoons weight and personality.
- Be Consistent: Once you land on a look you like, practice it over and over. Consistency is what turns a few good drawings into a recognizable style.
Part 6 Frequently Asked Questions
1. What is the most popular cartoon drawing style?
While popularity shifts, Modern Anime styles (like those in My Hero Academia) and iconic Western styles (like The Simpsons) remain incredibly popular and influential worldwide. The "CalArts" style, a type of Modern Cartoon style, is also extremely prevalent in modern TV animation.
2. How can I turn my photo into a cartoon?
You have several great options! You can practice drawing it yourself, or hire a freelance artist. But for a fast, easy, and incredibly fun method, you can use an AI-powered tool. Wondershare Filmora makes this effortless. Its AI Image Stylizer can analyze your photo and transform it into various cartoon styles—like anime, comic book, Disney, and more—in just a few clicks. It's the perfect way to create a unique profile picture or just have fun with your photos.

3. What's the difference between cartoon and anime style?
While anime is a type of cartoon, the term "cartoon" usually refers to Western animation (like Disney or Looney Tunes), while "anime" specifically refers to animation from Japan. Stylistically, anime often features large eyes, dramatic lighting, and focuses on more mature or complex storylines, though there is huge variety in both forms.
Ending Thoughts
Cartoon-style drawings come in many forms, each with its own personality. When learning how to turn your picture into a cartoon, choose one style that resonates the best with you. This way, you can express yourself better. Also, don’t be afraid to experiment and mix and match the different styles to create your own.
And if drawing isn’t your thing, tools like Filmora make it easy to cartoonize yourself with zero effort. From AI-powered filters to cartoon-style video templates, you can turn photos and clips into creative visuals in minutes.


 100% Security Verified | No Subscription Required | No Malware

