
 100% Security Verified | No Subscription Required | No Malware


 ChatGPT
 Perplexity
 Gemini
 Claude
 Grok
Grok
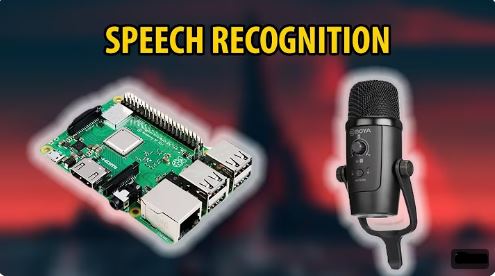
Turning spoken words into text with Raspberry Pi speech recognition opens up endless possibilities—from building voice-controlled projects to automating tasks. But many struggle with setting it up, choosing the right software, and improving transcription accuracy.
This guide will simplify the process, showing you how to convert speech to text on Raspberry Pi step by step. You'll learn about the best speech recognition libraries, how to configure your device, and how to refine transcriptions for better readability. Plus, we’ll introduce an easier solution to get speech-to-text results within minutes. Whether you’re a beginner or an advanced user, this article will equip you with everything needed to make Raspberry Pi voice recognition work seamlessly. Let’s get started!
In this article
Part 1. Speech Recognition Raspberry Pi Overview
Speech recognition technology enables machines to understand and process human speech, converting spoken words into text or commands. While Raspberry Pi offers an affordable and flexible platform for speech recognition, it requires a manual setup, specific hardware, and knowledge of software libraries. But how effective is it in real-world use? Let's take a look at its capabilities, limitations, and performance.
How Speech Recognition Works on Raspberry Pi
Raspberry Pi processes voice input by capturing audio through a microphone, analyzing the speech using software and APIs, and converting it into text or executing commands. Typically, it works through cloud-based (Google Speech API) or offline (CMU Sphinx, Vosk) recognition methods. Here’s the Raspberry voice recognition workflow:
- Voice Input: A microphone captures the spoken command.
- Processing: The speech recognition software translates the audio into text.
- Execution: If the text matches a predefined command, the system responds accordingly.
Advantages of Raspberry Pi Speech Recognition
- Affordable Solution – Raspberry Pi is budget-friendly compared to high-end AI devices.
- Highly Customizable – Users can choose from multiple speech recognition libraries and APIs.
- Works with IoT & Robotics – Ideal for home automation and AI projects.
- Supports Offline Processing – Some libraries (CMU Sphinx, Vosk) work without the internet.
Hardware Requirements for Speech Recognition
To enable speech recognition on Raspberry Pi, you need:
- A Raspberry Pi board (Pi 3, 4, or newer for better performance).
- A USB microphone or a headset for capturing voice input.
- A stable internet connection (if using cloud-based speech recognition)- – Needed for Google Speech API, OpenAI Whisper, etc.
- A microSD card with Raspberry Pi OS installed.
While built-in microphones on some Raspberry Pi models can work, an external USB microphone improves accuracy and clarity.
Software & Libraries for Speech Recognition on Raspberry Pi
Speech recognition on Raspberry Pi can be done using a lot of software tools. The following open-source libraries and APIs are frequently used for speech recognition on Raspberry Pi:
| Library/API | Processing | Internet connection | Accuracy & Performance |
| CMU Sphinx | Offline | ⭐⭐ (Basic accuracy) | |
| Vosk | Offline | ⭐⭐⭐ (Better accuracy) | |
| Mozilla DeepSpeech | Offline | ⭐⭐⭐⭐ (AI-based model) | |
| Google Speech API | Cloud-based | ⭐⭐⭐⭐⭐ (High accuracy) | |
| Picovoice | Offline | ⭐⭐⭐⭐ (Optimized for small devices) | |
| OpenAI Whisper | Cloud-based | ⭐⭐⭐⭐⭐ (Advanced AI-powered) |
Part 2. How to Set Up Speech Recognition on Raspberry Pi
Setting up speech recognition on Raspberry Pi requires installing the right software, configuring a microphone, and running a speech-to-text program. Follow this step-by-step guide to get started.
Step 1: Set Up Raspberry Pi
- Install Raspberry Pi OS on an SD card.
- Connect Raspberry Pi to a power source, monitor, keyboard, and internet.
- Enable SSH for remote access (optional but recommended).
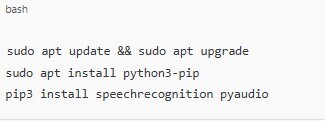
Step 2: Install Required Dependencies
Run the following command to update the system:
Step 3: Set Up and Test Your Microphone
To capture voice input, plug in a USB microphone and check if Raspberry Pi detects it:
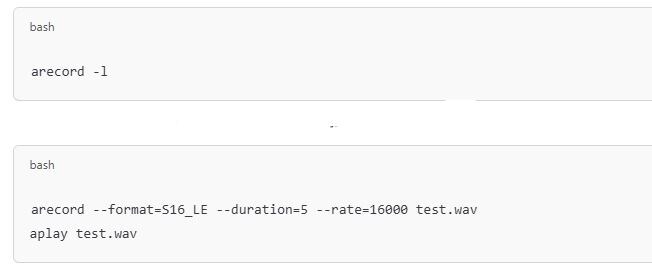
If you hear your recorded voice, your microphone is working correctly.
Step 4: Install and Configure a Speech Recognition Library
There are multiple libraries you can use for speech to text on Raspberry Pi:
Option 1: CMU Sphinx (Offline Speech Recognition)
For CMU Sphinx, install it using: pip3 install pocketsphinx
Option 2: Google Speech-to-Text API (Online & High Accuracy)
Run the following Python script to test Google’s Speech Recognition:
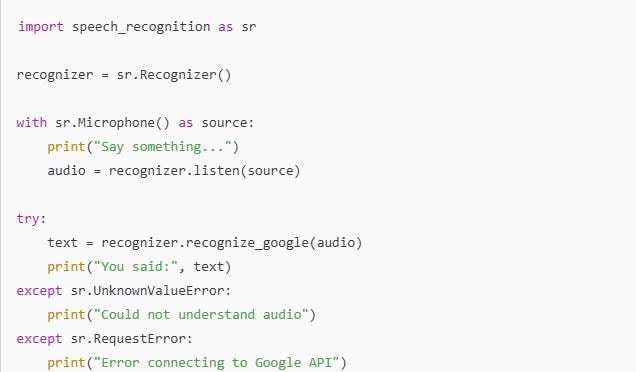
Save this as speech_test.py and run:

Step 5: Running and Testing Speech Recognition
Now that you have installed the required software and configured your microphone, test your setup by speaking into the microphone. The system should convert your speech into text and display it on the screen.
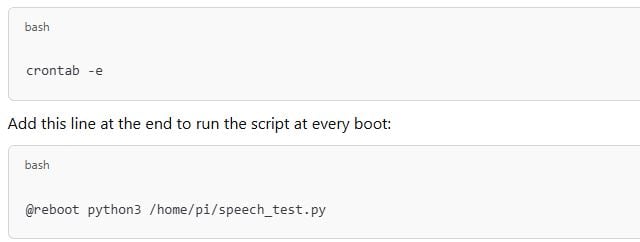
Step 6: Automating Speech Recognition on Raspberry Pi
To make your Raspberry Pi voice recognition work continuously:
- Create a Python script that runs on startup.
- Use cron jobs or systemd services to automate speech-to-text execution.
Example cron job:
Part 3. Challenges & Limitations in Raspberry Pi Speech Recognition
Although the speech recognition with Raspberry Pi is an affordable way to experiment with speech recognition, its performance is not on par with commercial-grade voice assistants like Google Assistant or Amazon Alexa. Users often face technical hurdles, accuracy issues, and real-time processing delays. In this section, we’ll discuss its limitations.
- Limited Processing Power
Raspberry Pi has a weaker CPU compared to full-sized computers, making it slower at processing voice input, especially for real-time applications. Running deep-learning-based models like DeepSpeech can cause lag and delays. - Audio Quality Issues
Microphone quality affects accuracy. Built-in microphones or low-quality USB mics can result in unclear audio input. Also, background noise impacts recognition. Unlike commercial voice assistants, Raspberry Pi lacks advanced noise cancellation
- Offline vs. Cloud-Based Recognition
Offline recognition tools (CMU Sphinx, Vosk) have lower accuracy than cloud-based solutions like Google Speech API. Cloud-based APIs provide better accuracy but require a stable internet connection, which limits offline usability.
- Latency & Slow Response Time
Speech recognition is not instant—processing takes longer compared to AI-powered voice assistants. Raspberry Pi struggles with handling multiple voice commands quickly, making it less practical for real-time applications.
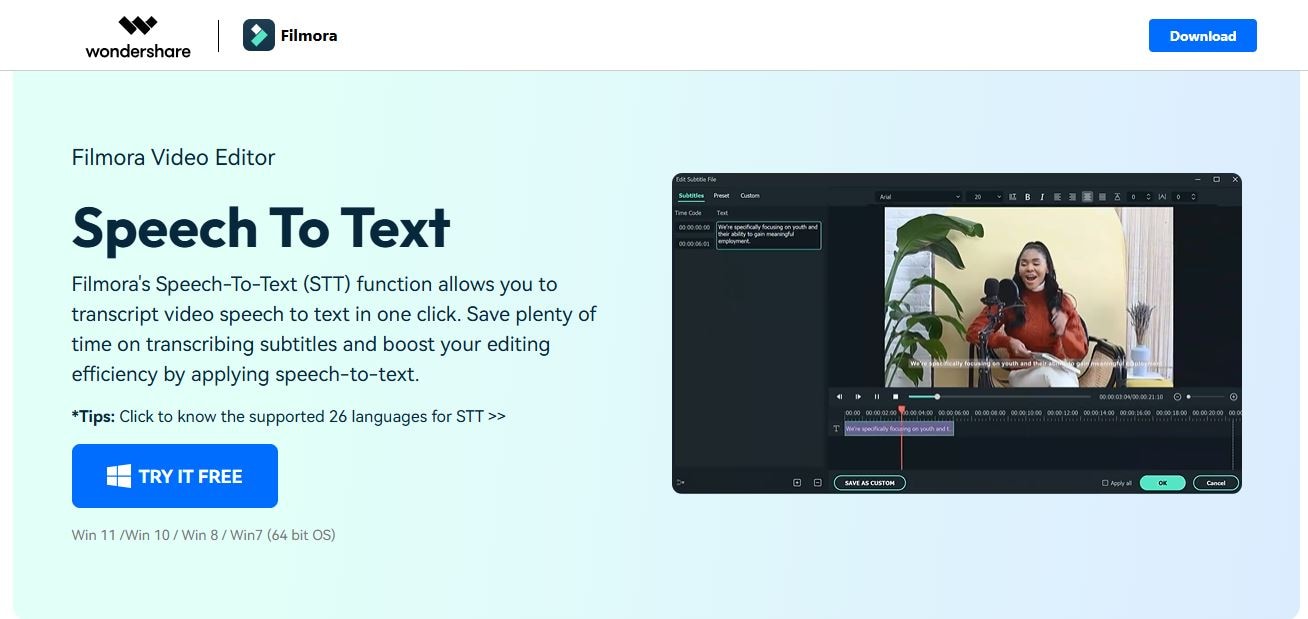
Part 4. Easier Alternative with High Accuracy and No Technical Requirements: Filmora
While Raspberry Pi speech recognition is a powerful option for tech enthusiasts, it requires manual setup, coding knowledge, and occasional troubleshooting. If you're looking for a faster, more accurate, and hassle-free solution, Wondershare Filmora is the perfect alternative.
Filmora is a video editing software that comes with built-in AI-powered speech recognition tools, making voice-based editing effortless. Unlike speech to text Raspberry Pi setups, which may struggle with accuracy and background noise, Filmora delivers highly precise transcriptions without requiring complex configurations or external libraries.
It offers a seamless experience with two major tools for speech-to-text conversion and voice-based editing:
- Speech-to-Text Feature (Desktop): Automatically converts spoken words into accurate subtitles and captions.
- Speaker Detection & Speech Edit Feature (Mobile): Identifies different speakers in a video and allows easy text-based speech modifications.
These features ensure greater accuracy, time efficiency, and an intuitive experience compared to Raspberry Pi’s manual setup. In the next section, we'll explore how to use these tools for speech recognition and editing in Filmora.
- Vast video/audio effects and creative assets.
- Powerful AI for effortless content creation.
- Intuitive, professional yet beginner-friendly.
- Works on Mac, Windows, iOS, and Android.


How to Use Speech to Text Feature in Filmora Desktop version
To use Filmora speech-to-text feature on desktop, the process involves several key steps:
Step 1. Download and install Filmora software on your desktop. Open it Click New Project and import your audio or video file.

 secure download
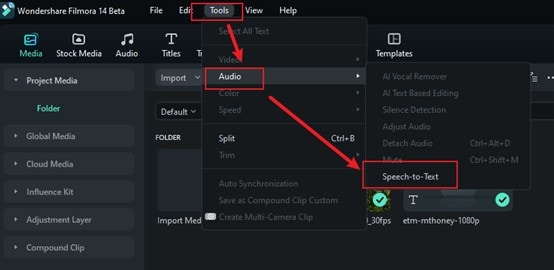
 Step 2. Once your audio file has been imported drag it to the timeline. To use the speech-to-text tool, go to Tools> audio>speech to text option. Click on the speech to text button to get started with speech recognition and convert it into text
Step 3. Set your language preference to whatever language you want. For the transcription to remain in the original language, click on “No translation” for it to remain the same. Click Generate to get started and wait for the transcription to be complete then you can save the file.
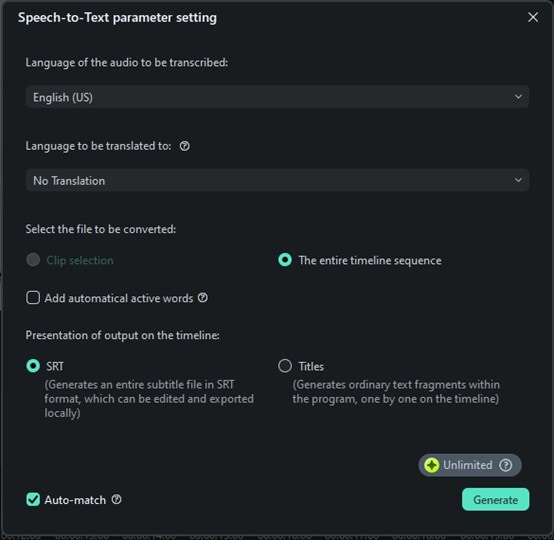
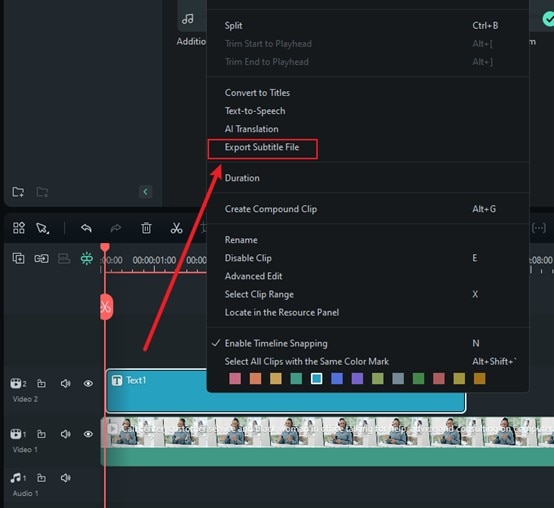
Step 4. The processing will take some time and then text file will be generated automatically. You can edit the file however you see fit. Click on the text file, select Export subtitle file and choose the location to save it. That’s it, yYour Speech to text is ready with Filmora.
Recognize Voice Automatically Using Filmora Speaker Detection on Mobile
Using the Filmora speaker detection feature on a mobile device, you can automatically identify voices by following these instructions.:
Step 1. Download the latest Filmora application on your device, open it and click New Project to start.
 secure download
 Step 2. Choose your video file you want edit and click Import.

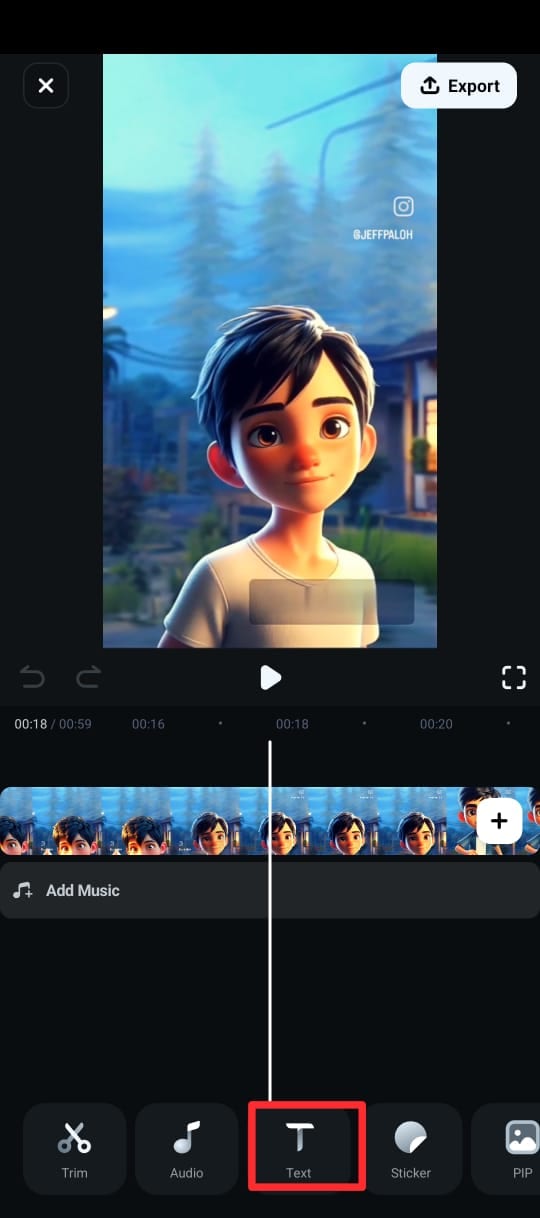
Step 3. Navigate to the bottom menu, tap Text (represented by a "T" icon), and select AI Captions.
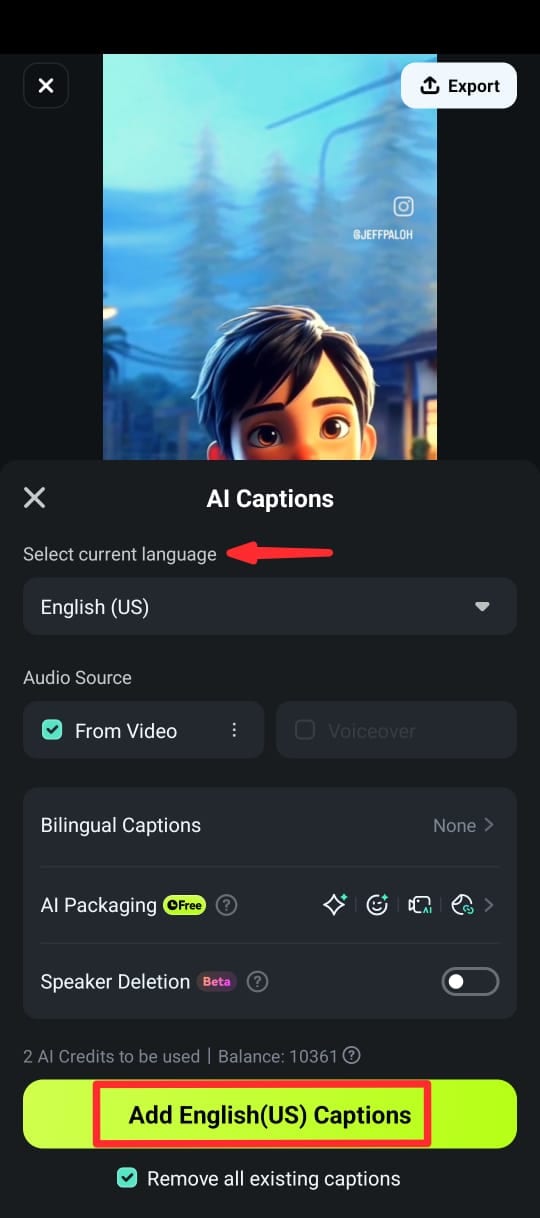
Step 4: On the next screen:
- Select the language of the speech.
- Toggle on Speaker Detection (if needed).
- Tap Add Captions to generate text from the video’s audio.
Step 5. Once captions are generated, you can:
- Choose from various text templates, fonts, and emojis.
- Edit the text directly in the timeline by selecting Edit Speech from the editing suite.
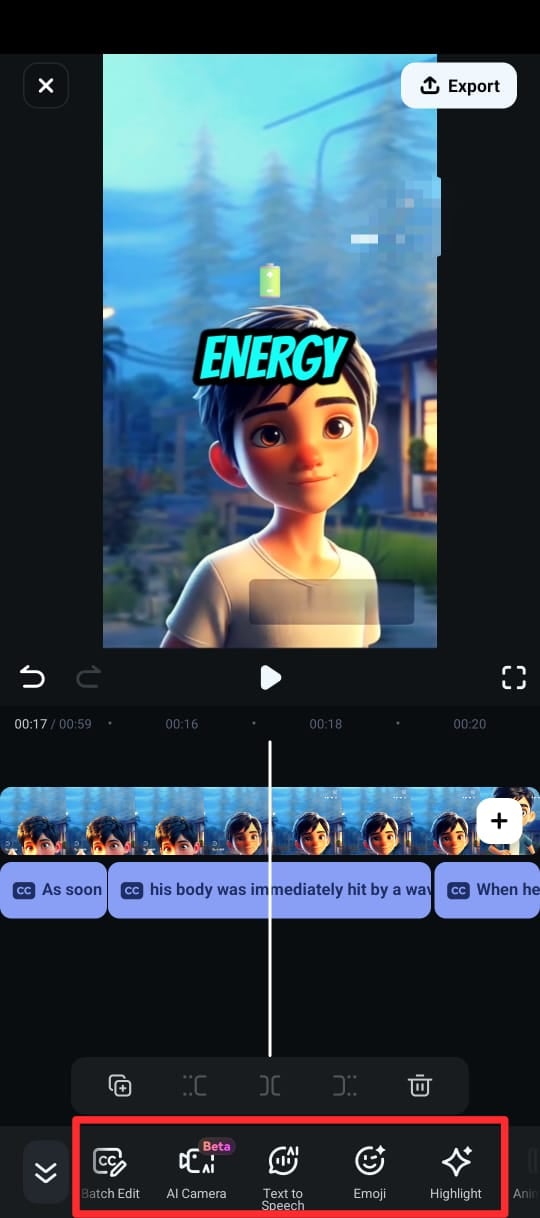
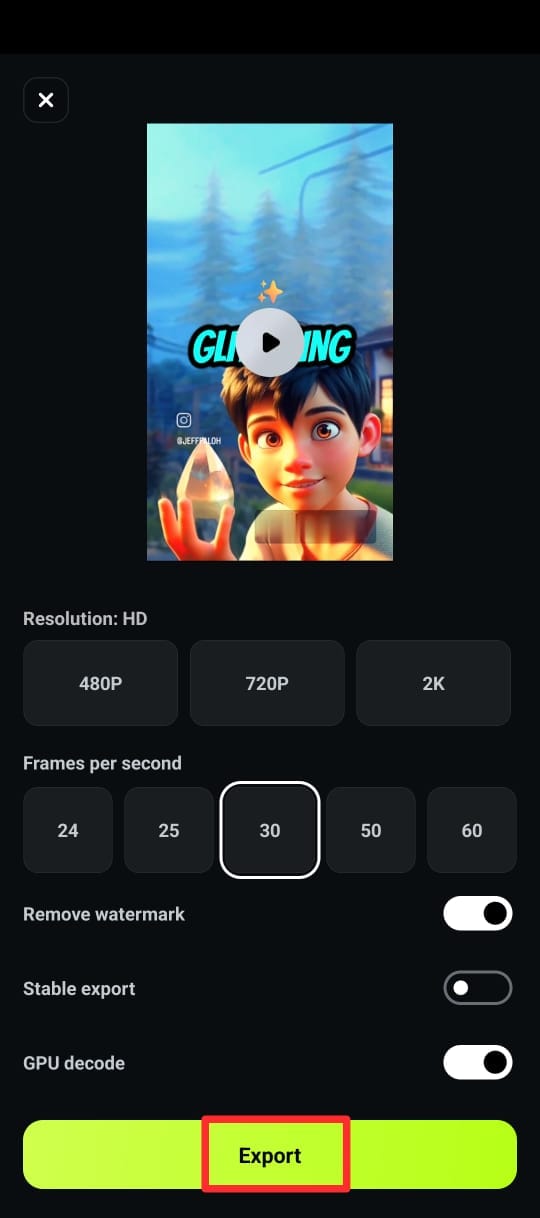
Step 6. Once you're satisfied with the captions, export your video in the desired format and resolution.
Conclusion
Raspberry Pi speech recognition is an excellent platform for with a variety of software alternatives, however it has limitations in accuracy and processing capacity. For users who prefer a simple experience, Filmora's Speech-to-Text and Speaker Detection tools provide an option for easy audio transcription and editing. Filmora enables you to simplify voice-based work without requiring sophisticated settings, making it an excellent option for content creators and professionals.
secure download 