Split screen is a video editing method where multiple video clips are shown at the same time on different parts of the screen. This method allows viewers to see various perspectives or storylines all at once. Split screen video is commonly used in tutorials, reaction videos, and storytelling videos.
Creating a split screen effect with video editing software might seem simple, but it can be challenging for beginners. If you are new to video editing, this guide is for you. We will show you how to create split screen videos using Wondershare Filmora. Let’s get started!
In this article
Part 1. Creative Ideas for Split Screen Videos
Split screens in video editing are very versatile and you can use them to enhance various creative projects. This technique allows you to display multiple video clips within the same frame. Therefore, it is offering viewers different perspectives or viewpoints at once, making your content more engaging.
Here are some creative ideas to consider when applying split screen for videos:
Idea 1: Side-by-side Comparisons
Split screen videos are perfect for side-by-side comparisons. This technique allows you to place two clips next to each other, making it easy for viewers to see differences or similarities. For example:
- Product reviews:Using split screens in this type of video can help you compare two similar products. It can highlight their features, advantages, and drawbacks by seeing them side-by-side.
- Before-and-after shots:You can show the transformation process, such as makeovers or renovations, showing the changes over time.
Idea 2: Simultaneous Storytelling
Using split screens for simultaneous storytelling can bring multiple narratives together in a clear and visually appealing way. This technique is ideal for showing events that happen at the same time in different locations. For example:
- Event documentation:You can show different parts of an event, such as a wedding, sports game, or concert, from multiple angles or perspectives.
- Narrative storytelling:Illustrate parallel storylines that intersect or relate, adding depth and intrigue to your video.
Idea 3: Tutorials and Demonstrations
Split screens on YouTube videos are ideal for tutorials and demonstrations, enabling you to show multiple steps or views at once. This is particularly helpful for instructional content where visual clarity is important. For example:
- Cooking tutorials:Display the cooking process on one side and the final dish on the other, providing a clear step-by-step guide.
- DIY projects:Show close-up details of the crafting process alongside a broader view of the workspace, making it easier for viewers to follow along.
Idea 4: Collaborations and Interviews
Split screen videos are great for collaborations and interviews, especially when participants are in different locations. This format allows you to show each person’s contributions or reactions simultaneously. For example:
- Remote interviews:Conduct interviews with guests in different locations, showing both the interviewer and interviewee on screen together.
- Virtual duets:Create music or performance collaborations with artists in separate places, showcasing their talents side-by-side.
These ideas can help you explore the possibilities of split screen videos. By trying out different configurations and themes, you can create compelling content that captivates your audience. Next, we will walk you through the steps to make split screen videos using Wondershare Filmora.
Part 2. How to Create a Split Screen Videos in Filmora
Wondershare Filmora provides intuitive tools to bring your creative vision to life. Creating split screen videos in Filmora is easy and can add a dynamic touch to your video projects. Here is the step-by-step guide on how to create split screen videos using Filmora:
- Step 1. Begin Adding the Split Screen Effect
Assuming you are already in Wondershare Filmora and have your project timeline open, navigate to the point where you want to insert the split screen effect.
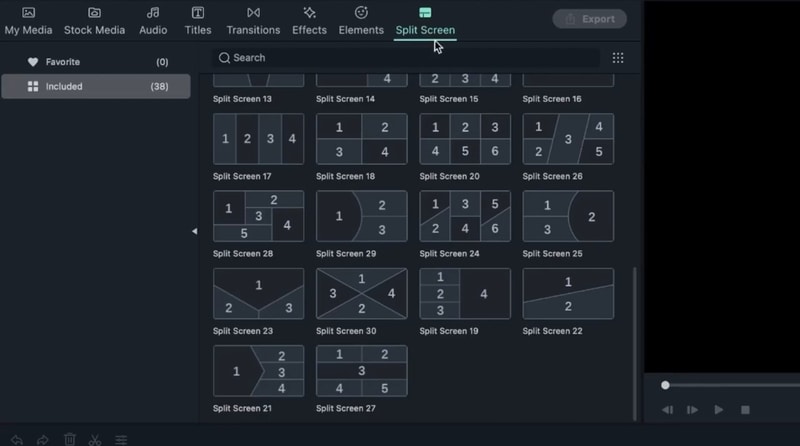
- Step 2. Choose a Split Screen Layout
Click on Templates > Split Screen to browse through over 86 layout options. Preview a layout by double-clicking its thumbnail. Drag your chosen layout from the library to the timeline.
Note: By default, split screens last for 5 seconds. You can change this by dragging the edges of the split screen clip on the timeline.
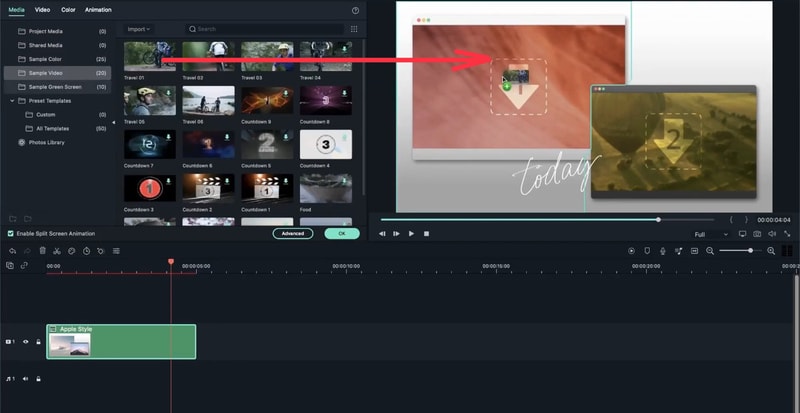
- Step 3. Add Clips to the Split Screen
Drag your video clips one by one from the media library into the respective windows of the split screen preview.
- Step 4. Edit Individual Clips
Then, you can edit the clips within the split screen preset. Here are some creative methods you can explore:
- Zoom In/Out:Select a clip in the split screen preview and adjust its zoom level using the slider.
- Mute Audio:Silence a clip by clicking the Mute icon in the split screen preview window.
- Remove Clip:Remove a clip from the split screen by selecting it in the preview and clicking the Remove
- Advanced Edits:For more detailed adjustments, go to Edit > Advanced Split Screen. Here, you can rotate clips, adjust position and scale, apply color corrections, and add motion effects.
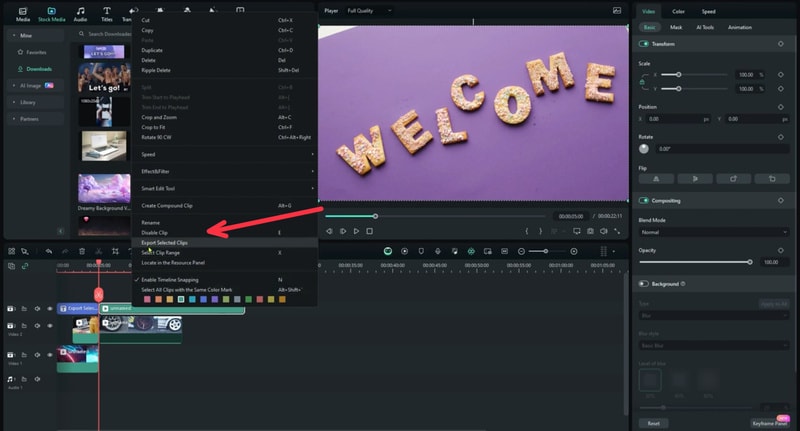
These Filmora tools ensure you have the flexibility to manage your split screen videos effectively. If you only need to export a specific segment, Filmora allows you to do this. You can use the Export Selected Clip tool that lets you choose and export individual segments without exporting the entire video.
This feature is useful when you want to export only specific clips from your editing project and share the snippet separately. Here is how to export selected clips in Filmora:
- Step 1. Access the Export Option
First, right-click the clip that you want to export. Then, from the menu that appears, choose Export Selected Clips.
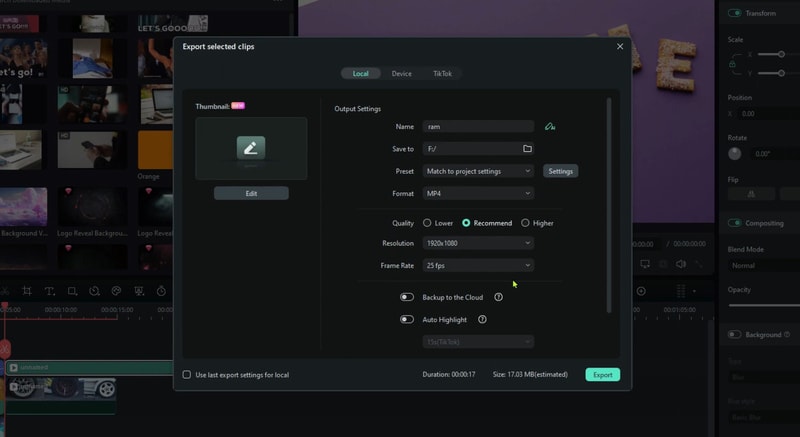
- Step 2. Customize Your Export
A new window will open where you can adjust the file name, location on your computer, frame rate, resolution, and other settings. Once you make your selections, click the Export button to save the clip to your device.
Creating split screen videos is easy with Filmora. Its features allow you to showcase multiple scenes simultaneously with ease. Moreover, its feature to export selected clips allows you to share specific segments of your project.
Part 3. Tips To Enhance Split Screen Videos
To make your split screen videos more engaging, try using advanced features offered by Filmora. These tips will help you enhance your videos and keep your audience interested. Here are some tips to enhance your split screen videos:
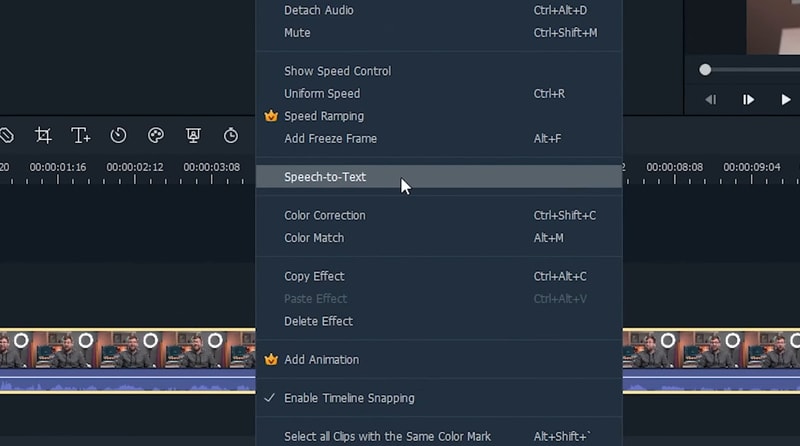
Tip 1: Use the Speech-to-Text (STT) Feature
Filmora’s Speech-to-Text feature converts spoken words into text that appears on the screen. By showing text alongside video content, you can make your videos easier to follow and more informative. This feature is great for emphasizing dialogue or key points in split screen videos.
To use the Speech-to-Text feature in Filmora, select the audio clip on the timeline. Then, right click on it and choose Speech to Text.
Tip 2: Use Keyframing for Dynamic Transitions
Keyframing allows you to create dynamic transitions between different elements within your split screen layout. This technique adds movement and allows smooth transitions between clips, making your videos more polished.
How to Use Keyframing in Filmora:
- Step 1. Select the clip on the timeline. In the properties panel on the right, go to Video > Basic and click the diamond icon to set a keyframe.
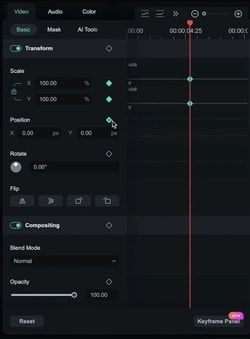
- Step 2. Move the progress bar to the desired points on the timeline. Click the diamond icon each time to add keyframes.
- Step 3. Adjust each keyframe’s properties to create smooth transitions. Then, preview the animation to ensure it enhances your split screen video.
Using these tips will make your split screen videos more visually appealing and effective at telling your story. Try different layouts, animations, and text elements to create content that grabs your audience’s attention.
Conclusions
Creating split screen videos with Wondershare Filmora is simple and adds a dynamic touch to your projects. By trying different layouts, animations, and using features like Speech-to-Text and keyframing, you can create engaging and visually appealing content. Start experimenting with split screen videos today to enhance your videos.