

 ChatGPT
 Perplexity
 Gemini
 Claude
 Grok
Grok
If you are new to Adobe After Effects, you may find the interface intimidating. Even performing a simple task like splitting a clip in After Effects can be confusing due to its wide range of available tools. After all, mastering its features requires time and practice.
So before you can tackle more complex projects, it's crucial to get comfortable with the basics. Here, we are going to guide you through the steps on how to split in After Effects, helping you gain confidence, and improve your editing skills with this software.
In this article
Part 1. Understanding Adobe After Effects
Adobe After Effects is a powerful tool designed for creating motion graphics and visual effects. Its extensive capabilities make it an invaluable asset for professional video editors and designers who need to create high-quality, visually stunning content.

But unlike other video editing software like Premiere Pro, After Effects doesn't have a traditional "cut" tool for splitting layers. This might be why splitting clips in Adobe After Effects seems a bit confusing at first, but it's definitely manageable.
Splitting clips in AE lets you isolate specific segments of your footage for detailed editing. It's particularly useful when you want to apply different effects to different parts of a clip or make precise cuts for timing and pacing.
Adobe After Effects' Pricing:
Adobe After Effects is subscription-based software. So before learning how to split a clip in After Effects in the next section, make sure you have an active subscription to access its features. You can subscribe as a standalone application for $22.99/month*. Or you can subscribe to Adobe Creative Cloud, which includes over 20 Creative Cloud apps for $59.99/month*.
*prices may vary depending on your country and any ongoing promotions.
Part 2. How To Split a Clip in After Effects
Once you are in the After Effects interface, it's important to note that After Effects organizes your Timeline into layers, with each layer containing only one clip at a time. When you split a clip in After Effects, it will divide that layer into two separate layers.
The process of splitting and trimming layers in AE is the same across different media types. You can do it for video clips, photos, royalty-free music, audio, and AE-built shapes and solids. And, there are a few methods to split clips in AE.
Method 1: Using the Time Indicator
The first method to split clips in After Effects is by using the Time Indicator. Time Indicator is a vertical line in the Timeline panel that shows the current frame of your composition. To do it, follow the steps below.
Step1Select the clip and locate the split position
Move the Time Indicator to the point where you want to split the clip. You can drag it manually or use the timecode to be precise.
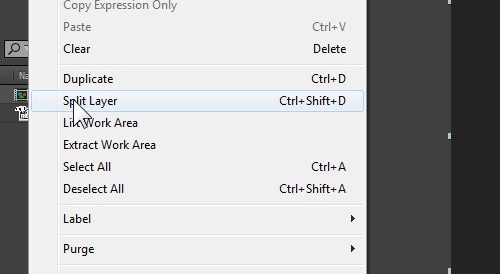
Step2Divide the clip
Navigate to Edit > Split Layer or press Ctrl+Shift+D (Windows) or Cmd+Shift+D (Mac) to split the clip at the Time Indicator's position. This will divide the clip into two separate layers.
Method 2: Trimming The Clip Manually
The second way to split clips in After Effects is by trimming the clip. Trimming is a way to adjust the length of a clip by manually selecting the start and end points. In After Effects, you can trim a clip by dragging the layer's edges in the timeline.
Step1Add your clip and adjust the setting
Duplicate the layer by pressing Cmd+D (Mac) or Ctrl+D (Windows) on your keyboard.
In the timeline panel, adjust the start and end points of the clip by clicking and dragging the layer's edges to the desired position.
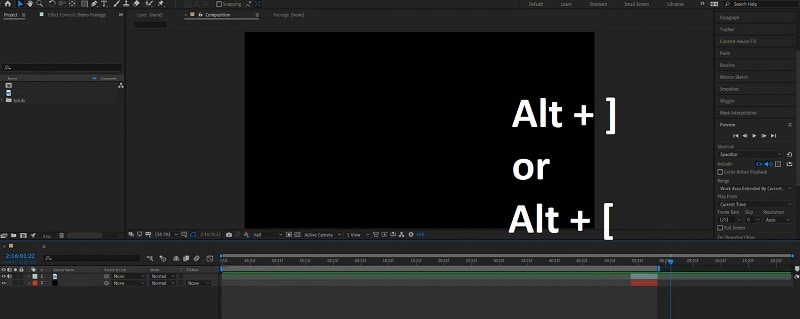
Step2Quickly trim the layer to the playhead by using the following shortcuts
- For the start of the clip: Alt + [(Windows) or Option + [ (Mac)
- For the end of the clip: Alt + ] (Windows) or Option + ](Mac)
Part 3. Keyboard shortcuts for splitting videos in After Effects
| Shortcut | Windows | Mac |
| Split a layer | Control + Shift + D | CMD + Shift + D |
| New project | Control + Alt + N | Command + Option + N |
| New composition | Control + N | Command + N |
| Set beginning or end of work area to current time | B or N | B or N |
| Trim Composition to work area | Control + Shift + X | Command + Shift + X |
| Go to specific time | Alt + Shift + J | Option + Shift + J |
| Go to the beginning of a composition, layer, or footage item | Home or Ctrl + Alt + Left Arrow | Home or Command + Option + Left Arrow |
| Import one file or image sequence | Control + I | Command + I |
| Import multiple files or image sequences | Control + Alt + I | Command + Option + I |
Filmora for Mobile Filmora for Mobile Filmora for Mobile Filmora for Mobile Filmora for Mobile
Edit Videos on Your Mobile Phone with 1-Click!
- • Powerful Brand New AI Features.
- • User-friendly video editing for beginners.
- • Full-featured video editing for professional.


Part 4. Quick and Easy Alternative to Split a Clip: Wondershare Filmora
Now you must be familiar enough with After Effects. While it is a powerful animation toolkit that allows you to create incredible effects, it isn't actually built for speedy clip editing. If you want to quickly and easily split clips without dealing with the complexities of After Effects, Wondershare Filmora is an excellent alternative.
Filmora is video editing software available on Windows and Mac, known for its simpler and more intuitive interface. Although its features may not be as specialized as those in After Effects for creating complex motion graphics, it is still more than sufficient for most video editing needs.
For tasks like splitting clips, Filmora includes the Quick Split Mode feature, which lets you cut your clips directly on the timeline using the razor tool and improve your editing efficiency. Some of Filmora's notable features include:
- Basic video editing tools like splitting, cutting, and trimming
- A range of built-in effects and transitions
- Built-in audio editing and enhancement tools
- A library of stock media, including videos, images, music, and sound effects
- AI features such as auto denoise, copilot editing, text-to-video, and more
How to split clips in Filmora:
Step1Use the Split button to split clips in the timeline
Unlike After Effects, Filmora has a split button on its playhead, making it easy to split clips. What you need to do is select the video in the timeline, drag the playhead to the desired position, and then click the split button (the scissor icon) to create the split. You can also use the keyboard shortcut Ctrl+B (Windows) or Cmd+B (Mac) to split clips.
If you don't see the split button in the timeline, you can enable it by going to File > Preferences > Editing. Then, select the option to show it.


Step2Enable Quick Split Mode to separate clips in real time
Another quick way to split clips in Filmora is by using the Quick Split Mode to separate clips directly in the timeline. First, enable Quick Split Mode by changing the cursor to Quick Split Mode.

Once your cursor is in Quick Split Mode, it will change into a razor. If you move it over the timeline, the razor tool will automatically preview the clip in real time as you navigate through the timeline. Click the part you want to split. No need to drag the playhead.

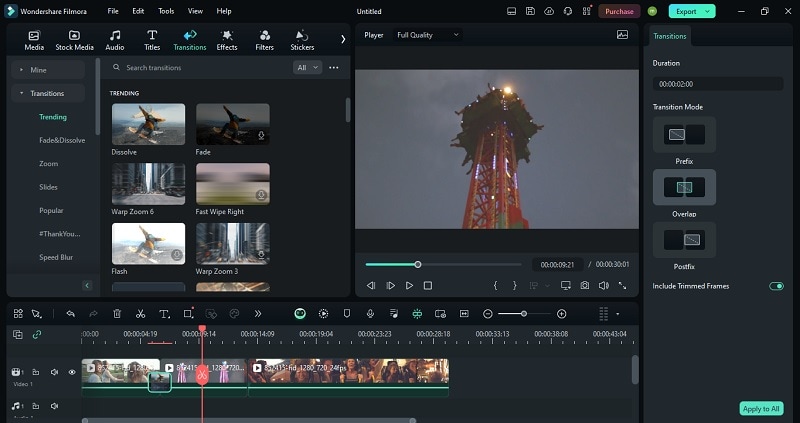
Step3Add cool transitions between the clips
Next, make any necessary edits for each clip. Since you are separating the clips, it'd be better to add transitions to make your video flow better. There are various transitions available on Filmora, and most of them are free to use.
Just go to the Transitions tab and download the transition you need. Then, drag the transition between the clips. You can place it in between (overlap), before the first clip (prefix), or after the second clip (postfix).
Step4Add different effects to each clip
Another benefit of splitting your clips is that you can apply different effects to each one. To do this, go to the Effects tab and download the effect you want. Next, drag the effect onto the clip in the timeline. You can set the opacity and radius of the effect.
Or you can click the + button to add the effect to a separate track and then adjust the timing of the effect as needed.

How to split video clips in Filmora automatically using a scene detector
Wondershare Filmora has a nifty feature called scene detection that allows you to split a video automatically when a change in the scene is detected. The following are the steps you need to follow to use this feature.
- Import your video into the project media library using the same steps above.
- Once you have your video in the media library, right-click on it and select the Scene Detection This opens the scene detection interface.

- Click on the Detect button to allow Filmora to automatically detect the scenes and split the video up. You have the option of previewing each of the individual clips before they are added to the timeline.

- You can also delete any section you will not need by clicking the Delete icon next to the clip. Alternatively, select Add to Timeline to add any clips you want to use to the timeline.
- Save your split video by using the Export button.
Conclusion
As simple as "How do you split a clip in After Effects" can be a bit tricky if you are using the software for the first time. The unique interface and toolset of After Effects can initially be overwhelming, but with practice and an understanding of the basics in this article, you'll be able to split clips effectively and incorporate them into your projects with ease.
If not, you can also use alternative software like Wondershare Filmora. Filmora offers a simpler and more intuitive interface, making it a great option for those seeking a more straightforward editing experience.
