
 100% Security Verified | No Subscription Required | No Malware


 ChatGPT
 Perplexity
 Gemini
 Claude
 Grok
Grok
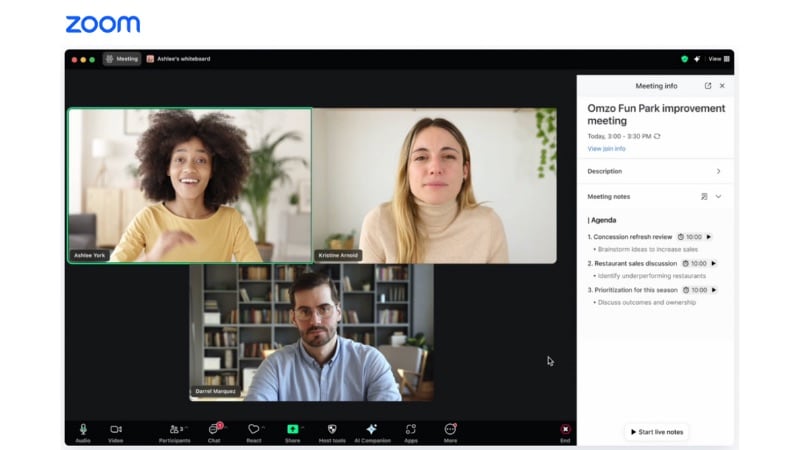
Ever joined a Zoom meeting only to find your video looks grainy or pixelated? Poor Zoom quality can affect how professional you appear and make it harder for others to stay engaged.
A good video starts with the right adjustments. By learning how to improve Zoom video quality, you can create a clearer image that helps you communicate your ideas more effectively.
This guide walks you through adjusting Zoom video quality settings and using editing tools to polish recordings. It will also give you practical setup tips for sharper calls and smoother online meetings. Let's jump right in!

In this article
Part 1. Optimize Zoom Video Quality Settings
To get better Zoom quality, start by checking the settings inside the app. These options help reduce pixelation and create a sharper image in every meeting. Make sure they're set up correctly for the clearest results.
Method 1. Enable HD and Full HD in Zoom
Turning on HD improves Zoom video quality and makes your video look clearer. This setting is compatible with both computers and phones.
On Desktop (Windows/Mac):
Follow the steps below to improve Zoom video quality on a desktop:
Step 1. Open the Zoom desktop app and log in to your account.
Step 2. Click on your Profile Picture in the top right and choose Settings.
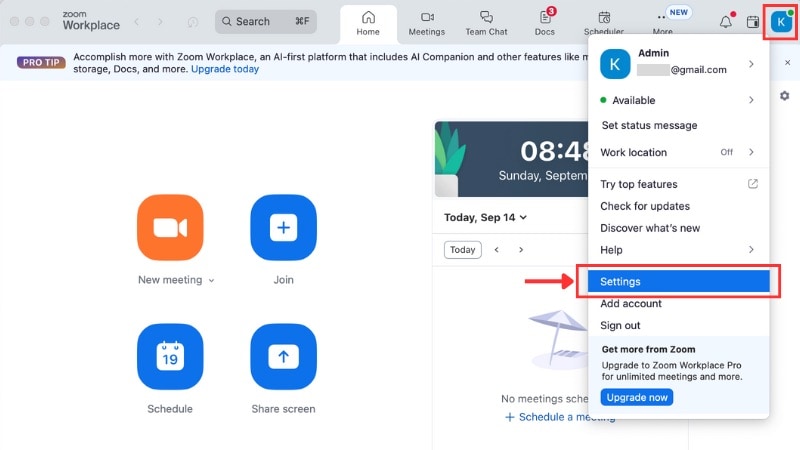
Step 3. In the sidebar, select the Video& Effects tab.
Step 4. Under the video preview, go to the Camera tab and check the box for Enable HD.
Note: This option activates 720p HD video by default. If you're on a Pro, Business, Education, or Enterprise plan, you can request 1080p Full HD from Zoom Support.
On Mobile (Android/iOS):
This is how to improve Zoom video quality on a phone:
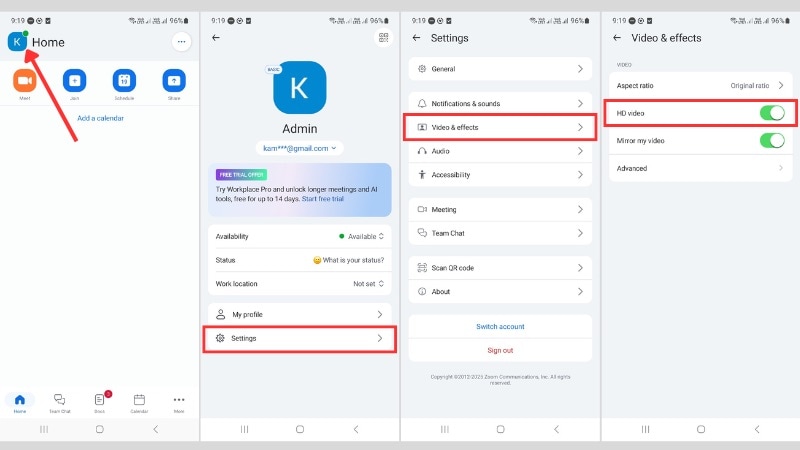
Step 1. Launch the Zoom app on your mobile device and sign in to your account.
Step 2. Tap your Profile Picture in the upper-left corner, then select Settings.
Step 3. Navigate to Video & Effects and switch on the HD Video option.
Note: On mobile devices, HD mode supports a maximum of 720p. Full 1080p resolution is not available on Android or iOS.
Method 2. Adjust Advanced Video Settings
If your video still looks grainy after enabling HD, you can improve Zoom video quality even more by using advanced video settings.
On Desktop (Windows/Mac):
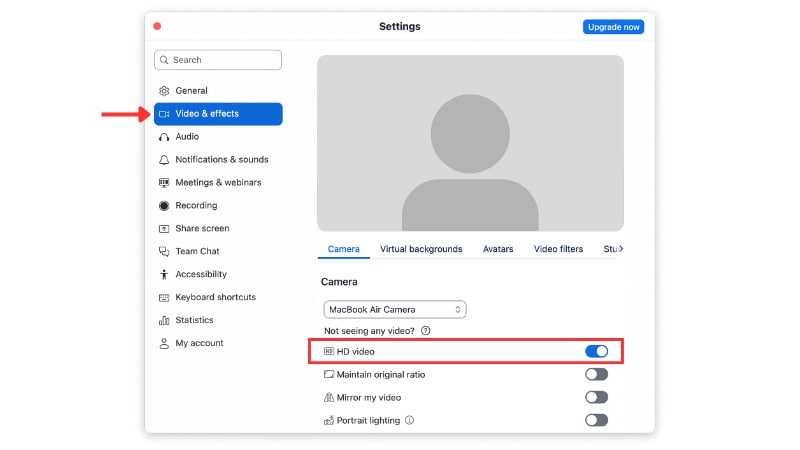
Step 1. After signing in to your Zoom account, click your Profile Picture in the top-right corner and choose Settings.
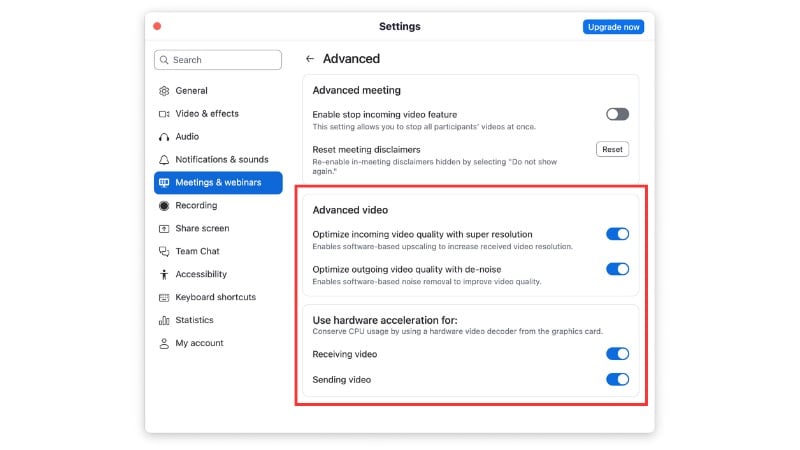
Step 2. Go to the Meeting and Webinars tab, scroll down to the bottom, and click the Advanced button.
Here you will see several options, including:
- Super Resolution: Uses software upscaling to enhance the resolution of incoming video.
- Video Denoise: Helps reduce grain in low-light or noisy images. Enable it if your video looks fuzzy.
- Hardware Acceleration: Let Zoom use your computer's GPU for smoother video. Turn this on if your computer has a capable graphics card.
Tip: Only turn on features that actually improve your setup. Adding too many filters can lower Zoom quality instead of making it sharper.
On Mobile (Android/iOS):
The mobile app only provides the Hardware Acceleration option. To enable it, go to Profile Picture > Settings > Video & Effects > Advanced.

Method 3. Optimize Zoom Recording Settings
If you plan to edit your Zoom recordings later, adjusting the Zoom video quality settings can make a big difference. Setting up Zoom properly ensures your exported files keep better resolution and work well in third-party editors.
Follow the instructions below to optimize Zoom recording settings:
Step 1. Once you sign in to your Zoom account, click on your Profile Picture > Settings.
Step 2. From the left sidebar, select Recording, and look for the Advanced button.
Step 3. Enable the “Optimize for third-party video editors” option.
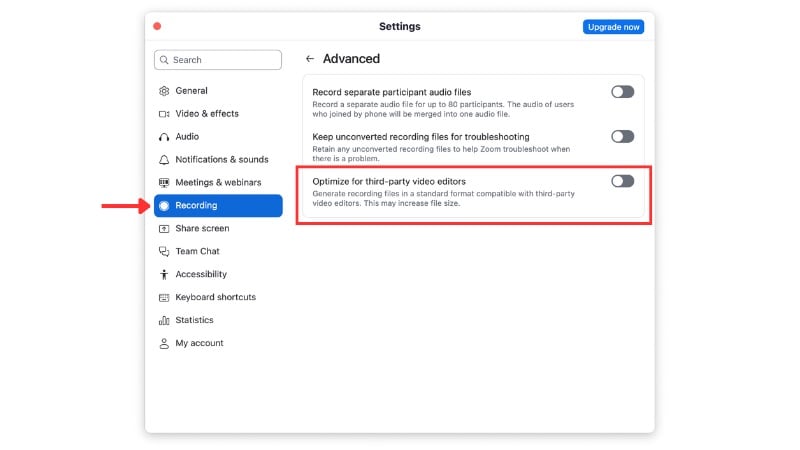
When you enable this option, Zoom saves your recordings in a format that is easier to edit and retains more detail. This can improve Zoom video resolution if you plan to cut, trim, or enhance the recording in editing software.
Supplemental Features for Visual Quality
Along with the options above, Zoom also offers visual tools that help improve Zoom video quality and overall image clarity. Each option can be turned on or off depending on what works best for your environment.
How to Access These Tools:
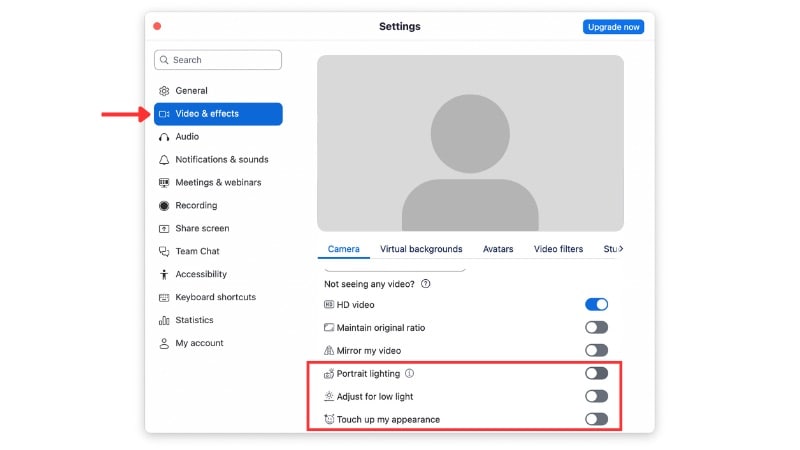
Go to Settings > Video & Effects > Camera. Here you'll find:
- Portrait Lighting: Adds light around your face so you stand out from the background.
- Adjust for Low Light: Brightens your video when the room is dim. Choose Auto for quick adjustment or Manual for more control.
- Touch Up My Appearance: Smooths skin tone and reduces small blemishes. Use the slider to set the level you prefer.
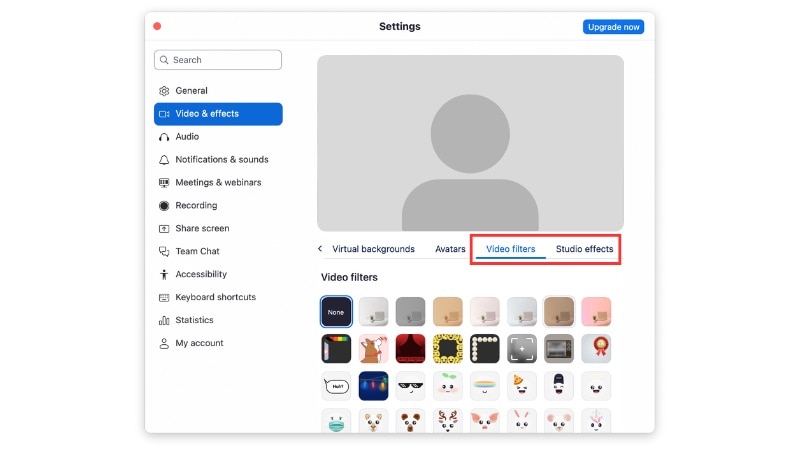
For additional effects, navigate to these tabs:
- Video Filters - Adjust colors, add overlays, or set a mood for casual meetings or presentations.
- Studio Effects - Customize eyebrows, facial hair, or lip color for a more personal look.
Part 2. Enhance Zoom Recordings with Editing Tools
After adjusting Zoom video quality settings, do your recordings still look blurry or poorly lit? Even with the right setup, raw footage can sometimes fall short. Post-production editing is the best way to rescue and polish recordings so they look sharper and sound clearer.
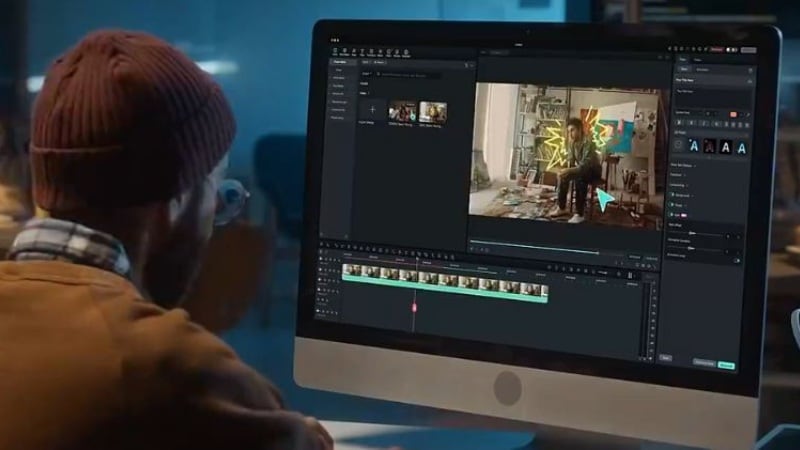
Wondershare Filmora is a great editor choice for this. It includes built-in AI tools and manual adjustments that work well for fixing Zoom recordings:
 secure download

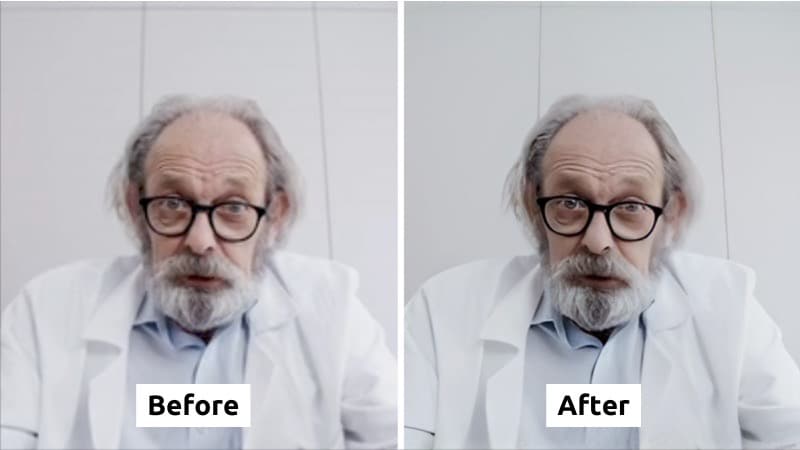
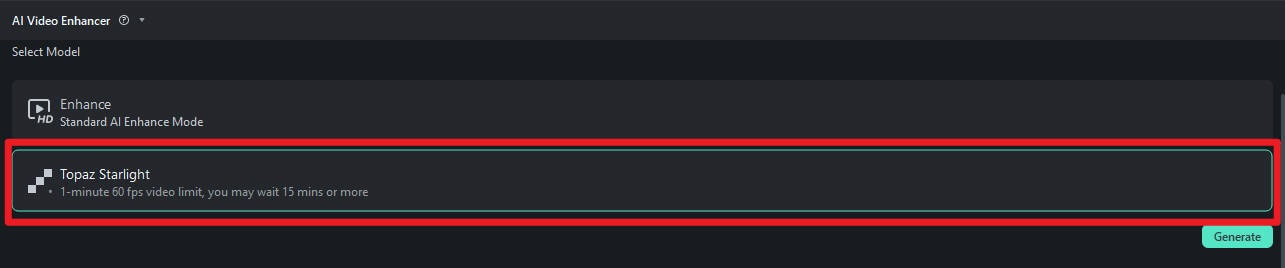
- AI Video Enhancer: Automatically sharpens blurry footage, reconstructs details, and improves overall clarity without complicated settings. For higher-end enhancement, the Topaz Starlight AI model can be selected within the AI Video Enhancer panel to upscale resolution, restore fine details, reduce noise, and produce smoother output. (Supports 1-minute 60fps clips; processing may take 15 minutes or more.)
- Color Correction: Adjust brightness, contrast, and white balance to fix recordings that appear too dark or washed out.
- AI Audio Denoise: Removes background noise like typing, fan sounds, or street noise so your voice comes through clean.
- AI Subtitles: Generate accurate captions for your recordings, making them easier to follow or share with a wider audience.
- HD / Full HD Export: Save the improved video in high resolution so your final version is ready for presentations or uploads.
Check out this YouTube tutorial to see Filmora's AI Video Enhancer in action before you try it yourself:
How to Improve Zoom Video Quality with Filmora
Post-editing gives you the chance to fix problems that might still appear in your Zoom recordings, even after adjusting in-app settings. Filmora offers straightforward tools that make the process easier.
Follow the step-by-step guide below to learn how to improve Zoom video quality with Filmora:
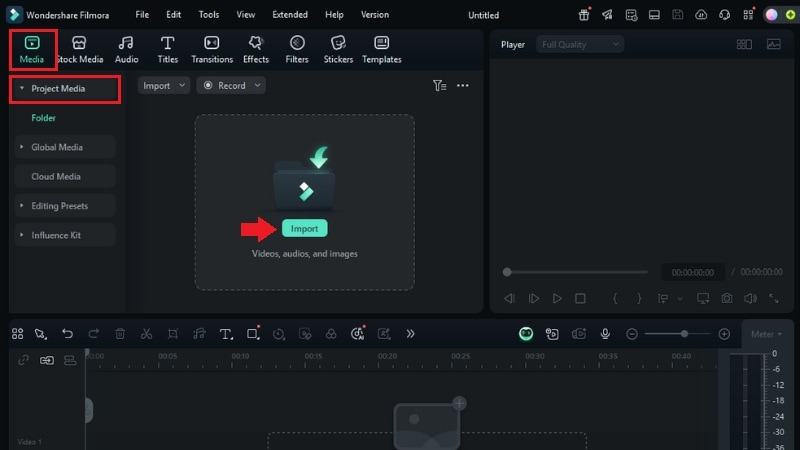
Step 1 Import your Zoom recording into Filmora
- In the editing workspace, open the Media > Project Media panel and click Import.
- Select your Zoom recording from your computer, place it in the media library, and then drag it onto the timeline.
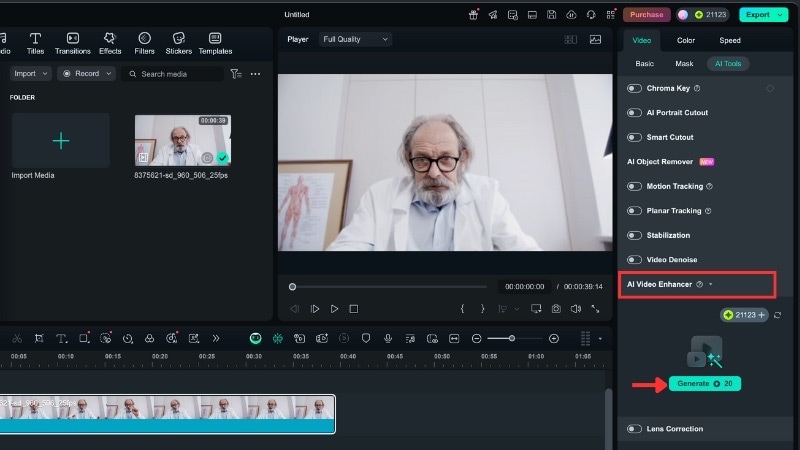
Step 2 Apply AI Video Enhancer
Select your video track on the timeline and open the editing panel on the right.
Go to Video > AI Tools, and look for the AI Video Enhancer option.
- If you want standard enhancement, the AI Video Enhancer will automatically sharpen and improve clarity.
- If you want high-end enhancement, select the Topaz Starlight AI model before generating. This will reconstruct details, reduce noise, and upscale resolution. Note that Topaz has a 1-minute 60fps limit, and processing may take around 15 minutes or more.
Once complete, your video will appear sharper, with smoother visuals and enhanced details.
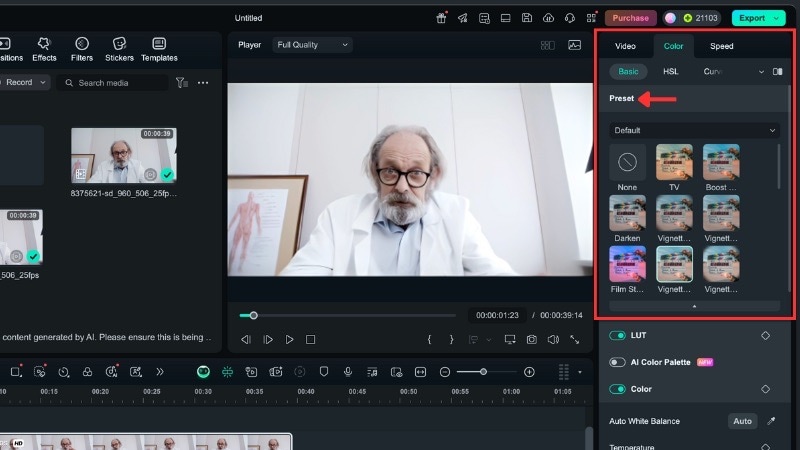
Step 3 Adjust Color and Exposure
- Still on the editing panel on the right side of the screen, open the Color > Basic panel.
- Choose the Preset templates for quick corrections.
- If presets don't work, adjust exposure, white balance, and contrast manually to achieve a more balanced video.
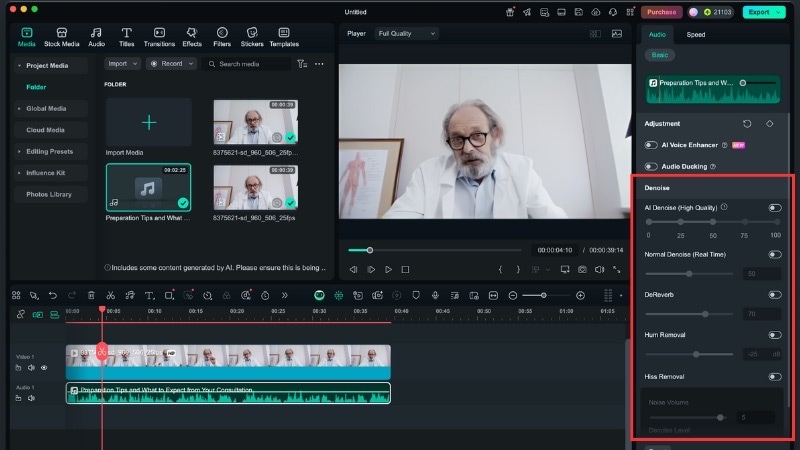
Step 4 Apply AI Audio Denoise
On the editing panel, go to Audio > Basic, and scroll down to find the Denoise tool. You'll see several options:
- AI Denoise: Removes background noise with advanced AI processing.
- Normal Denoise: Handles simple noise reduction for lighter fixes.
- DeReverb: Reduces echo from recording in a room with poor acoustics.
- Hum Removal: Eliminates low-frequency hum from electrical sources.
- Hiss Removal: Cuts high-frequency hiss from microphones or speakers.
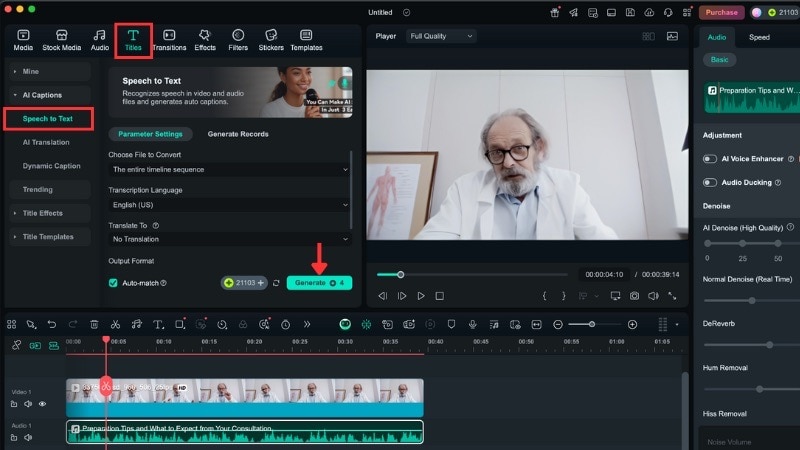
Step 5 Add AI Subtitles (Optional)
If you plan to share the recording widely, subtitles make your video easier to follow for every viewer. To add AI subtitles in Filmora, go to Titles > AI Captions > Speech to Text. Then set the following options:
- Choose File to Convert: Add subtitles to the entire sequence or selected clips only.
- Transcription Language: Select the spoken language in your video.
- Translate To (Optional): Pick a target language or choose No Translation if you just need subtitles.
- Output Format: Save as SRT or apply as Titles directly.
- Auto Match: Enable this tool to sync the subtitles with your video timeline.
When everything is set, click Generate to start creating the subtitles.
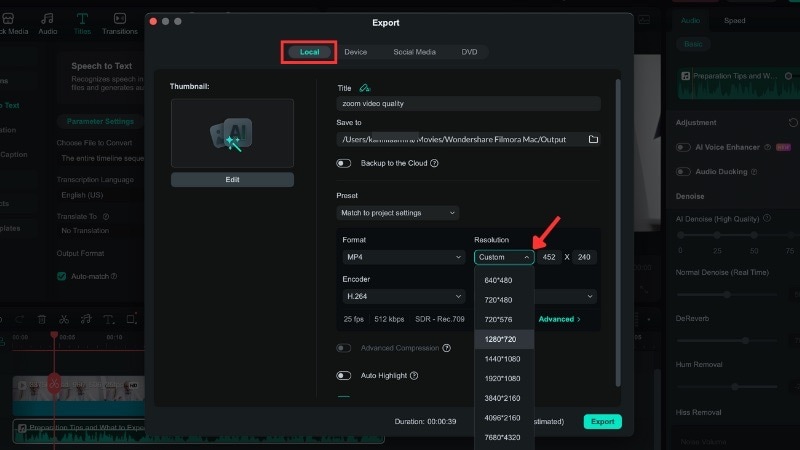
Step 6 Export in HD or Full HD
- When you're happy with your edits, click Export in the top-right corner.
- Go to Local and set the resolution to HD (1280 × 720 pixels) or Full HD (1920 × 1080 pixels). This final step ensures you improve Zoom video quality before sharing or storing the recording.
- Click the Export button to save the file for easy sharing or storage.
Part 3. Improve Zoom Video Quality Through Setup and Equipment
Adjusting in-app settings and editing tools can take you far, but your setup also plays an important role. Simple changes will support better Zoom video quality in every call. Here are some tips for creating a clear and consistent appearance during your meetings:
Tip 1. Strengthen Your Internet Connection
A weak connection forces Zoom to lower resolution. Here's how to keep it stable:
- Use a wired Ethernet connection when possible.
- If you're on Wi-Fi, stay close to the router.
- Close background apps and pause large downloads to free up bandwidth.

Tip 2. Improve Lighting Setup
Poor lighting creates grainy or shadowed video. Improve your setup with these steps:
- Face a natural light source like a window.
- Avoid sitting with a strong light behind you.
- Use an LED ring light or a desk lamp with a diffuser if natural light isn't available.

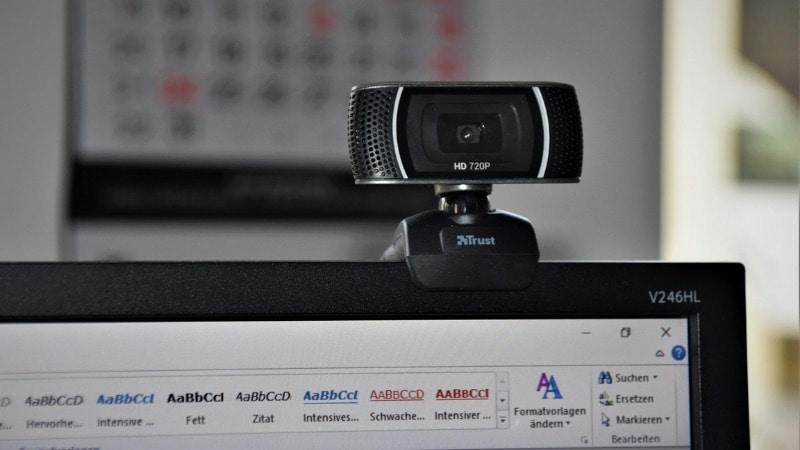
Tip 3. Upgrade or Adjust Your Camera
Built-in laptop cameras often have limited resolution. For clearer video, try these options:
- Use an external HD webcam for sharper detail.
- Connect your smartphone as a webcam, since most phones provide higher-quality video than laptop cameras.
Tip 4. Create a Professional Environment
Your background affects how focused and professional your video looks. Keep it simple:
- Remove clutter to reduce distractions.
- Use a plain or neutral backdrop when possible.
- Limit virtual backgrounds, as they can sometimes reduce video quality.

Bonus Tip: Strong video quality works best with clear audio. A headset with a built-in microphone captures cleaner sound than most laptop mics, making your meetings feel more professional.
Conclusion
Strong Zoom quality makes your calls look professional and keeps your message clear. The right adjustments can prevent grainy or pixelated video.
By learning how to improve Zoom video quality, you create recordings that look sharper and are easier to edit or share later. Editing tools like Filmora and a good setup help you maintain consistency.
Remember to check your Zoom video quality settings, use proper lighting, and upgrade your equipment when needed. Start applying these steps in your next meeting to improve your results!
secure download 