

 100% Security Verified | No Subscription Required | No Malware


 ChatGPT
 Perplexity
 Gemini
 Claude
 Grok
Grok
Simple shapes are the foundation of every great design, yet their true potential is often overlooked. With the latest updates in Wondershare Filmora, even the most basic circles, squares, and lines can be transformed into polished, professional visuals. This article explores how Filmora reimagines shape tools, making design more intuitive and powerful for beginners and creators alike.
In this article
Part 1. What Filmora Shapes Could Already Do
Before the latest update, Filmora already offered a solid set of basic shape tools for creators. Users could easily add rectangles, circles, and lines to enhance videos, create overlays, or design simple graphics. These shapes were linear and supported basic customization options such as color, size, and positioning. This made them useful for titles, highlights, and visual storytelling elements within projects.
Part 2. What's New in This Update (Quick Overview)
Building on the existing tools, the latest update in Filmora completely transforms how you work with shapes. What used to be simple elements are now powerful design components that support creativity, precision, and advanced editing workflows.
- ✨ New Shape Types: Users can quickly create star and polygon shapes directly from the toolbar with simple drag actions.
- 🎛️ Fully Adjustable Shapes: Polygons and stars now support parameter controls for sides, points, and corner radius, enabling precise design.
- 🖊️ Stroke Support Added: Shapes can now include customizable outlines, enabling modern UI, neon, and glowing effects.
- 🔁 Convert to Path Feature: One-click conversion allows node-level editing for reshaping and advanced animations.
- 🧭 Improved Pen Tool Access: The pen tool is now easier to find and use for drawing paths and motion designs.
- ⚡ Optimized Workflow: Designers can build layouts with shapes and refine them using path editing for better efficiency.
- 🚀 Design Evolution: This update transforms static shapes into dynamic, professional design components.


Part 3. Meet the New Shapes
In the next section, we'll explore the newly introduced shapes in detail and walk through how to create and customize them effectively:
1. The Polygon Shape
The Polygon shape in Filmora offers a flexible way to create multi-sided designs with precision. Users can customize the size, position, and sides of this shape according to their preferences. Moreover, you can color it, apply a blur, change the opacity, and adjust the line style. It allows for trimming the path and adding subjects to the path followed.
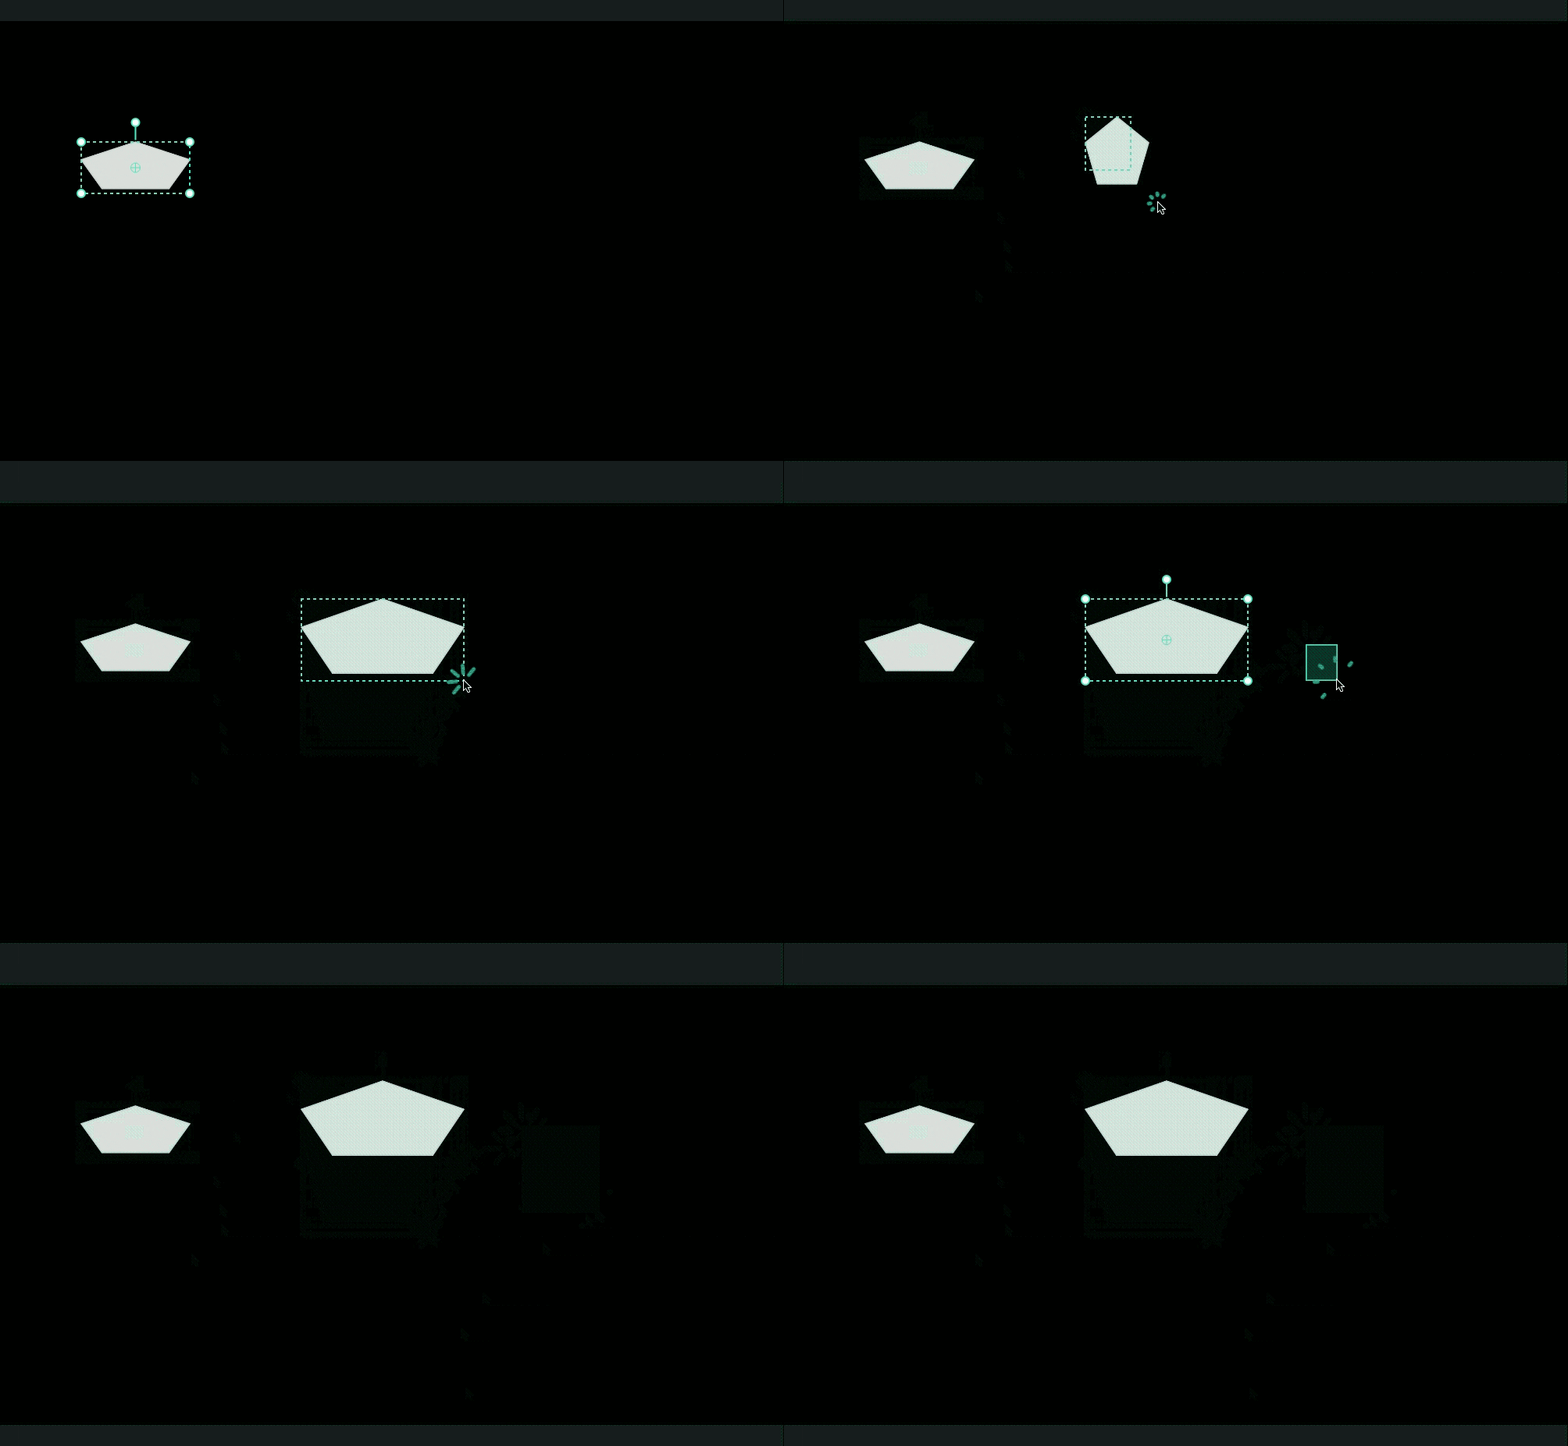
How to Create a Polygon Shape in Filmora
As discussed, users can create and customize the Polygon shape in no time. Provided below are the steps for creating and customizing a polygon shape:
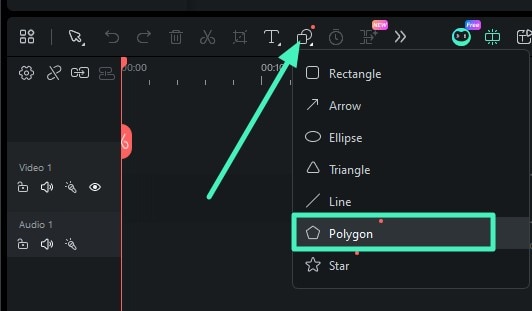
Step 1. Import Media Choose Polygon
After you have entered the main interface, import the media on which you want to draw the "Polygon." Head to the toolbar and click on the "Shapes" icon. Select the "Polygon" shape from the dropdown menu.
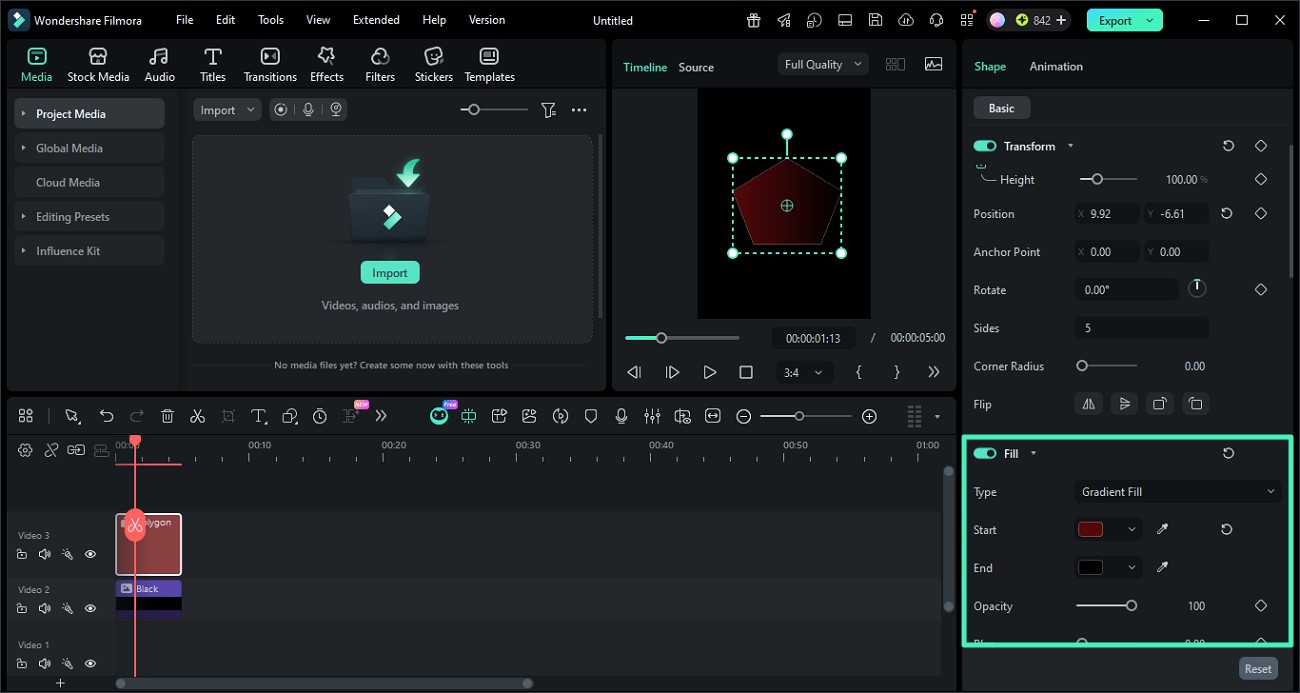
Step 2. Draw the Shape and Customize
Drag the cursor into the preview window and draw the shape. Adjust the height and position by dragging the cursor or using the properties panel. You can now customize the shape's color, opacity, blur, and more.
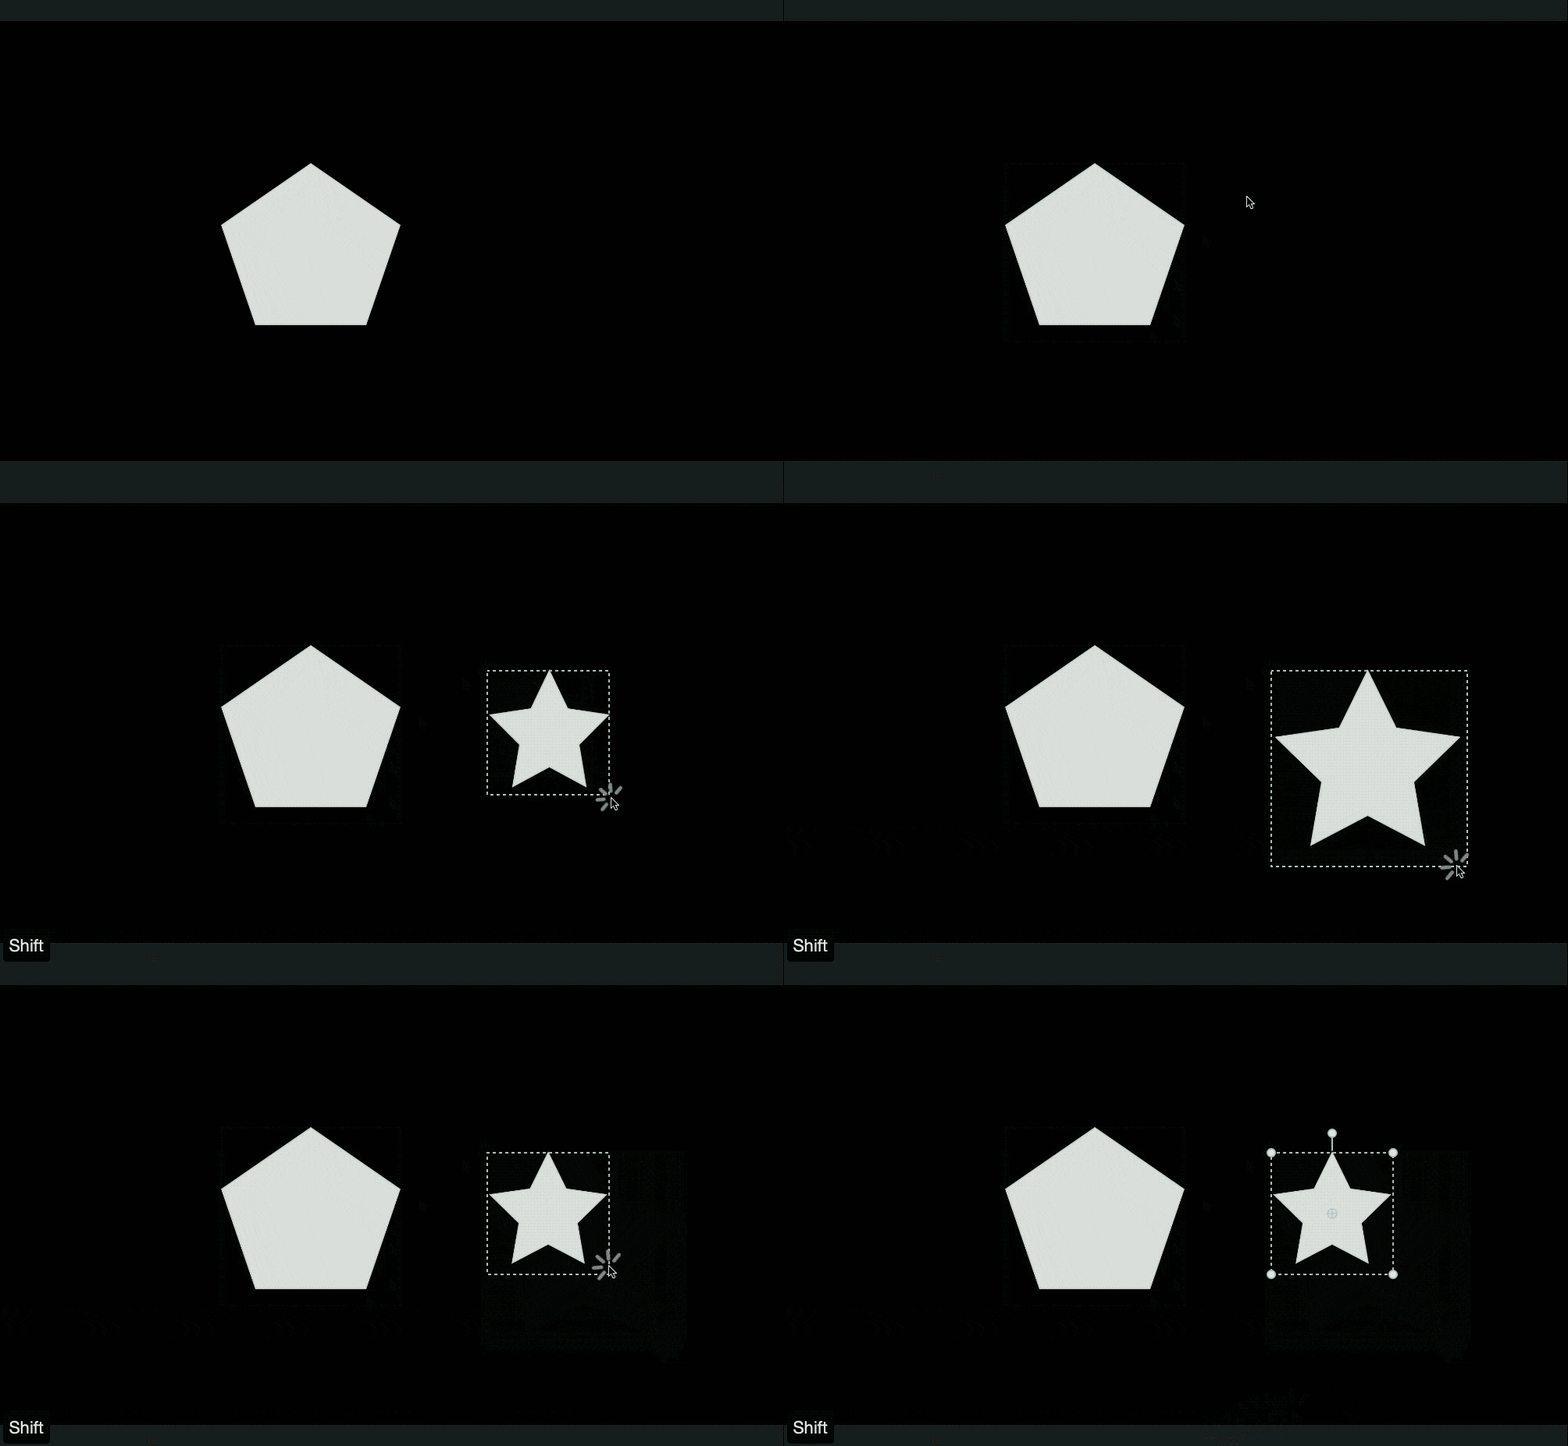
2. The Star Shape
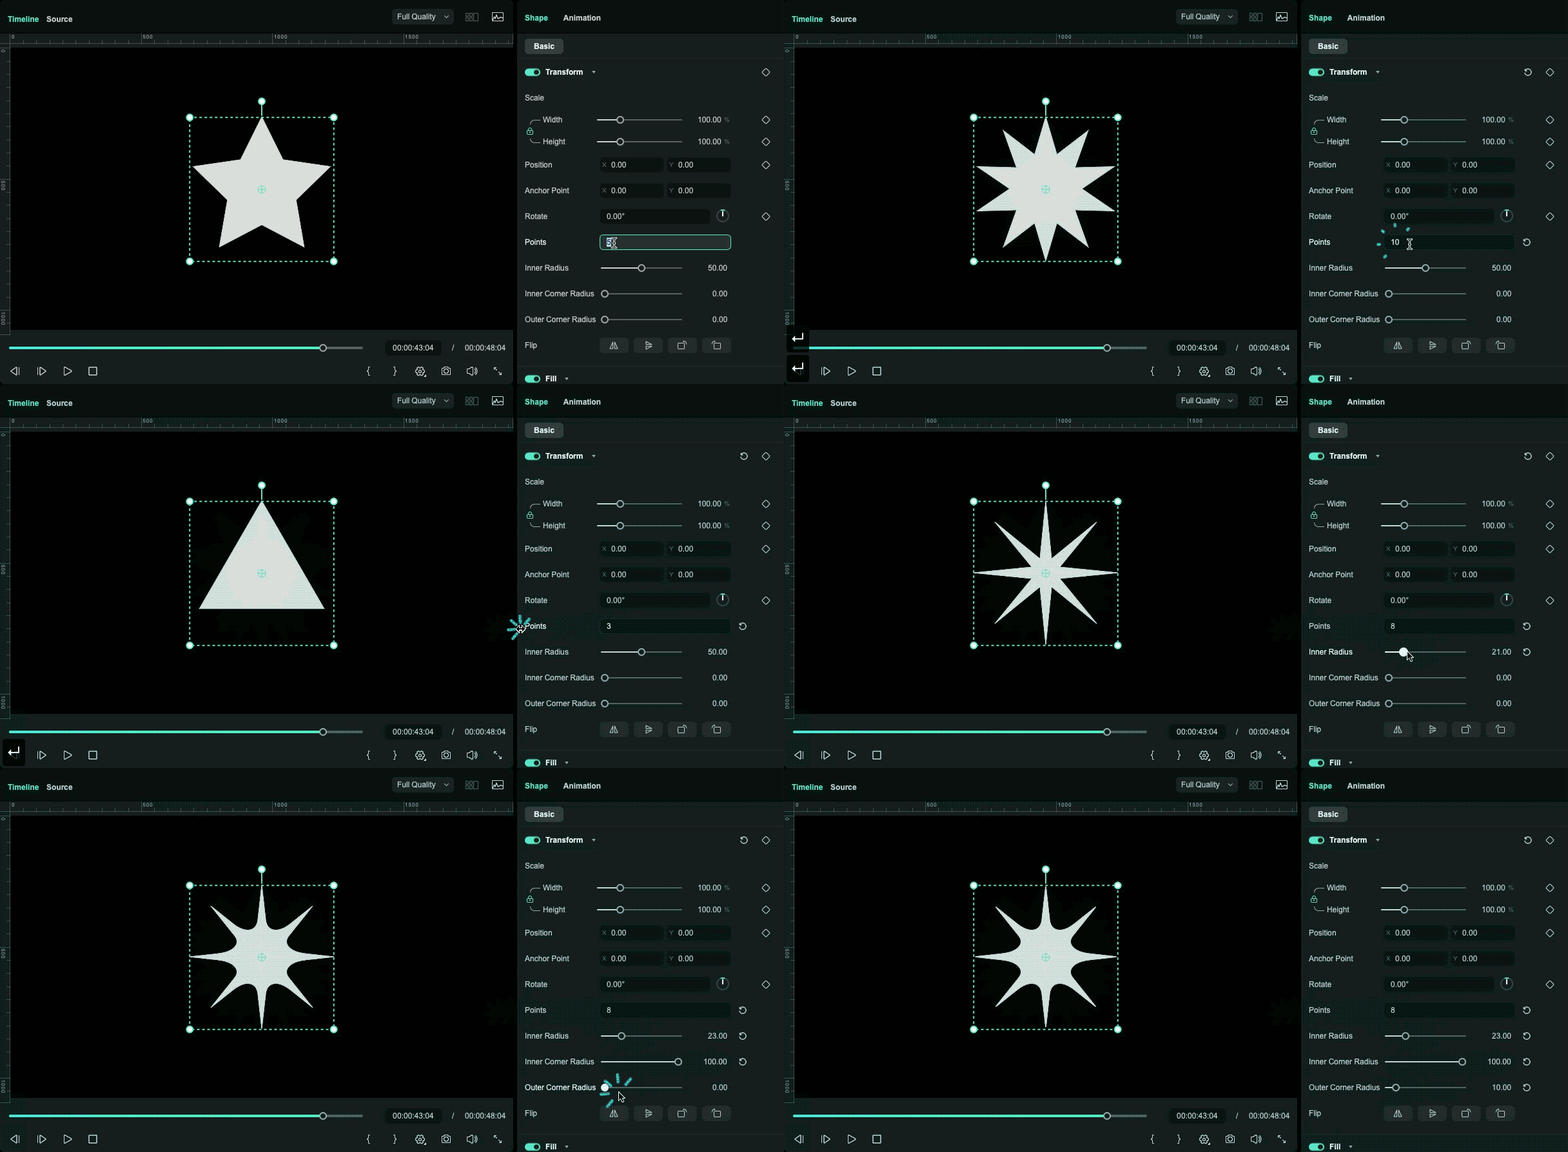
In Filmora, the Star shape allows users to create visually striking, multi-point designs with great flexibility. You can modify the number of points, adjust its size, and position it as needed. It also supports color changes, opacity adjustments, blur effects, and stroke styling. Additionally, the inner radius can be refined, and the shape can be applied along paths for more dynamic visuals.
Steps to Create a Star Shape Using Filmora
If you do not know how to create the Star shape in Filmora, read the steps provided below:
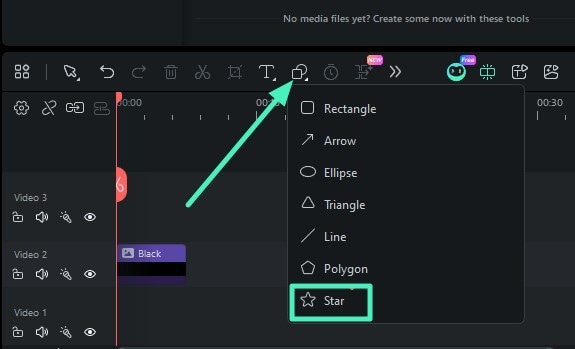
Step 1. Choose The Star Shape
After importing the background on which you want to add the shape, choose the "Star" option from the "Shapes" icon.
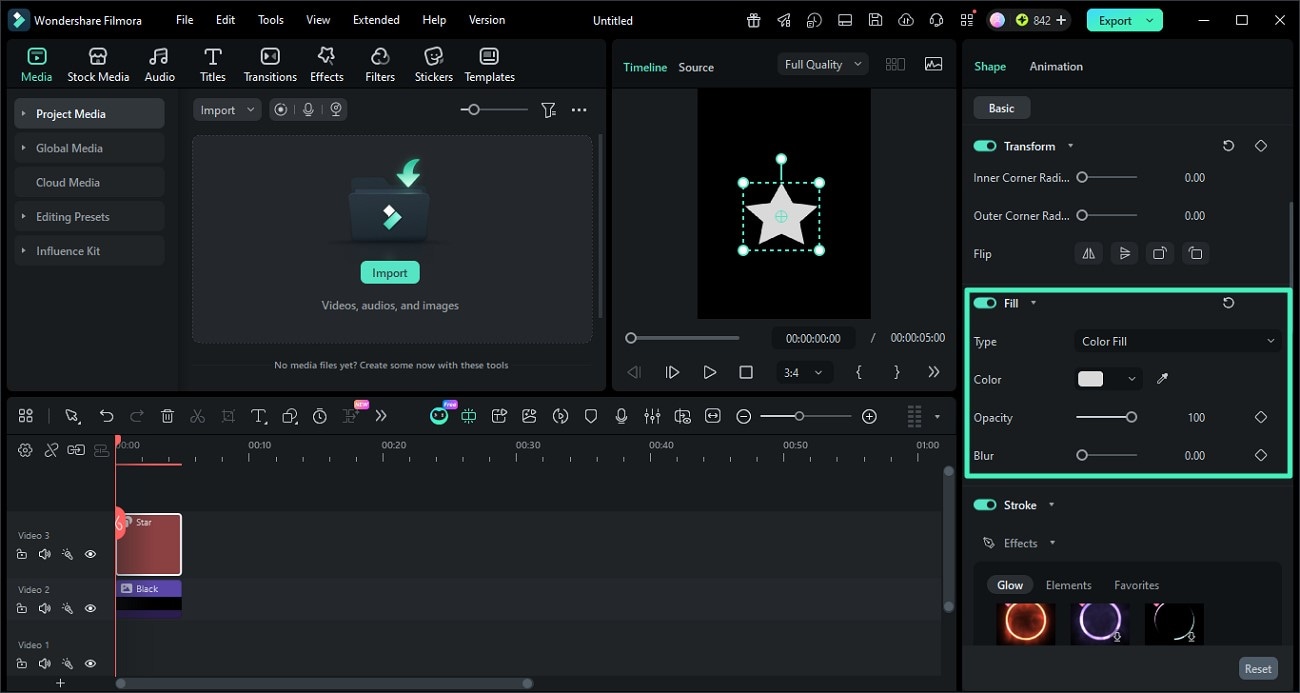
Step 2. Create and Edit Shape
Next, place the cursor within the preview window and drag it to draw the star shape. Next, head to the panel on the right and adjust the opacity, blur, color, and other settings as you see fit.
Part 4. What These Shapes Help You Create
Now that we've explored how polygon and star shapes work in Filmora, it's important to understand their real purpose in design. These shapes are not just visual elements; they are powerful building blocks that help you create structured layouts, stylish graphics, and dynamic compositions. Let's break down what these new shapes actually enable you to do in your projects:
1. Fully Adjustable
The new update of the shape in Filmora is fully adjustable and lets users control every detail with precision. You can easily change size, position, color, opacity, and stroke to match your design needs. It also allows fine-tuning of structure, such as polygon sides or star points, making each shape highly customizable.
This flexibility turns simple shapes into powerful design elements that adapt perfectly to any creative project. Here is how you can adjust the applied shapes:
Instructions: Go to the properties panel on the right and enable the "Transform" section. Here you can change the number of sides, change the corner radius, flip, and more.
2. Stroke Support
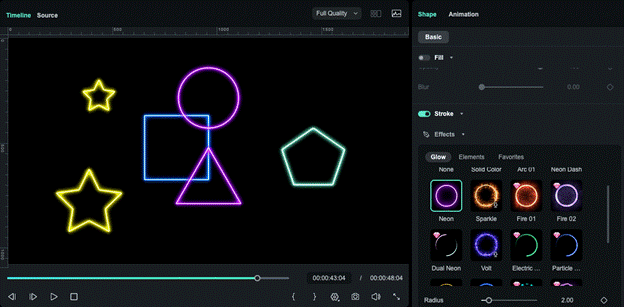
With the latest upgrade, shape design is far more powerful and expressive thanks to Stroke Support. This feature transforms plain outlines into fully customizable design elements, giving creators complete control over the visual identity of every shape. Instead of flat graphics, you can now build depth, style, and motion-ready visuals with ease.
How to Use It?
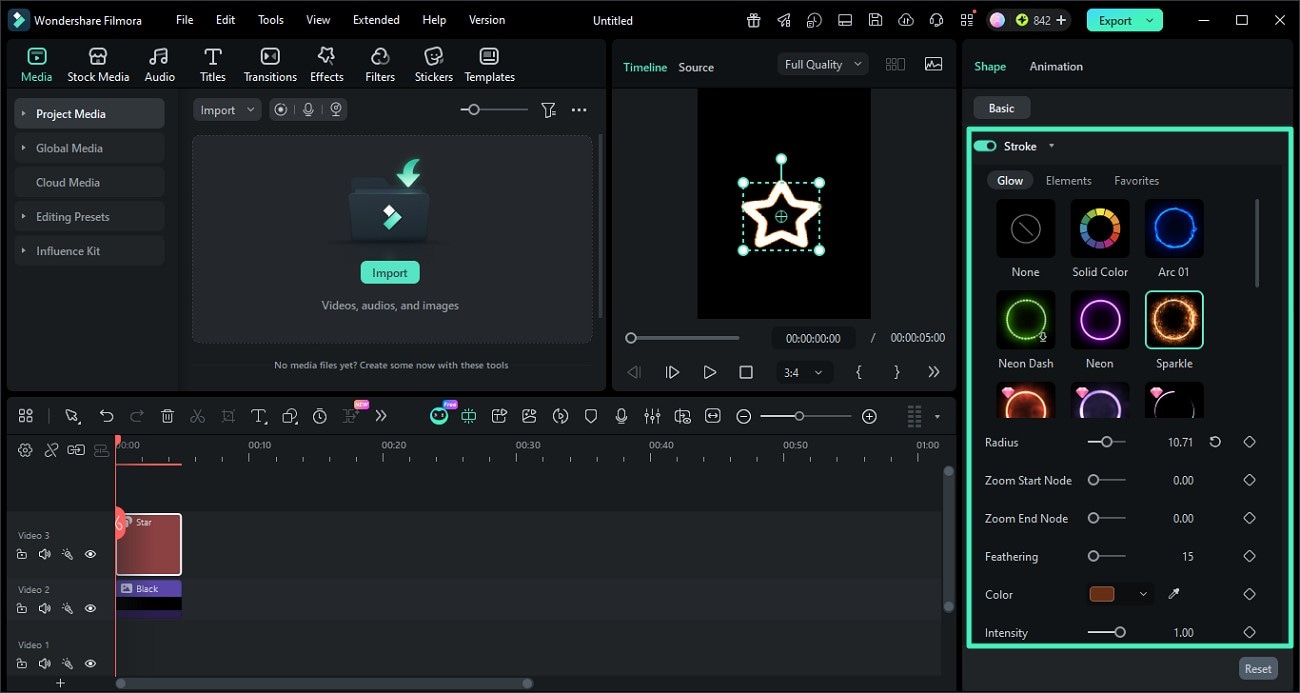
Instructions: After creating the shape with the drawing tool, open the properties panel on the right. From here, turn on the "Stroke" toggle and select the Stroke type, such as "Glow" or "Element." Apply the effect by clicking on it, then you can change the color, feathering, and intensity of the stroke.
What You Can Achieve With This
- 📏 Stroke Width Control: Easily adjust outline thickness to create bold highlights, subtle edges, or balanced design structures depending on your creative needs.
- 🎨 Stroke Color Customization: Change stroke colors freely to match themes, branding styles, or cinematic moods for stronger visual consistency.
- Advanced Visual Styling: Apply different stroke looks to achieve clean, minimal lines, artistic edges, or dynamic graphic effects.
- ✨ Glowing Outline Effects: Create luminous, neon-style borders that stand out in dark scenes and futuristic compositions.
- Modern UI Elements: Design sleek interface components such as frames, icons, and HUD-style graphics with professional precision.
- Neon Geometric Designs: Build cyberpunk-inspired visuals using bright strokes and layered shape compositions.
- Motion-Ready Borders: Use stroke-based shapes for animated outlines that enhance transitions and visual storytelling.
3. Convert to Path
The Convert to Path feature in Filmora is one of the most powerful upgrades for designers who want full control over their shapes. It allows you to instantly break free from preset limitations and turn simple geometric shapes into fully editable design elements. Once you apply it with a single click, your shape transforms into a flexible path that can be reshaped, refined, and animated in much more detailed ways.
What Does the Feature Offer?
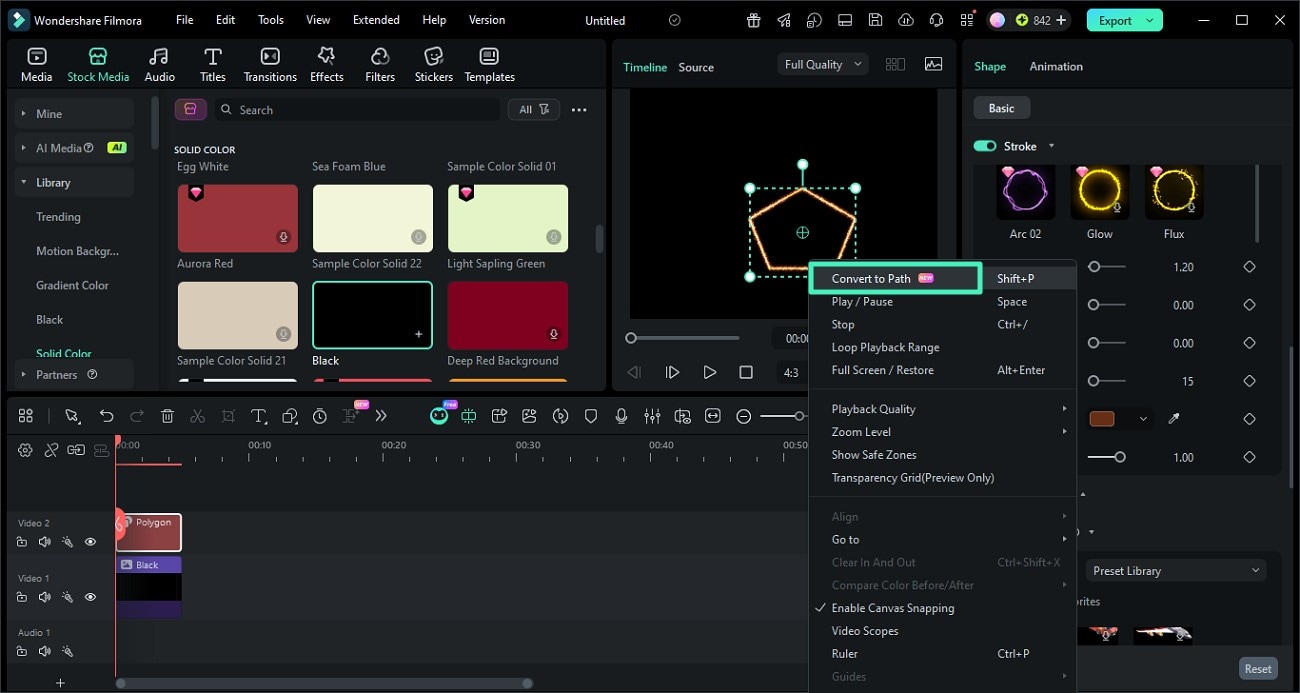
- ✅ One-Click Conversion: Simply right-click and choose "Convert to Path" to instantly unlock advanced editing control.
- Fine Point Editing: Adjust individual anchor points to reshape the structure exactly how you want.
- Warp & Reshape Flexibility: Bend, twist, and modify shapes freely for creative and organic designs.
- Animation Control: Use paths to create smooth motion graphics and complex animated transitions.
- Node-Level Precision: Gain full control over every curve and corner for professional-level detailing.
- Pen Tool Integration: Seamlessly combine with the pen tool for advanced custom shape building.
How to Use It?
Instructions: Once the shape is created and you have applied effects and customization, right-click on the shape in the preview window. Now, select the "Convert to Path" option from the expanded list by clicking on it. You can then create an animation according to your preferences.
 secure download
Part 5. Pen Tool: Now Easier to Find and Use
The Pen Tool is now placed in a much more accessible position, right after Basic Shapes. This update responds to user feedback asking where the tool was located. It is clearly visible and comes with a helpful tooltip: "Draw paths and create path animations." This makes path creation faster, easier, and more intuitive for designers.

Part 6. Shapes vs Paths: Choosing the Right Tool
Now that you understand how shapes and paths work in Filmora, the next important step is knowing when to use each one. Choosing the right tool at the right time helps you design faster, stay organized, and achieve better visual results:
| Scenario | Best Choice |
| Regular Geometry | Shapes |
| Fast Layout Building | Shapes |
| UI Elements and Icons | Shapes |
| Fine Adjustments | Paths |
| Complex Animations | Paths |
| Custom Creative Designs | Paths |
Part 7. A Smooth Workflow: Shapes → Paths → Animation
After understanding when to use shapes and when to switch to paths in Filmora, the next step is putting both tools together in a smooth, efficient workflow. By combining their strengths, you can design faster, stay organized, and create more polished and professional visuals with ease.
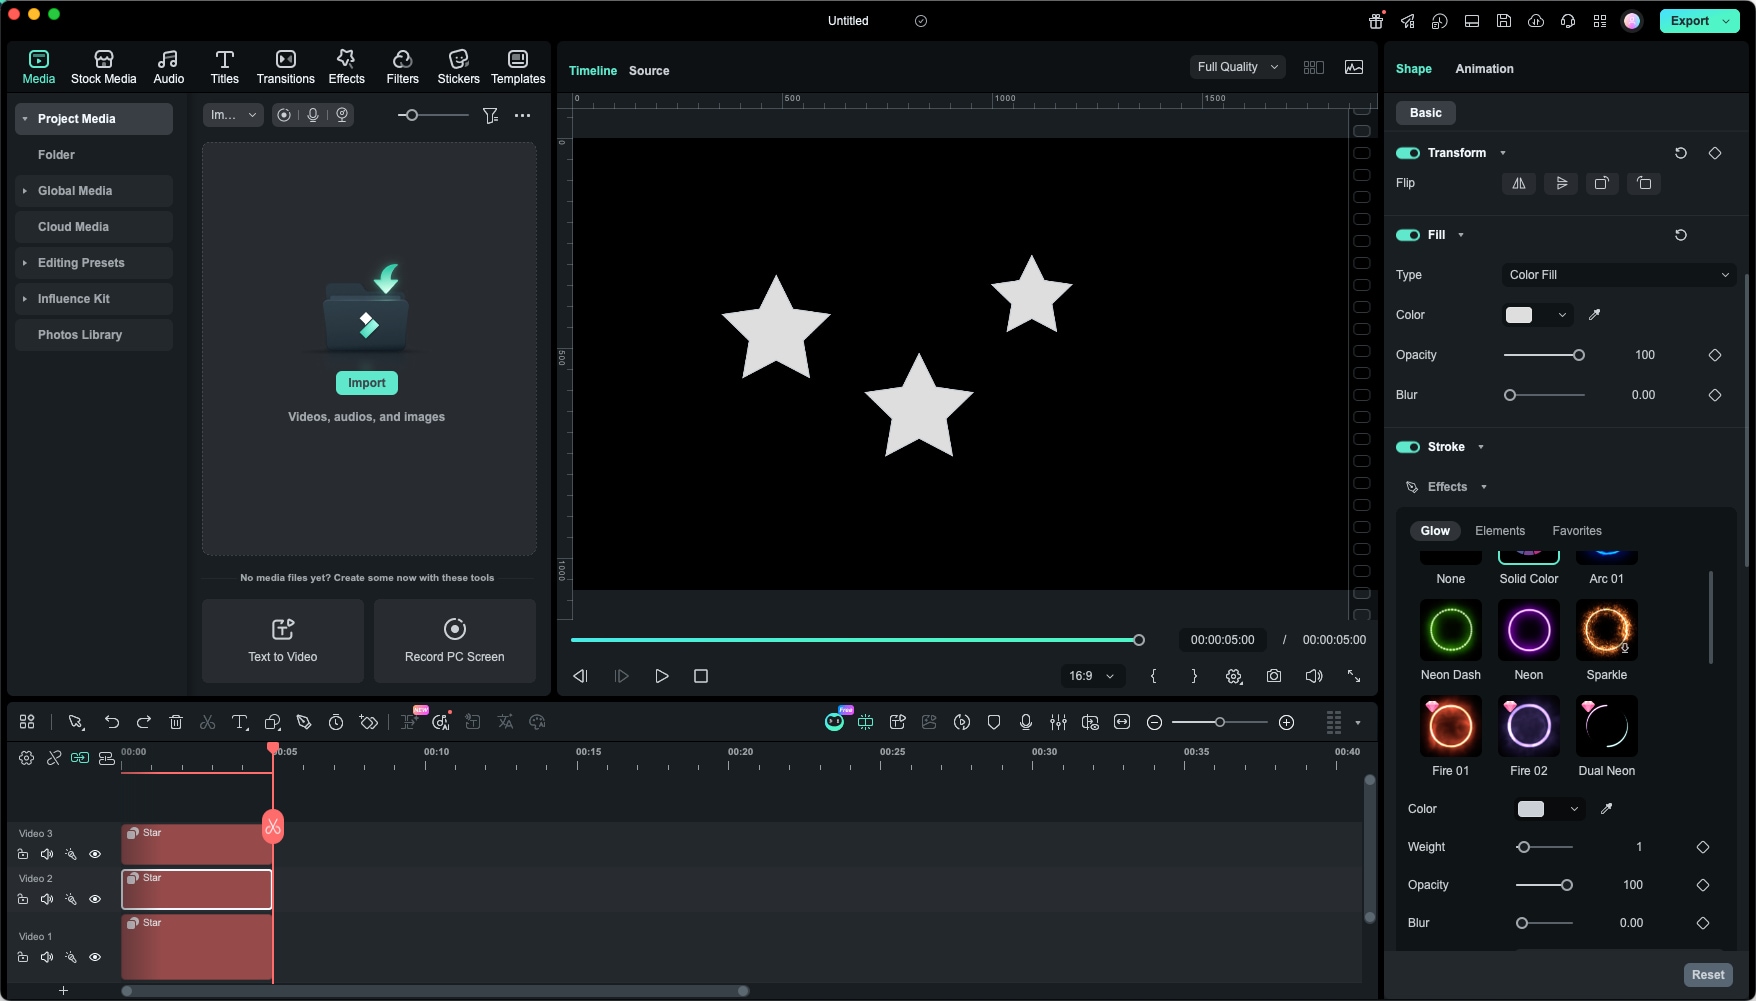
Step 1. Create The Shape
First, create a basic shape as the foundation of your design, and use the Shapes icon to build a clear layout.
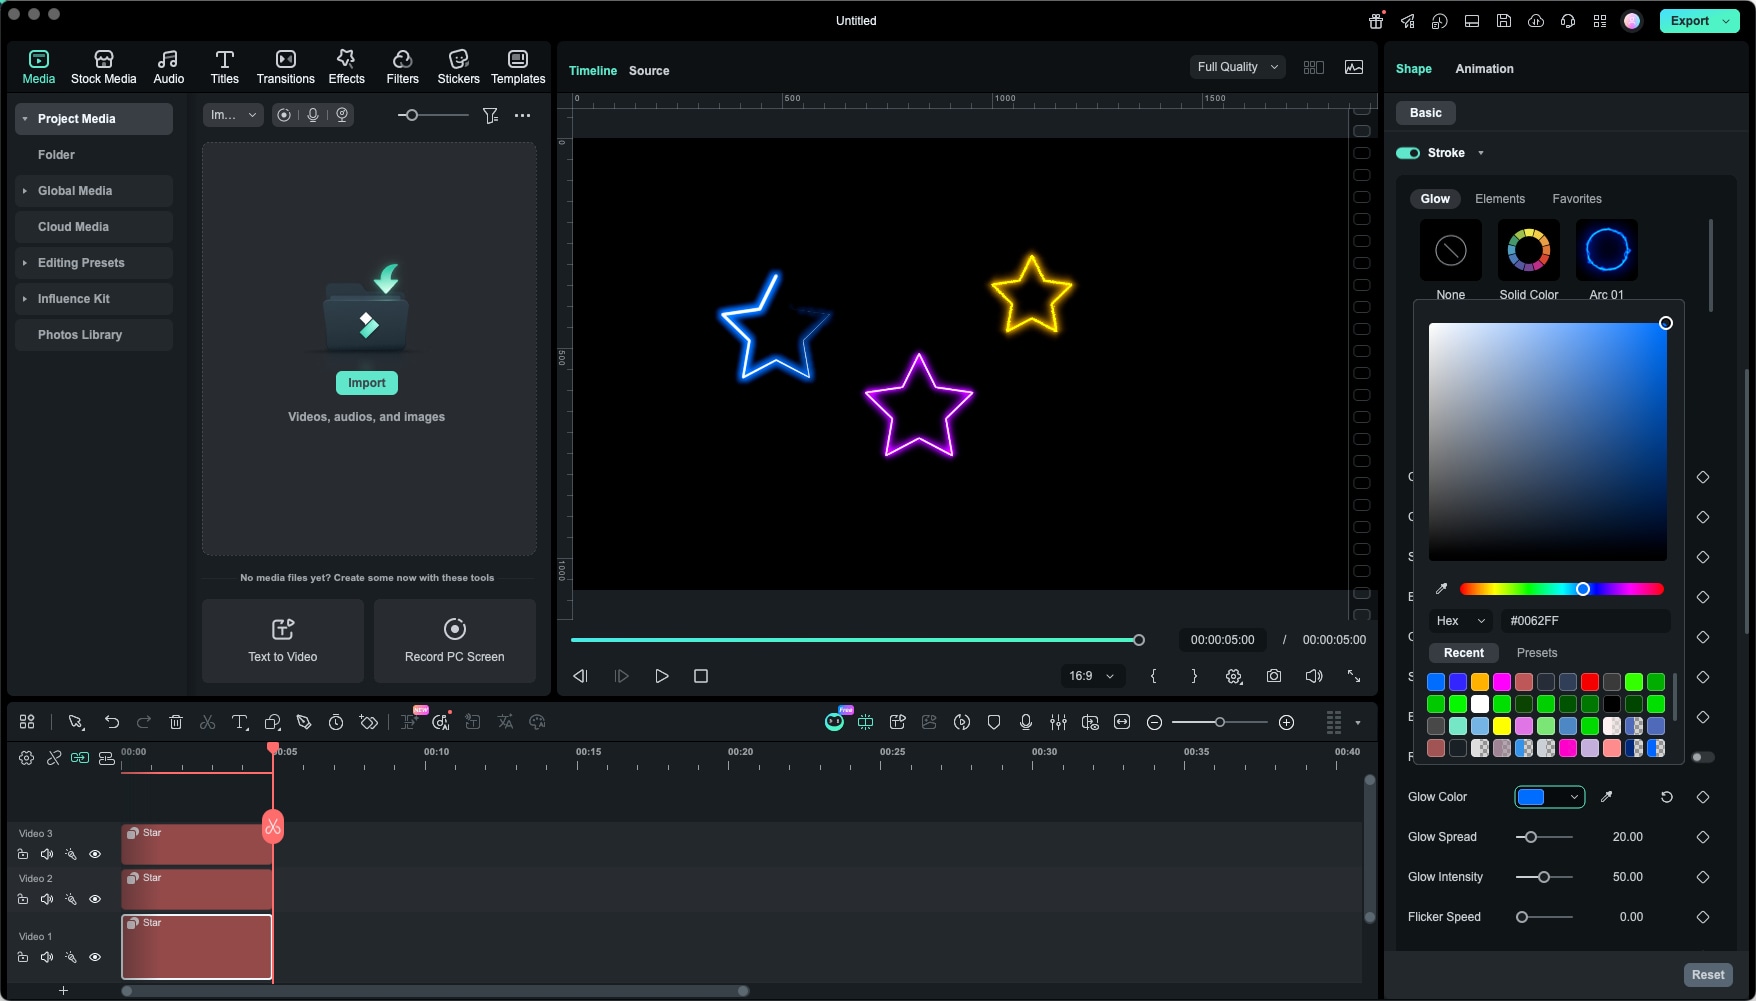
Step 2. Apply Path Effects to the Shape
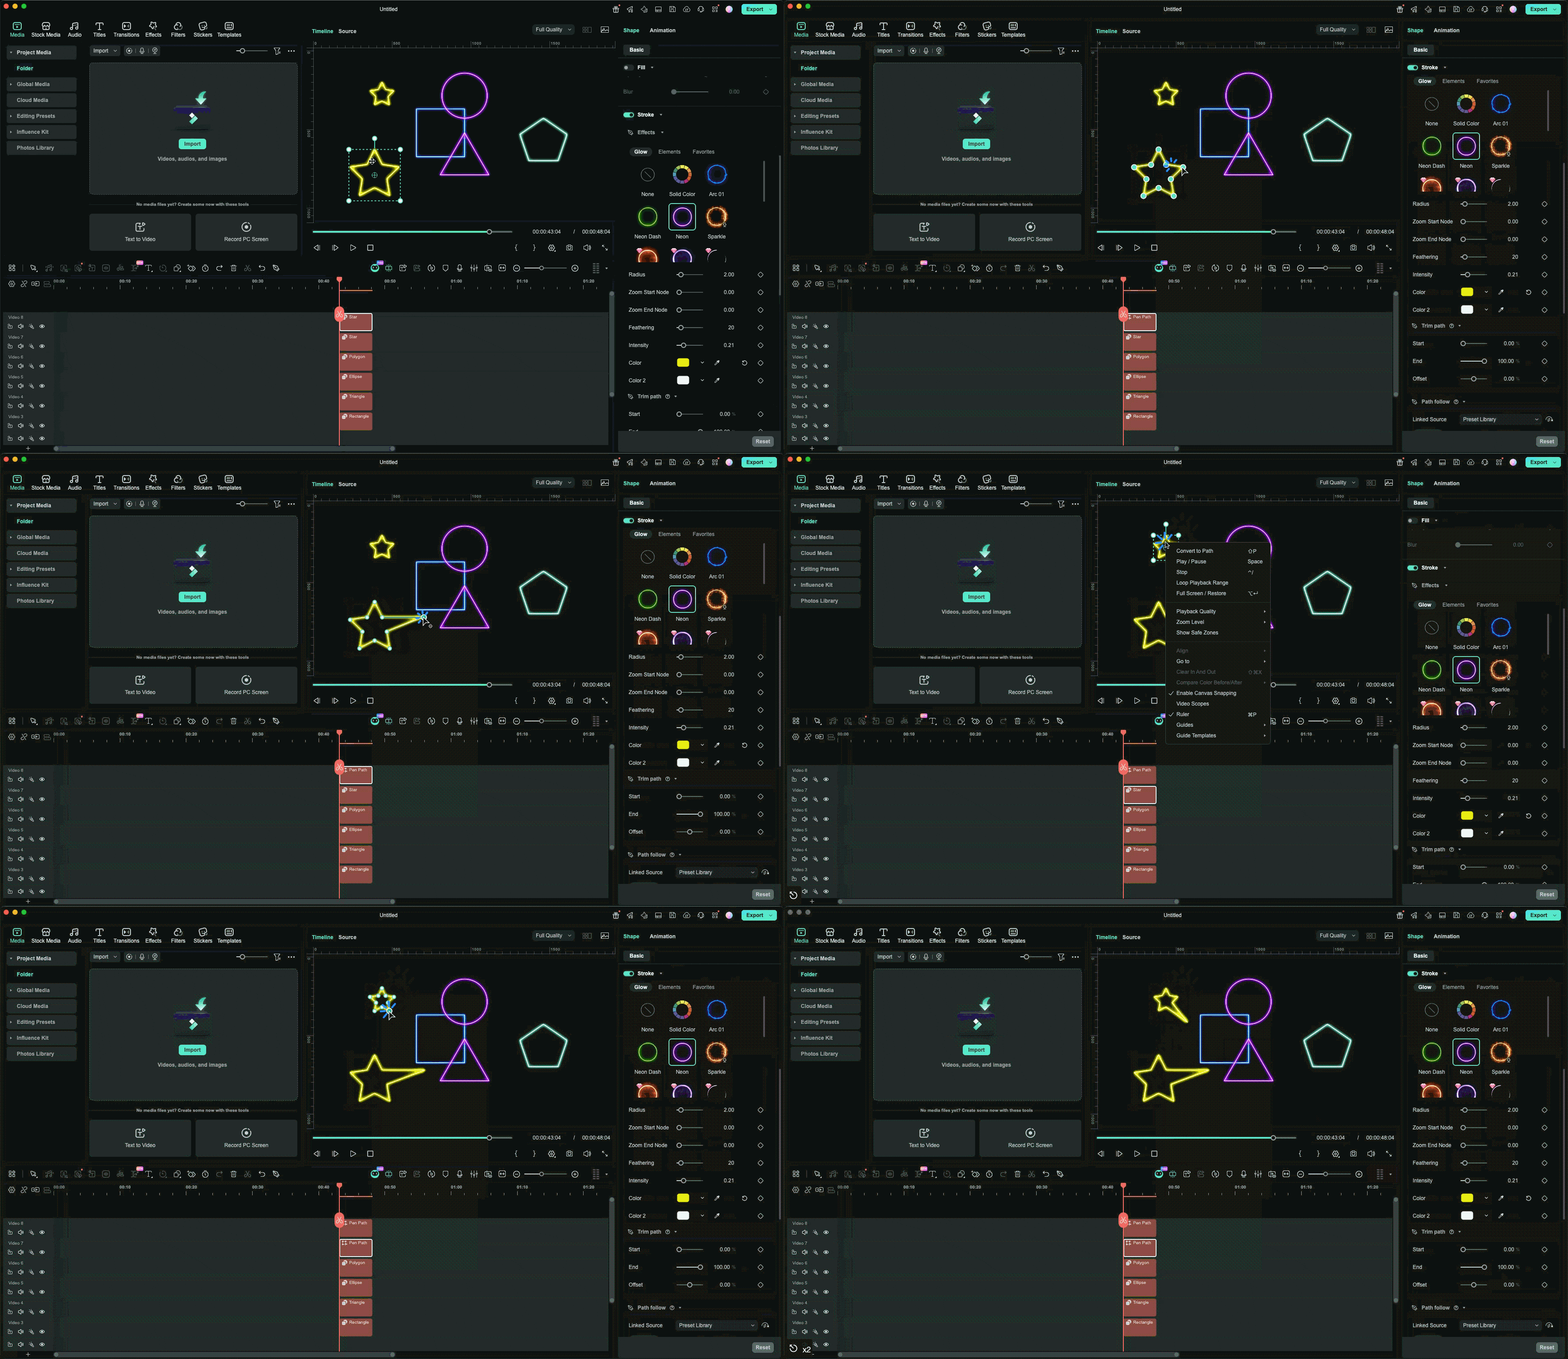
You can apply different stroke effects to it, or adjust the color and other Path Effects parameters, as shown in the image below.
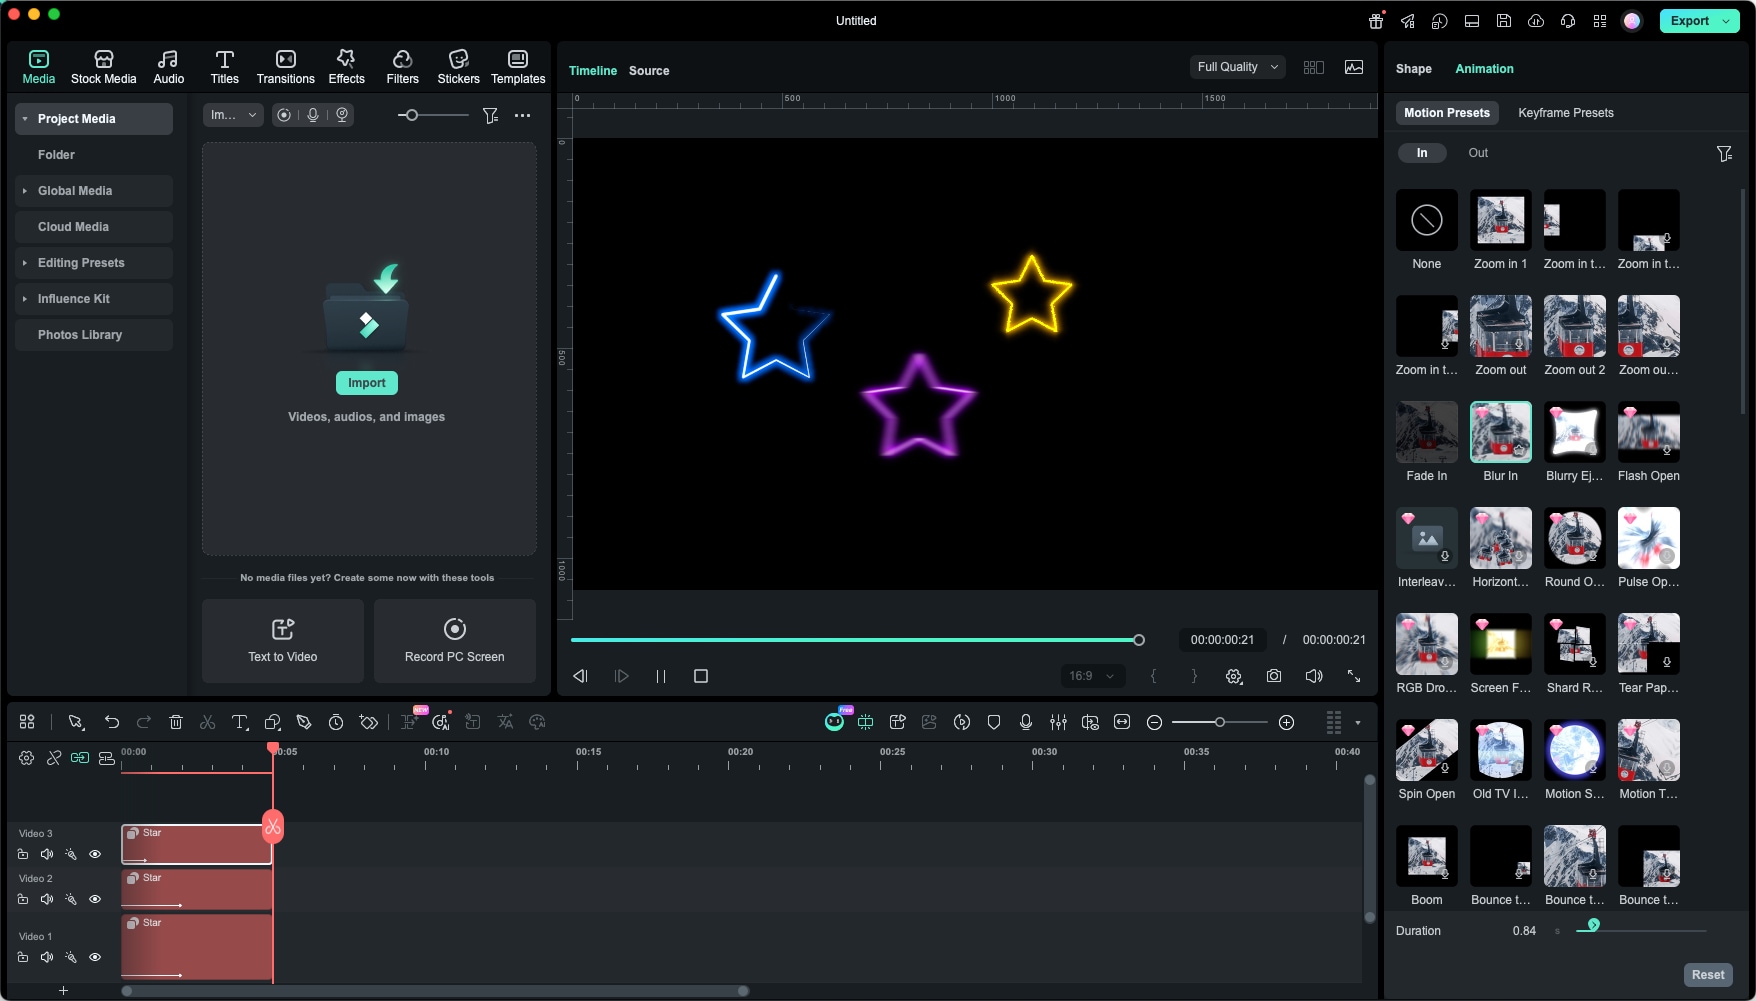
Step 3. Add Animation Effects
In the Animation section on the right, you can add animation effects to the shape.
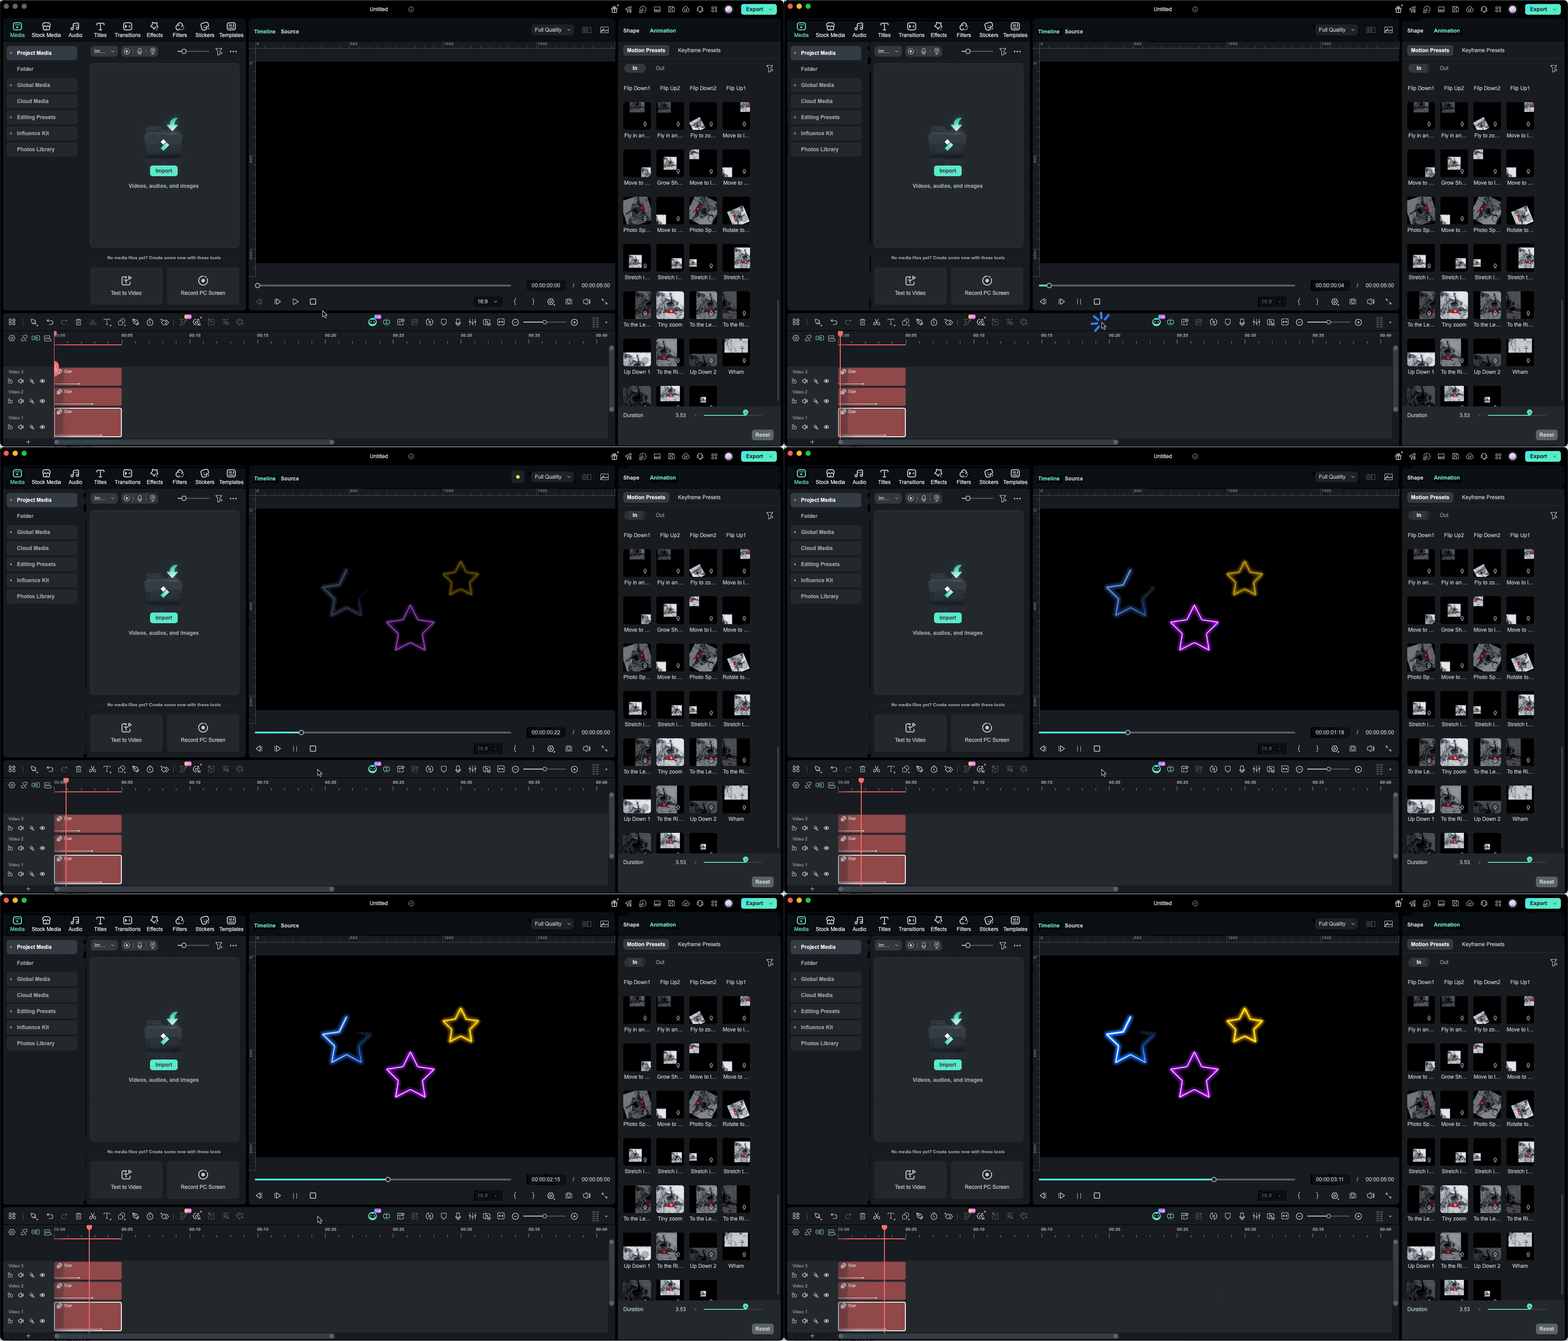
Step 4. Preview the Animation
After completing the steps above, you can preview the animation effect, as shown in the GIF below.
 secure download
Part 8. Creative Ideas to Try
These tools open the door to a wide range of creative possibilities that can transform simple designs into eye-catching visuals. Here are some inspiring ideas you should definitely try in your next project:
- 💡 Polygon + Stroke → Futuristic UI Frames: Combine polygon shapes with stroke effects to create clean, high-tech interface frames and sci-fi style layouts.
- Star + Animation → Particle Burst Effects: Use star shapes with motion animation to design energetic burst visuals and dynamic transitions.
- Convert to Path → Organic Morphing Designs: Turn shapes into paths and reshape them freely to create smooth, flowing, organic animations.
- Stroke + Glow → Neon Visual Effects: Apply stroke and glow together to build vibrant neon outlines perfect for cyberpunk and modern aesthetics.
Conclusion
To sum it up, this article provided a detailed guide on how to use the new update in the basic shapes offered by Filmora. These improvements make the design more flexible, creative, and efficient for users. From simple shapes to advanced path editing, everything now works in a smoother workflow.
secure download
