Sound is one of the elements that determine the success of your video production. In this following guide, you will learn how to:
In Filmora for Mac, you can insert background music and other files from the audio library or your computer, or you can even record your own voiceover using Filmora for Mac.
Add Background Music
Adding background music can drastically change the tone of your video. Filmora for Mac provides a royalty-free music library you can access within the program, or you can import your own music. Using Music from Filmora: choose a song from Filmora’s royalty-free audio library and use it for free.
The audio library has 50 songs divided into five categories: YOUNG & BRIGHT, TENDER & SENTIMENTAL, ROCK, FOLK, and ELECTRONIC. There are also sound effects available under SOUND EFFECT.
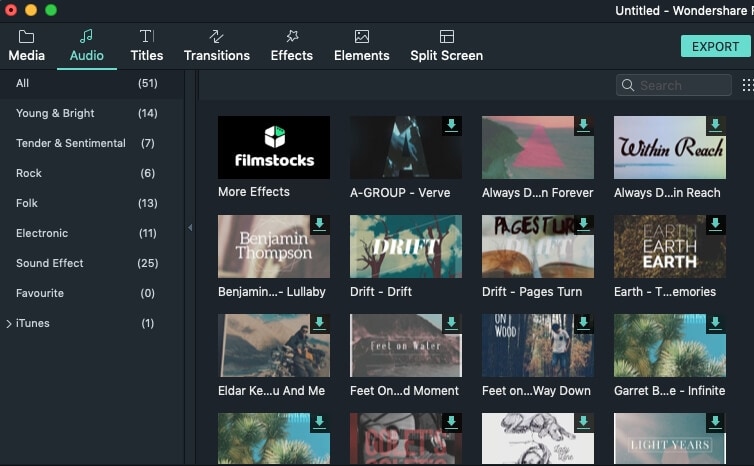
In the left side of the Audio tab you can click on the genre you'd like to explore. Once you find a song or sound effect you'd like to use in your video, either right-click on it and select Apply, or drag and drop it into an audio track in the timeline.
Using music from your Mac: select an audio file that's stored on your PC and bring it into Filmora for Mac.
Click the Import button above the Media Library panel to browse for audio files in your computer. When you find the song or other audio files you want, select it and import it into the Media Library. You can also drag and drop audio files into the Media Library. From there, you can drag and drop your audio into an Audio Track in the timeline.
Once a song is placed in the timeline, double-click on it to edit it in the Audio editing panel. You can apply fade in or fade out effects, or adjust the volume and pitch. Filmora for Mac lets you add up to 100 audio tracks.
Add Voiceover
To record a voiceover, follow the steps below.

In the Media panel, click Record next to Import and select the Record voiceover ![]() option in the dropdown menu. Alternatively, you can click on the Voiceover icon in the toolbar.
option in the dropdown menu. Alternatively, you can click on the Voiceover icon in the toolbar.
Place the playhead at the location on the timeline where you want the voiceover to be added and click on the Microphone icon ![]() to start recording. The session will start after a 3-second countdown. When you want to stop recording click on the stop icon
to start recording. The session will start after a 3-second countdown. When you want to stop recording click on the stop icon ![]() . The voiceover file you created will be automatically placed in the audio track after you stop recording.
. The voiceover file you created will be automatically placed in the audio track after you stop recording.

To start a new voiceover recording session, move the playhead to another position and click on the Microphone icon once again. Click OK to exit the Record Audio window.
Note: Longer voiceovers tend to contain more errors you need to edit out, so recording in shorter intervals can save you time.
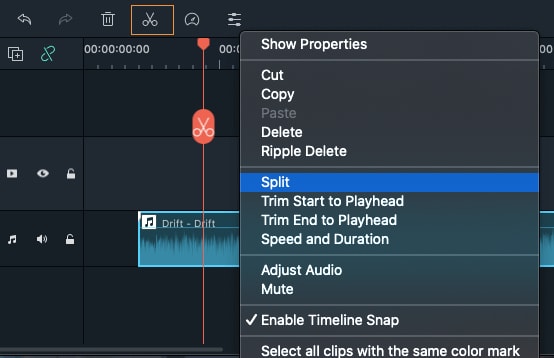
Split audio clips
Select your audio clip and place the playhead where you want to split it, then right click on the clip and select Split or click the Split icon above on the toolbar.
Your videos will be more dynamic when you edit to the beat of music. Filmora’s Beat Detection audio tool will mark audio beats automatically and make it easier to match your edit to your music. Here’s how you use Beat Detection:
Creating markers with Beat Detection

Note: The first time you use Beat Detection, Filmora will need to install the beat detection plugin. This may take some time.

Filmora will display highlight beat markers in red every four beats by default, but you can change this setting. To view blue beat markers for every hit, change the beat detection settings by right-clicking the music file in the library and then selecting Beat Options. In this menu, you can change the highlight beat frequency, highlight offset, or un-check Only mark highlight beats to display every beat marker.

Detach audio from one video:
Add the clip to the Timeline and right-click to open the menu and choose the Detach Audio option. The proficient tool will automatically detach the audio from the video and place it in an audio track on the timeline.

Now you can easily edit or delete the audio track without affecting the attached video clip.

Detach audio from multiple videos:
Add all the clips to the timeline, select all of them with your mouse, and then select the Detach Audio option from the menu. You will be able to extract audio from several video clips together.

Large video editing projects often require you to work with multiple video and audio tracks. Adding a new track to Filmora's timeline is easy; click on the Plus icon in the upper left corner of the timeline and select Add Video Track or Add Audio Track.

If you would like to add multiple tracks to the timeline at the same time, click on the Plus icon and choose Open Track Manager. In the Track Manager window, you can insert the desired number of tracks in the Add box. The Placement option enables you to choose if the new tracks will be added above or under the existing tracks.

Deleting Empty Audio Tracks
If you no longer need an audio or video track, remove any media that’s left in it and click on the Plus icon. Choose Delete Empty Tracks in the dropdown menu and all tracks that don't contain any audio or video files will be automatically removed from the timeline.

Adjusting Track Height
Click the icon in the left upper corner of the timeline panel and then select Small, Normal, or Big under Adjust Track Height. When the audio tracks are larger it will be easier to see the wave forms.


To make adjustments to your audio, double click on the audio clip you want to work on in the timeline to open a panel with adjustment sliders for volume and pitch. You can also apply Fade in/out effects and adjust their lengths here.
Another tool you’ll find in this panel is Denoise, which is a feature that can remove background noise from your audio clips.
For a more advanced audio editing experience, you can also access the Audio Equalizer from this panel. You can choose from presets or make manual adjustments by clicking ‘Customize’.
Give it a listen when you are done and, if you’re not happy with the results, click Reset to start over.
Mute a Video Clip
To mute the audio in a video clip, right click on the clip in the timeline and choose Mute.

Replace the Original Audio of a Video
To remove the original audio and add a new audio clip to a video, please follow the instructions below:
After adding the video clip to the timeline, right click on it and select Audio Detach. The audio will be detached from the video clip and placed in an audio track.
Import the audio file you want to use from your computer or add music from the Audio library to an audio track. If you are using a higher quality version of the audio which you detached, drag it to an audio track underneath the separated audio and make sure the waveforms line up to sync it. Then, select the detached audio clip and delete it.
Adjust Audio Volume
There are several ways to adjust the volume of your audio in Filmora for Mac:
To adjust the volume in the Audio panel: after you drag and drop the audio file into the timeline, double click on it to open the Audio panel.
In the volume section, drag the slider up or down to adjust the volume.
To adjust the volume in the timeline: Move your mouse over the volume band in the audio clip and the pointer will change to a hand icon  .
.
Drag the handle up to increase the volume and drag it down to decrease the volume.
If you want to adjust the left/right balance, enter a numerical value or drag the knob in the Balance circle. A numerical value of 0 means the audio is balanced, -100 is all the way to the left and 100 is all the way to the right.

If you need to have the volume increase and decrease as the clip plays, use audio key frames.
To add an audio key frame, go to the timeline and move the playhead to the location where you want the change in volume to start.
Double click the audio clip to open the Audio control panel and click the key frame button.

Next, move the playhead to where you want the volume adjustment to end and click the Keyframe button again. Now you’ll be able to rag the volume envelope (the line between your two keyframe dots) to adjust the volume of that section of your audio clip.
Fade Audio In or Out
To add fade in or fade out effects to an audio file, you'll first have to place it on the timeline. Double-click on it to gain access to the Audio settings panel and then drag the fade in and fade out sliders to the right to add fade effects and set their durations.
You can also apply fade in and fade out effects directly from the timeline. Each file you place on the audio track will have Fade ![]() icons in the audio waveform area near the beginning and the end. Dragging the fade in handle at the beginning of the clip will apply the effect and set its duration. Dragging the fade out handle near the end of the clip will apply the fade-out effect and set its duration.
icons in the audio waveform area near the beginning and the end. Dragging the fade in handle at the beginning of the clip will apply the effect and set its duration. Dragging the fade out handle near the end of the clip will apply the fade-out effect and set its duration.
Audio Speed Adjustments
You can alter the speed audio clips the same way you alter the speed of video clips. Right click on an audio clip in the timeline and select Speed and Duration. Alternatively, you can select the audio file on the timeline and click on the Speed icon ![]() in the toolbar.
in the toolbar.
Audio Denoise
Audio denoise is used to reduce unwanted background noise (wind noise, computer noise, etc.). After you drag and drop the audio clip (or video clip with audio) into the timeline, double click on it. If it was an audio clip, the audio settings menu will open. If it is a video clip then the video settings menu will open and you will need to click into the audio tab.
In the Audio settings menu check the box next to Remove Background Noise.

You can set the intensity of this effect to Weak, Mid or Strong. Click OK apply your changes.
All videos have an abundance of different sounds like music, speech, or sound effects. Changing the strength of sound waves will enable you to mix these sounds together into a coherent soundtrack.
Place your audio clip in an audio track and double-click on it to open the Audio settings menu window. Next to the Equalizer feature, you'll see a drop-down menu that contains presets such as Default, Classic, Rock'n'Roll, Techno, Bass, Sparkle, Hard Rock, Pop, Ska, Acoustic, Blues, Folk, Country or Custom. Select the preset that best fits your current needs and click OK to apply it.

Click on the Customize button located next to the drop-down menu to adjust the Audio Equalizer manually. You can make the adjustments by dragging the sliders up or down until you find the desired value for each of them. Hit OK to save your settings.

The Audio Mixer lets you adjust the db levels of all your tracks that contain audio and set whether they’re set more to the right or to the left.
To use the Audio Mixer, follow these instructions:
1) Drag and drop all your audio files (including video files you will be using the audio from) into the timeline.
2) Click the Audio Mixer icon in the toolbar.
![]()
3) Drag the small ball along the circle (the Pan/Balance knob) for each track to switch the sound between the left and right channels. You can also move the circles on the gauges upwards or downwards to adjust the gain.
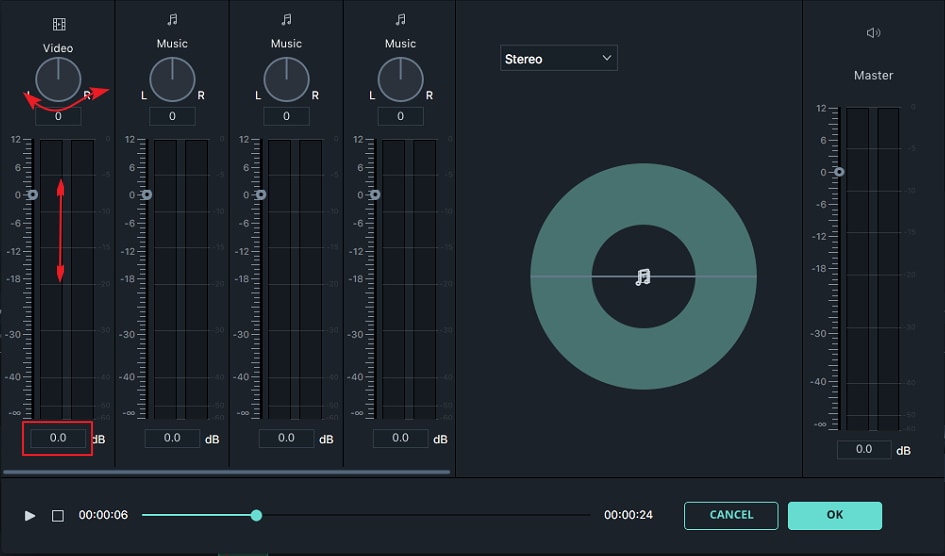
4) In the right side of the window you can choose between Surround (virtual) and Stereo. You can also drag the corresponding tracks to the where you need along the Pan.

If you select Surround you'll be able to pan from left to right and from back to front, while in the Stereo mode you can only pan from left to right.

5) Click OK to apply your changes to your video.
The Audio Mixer also lets you control the Master volume by dragging the sliders up or down so you can choose how loud a video clip should be. Click on the Play button to hear the results and click OK to apply your adjustments.
Audio ducking is when you 'duck' the volume of something like background music down so that dialogue can be heard more clearly.
Here's how to use Audio Ducking:
1. Select the clips that have diagloue.
2. Right click and choose 'Adjust Audio'.

3. Check 'Lower the volume of other clips'.

4. The volume of any other media, like a background music track, overlapping with your selected clips will be lowered. You can adjust the degree of the effect with the slider.
