

 100% Security Verified | No Subscription Required | No Malware

Want to reveal a video through text, a shape, or another clip? A Premiere Pro track matte lets you do that without manually masking every part of the footage. By using one clip as a matte, you can control exactly which parts of another clip appear on screen.
If this is your first time using a track matte, this guide will help you get started. You'll learn how to set up a track matte, choose the right matte settings, animate it with keyframes, fix common issues that may come up, and explore a Premiere Pro alternative for creating similar effects.

In this article
Part 1. What Is a Track Matte in Premiere Pro?
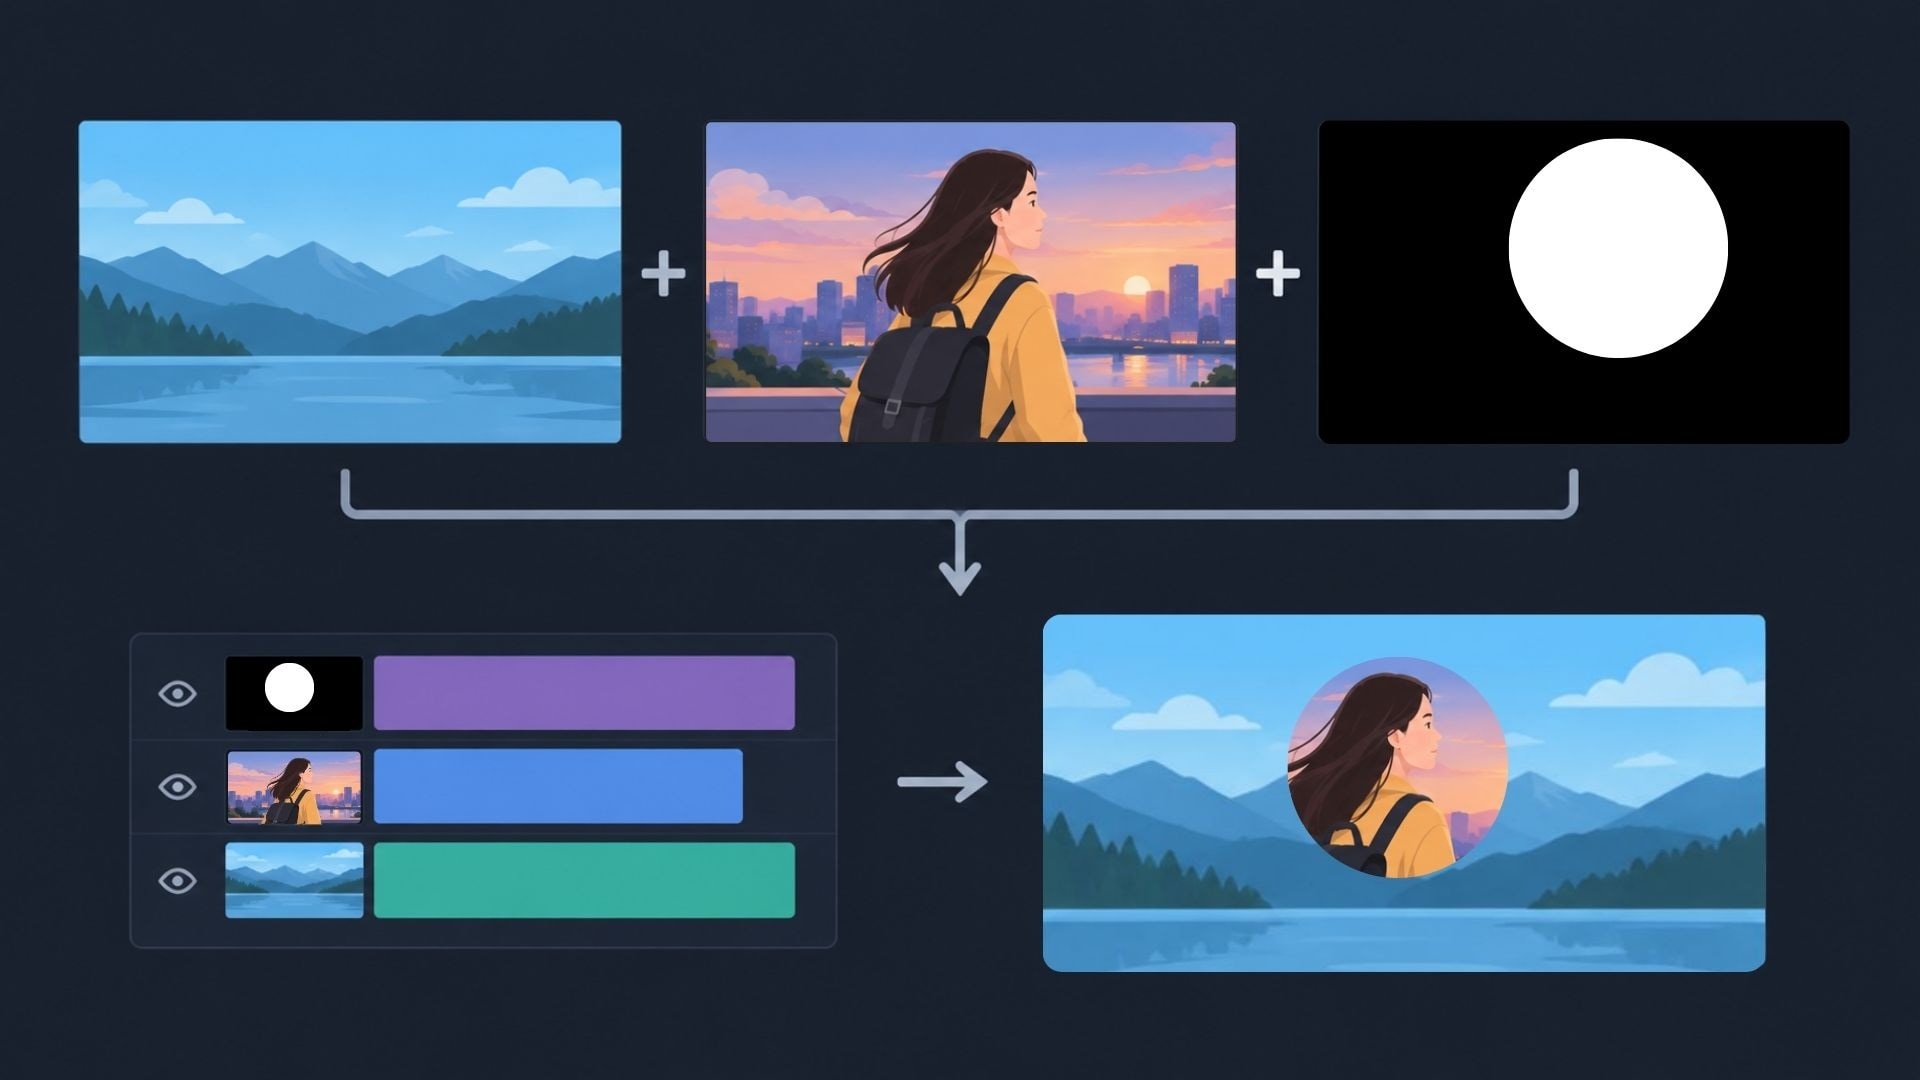
A track matte is a compositing technique that uses one clip to determine which parts of another clip are visible. In Premiere Pro, the Track Matte Key effect uses a third clip as the matte and creates transparent areas in the clip receiving the effect.
Using a track matte in Premiere Pro, or anywhere else, usually requires three elements:
- Background: The clip underneath everything else.
- Foreground or superimposed clip: The footage you want to reveal.
- Matte: The clip that determines which parts of the foreground clip are visible.
The matte itself can actually be a text layer, a shape, a graphic, or even moving video. Whatever shows up bright or opaque in the matte determines what becomes visible below it.
Track Matte Key Settings
Once you apply Track Matte Key in Premiere Pro, you'll see a few settings that control how Premiere Pro uses the matte. The most important ones are Matte, Composite Using, and Reverse.
| Setting | What It Does |
| Matte | Selects the video track containing the matte. |
| Composite Using: Matte Alpha | Uses the matte's transparency or alpha channel to determine which parts of the foreground clip are visible. |
| Composite Using: Matte Luma | Uses the matte's brightness values to determine which parts of the foreground clip are visible. |
| Reverse | Inverts the matte, switching the visible and hidden areas. |
With Matte Luma, the brighter an area is, the more of the foreground clip it reveals:
- White: Fully revealed
- Black: Hidden
- Gray: Partially revealed
Part 2. How to Use Track Matte in Premiere Pro
Now let's walk through the basic process of using a track matte in Premiere Pro. For this example, we'll create a simple composition like this:

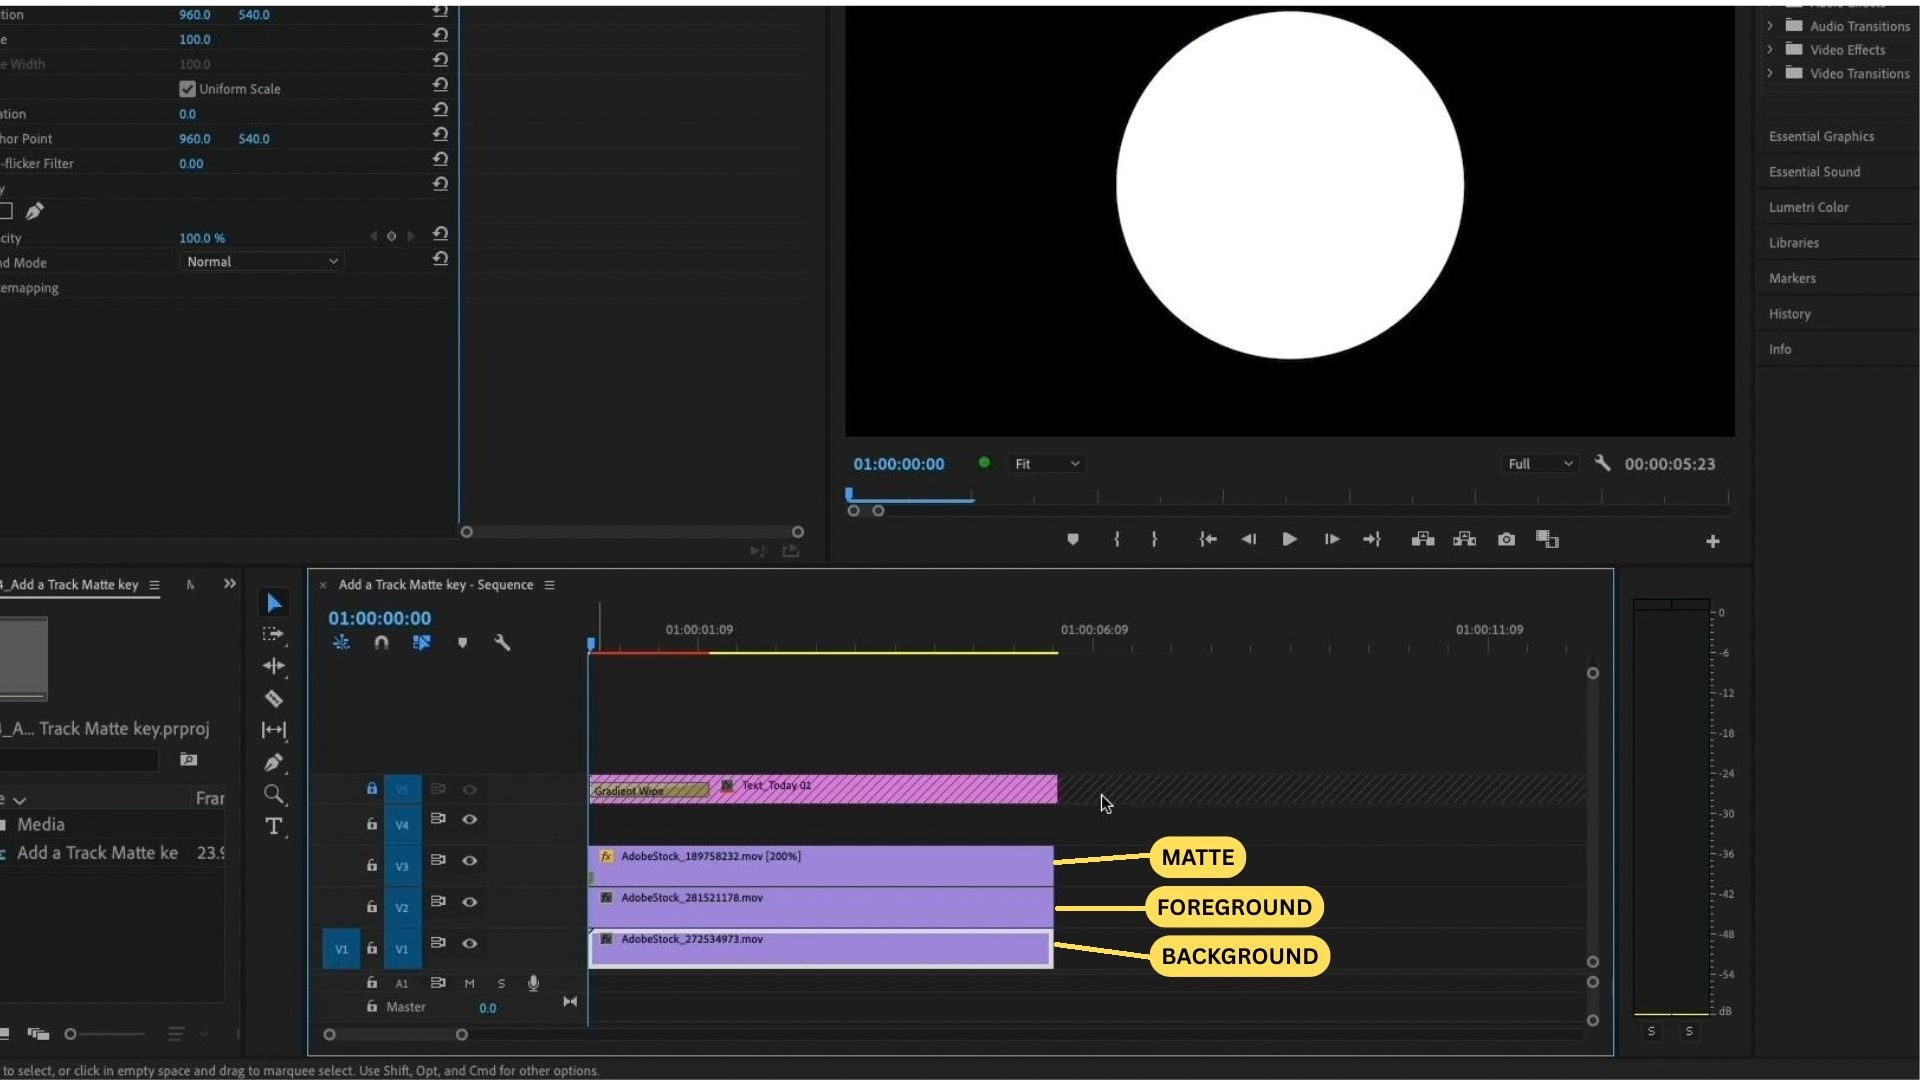
- Step 1. Prepare and Set Up Three Video Tracks
In your timeline, arrange them from top to bottom as:
- Matte (V3)
- Foreground footage (V2)
- Background (V1)
- Step 2. Apply Track Matte Key
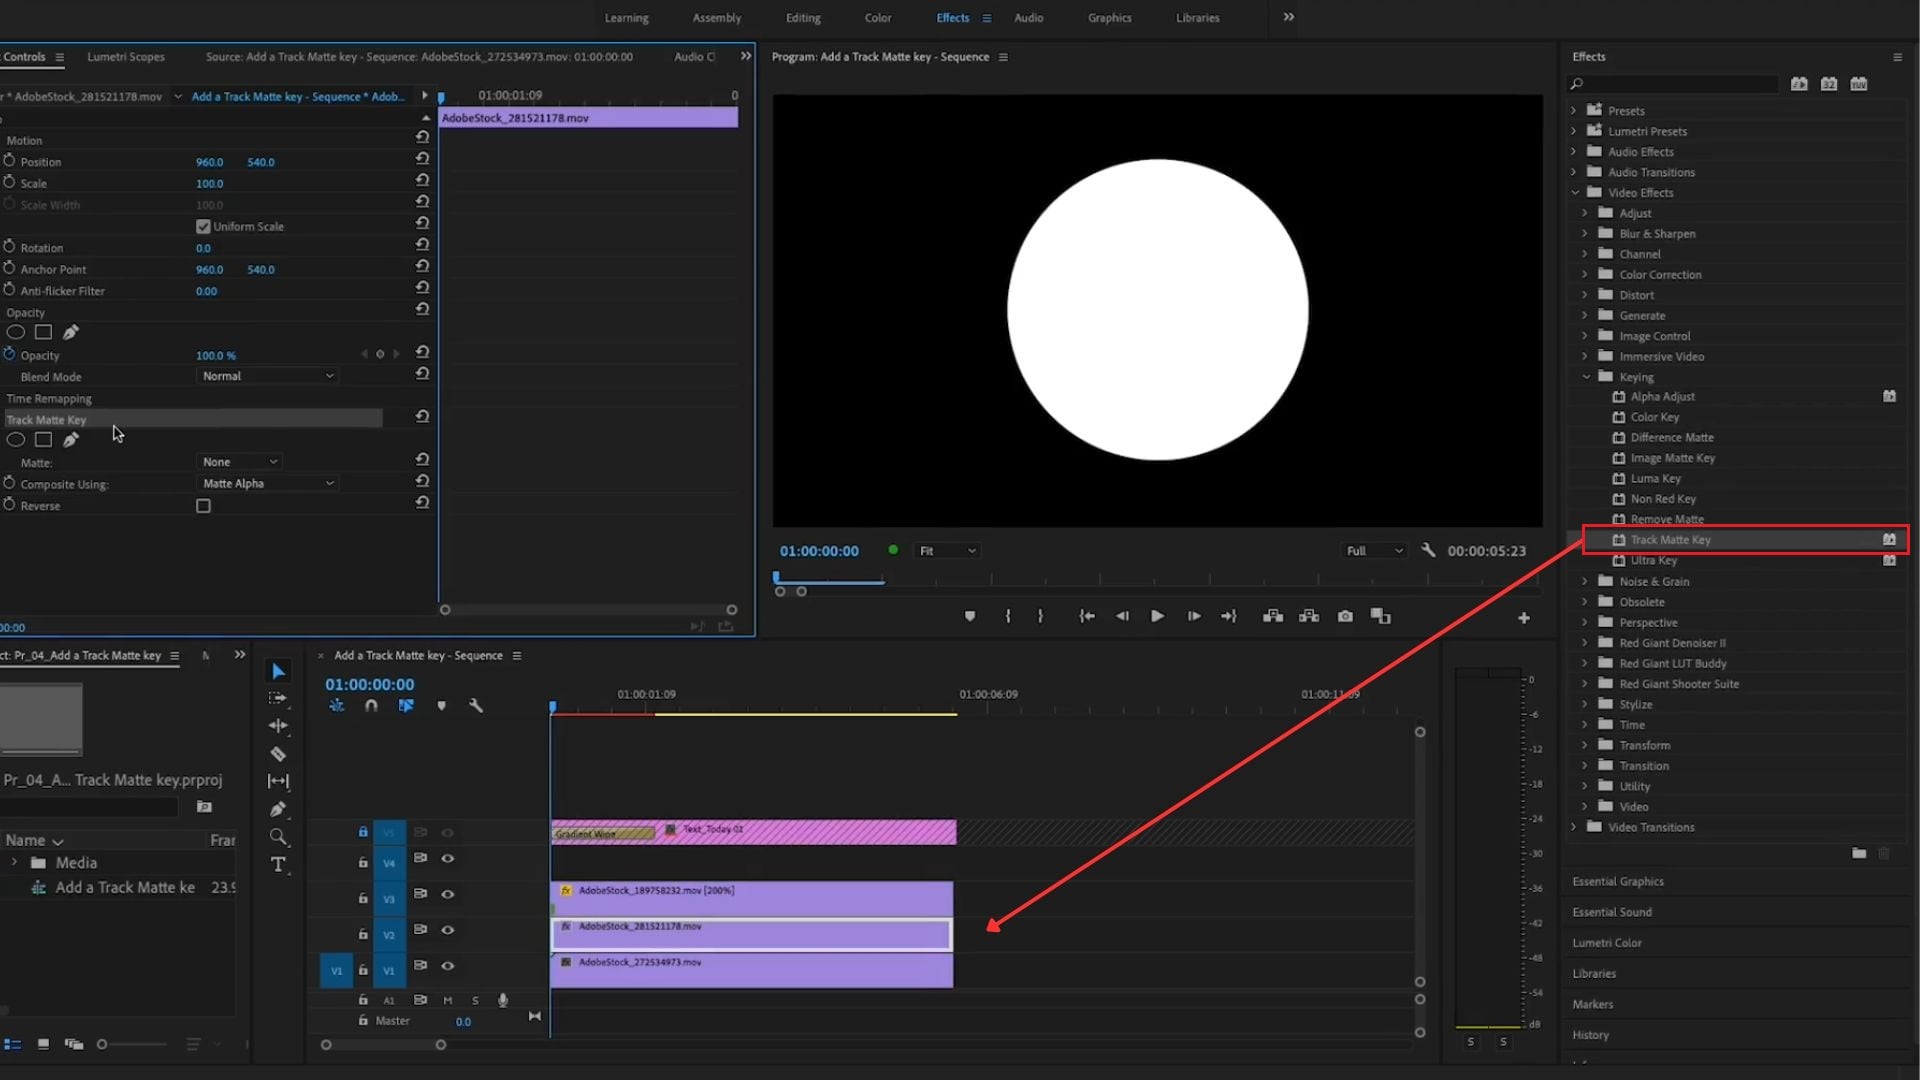
Select the middle (V2 foreground) clip and open the Effects panel. Search for “Track Matte Key” and drag it onto that clip.
- Step 3. Choose the Matte Track
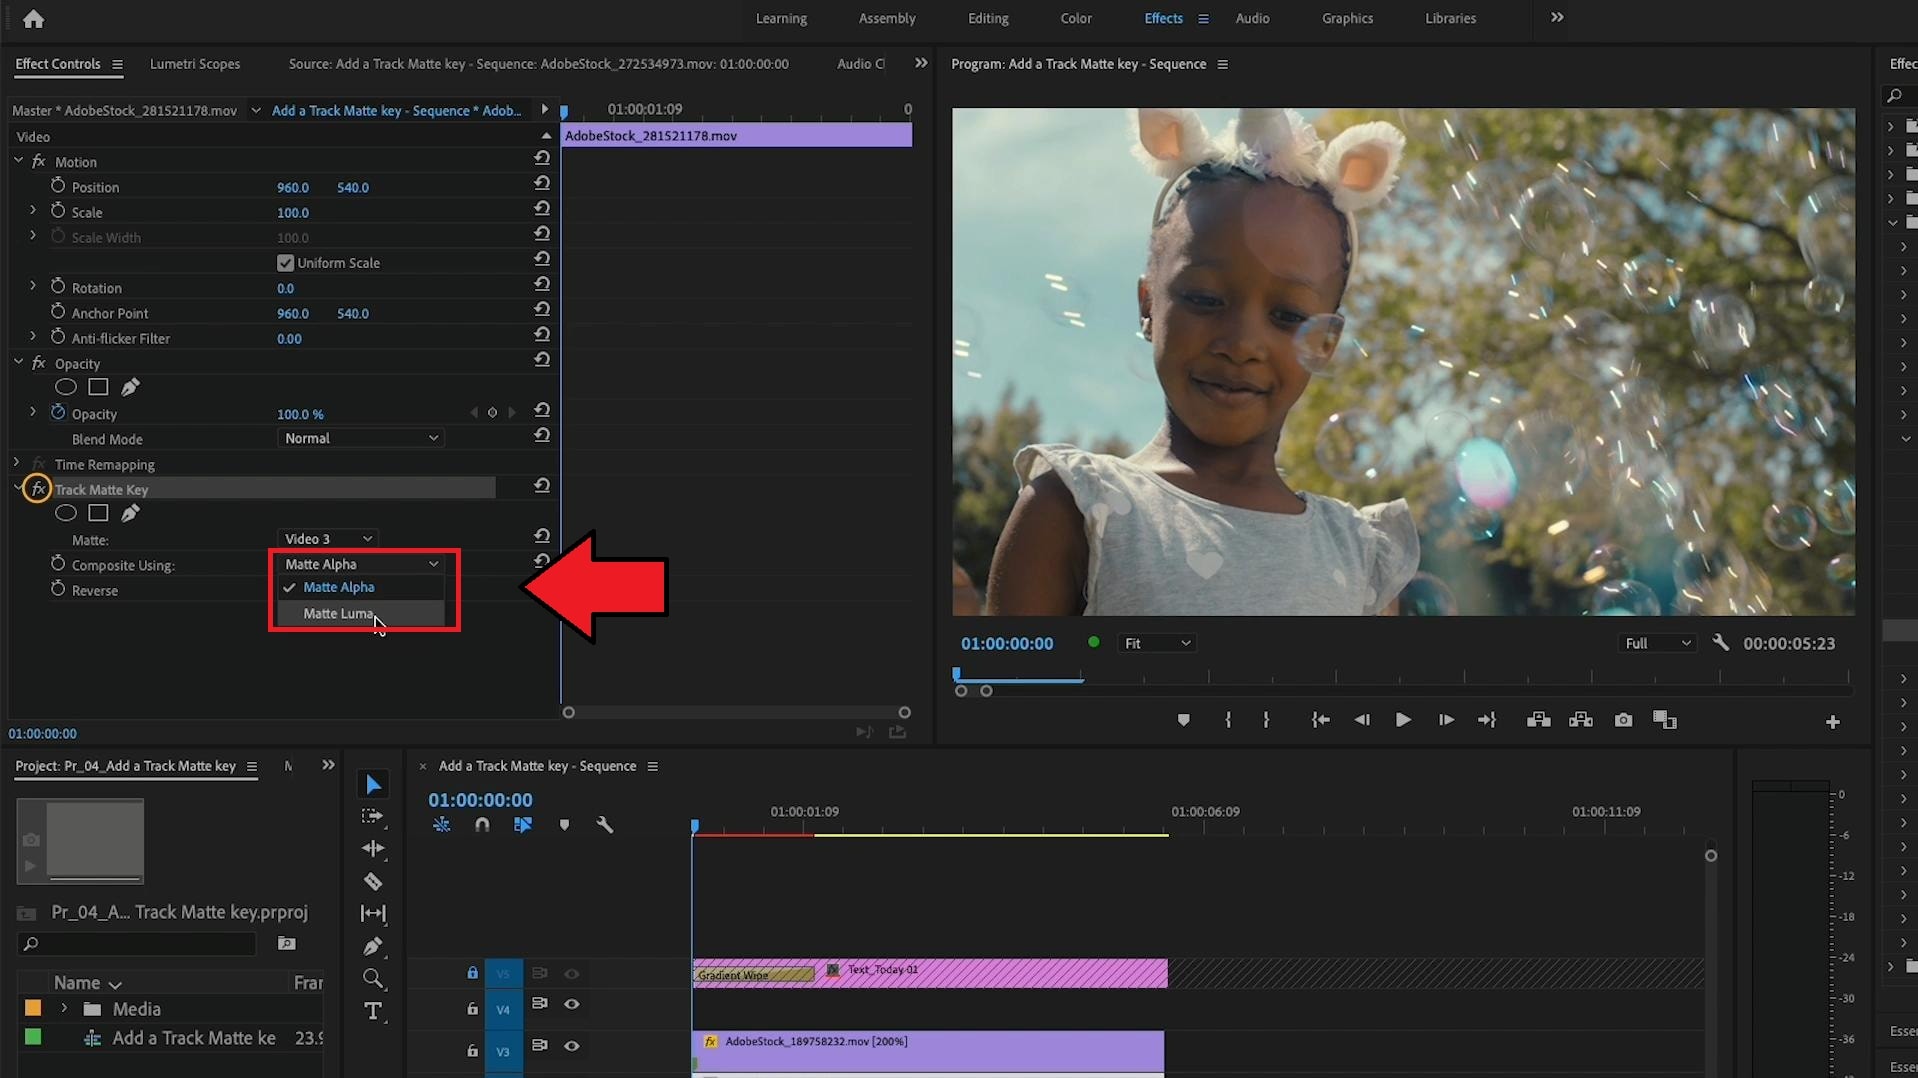
With the V2 foreground clip still selected, open Effect Controls. Find the Track Matte Key settings and locate the Matte option, then select Video 3 because your matte is on V3.
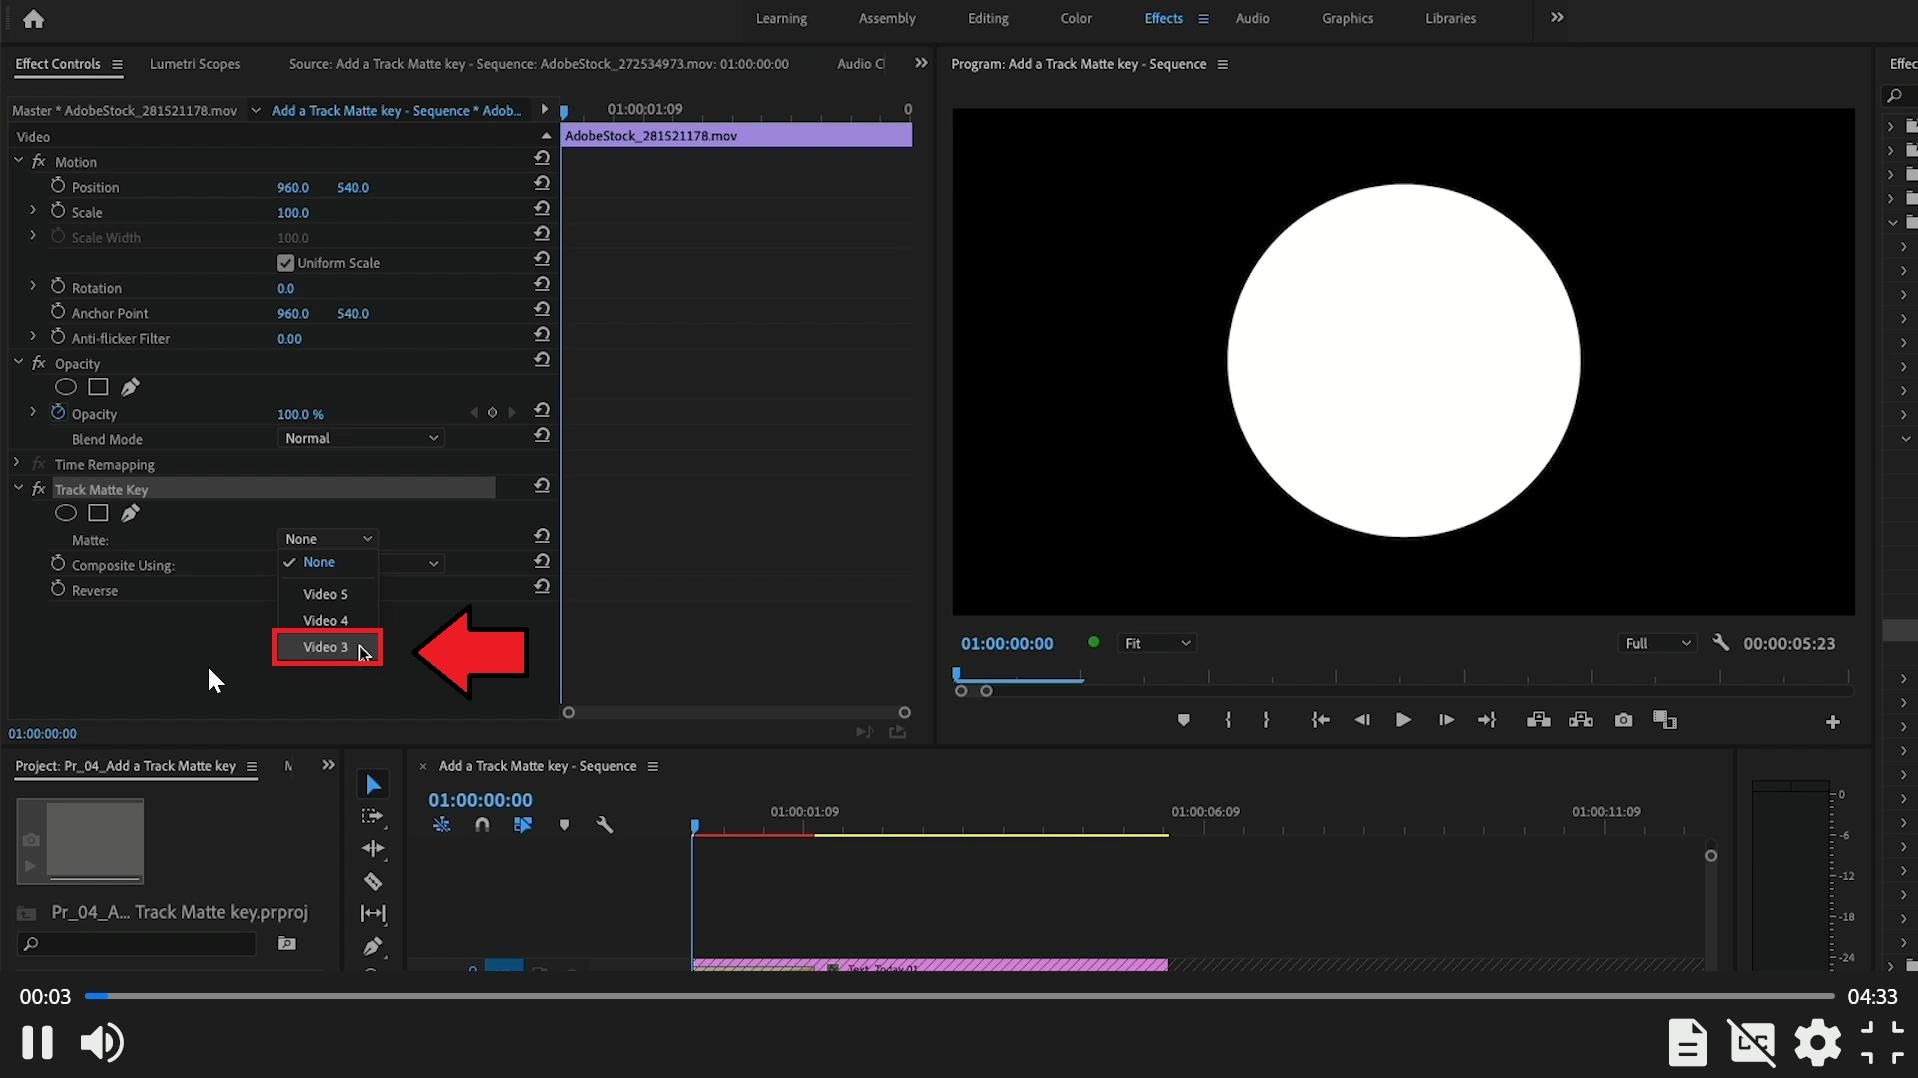
Premiere will now use the V3 clip to determine which areas of the V2 footage are visible.
- Step 4. Choose Matte Luma or Matte Alpha
Next, choose the appropriate compositing method:
- For a simple black-and-white graphic, choose Matte Luma.
- For a graphic with transparency, Matte Alpha can use its alpha channel instead.
Adobe specifically recommends Matte Luma for an opaque black-and-white graphic and Matte Alpha for titles or graphics containing an alpha channel.
- Step 5. Preview the Result
Play the sequence. You should now see the foreground video revealed according to the shape or brightness information in your matte.
Part 3. How to Animate a Track Matte in Premiere Pro
After you’ve nailed the basic setup for a Premiere Pro track matte, you can take it a step further by putting the matte in motion. An animated track matte, often called a traveling matte or moving matte, uses the same Track Matte Key setup but adds keyframes to move, scale, or rotate the matte over time instead of sitting still.

How to animate a track matte in Premiere Pro
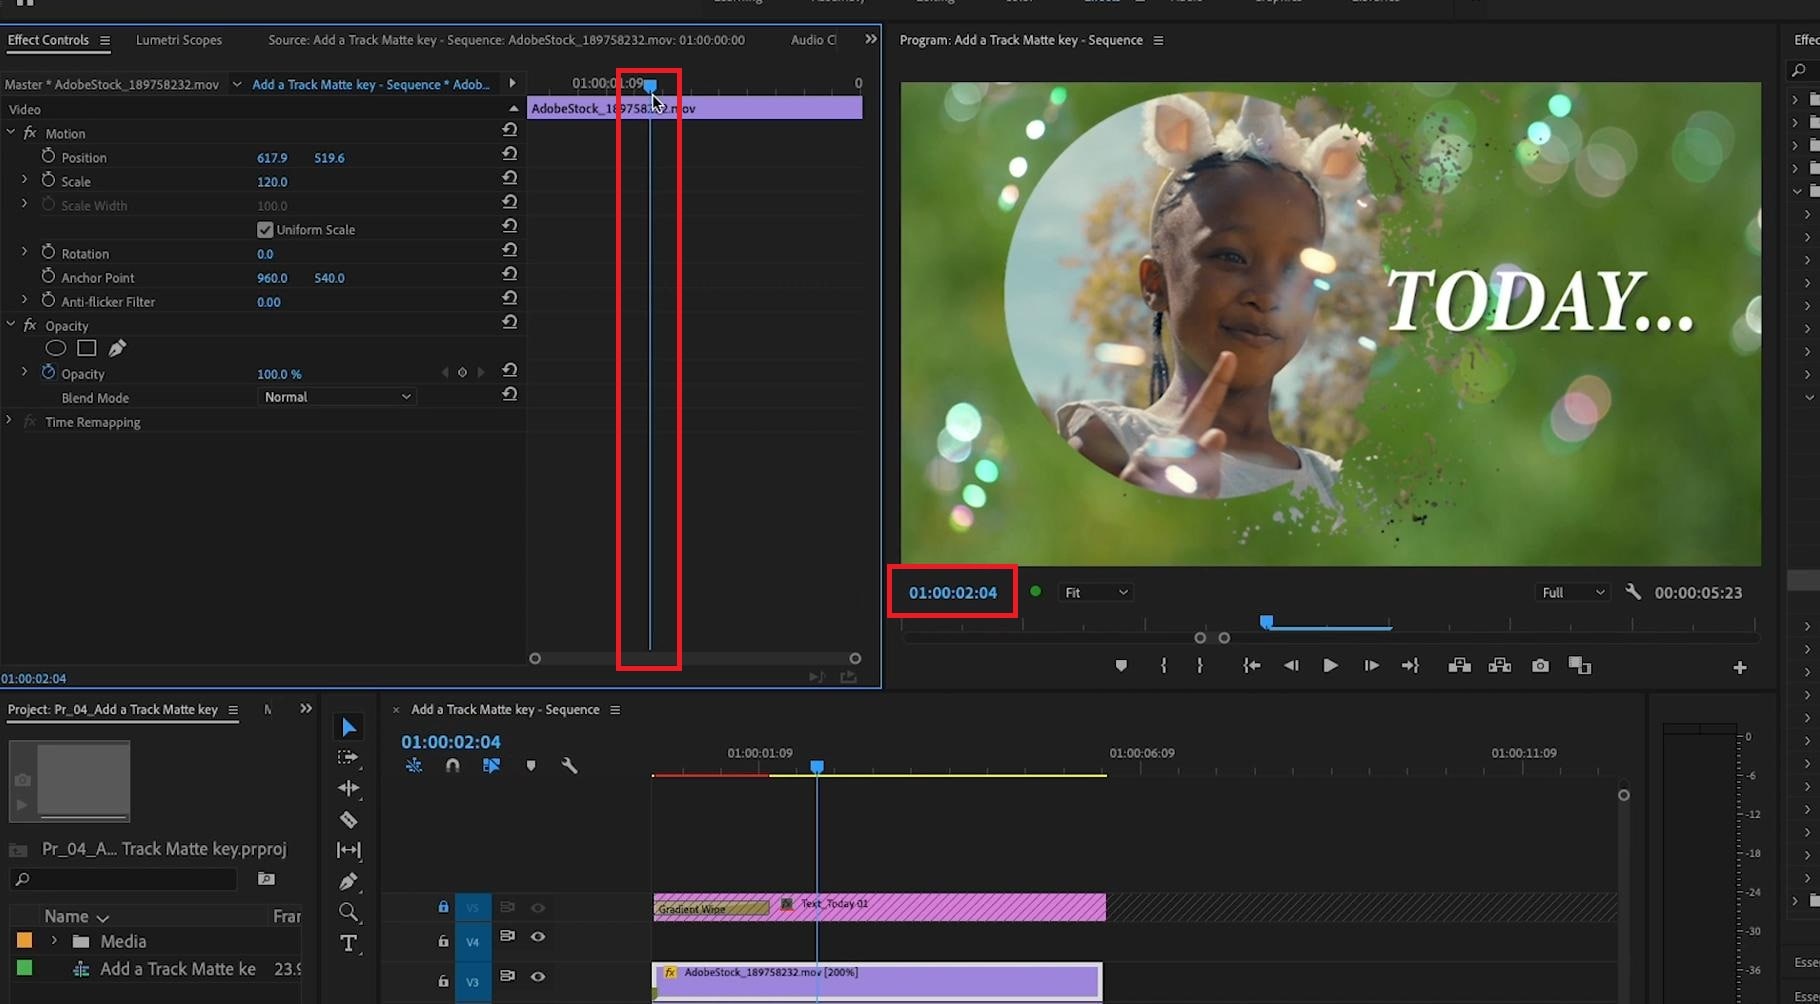
- Step 1. Position the Playhead
Select the matte on V3 in the Timeline. Position the playhead at the beginning of the section where you want the animation to start.
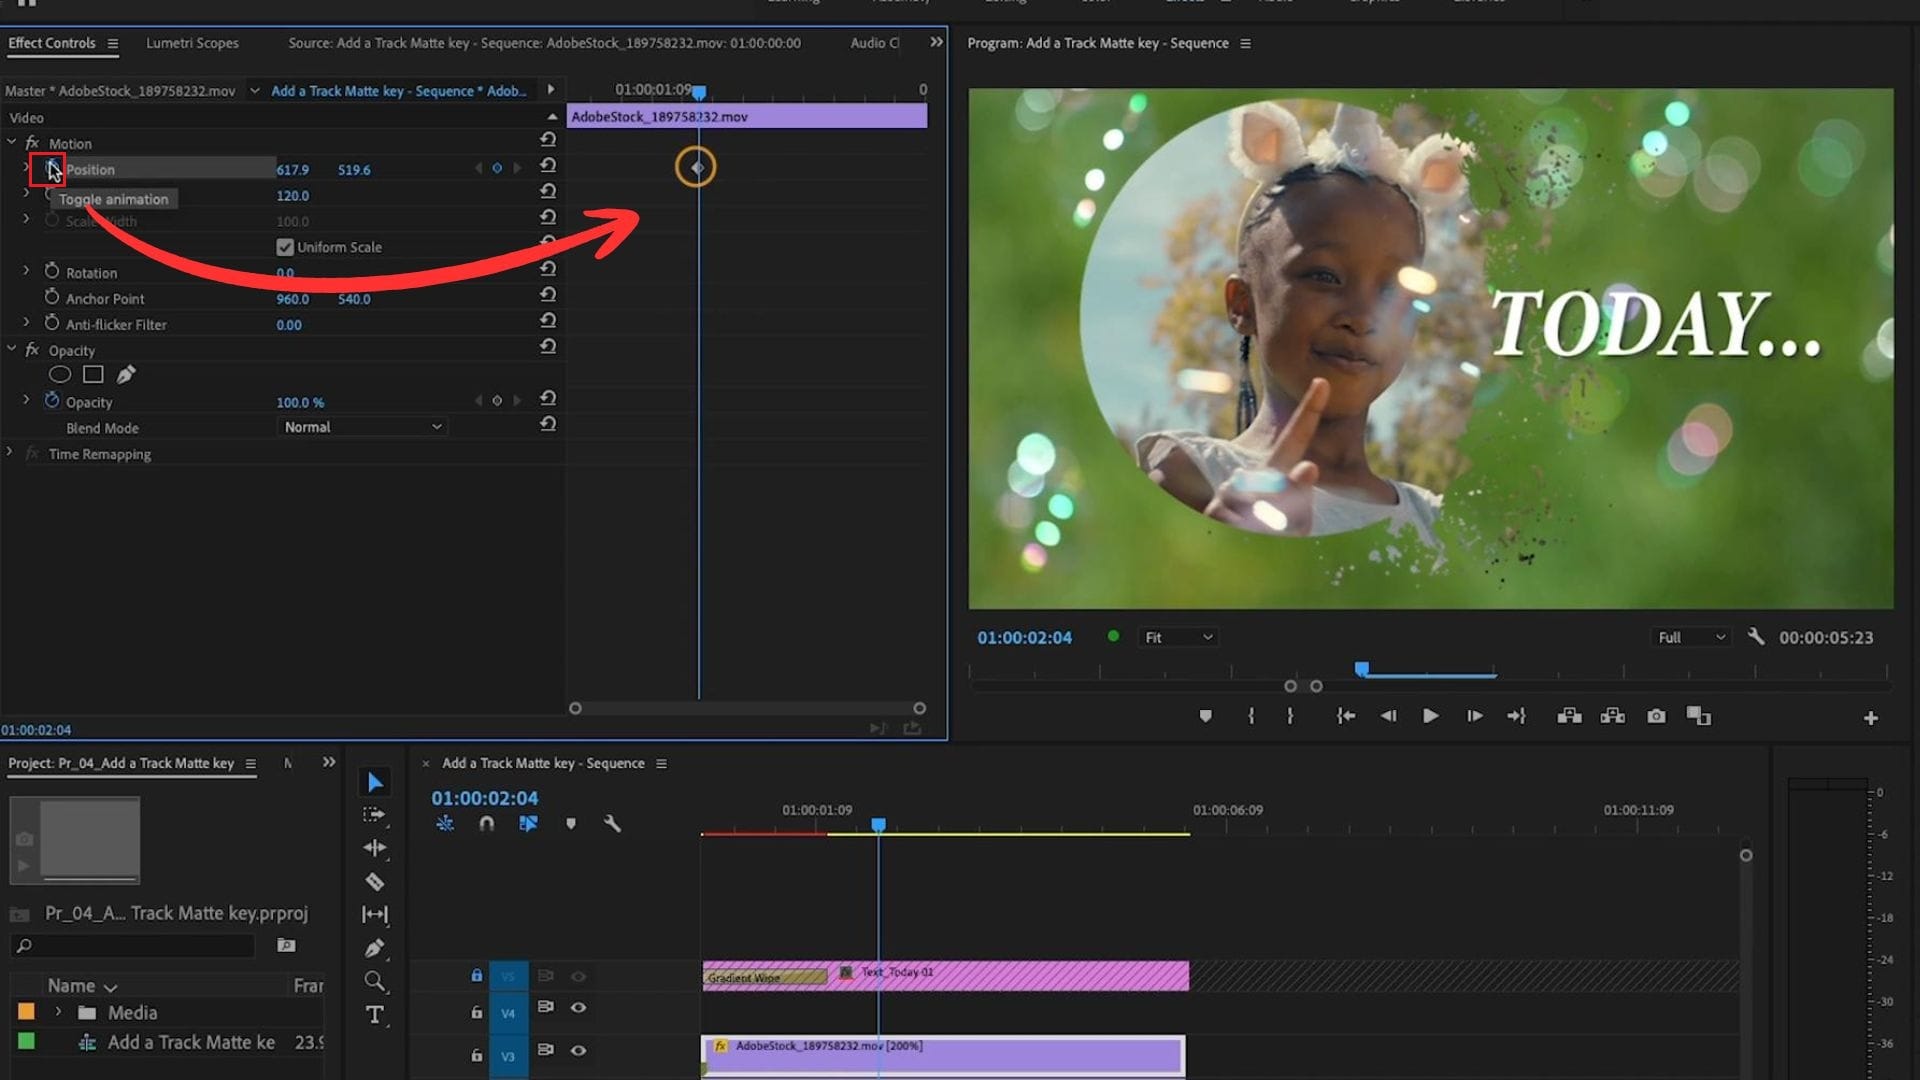
- Step 2. Add Keyframes to Create Motion
Open the Effect Controls panel and expand the Motion section. You'll see controls such as Position and Scale. Click the stopwatch next to Position (or any property you want to animate) to create your first keyframe.
Move the playhead forward to the point where you want the matte animation to finish. Then, reposition the matte in the Program Monitor. Premiere automatically creates another Position keyframe to create the movement between the two points.
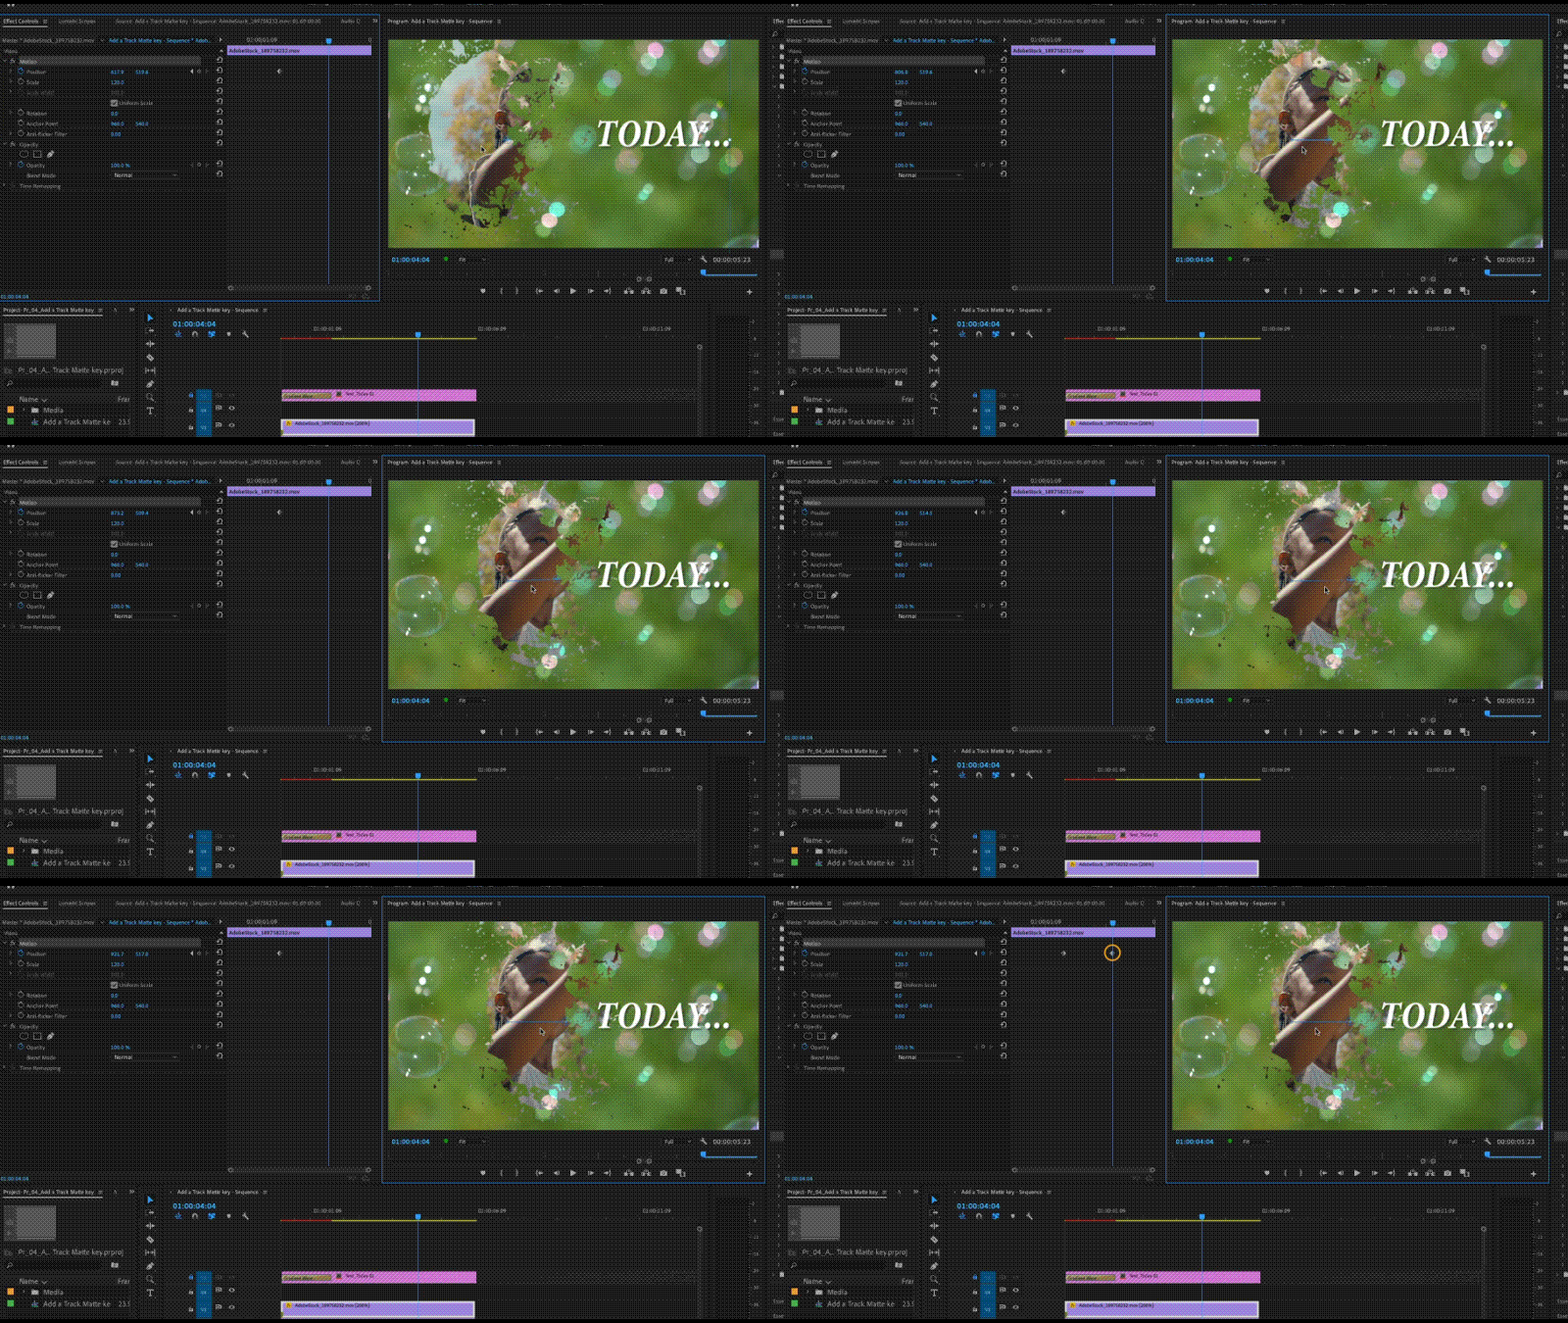
Press Spacebar to preview the animation. You can use animated track matte effects for:
- Text reveals
- Video sliding through a shape
- Moving logo reveals
- Wipe-style transitions
- Animated title sequences
- Creative graphic transitions
Part 4. Common Track Matte Problems and How to Fix Them
Is your Premiere Pro track matte not working as expected? A track matte can stop working if the wrong clip is selected, the matte is on the wrong track, or the settings don't match the asset. Below are some common problems and fixes you can try.
Issue #1: The Track Matte Effect Not Working
Common Causes: If nothing appears to happen after applying Track Matte Key in Premiere, it may be because of mismatched clip and matte settings. Nothing will register if the effect is placed on the wrong clip or if Premiere Pro isn't pointing to the track that contains your matte.
How to Fix:
- Check that the effect is applied to the foreground clip and not the matte.
- Try switching between Matte Alpha and Matte Luma to see which one reads your matte correctly.
Issue #2: The Background Disappears
Common Causes: The matte may be revealing the foreground clip across more of the frame than expected. This can happen when using the wrong Composite Using option, an inverted matte, or a matte with large white or opaque areas.
How to Fix:
- Make sure the background clip is on a track below the foreground clip.
- Check whether you're using Matte Alpha or Matte Luma correctly.
- If you're using Matte Luma, check the matte's black, white, and gray areas.
- Turn off Reverse if the matte is inverted.
Issue #3: The Matte Doesn’t Move with the Effect
Common Causes: The foreground clip and matte are separate clips, so moving one does not automatically move the other. If you've animated the foreground but left the matte in place, the reveal can appear out of sync.
How to Fix:
- Select the matte clip and add keyframes to Position so it follows the desired movement.
- If you need the matte to scale or rotate with the effect, add keyframes to Scale or Rotation as well.
- Move and adjust the matte keyframes until the reveal lines up with the foreground animation.
Bonus: Create Track Matte Effects More Easily with Filmora
Track matte is not a feature exclusive to Premiere Pro. If you want a faster route to similar results, or you’re working on a lighter machine, Wondershare Filmora offers a built-in Track Matte feature in the Properties panel.

Filmora is a more lightweight and beginner-friendly alternative to full-scale editors like Premiere Pro, while still giving you the tools to create layered video effects. The workflow for track matte is similar to what you already know from Premiere Pro, but with a simpler setup and fewer steps to get the effect working.
- Simpler setup: Enable Track Matte directly from the Properties panel instead of adding a separate effect.
- Lighter editing experience: A more lightweight option that’s easier to run and navigate.
- Familiar controls: Choose a matte source track and use Matte Alpha or Matte Luma, similar to the concepts you're already familiar with.
- Stable track connection: Filmora keeps the matte source linked to its Track ID, so the relationship between the target clip and matte can remain intact even when the track order changes.
- Quickly invert the matte: Use Reverse to swap the visible and hidden areas.
- Animate the effect: Add keyframes to create moving or changing matte effects.
- Vast video/audio effects and creative assets.
- Powerful AI for effortless content creation.
- Intuitive, professional yet beginner-friendly.
- Works on Mac, Windows, iOS, and Android.



How to Use Track Matte in Filmora
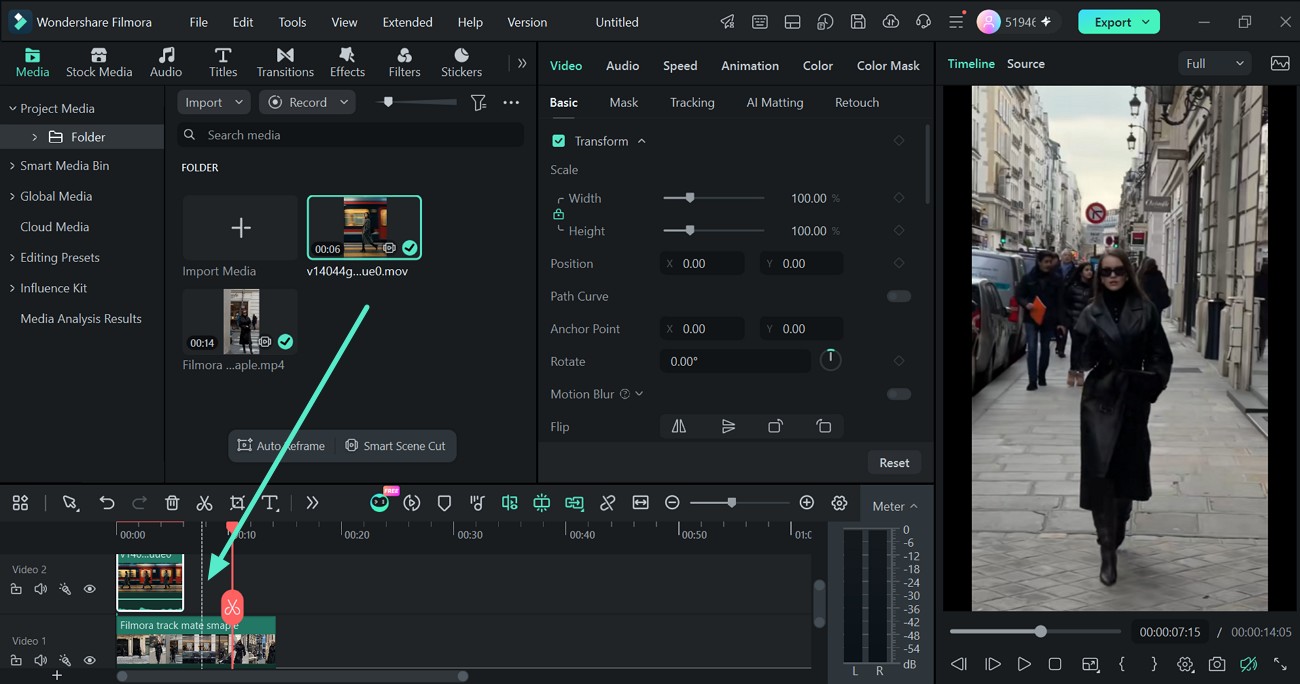
- Step 1. Add Your Clips to the Timeline
Open Filmora to create a new project. Then, import your background, foreground, and matte assets into Filmora.
 secure download
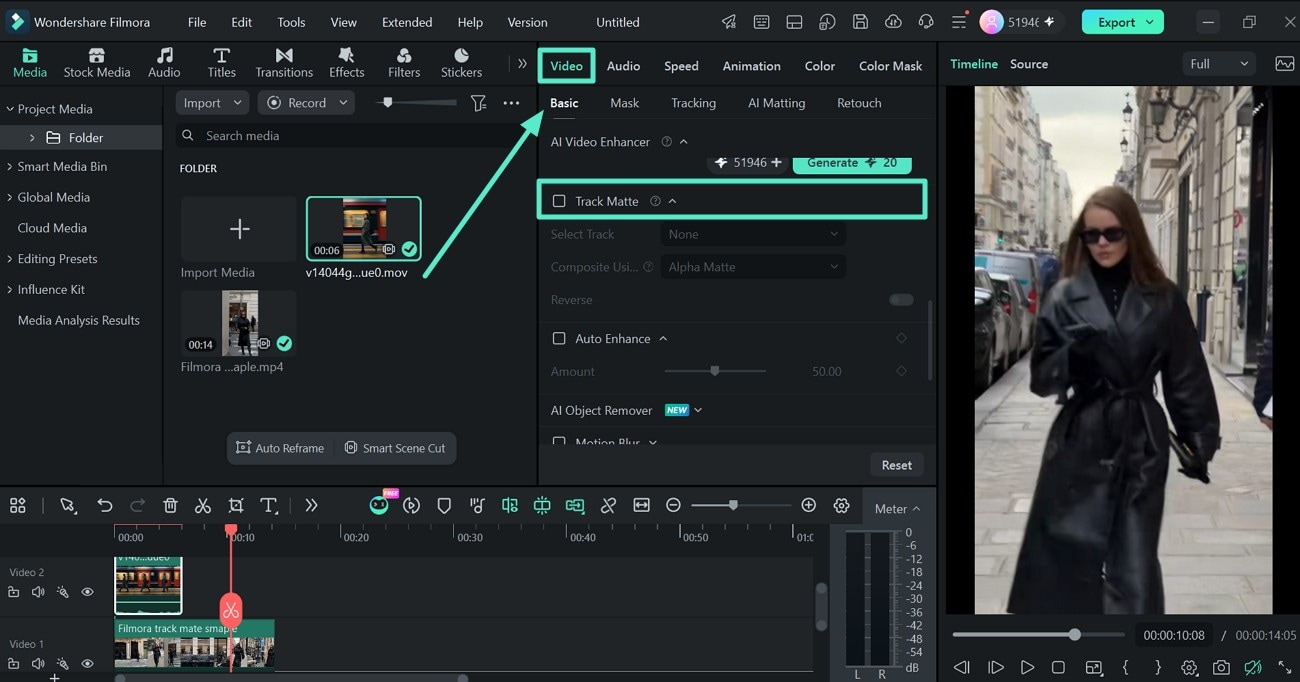
 - Step 2. Select the Foreground Clip
Click the foreground clip that you want the matte to control. Then, open the Properties panel and go to Video > Basic > Track Matte. Turn on Track Matte.
- Step 3. Choose the Matte Source and Composite Method
Under Select Track, choose the video track containing your matte. Filmora uses this track to determine which parts of the foreground clip remain visible.
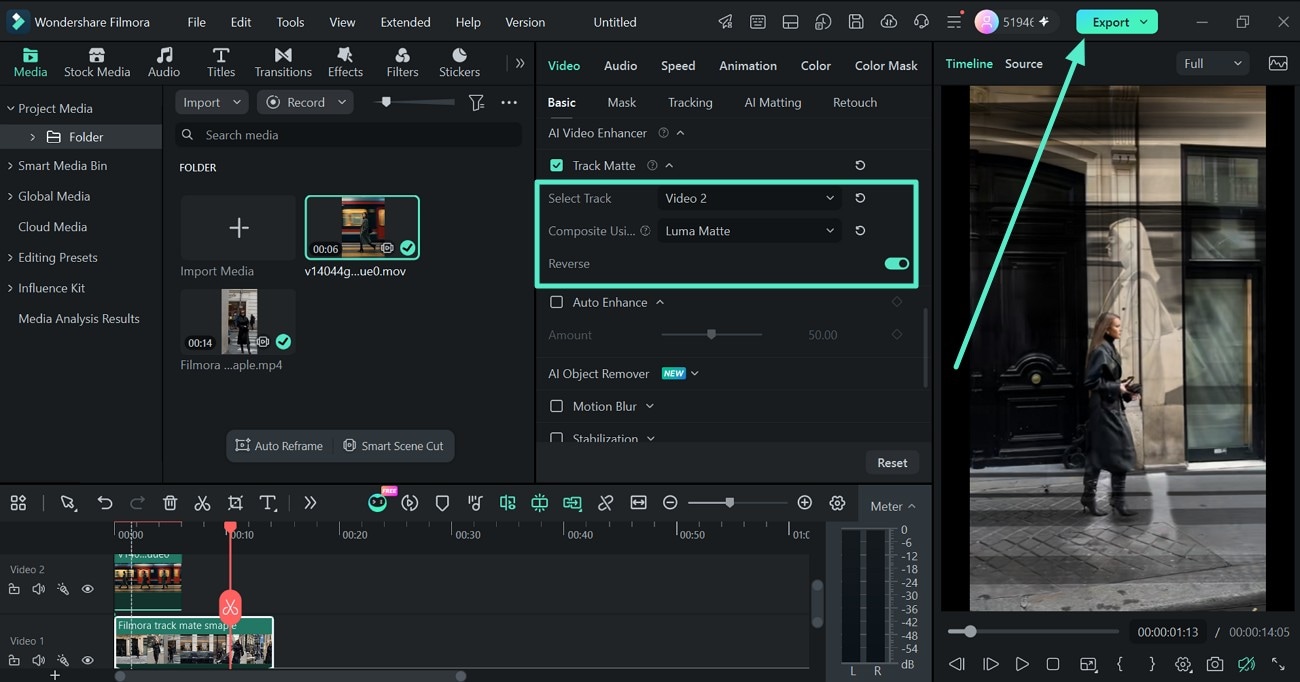
Under Composite Using, choose Matte Alpha or Matte Luma:
- Matte Alpha uses the matte's transparency.
- Matte Luma uses its brightness values.
You can also turn on Reverse if you want to swap the visible and hidden areas.
Conclusion
When you want to reveal part of a clip using text, shapes, or another video, Track Matte Key in Premiere Pro is the tool you are after. It lets you use one clip to control which areas of another clip remain visible. Choose between Matte Alpha and Matte Luma based on how your matte is created, then use keyframes to animate the effect.
For a more lightweight option, Filmora also offers a built-in Track Matte feature with similar controls. You can select the matte track, choose Matte Alpha or Matte Luma, reverse the effect, and add keyframes without adding a separate Track Matte Key effect.
