
 100% Security Verified | No Subscription Required | No Malware


 ChatGPT
 Perplexity
 Gemini
 Claude
 Grok
Grok
Losing a loved one is a challenging journey. Honoring their memory can provide comfort during difficult times. Creating a heartfelt slideshow is a meaningful way to celebrate their life and legacy. But how to make a slideshow for a funeral that truly captures their essence?
If you're unsure where to start, this guide will show you how to make a memorial slideshow step by step. It covers organizing cherished memories, choosing the right tools, and designing a personal tribute. Follow this tutorial to create a beautiful slideshow and honor your loved one's memory!

In this article
Part 1. Gathering and Organizing Content
Creating a meaningful slideshow begins with thoughtful preparation. A well-curated selection of content ensures the slideshow beautifully reflects your loved one's life and legacy. If you're wondering how to make a slide show for a funeral, this step is crucial to capturing the essence of their story.
1. Collect Meaningful Photos and Videos
Start by gathering photos and video clips that capture the important moments of their life. Include milestones like graduations, weddings, and personal achievements. Plus, special occasions, like family gatherings, and cherished hobbies. Ask friends and family contributions to help you uncover hidden gems and make the slideshow more personal.

2. Organize Chronologically or Thematically
Before creating a slideshow for a funeral, decide how to arrange the content to tell their story in a cohesive flow.
- Chronological Order: Showcase their life journey from birth to the present. This approach offers a timeline of significant events.
- Thematic Grouping: Organize content by themes such as family, friends, hobbies, or travel. This structure highlights different aspects of their personality and interests.

3. Digitalize the Old Photos and Videos
For older physical photos or VHS tapes, convert them into digital formats to include in the slideshow. Use a scanner, photo digitizing service, or apps like PhotoScan by Google Photos. For VHS tapes, consider using a video capture device or professional digitization services.

Gathering and organizing the content thoughtfully ensures that your slideshow is both heartfelt and cohesive. In the next step, we'll explore how to choose the right tools to make a funeral slideshow.
Part 2. Selecting the Right Tool to Make a Slideshow for a Funeral
Choosing the right funeral slideshow maker can simplify the process while achieving professional and heartfelt results. Instead of manually piecing together photos and videos, using a memorial video maker allows you to focus on honoring your loved one's memory.
- A variety of templates for easy video creation.
- Vast video/audio effects and creative assets.
- Powerful AI for effortless content creation.
- Intuitive, professional yet beginner-friendly.
- Works on Mac, Windows, iOS, and Android.


Why Choose Wondershare Filmora for Creating a Slideshow for a Funeral
Wondershare Filmora is an excellent choice when you need to create a slideshow for a funeral. It has a user-friendly interface and powerful features that suit both beginners and experienced users. Below are some highlights that set Filmora apart:
Select from a variety of royalty-free music or use the AI Music feature to generate an emotional soundtrack. This feature helps set the right tone without requiring any music editing expertise to create a memorial video.

If you're unsure how to phrase certain messages, don't worry! Filmora's AI Copywriting feature can suggest heartfelt captions or titles to accompany your images.

You can seamlessly blend photos and videos with transitions and effects that suit a memorial theme. This feature creates a polished final slideshow.

By using a tool like Filmora, you can create a memorial slideshow that reflects your loved one's life. In the next section, we'll explore how to design your slideshow and bring all the elements together in a meaningful way.
Part 3. Designing the Slideshow
Now that you've gathered all your content and selected the best tool, it's time to learn how to make a memorial video using Filmora. In this section, we'll provide a step-by-step guide on using Filmora's powerful features mentioned above. By the end of this process, you'll have a memorial slideshow that beautifully celebrates your loved one's life.
Here's the step-by-step guide on how to make a slideshow for a funeral using Filmora:
Step 1 Import Your Media
Open Wondershare Filmora and start a New Project dedicated to the memorial slideshow. Go to Media > Project Media > Import to bring the photos and videos you want to include. This action centralizes all your content, making it easy to access while you create the slideshow. Then, drag and drop these files onto the timeline.

Step 2 Adjust the Photo Duration
By default, photos only have a short duration of less than 1 second. To ensure each memory has enough time on screen, adjust the photo duration. Right-click a photo in the timeline, select Duration, and choose how many seconds you'd like it displayed.
Tip: Consistent durations across photos create a steady pace. But, feel free to vary the timing for especially meaningful images.

Then, a pop-up window will show the Duration Setting. Change the duration by sliding the Input Duration time, and then click Save. You need to apply this setting to all of the photos you put in the timeline.

Step 3 Add Slideshow Effects to Your Photos
To create a slideshow effect for your video, go to Effects > Video Effects and search for the Slideshow category. Drag and drop an effect that complements your tribute's theme onto each photo in the timeline.

Step 4 Add Transitions and Effects
You can add transitions to your memorial video to create a seamless flow. Navigate to Transitions > Transitions > Slides and look for subtle transition effects to maintain a respectful tone. Then, drag and drop it between photos or clips to ensure smooth changes from one moment to the next.
Tip: The duration of transitions is adjustable. To change how long a transition lasts, right-click it in the timeline and select Duration.

Step 5 Incorporate Text and AI Copywriting
Go to the Titles panel to add titles, captions, or dates that are meaningful to your loved one's story. Then, drag your chosen title onto the timeline for your slideshow.

Customize the text to include your loved one's name or a thoughtful message. To do this, click on the title clip in the timeline and navigate to Text > Basic on the right side of the screen.

If you need help finding the right words, use Filmora's AI Copywriting feature. Click on the AI icon above the text box to open a pop-up window.

Enter specific details about the person or the tone you want, then click Generate to receive caption suggestions.

Step 6 Add Background Music
Adding music helps you to set the emotional tone of the memorial slideshow. To add royalty-free music in Filmora, go to Audio > Music and enter keywords like “memorial” or “tribute” in the search bar. Browse through the available tracks and pick one that best reflects the tone you want to convey.

If you don't find a suitable track, you can use Filmora's AI Music Generator to create a custom piece. Go to Audio > AI Music and click the Plus icon to set your preferred Mood, Theme, and Genre. Under Settings, adjust the Tempo and Music Duration, then click Generate. Once your unique track is ready, download it and drag it onto your timeline.

Step 7 Review and Export
Preview the entire slideshow in the preview window. Check for timing issues or abrupt transitions, then make adjustments as needed. This final review ensures your tribute flows smoothly and respects the memory of your loved one.
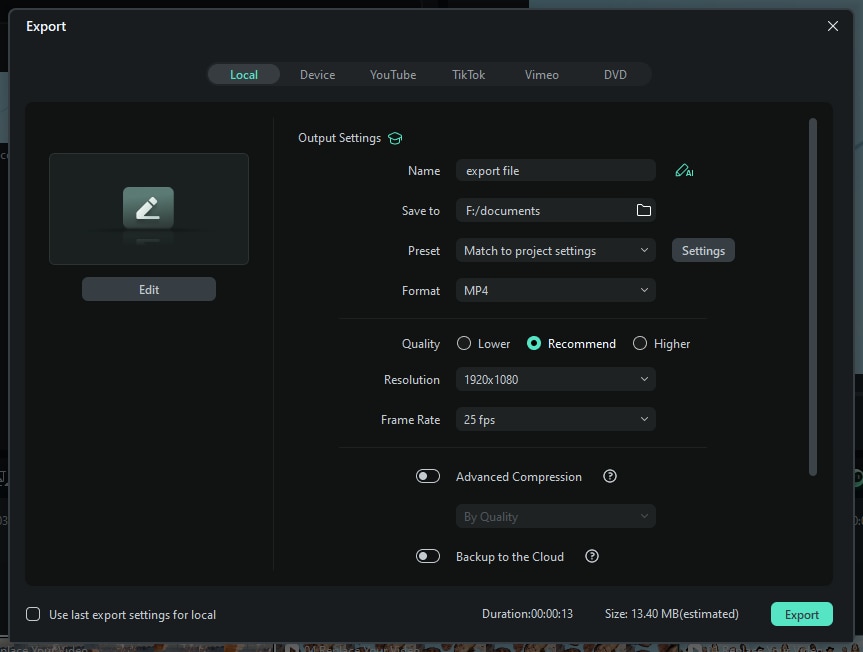
If you're satisfied with the result, click Export at the top right of your screen. Then, a pop-up window will show the export window. Select Local and set the output settings before clicking Export to save it to your computer.
Following these steps on how to make a slideshow for a funeral in Filmora will help you create a meaningful slideshow video. Then, you'll have a respectful, heartfelt slideshow that preserves your loved one's legacy.
Conclusion
Losing a loved one is never easy, but learning how to make a slideshow for a funeral can bring comfort to friends and family. By gathering photos, choosing heartfelt music, and adding personal messages, you can make a memorial video that honors their memory.
For more guidance on how to make a memorial slideshow in Filmora, follow the steps in this tutorial. It's a thoughtful way to share stories and celebrate the special moments of a life well-lived. Start today, and offer a heartfelt keepsake that helps everyone remember your loved one with warmth and gratitude!
