


 100% Security Verified | No Subscription Required | No Malware

In this article, we talk about how to make a Minecraft server. This article contains a lot of information about making a Minecraft server. So let's start.
Minecraft has been downloaded more than 100 million times throughout the globe. Adults and children worldwide are constructing together in online multiplayer environments to learn problem-solving skills, enhance their social skills, and unleash their creative juices. Minecraft has so many educational advantages that it's mind-boggling.
Players on public internet servers may cooperate in developing larger and better things that they could have done alone. Still, you cannot precisely control who connects to a public server and, therefore who your kid is engaging with online. It's a good thing! You'll be able to keep tabs on precisely who's interacting with & playing in your child's virtual worlds if you put up your own server.
We've put up a set of instructions to help you get started hosting your students on how to make a Minecraft server. All of them were made using students' familiar learning management system, iD Game Plan.
First, Importantly about how to make a Minecraft server...
These instructions are for parents assisting their children and should not be followed by anyone else. As a result, children must acquire parental permission and schedule a time to be supervised and assisted. To play in the Minecraft world, you will need to set up and maintain a Minecraft server on the internet. Consider who you invite to your server very carefully!
How to join a Minecraft server
Here we talk about the 12 steps for "how to join a Minecraft server or how to make a Minecraft server". These 12 steps for the information of "how to join a Minecraft server or how to make a Minecraft server" are following:
1.Checking to Make Sure Java Is the Latest Version
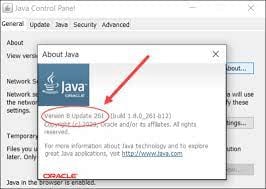
Checking to Make Sure Java Is the Latest Version is the first and important step about how to make a Minecraft server or how to join a Minecraft server. We'll start by checking to see whether you're running the most recent version of Java since Minecraft is built on it. Otherwise, you may get a copy of Java here.
Need Help Troubleshooting?
Consult the Minecraft online server setup page on the Wiki for further info… Please be aware that some fixes to server problems include changes to essential computer settings. If you do this incorrectly, you might damage your computer.
2.Minecraft_Server.jar

It is necessary, to begin with, the server files. Mojang offers these for free on their website:
- Download Minecraft server.1.11.jar from the Minecraft Server Downloads page.
- Copy Minecraft server when the download is complete. Create a new folder on the desktop called "Minecraft Server" and extract the contents of version 1.11.jar there.
- Right-click Minecraft server and select double-click. Run it using 1.11.jar
You'll notice a few new files in the folder as well.
3.Version of Minecraft
A version of Minecraft is the third and important step in the study of how to join a Minecraft server or how to make a Minecraft server. There is no need to worry about the "1.11" being changed with the new version number if Minecraft upgrades!
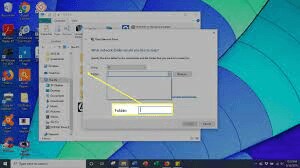
4.A Batch File to Start a Server.
- The Minecraft Server.1.11.jar should be located in the Server folder, so do a right-click there.
- Select New > Text Document.
- Name the new document "Run".
- Paste the following text into your Notepad document: Minecraft server.1.11.jar is a jar file that may be run from the command line.
Important
•Change "Minecraft server.1.11.jar" to the name of the version of the server you're using if you're using a different version.
• Now save as just a batch file, which Windows utilizes to execute tasks from the command line.
- Click File > Save As.
- Make sure that the Save as Type option is set to All Files.
- Set the file name to "Run.bat".
5.Accepting the EULA
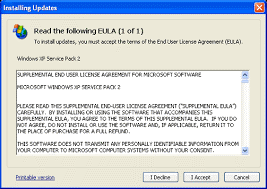
Accepting the EULA is the fifth and important step in the study of how to join a Minecraft server. Before creating a Minecraft server, you must agree to the terms of a licensing agreement provided by Mojang. Eula.txt will need to be edited to signify that you accept the terms.
- Double-click eula.txt to open it.
- Read the EULA here, copy the file's content, and paste it into your browser.
- Replace eula="false" with eula="true" on line 2.
6.Your Server Is Ready to Go!
The server is now up and running!
To get your server up and running, just double-click Run.bat.
Your server's information will be shown in a new window. Players will be able to join your server as long as you keep this window open!
7.The Server Window

Even if you're not playing the game, your server gives you some useful information about what's going on.
- This information is available in the Stats section.
- If you'd want to see who's online, you may check out the Players panel.
- Messages sent by the server and received by players are both shown in the Log & Chat tab. 3.
- In the bottom-right corner of the screen, you may input server instructions.
- A server's commands
For more skilled users, server commands provide them additional power. This page contains a comprehensive list of all available commands.
8.Joining Your Server
Joining your server is the eighth step in studying how to join a Minecraft server. Your Minecraft server is now available for connection.
- Start Minecraft and see what happens.
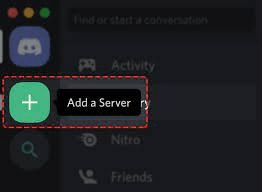
- Click Multiplayer from the main menu.
- Click on The add Server icon to get started.
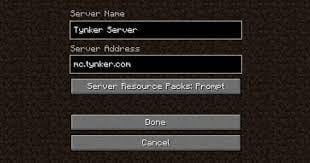
- In the Server Name area, enter the name of your server.
- When prompted, enter "localhost" for the Server Address.
- Click Done.
- Click on the server you want to join.
Your home server should now be available for gaming. This step will prepare your internet connection so that other gamers may connect to your server.
9.Port Forwarding
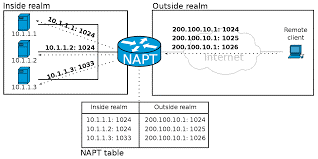
Next, you'll need to change the settings on the router so that other people may access your computer via it. Depending on the kind of router you have, this method will be different for each individual.
- This website on portforward.com provides some basic information about port forwarding before you get started.
- A list of port forwarding guidelines may be found here.
- Select your router's brand and model from the list, and then follow the instructions given to configure it.
Is The Router Not Included in the Listed?
• There is a good chance that you will be able to locate the manufacturer but not your model. Follow the instructions for the model number that is the closest match to yours. Often, they're the same thing.
• Go online and look for "port forwarding" and the model number of your router.
• Contact the router's customer service and inquire about port forwarding.
10.Finding Your External IP Address
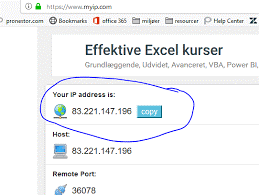
To determine your external IP address, you'll first need to forward your ports.
- Go to google.com and type in your search term.
- Using the search field, type "external IP" and hit Enter or Return.
- The external IP address may be found by searching for it on Google
Any of the following instances might serve as an example of your external IP address in Internet Protocol version 4 or version 6.
- A sample IPv4 address is 12.34.456.789:
- Address 2001:0db8 000:0000 0000:0001 is an example of an IPv6 address.
To make it easier for other users to connect to the server, remember your external IP address.
11.Connecting to Your Server
Other players will be able to connect to your server using your external IP address now that you've port-forwarded your connection. The following are the processes that new players should take while joining your server:
- Open the Multiplayer option in Minecraft.
- To add a new server, click the Add Server option.
- Enter the name of the server.
- It's time to type in the server's URL.
A port number of 25565 is your external IP address. On the right, you can see an example of the address.
Your IPv6 address should be included in the following [] characters: [2001:0db8:0a0b:12f0:0000:0000:0000:0001]:25565
- When you're finished, click the Done button. In the meanwhile, Minecraft is attempting to communicate with the server. Once you've connected, pick the server & click the Join Server button.
Inviting Players to Join
• Anyone who knows the external IP address may join your Minecraft server. Make sure you have faith in the people you ask to play with you. Only those you know should be invited. Before bringing in new members, make sure to check with your parents first.
12.Server.properties File
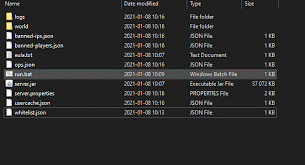
Server.properties, a file located in the Server folder, is another place where you may make changes to the game.
You may modify the file's lines in any text editor to alter the attributes of your Minecraft environment.
Changes to these attributes are the most prevalent.
- Change gamemode=0 to gamemode=1 to activate creative mode on your server.
- Change the value of maxplayers=20 to raise or reduce the maximum number of players that may simultaneously join your server.
The Minecraft Wiki has a comprehensive list of all the possible settings.
Editing Server Properties
You don't need to alter anything in this file for your server to operate. Changes to the file should only be made when you are confident in your abilities.
Recap
- Never build an internet server without first getting your parents' approval!
- To enable people to join your server, you must access the server software via Minecraft and perform port forwarding.
Conclusion
The process of setting up a Minecraft server is admittedly time-consuming and difficult. Even though it's a challenge in and of itself, ensuring that all of the steps in the process are completed correctly is entirely doable. If you're willing to put in the effort, however, the reward can be worth it, especially when you and your friends get to perform in your private virtual world.
For Win 7 or later (64-bit)
For macOS 10.12 or later
