
 100% Security Verified | No Subscription Required | No Malware


 ChatGPT
 Perplexity
 Gemini
 Claude
 Grok
Grok
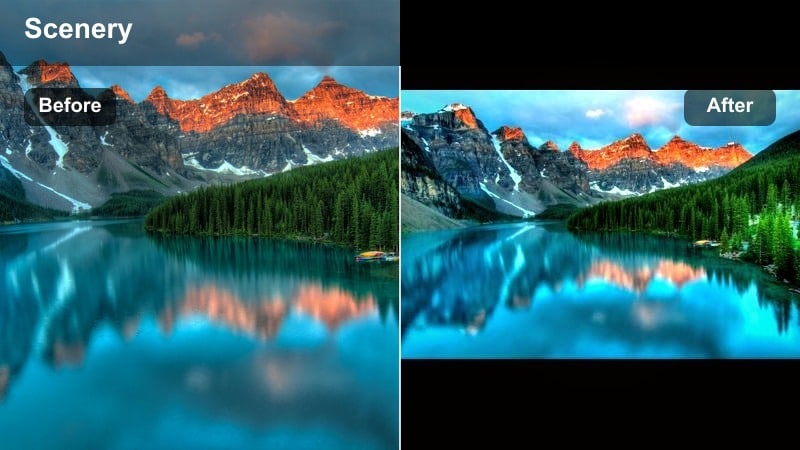
Moody mountain video filters help photographers and filmmakers turn flat outdoor footage into atmospheric mountain stories filled with fog, contrast, and drama. With the right presets, rocky ridgelines, low clouds, and distant valleys gain depth and emotion in just a few clicks.
This guide showcases the Moody Mountain Filter. Misty Ridge preset and a complete set of dark alpine looks tailored for moody mountain scenes. Use them inside Filmora to quickly dial in cinematic tones for hiking films, travel vlogs, and narrative projects set in high, rugged landscapes.
In this article
Signature Moody Mountain Looks
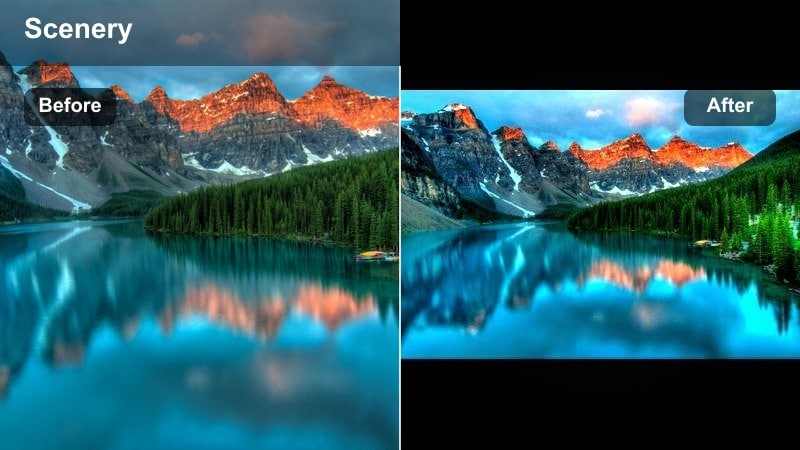
Moody Mountain Filter. Misty Ridge
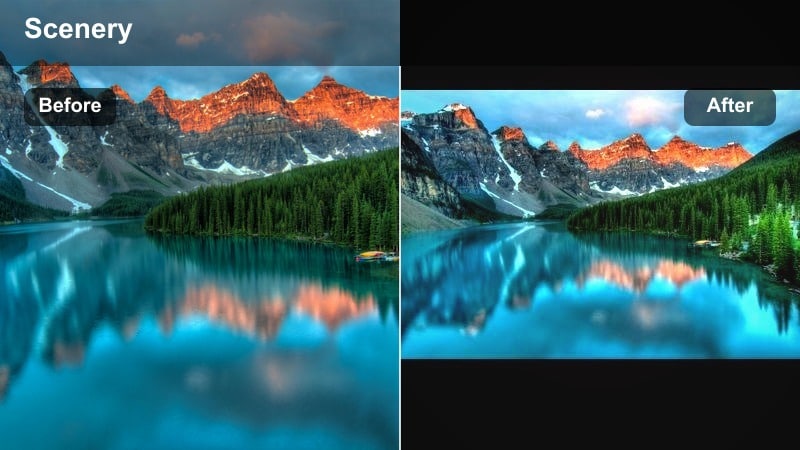
- Effect look: Soft, low-contrast mist with lifted blacks and cool blue-greens that wrap your mountains in gentle fog and subtle film grain.
- Best for: Overcast ridge hikes, early morning trail sequences, and any atmospheric mountain scene that feels calm but mysterious.
- Editing tip: Lower overall contrast slightly, then add a gentle vignette to keep attention on the central peak while preserving detail in the clouds.
This signature Filmora preset creates dreamy, mist-wrapped mountains with soft tones and a subdued, cinematic palette. It works especially well on footage shot in flat or overcast light, adding depth to low-contrast scenes without pushing colors into anything too stylized.
In Filmora, apply Misty Ridge to your entire sequence, then fine-tune intensity and contrast on an adjustment layer. Use masks to keep foreground hikers or tents a touch brighter and sharper than the foggy background so the atmospheric mountain layers stay moody while your main subject remains clear.
Pro tip: Balance foggy softness with subject clarity
After applying Misty Ridge, pull down clarity or sharpness slightly on the background while masking and preserving detail on your main subject in the midground.
This separation keeps the mountains dreamy and atmospheric mountain layers intact while ensuring hikers, tents, or foreground rocks remain crisp and readable on smaller screens.
Boost Moody Mountain Filters with AI-Powered Color Control
Filmora’s AI-driven color tools make it easier to refine moody mountain video filters so they fit each location’s unique light and weather. Instead of starting every grade from scratch, you can load presets like Moody Mountain Filter. Misty Ridge, then lean on AI color tuning to adapt the mood from misty mornings to stormy afternoons.
Use AI to quickly balance exposure between sky and foreground, even out color casts from mixed light, and protect skin tones in front of dark alpine backdrops. This lets photographers and filmmakers focus on creative choices, not technical corrections, while preserving the atmospheric mountain character of each scene.
 secure download

See Moody Mountain Filters in Action on Real Footage
Before committing to a full grade, test how each dark alpine filter behaves across wide shots, mediums, and close-ups in your timeline. Apply a preset to a short sequence with varied angles, then toggle it on and off to see how well it keeps detail in clouds, treelines, and faces.
Pay attention to how Misty Ridge and its companion looks handle tricky transitions, like moving from a shaded forest to an exposed ridge. Adjust intensity and basic contrast so your footage stays consistent shot to shot, while maintaining the moody mountain atmosphere you are aiming for.
secure downloadCombine Filters and LUTs for Consistent Mountain Stories
For longer films or multi-day mountain projects, pairing Filmora filters with LUTs helps ensure visual consistency from the trailhead to the summit. Start by choosing a core moody mountain filter that defines your base look, then reinforce it with a LUT that keeps color balance and contrast steady across changing weather and light.
Once your base combination is set, you can make small per-shot tweaks instead of rebuilding the grade every time the clouds shift. This workflow is especially useful for adventure filmmakers and photographers cutting reels, where cohesive dark alpine tones are key to a professional, cinematic finish.
secure downloadTwilight Ridge Fade
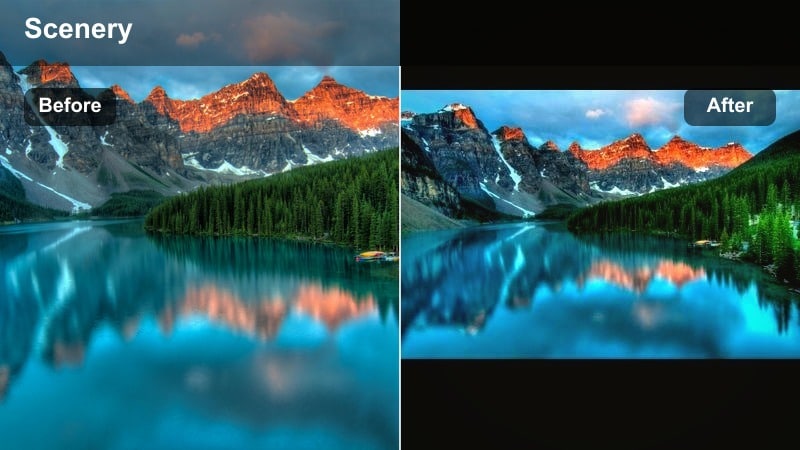
- Effect look: Dusky blue shadows with gently faded highlights for a late-evening, almost-night mood across distant mountain silhouettes.
- Best for: Blue hour timelapses, drone passes over dark alpine valleys, and moody closing shots before a scene fades to black.
- Editing tip: Reduce saturation in warm tones and slightly boost blues in the shadows to avoid muddy color mixes in low-light mountain shots.
Twilight Ridge Fade cools down your footage and softens bright areas so peaks read as clean silhouettes against a deepening sky. It is ideal for creating transitions from day to night, or for ending sequences with a calm yet mysterious blue-hour feel.
In Filmora, pair this filter with gentle fades to black and slower cuts between shots. Fine-tune the blue saturation and use the highlight and shadow tools to retain subtle detail in trees and rock faces, avoiding banding in deep shadows.
Pro tip: Protect detail in low-light mountain shadows
Enable Filmora’s highlight and shadow controls after applying this filter, lifting only the deepest blacks to keep texture in tree lines and rock faces.
This avoids banding and noise while preserving the impression of deep, atmospheric darkness in your alpine scenery.
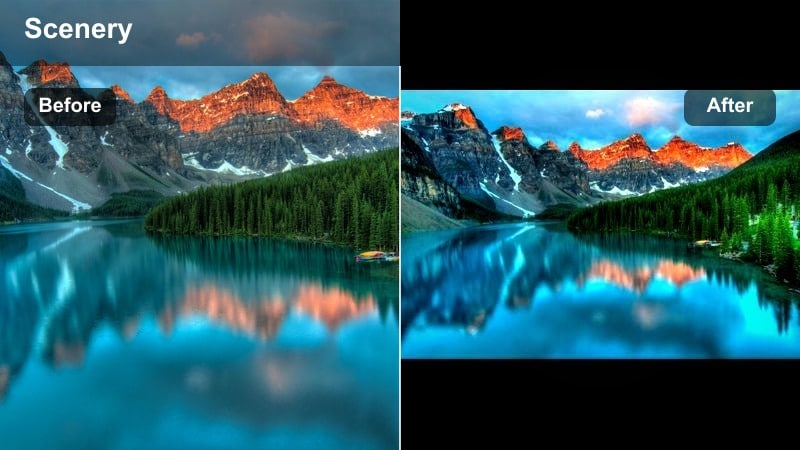
Stormveil Overlook

- Effect look: High-drama clouds with deepened midtones and a subtle cool-green cast that makes approaching storms feel heavy and cinematic.
- Best for: Stormy passes, wind-whipped ridges, and narrative cutaways that need an ominous, tense mountain mood.
- Editing tip: Add a slight push to local contrast in the clouds to emphasize shape and texture, while masking off faces or foreground subjects.
Stormveil Overlook turns incoming weather into a central storytelling device, amplifying cloud formations and shadowy slopes. It deepens the overall scene while keeping highlights controlled, so lightning gaps and bright cloud edges still read clearly.
Inside Filmora, combine this look with increased local contrast on the sky using masks, while slightly lifting exposure on your talent. This way, the storm feels heavy and threatening without losing important detail in people or gear.
Pro tip: Use movement to sell the storm mood
Pair this filter with slow pans or time-lapse clips so viewers can watch cloud layers roll and shift across the peaks.
The combination of motion and moody grading creates a powerful sense of incoming weather and narrative tension.
Dark Alpine Depth and Contrast
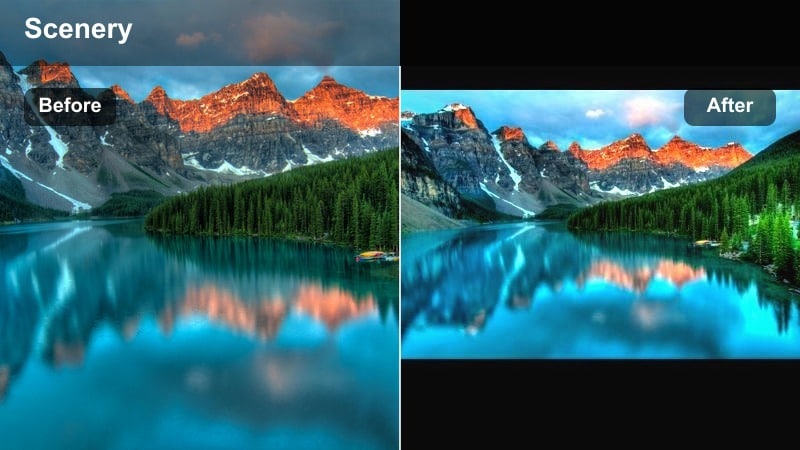
Shadowed Spire
- Effect look: Strong contrast, crushed shadows, and neutral highlights that carve rugged detail into steep cliffs and peaks.
- Best for: High-contrast midday footage, steep rock faces, and summit sequences that need bold definition and grit.
- Editing tip: Ease back the blacks slider if skin tones appear too harsh, and use selective color to keep greens from turning neon.
Shadowed Spire is built for dramatic rock textures and steep faces that benefit from extra structure. By deepening shadows and sharpening contrast, it turns otherwise flat midday footage into bold, sculpted alpine scenes.
In Filmora, apply this filter to summit reveals and cliff-side shots, then refine with the curves tool to avoid clipping. Add a small exposure boost on your main subject so eyes naturally lock onto the brightest point within the darker environment.
Pro tip: Anchor eyes with a bright focal point
After grading, add a subtle exposure lift or mask on the summit or central subject to guide attention in this high-contrast look.
This keeps the image readable even when much of the surrounding alpine terrain dips into deep shadow.
Ravine Ember

- Effect look: Dark ravine shadows with a faint warm tint in the midtones that suggests distant campfires or sunset glow.
- Best for: Campsite scenes in steep valleys, moody B-roll of forests between mountains, and intro shots for adventure films.
- Editing tip: Boost orange and red saturation slightly while leaving blues cooler to create a cinematic color contrast between sky and ground.
Ravine Ember adds narrative warmth to otherwise dark valley scenes, making lanterns, tents, and fires feel inviting against cool rock walls. It is ideal for evening camp sequences or story beats that highlight rest and connection.
In Filmora, emphasize the warm-cool split by increasing saturation in orange midtones while keeping blues subdued. Use masks to locally enhance campfires or lamps so the viewer immediately senses a human presence in the dark alpine environment.
Pro tip: Use masks for believable firelight
Mask around fires, lanterns, or tents and lift warmth and exposure locally to enhance the illusion of real light sources.
This selective approach reinforces depth and keeps the broader alpine environment moody and subdued.
Abyssal Pass

- Effect look: Desaturated colors with deep, cool shadows and a slight cyan tint in the distance for a harsh, isolated mountain crossing.
- Best for: High-altitude passes, snow-dusted ridges, and narrative sequences focused on endurance and isolation.
- Editing tip: Carefully apply noise reduction to shadow areas in low-light footage to keep the moody look clean and cinematic.
Abyssal Pass strips away much of the color in your footage, leaving behind a bleak, cool-toned palette that emphasizes hardship and distance. It makes remote terrain feel larger, harsher, and more unforgiving.
Use this filter in Filmora for story beats about struggle, solitude, or long crossings. Combine with subtle noise reduction on darker frames and restrained sharpening so the desaturated look stays smooth and professional, even in low light.
Pro tip: Lean into minimalism for emotional impact
Compose shots with simple, strong lines and few colors so this filter can highlight the brutal simplicity of the alpine environment.
Combine with sparse sound design or ambient wind audio to reinforce the sense of isolation in your film or video.
Atmospheric Mountain Layers and Fog
Veil of Valleys

- Effect look: Softened midtones and raised blacks with subtle haze that emphasizes layered mountain silhouettes fading into the distance.
- Best for: Telephoto shots of stacked ridges, drone flyovers above low clouds, and poetic establishing shots.
- Editing tip: Pull back clarity globally but add a slight sharpness boost on the foremost ridge to preserve a clear focal layer.
Veil of Valleys enhances natural haze and atmospheric perspective, making each mountain layer feel distinct yet gently blended. It is perfect for establishing shots that show the scale and depth of your location.
In Filmora, apply this preset to wide or telephoto views and experiment with clarity and sharpness controls on different layers using masks. Keeping the closest ridge slightly crisper than the rest adds a natural focal point without breaking the dreamy mood.
Pro tip: Use long lenses to compress mountain layers
Shoot at longer focal lengths to stack ridges tightly, then apply this filter to accentuate the depth and separation between them.
The combination of compression and soft haze transforms simple landscapes into richly atmospheric mountain backdrops.
Cloudline Drift
- Effect look: Bright, milky fog with muted colors and slight coolness that lets clouds slip smoothly around peaks.
- Best for: Timelapses of rolling fog, slow gimbal moves along ridgelines, and aerial footage above a moving cloud deck.
- Editing tip: Gently lower saturation and introduce a tiny amount of film grain to avoid a plastic, overly digital look in large fog areas.
Cloudline Drift focuses on soft, shifting fog and how it interacts with ridges and cliffs. It brightens misty areas, reduces harsh contrast, and keeps colors subtle so movement in the clouds becomes the main visual interest.
Within Filmora, this filter shines on timelapse sequences and slow cinematic moves. After applying it, pull back overall saturation slightly and add a touch of film grain, which helps large areas of white fog feel organic rather than flat or artificial.
Pro tip: Match grade across time-lapse sequences
Apply this filter to a reference clip, then copy its settings across your time-lapse sequence to keep the fog’s tone and brightness consistent.
This workflow prevents distracting flicker and grading shifts as clouds thicken or thin over time.
Glacial Murmur

- Effect look: Cool blue-grays and soft cyan highlights with low saturation for icy, distant glaciers and snowfields.
- Best for: Glacier views, snowy saddles, and cold alpine lakes that should feel pristine, quiet, and slightly surreal.
- Editing tip: Lower luminance in bright snow slightly and add a gentle curve to preserve texture without blowing out highlights.
Glacial Murmur is tuned for snow, ice, and glacial environments, cooling the palette while keeping contrast gentle. It avoids overly bright, blown-out snow, instead delivering subtle texture and calm, frosty tones.
When grading in Filmora, apply this filter to snowy scenes and refine with the curves tool to hold detail in the whites. Use HSL or color tuning to keep skin tones neutral so people do not look blue while the environment stays distinctly icy.
Pro tip: Keep skin tones natural in cold scenes
Use Filmora’s HSL or color tuning tools to protect skin tones from becoming too blue or gray under this cool filter.
This balance allows people to look alive and relatable while the alpine environment stays crisp and frosty.
Story-Driven Mountain Moods
Pilgrim’s Dawn
- Effect look: Soft, low-contrast shadows with a gentle golden-green tint that suggests hopeful early-morning starts.
- Best for: Sunrise approaches to the trailhead, first steps on the path, and reflective narration over quiet mountain scenery.
- Editing tip: Use keyframed exposure ramps as the sun rises so brightness builds alongside your narrative arc.
Pilgrim’s Dawn captures the calm optimism of early morning in the mountains, with warm, subdued colors and gentle contrast. It is ideal for opening sequences or reflective voiceover moments that set up a journey.
In Filmora, apply this preset to your first scenes and gradually increase exposure and warmth with keyframes as the sun climbs. This visual progression mirrors your story’s build from anticipation to action.
Pro tip: Pair with subtle camera motion
Combine this filter with slow, forward gimbal movement to reinforce the sense of beginning a journey into the mountains.
The combination of motion and warming light builds emotional connection while keeping the scene quietly moody.
Summit Soliloquy
- Effect look: Mid-contrast, slightly desaturated tones with gentle cool highlights to convey introspective, quiet summit moments.
- Best for: Talking-head reflections at the top, solo portraits on ridges, and final shots before descending.
- Editing tip: Use Filmora’s face detection or masks to softly lift exposure and clarity on faces without brightening the whole frame.
Summit Soliloquy balances grand vistas with personal emotion, keeping colors muted and cool so expressions and small gestures stand out. It fits interviews or reflective monologues recorded at the top.
In Filmora, focus on skin tones and facial clarity by masking faces and slightly boosting exposure and sharpness, while leaving the environment gently subdued. This keeps the emphasis on what is being said without losing the presence of the mountain backdrop.
Pro tip: Let ambient sound carry the emotion
After grading, keep your audio mix simple with wind, distant birds, or quiet breathing instead of heavy music.
The restrained soundscape works with the gentle moody grade to make summit scenes feel honest and unforced.
Emberfall Descent

- Effect look: Warm, low sun glow in the highlights with deep, cool shadows for bittersweet descents and end-of-day journeys.
- Best for: Golden hour descents, walking away shots, and closing sequences that blend warmth and melancholy.
- Editing tip: Use subtle lens flare overlays or light leaks sparingly near the sun to accentuate the warm, fading glow.
Emberfall Descent mixes glowing sunset highlights with cooler valley shadows to capture the feeling of leaving the peaks behind. It is made for final sequences and outro scenes that carry both satisfaction and longing.
Inside Filmora, use this filter on backlit shots and walking-away compositions, adding gentle flares or light leaks only around the sun to avoid distraction. Slow down your edit pace so viewers can absorb the last look at the landscape.
Pro tip: Tie visuals to your story’s resolution
Place this filter on the final scenes of your film where the journey winds down to visually signal closure to your audience.
Combine with slower cuts and gentle camera moves to let viewers absorb the landscape one last time.
Tips for Using Mountain Moody Filters in Filmora
- Shoot in flat or log-like camera profiles when possible so moody mountain filters have enough dynamic range to work with.
- Bracket exposures for high-contrast scenes with bright snow and dark rock to avoid clipped highlights before grading.
- Use a polarizing filter on the lens to cut glare on wet rock and deepen sky tones before applying any video filter.
- Stabilize handheld mountain footage in Filmora before grading so motion feels smooth and cinematic with atmospheric looks.
- Keep your white balance slightly cool for mist and storm scenes, and closer to neutral or warm for golden hour filters.
- Mix wide establishing shots with close-ups of boots, gear, and rock texture so the moody grade has varied details to shape.
- Create a dedicated adjustment layer for global color tweaks above all clips, then apply individual filters beneath it.
- Regularly check your grade on both a bright laptop and a dim phone screen to ensure moody details remain visible.
Moody mountain video filters like the Moody Mountain Filter. Misty Ridge preset give photographers and filmmakers a fast, reliable way to turn raw alpine footage into cinematic, atmospheric mountain stories. By combining dark alpine contrast, layered fog, and careful color control, you can transform simple ridgelines and valleys into emotionally rich scenes.
Load these filters in Filmora, refine them with AI and basic color tools, and then build a repeatable workflow that fits your style and locations. The more consistently you shape your mountain visuals, the easier it becomes to deliver videos that feel cohesive, immersive, and unmistakably your own.
secure download