
 100% Security Verified | No Subscription Required | No Malware


 ChatGPT
 Perplexity
 Gemini
 Claude
 Grok
Grok
From communication to education, or whatever industry or business you are in, video presentations have become a powerful tool for several tasks. Unlike traditional slideshows, video presentations captivate audiences more effectively by incorporating dynamic elements such as animations, voiceovers, and background music. They allow for a more immersive experience, making conveying emotions, explaining complex ideas, and maintaining viewer engagement easier.
Despite the effectiveness of video presentations, many people are unaware that they can create them directly from Microsoft PowerPoint. If you're wondering how to create a video from a PowerPoint, the process is simpler than you might think. With just a few steps, a standard slideshow can be transformed into a compelling video that can be shared across multiple platforms. This article will guide you through how to create a video with PowerPoint, offering tips for enhancements and a polished finish using Filmora to create professional-looking presentations.

In this article
Part 1. How to Create Videos from PowerPoint Slides Without Extra Tools
After knowing that PowerPoint allows you to turn your slideshows into engaging videos, let's jump into the step-by-step process. You don't need any additional software-PowerPoint has built-in tools that allow you to create presentation videos seamlessly. Whether you're creating a training video, business presentation, or lecture, this method ensures a smooth transition from static slides to a polished video file.
Step 1: Open your PowerPoint presentation
Before converting your slideshow into a video, ensure your presentation is complete with all necessary animations, transitions, and multimedia elements. If you're wondering how to create a video from a PowerPoint, follow these steps:
Open the PowerPoint presentation you want to convert into a video. Click on the File > Export from the menu. Click Create a Video to access video conversion settings.
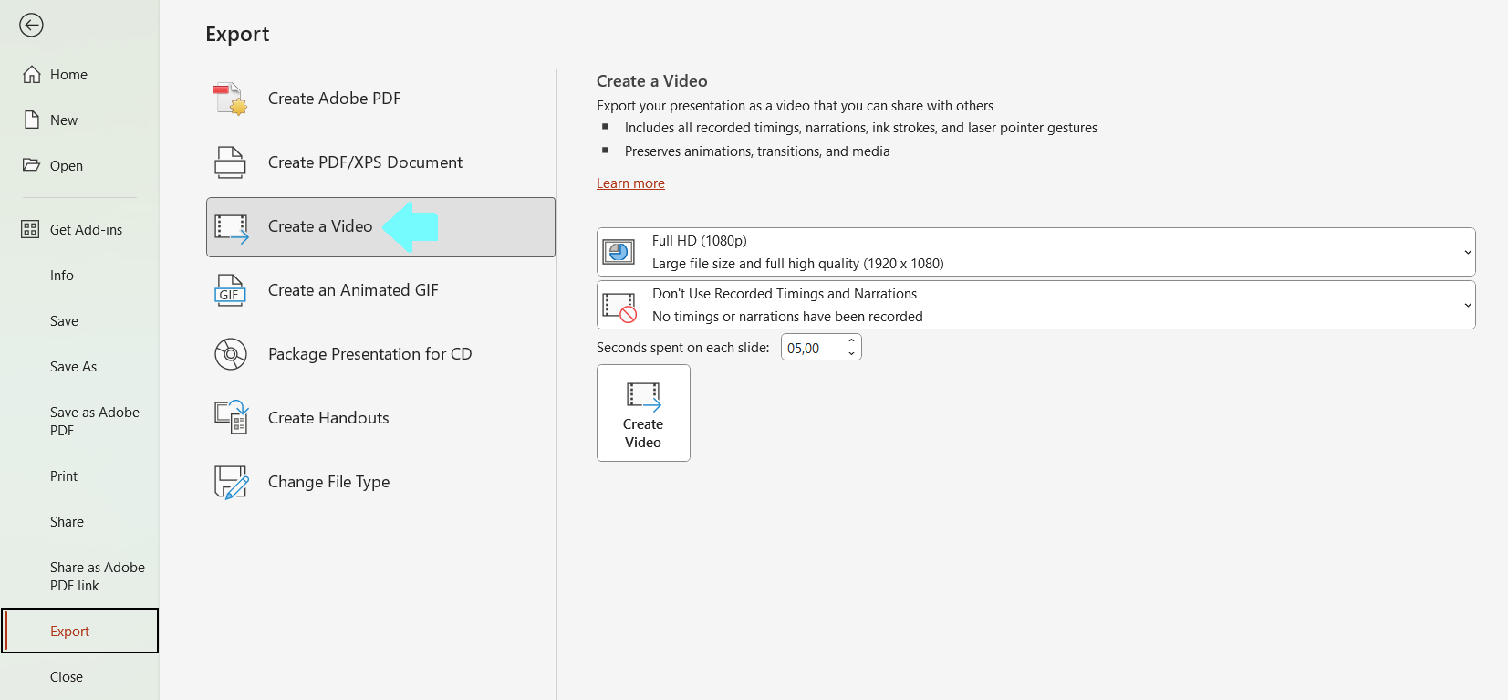
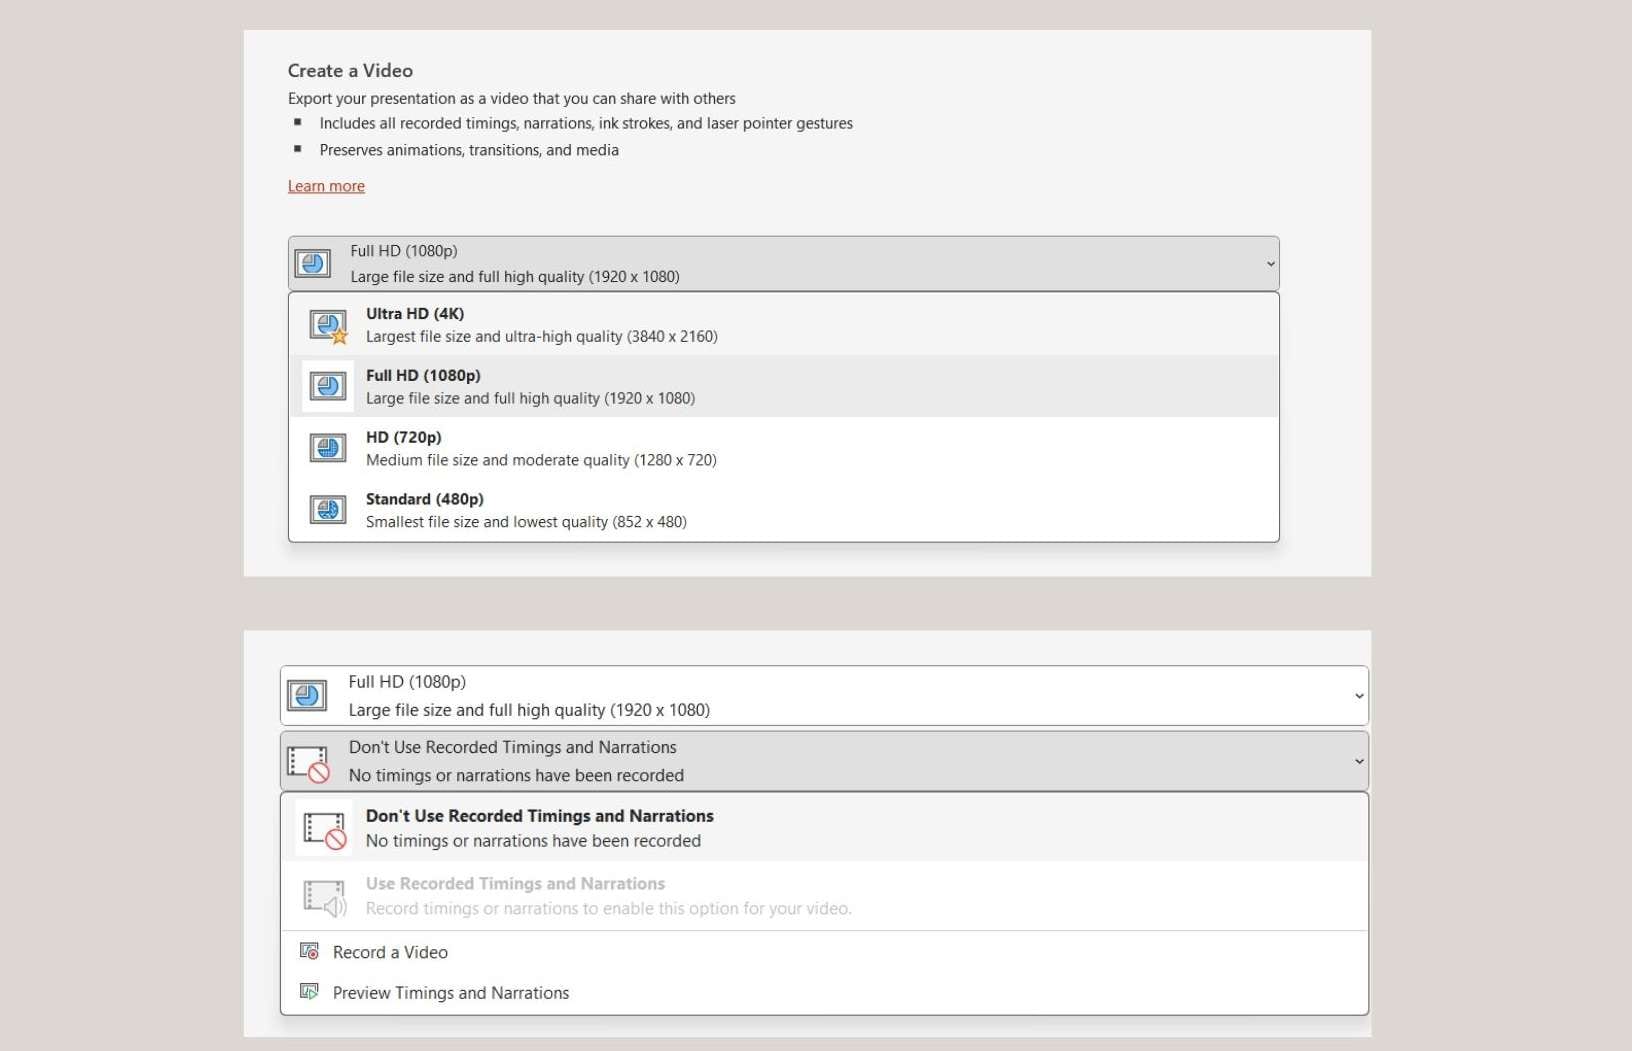
Step 2. Choose video quality and timings
Under the Create a Video section, choose a video quality option from the dropdown menu (e.g., Ultra HD, Full HD, HD, or Standard). Decide whether to use recorded timings and narrations:
- If you have recorded slide timings and narrations, select “Use Recorded Timings and Narrations”.
- If not, choose “Don’t Use Recorded Timings and Narrations”, and set the duration for each slide manually.
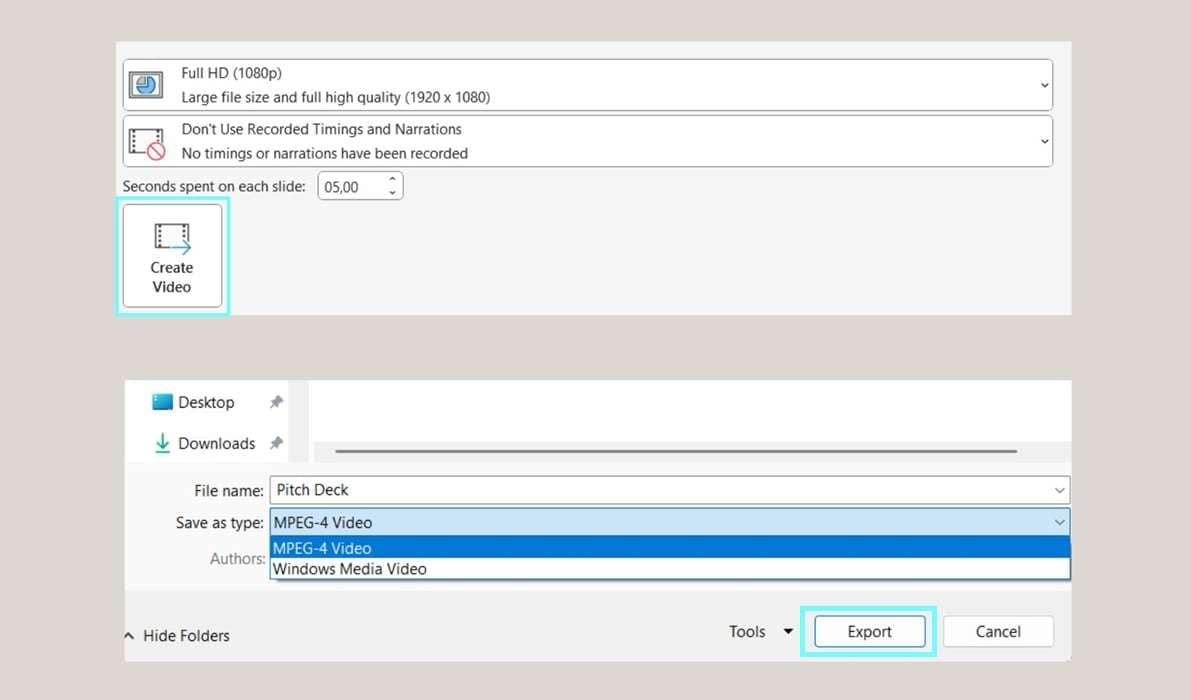
Step 3. Export the video
Click the Create Video button. In the Save As dialog box, choose a location to save your file. Select the file format (MPEG-4 Video (.mp4) or Windows Media Video (.wmv). Click Save to start the export process.
Step 4. Wait for the Export to finish
PowerPoint will process the video in the background. Depending on the file size and video quality, this process may take a few minutes. Once completed, your video is ready to be shared or further edited in tools like Filmora.
Part 2. Improve Your PowerPoint Video with Powerful Video Editor
While PowerPoint provides a straightforward way to create presentation videos, the final output can sometimes feel plain, and transitions may appear slightly stilted. If you're looking for how to create a video with PowerPoint but want a more professional and engaging video, you need a reliable and powerful video editor. And there’s no better option than Wondershare Filmora.
Why Use Filmora to Enhance Your PowerPoint Video?
 secure download

- Ready-Made Templates: Use Filmora’s pre-designed templates or effects packs for extra flair.
- All-in-One Editing Tools: Trim or split parts of the video for cleaner pacing.
- Personalize Your Style: Insert extra transitions or effects for smoother flow.
- AI Features: Various Advanced AI Features to take your video to the next level.
- Versatility: Choose royalty-free tracks or record your own narration directly in Filmora.
- High-quality Exports: Select high-quality export settings for the best results (MP4, 1080p, etc.).
- Share Anywhere: Post your video on platforms like YouTube, Instagram, TikTok, and more to connect with your audience.
A step-by-step how to take your PPT video to the next level with Filmora:
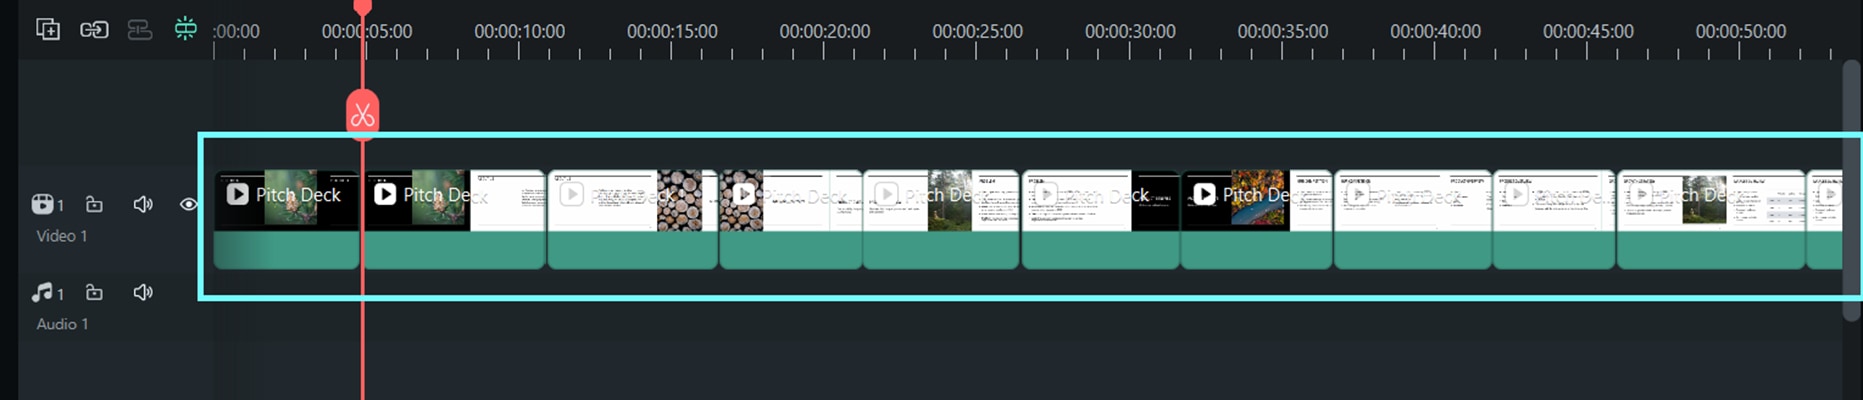
Step 1. Import your PowerPoint video into Filmora
Open the Filmora on your computer, then create a new project to start editing. Click Import Media and select the PowerPoint video you just created. Drag and drop the video onto the timeline to start editing.
secure download

Step 2. Trim or Split unnecessary parts
Use the Cut Tool to trim excess parts of the video. Split the video into sections for better pacing and organization. Delete any unwanted clips to maintain a smooth flow.
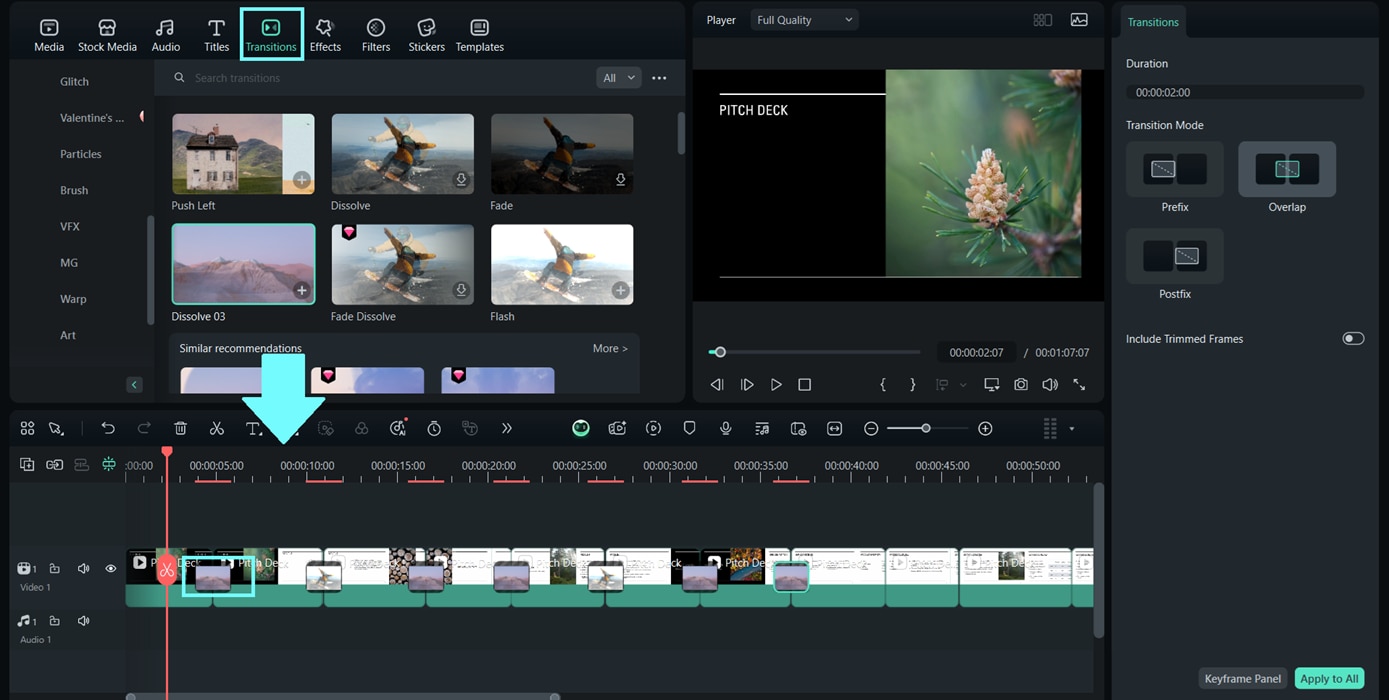
Step 3. Add Transitions and Effects
Navigate to the Transitions menu and select smooth transition effects. Drag and drop your chosen transition between slides for a natural flow. Explore the Effects tab to add filters or overlays to enhance visuals.
Step 4. Enhance Audio and Add Music
Click the Audio tab to browse and select royalty-free music. Drag and drop the audio file onto the timeline. Adjust the volume or fade in/out effects to sync with your video.
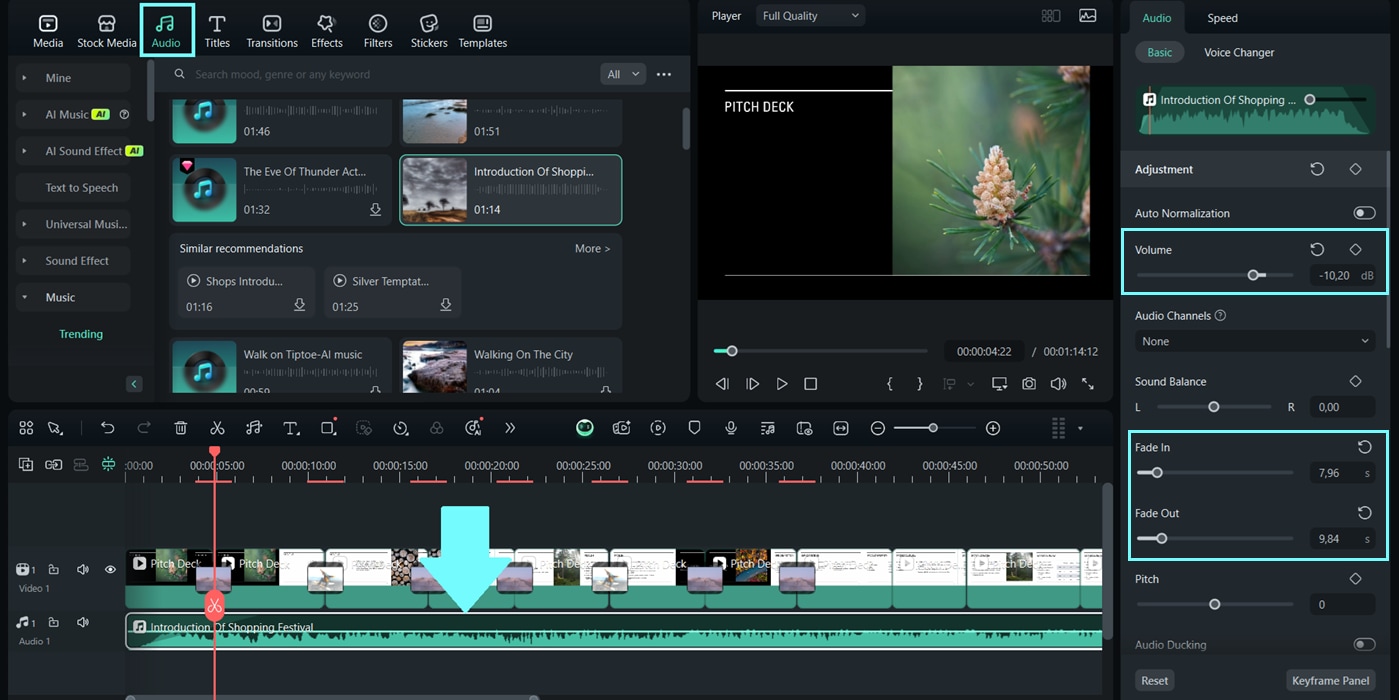
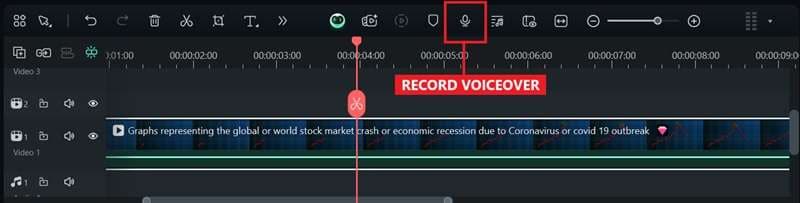
Record your own narration using the built-in Voiceover feature.
Step 5. Export the final video
Click Export in the top-right corner. Choose the video format (MP4 recommended for compatibility). Select resolution and quality settings (1080p for HD quality). Enable Advanced Compression to optimize the size. Click Export to save the final video to your device.

Now, your PowerPoint presentation has been transformed into a professional-quality video ready for sharing across different platforms. If you're looking for how to make your PowerPoint video on your mobile phone, you'll find out in the next section.
Part 3. How to Make Your PowerPoint Video Mobile-Friendly
Once you have a polished PowerPoint video, it is important to ensure it is accessible to a wider audience, including those watching on mobile devices. If you are thinking about how to make a video from PPT and make it suitable for viewing on mobile devices, optimizing your content for different screens will help maximize engagement. In that case, check out these few tips:
- Export in resolutions optimized for mobile devices (e.g., 720p or 1080p). Avoid excessive file sizes to ensure smooth playback on phones and tablets.
- Use vertical video formats if targeting platforms like Instagram or TikTok. You can use Filmora’s aspect ratio settings to adjust your video dimensions.
- Ensure text is clear and readable on smaller screens. Use strong contrast between text and background to improve readability.
- Create a bold, simple thumbnail that stands out in smaller mobile previews.
- Pick high-contrast colors that are easy to distinguish on mobile screens.
- Preview your video on different mobile devices to ensure compatibility and quality.
With these steps in mind, you can ensure your PowerPoint videos are optimized for mobile viewers and perform well across multiple platforms. Whether you're sharing it on social media, embedding it in an email, or uploading it to a website, a mobile-friendly format will improve accessibility and engagement.
Conclusion
If you are wondering how to make a video from PowerPoint, it's surprisingly easy for you to get professional results. While PowerPoint provides a basic way to export videos, enhancing it with a professional video editor like Filmora can take it to the next level. Filmora offers a wide range of tools, including ready-made templates, AI enhancements, advanced transitions, and high-quality export options.
Moreover, you can optimize your videos for mobile devices, you can reach a wider audience, and ensure professional results. Whether you're creating educational videos, business presentations, or social media posts, Filmora makes the process smooth and simple.
