AVI is extensively employed for archiving video and audio information and is highly compatible with most common media players and video editors. Due to their compatibility and relatively high quality, AVI files are commonly accessible for storing, streaming, and editing digital videos.
One of the regular operations that video editors and mere enthusiasts engage in is cutting AVI files. Modifying a video by being able to cut off undesired segments, making videos shorter, or dividing them into smaller parts can make a huge difference and improve the experience of viewing a video as well as its storage. This guide will briefly explain what cutting AVI files is, present the best AVI cutters, and give a step-by-step guide on using Filmora, the most advanced AVI cutter.
In this article
Part 1: Understanding Basic Requirements of AVI File Cutting
1. Basic Process of Cutting an AVI File:
- Loading the File: It is suggested that you open the software that you want to use to edit the file as this is easier.
- Selecting Segments: To make its segments, use the software's timeline and cut tools to draw markers around the beginning and ending times of the desired segments.
- Saving the Output: Export the final version of the clip to save the video by choosing the correct output type to the required format with the video quality.
2. Key Factors to Consider Before Cutting:
- File Size: Subsequently, AVI files can be very huge and therefore it is recommended that enough disk space on the computer should be available for both the original and those that will have been edited.
- Desired Output Format: Choose if you wish to keep the file in AVI format or convert it to the format of your choice while exporting.
- Quality Preservation: Select the program that allows for lossless cutting so that the quality of the video does not suffer.
3. Cutting Methods:
- Cutting at Specific Points: Mark specific points in the video where you want to make cuts, such as removing a commercial break from a TV recording.
- Splitting into Multiple Clips: Divide a long video into shorter segments, which can be useful for creating video snippets or managing large files.
Top AVI Cutter Software for Windows and Mac: How to Use Them Effectively
Here is the list of the best AVI cutter software based on its usability, advantages, and compatible format. Ranging from free to incessantly expensive and encompassing open-source platforms to professional, these tools are for all types of users.
Wondershare Filmora
Wondershare Filmora as we have seen is a simple yet powerful video editor for every person including professional ones. It provides simple-to-use cutting tools as well as other countless editing options. Moreover, it has an incredible number of capabilities, such as motion tracking, split-screen, auto beat sync, speed ramping, keyframing, assets and much more. The simplicity of the application's user interface enables users to edit their videos by cutting, trimming, and joining among others without much strain.
Key Features:
- Cut/Trim/Split Feature: Easily cut, trim, or split your AVI videos to remove unwanted sections, create multiple clips, or edit specific parts of your AVI video with precision.
- Motion Tracking: Allows you to track the movement of objects in your video and apply effects that follow those objects.
- Split-Screen: This enables you to create videos that display multiple screens simultaneously, perfect for comparisons or showcasing multiple views.
- Auto Beat Sync: Automatically syncs your video edits with the beat of your chosen music track, making it easy to create dynamic and engaging content.
- Speed Ramping: This allows you to adjust the speed of your video clips to create dramatic slow-motion effects or fast-motion sequences.
- Superb video stabilization with low distortion.
- Vast video/audio effects and creative assets.
- Powerful AI for effortless content creation.
- Intuitive, professional yet beginner-friendly.
- Works on Mac, Windows, iOS, and Android.

Cutting AVI Files with Filmora on Windows
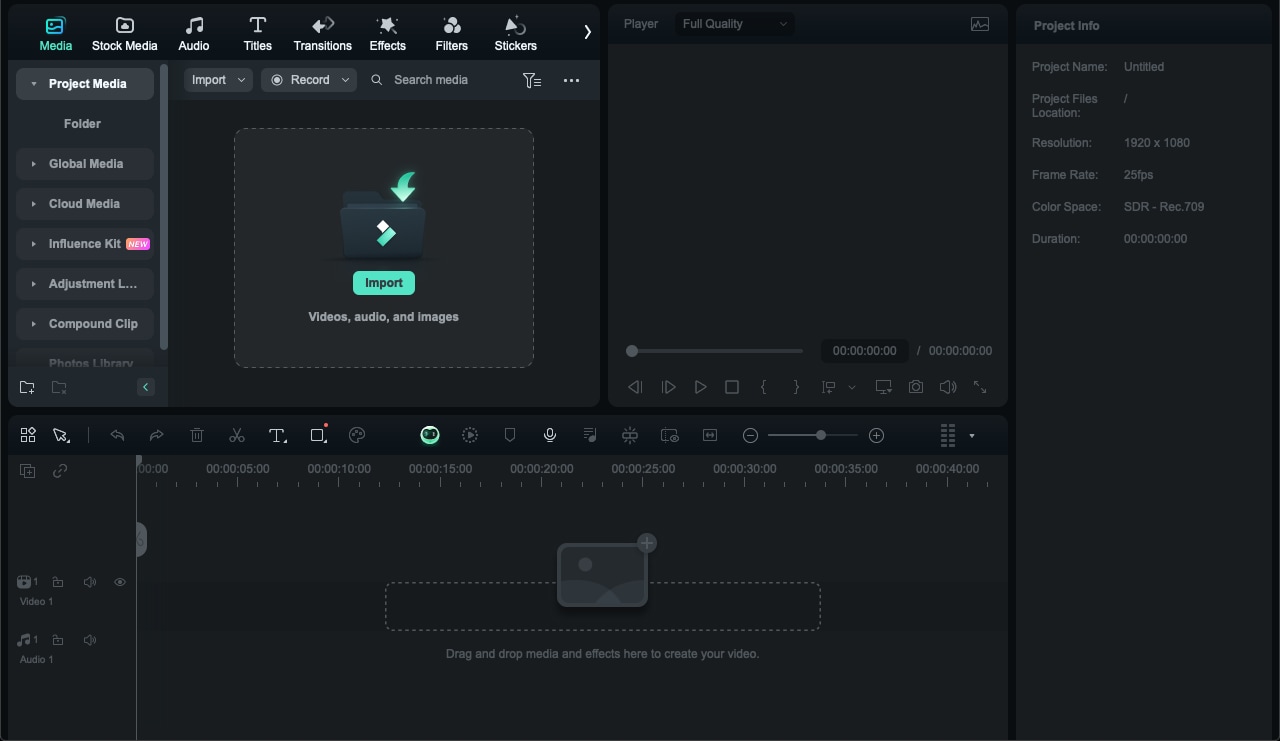
Step1Install and Import Your Video to Filmora Video Editor
Download the Filmora Video Editor for your operating system. Launch Filmora by double-clicking its desktop icon or finding it in your applications. Start a new video editing project by clicking on 'New Project'.

In the media library, click 'Import', select your video file, and click "Open". Your video will appear in the "Media" folder, and you should see its thumbnail.
Step2Move Your Video to Filmora's Timeline
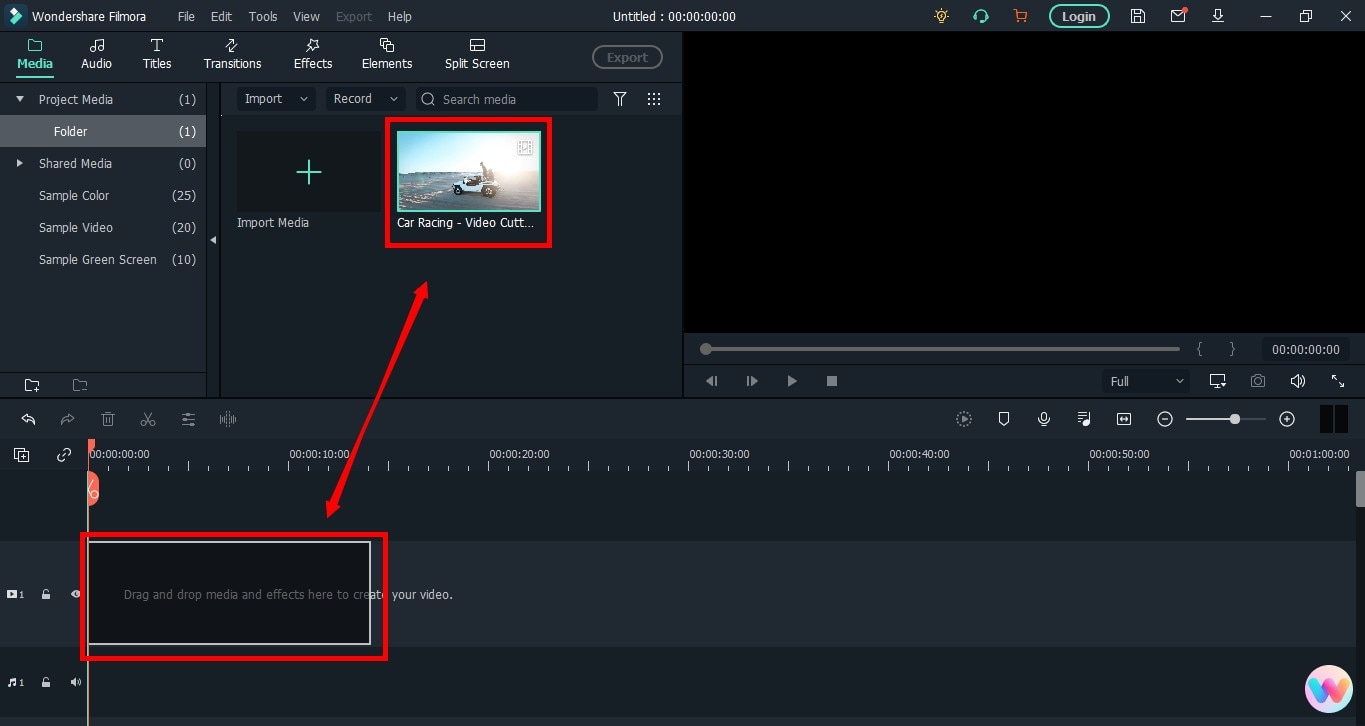
Click on your video in the media folder to select it, then drag and drop it onto the timeline track.
Step3Cut Your Video in Filmora
Move the playhead to the frame where you want to start cutting and click the "scissor" icon to make the first cut.

It has an important role in cutting your videos. So, move the playhead to your desired frame and click on the "scissor" icon to make the "starting" cut.
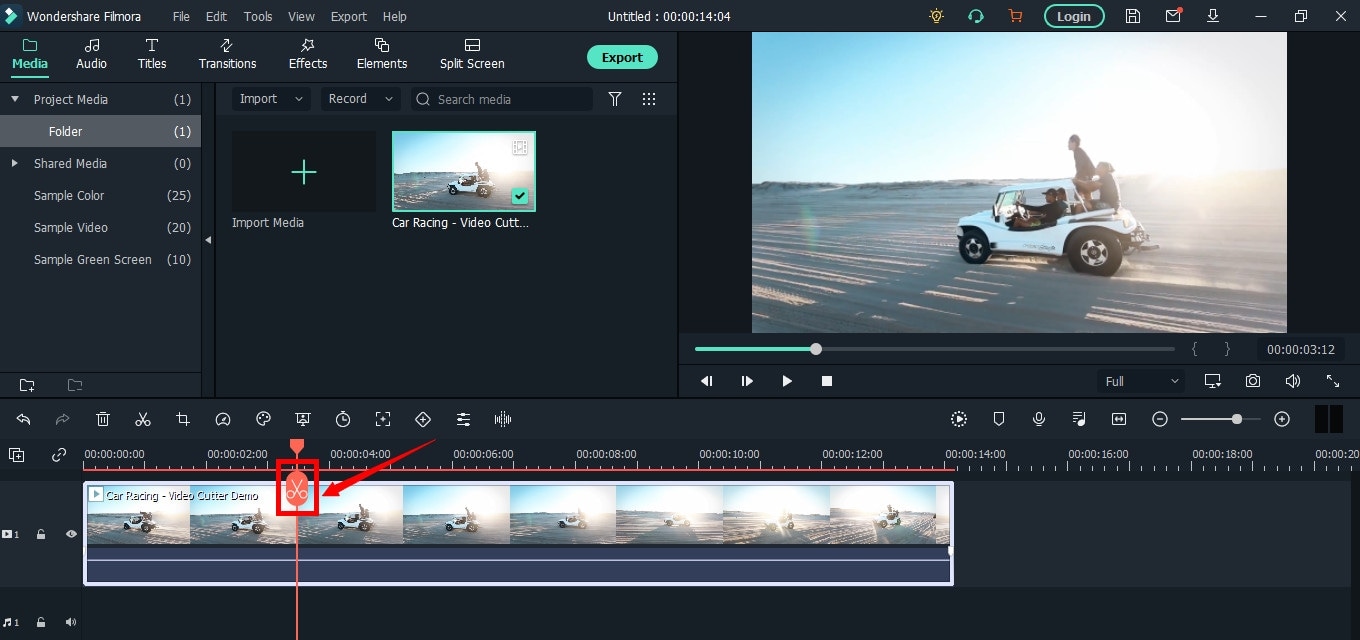
When you do it, you will see that the single clip is now divided into two parts similar to this image.
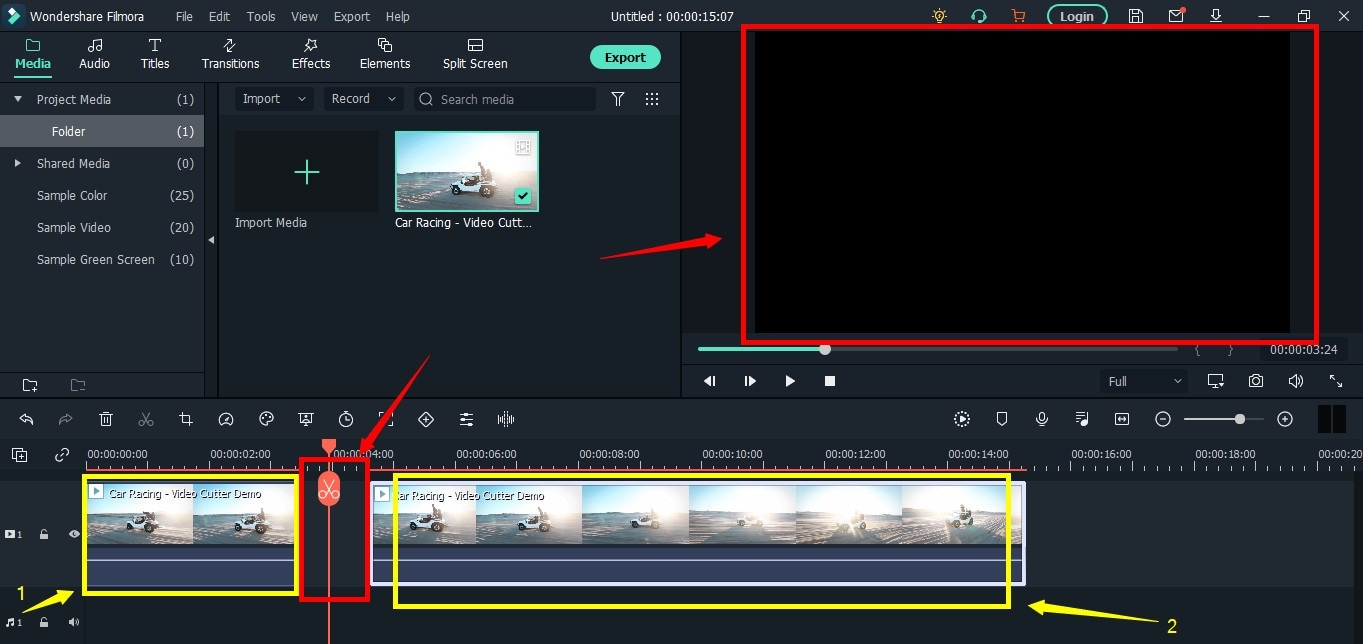
The "Red" indicated region makes sure there is a space between the clips in the timeline. Two different snippets from the same video are verified by the "Yellow" arrows.
As seen in this "Green" section, align the two clips.

Then move the play head around the clip as needed. And to perform the "ending" cut (second cut), click the "scissor" symbol once more.

To remove the middle segment, select it, right-click, and choose "Cut".
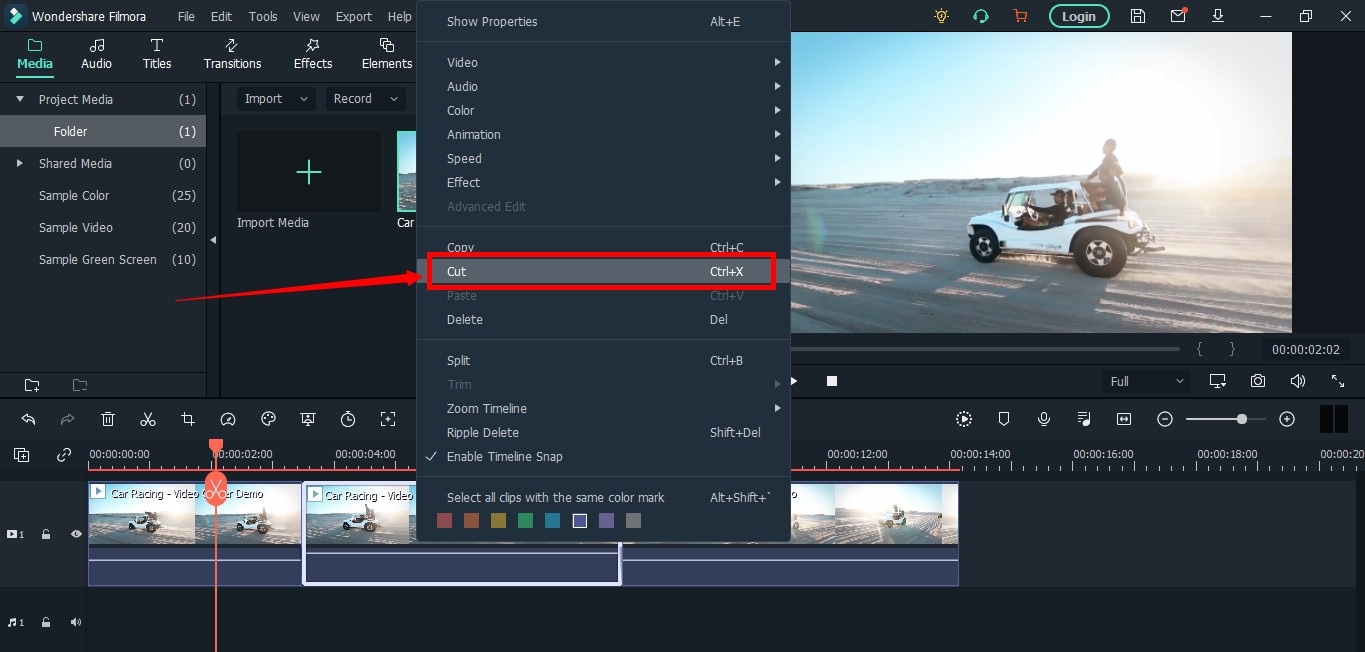
Drag the remaining clips together without any gaps and press the "Play" button to preview the result.
Then, click the "Play" button under the preview screen to see the results.
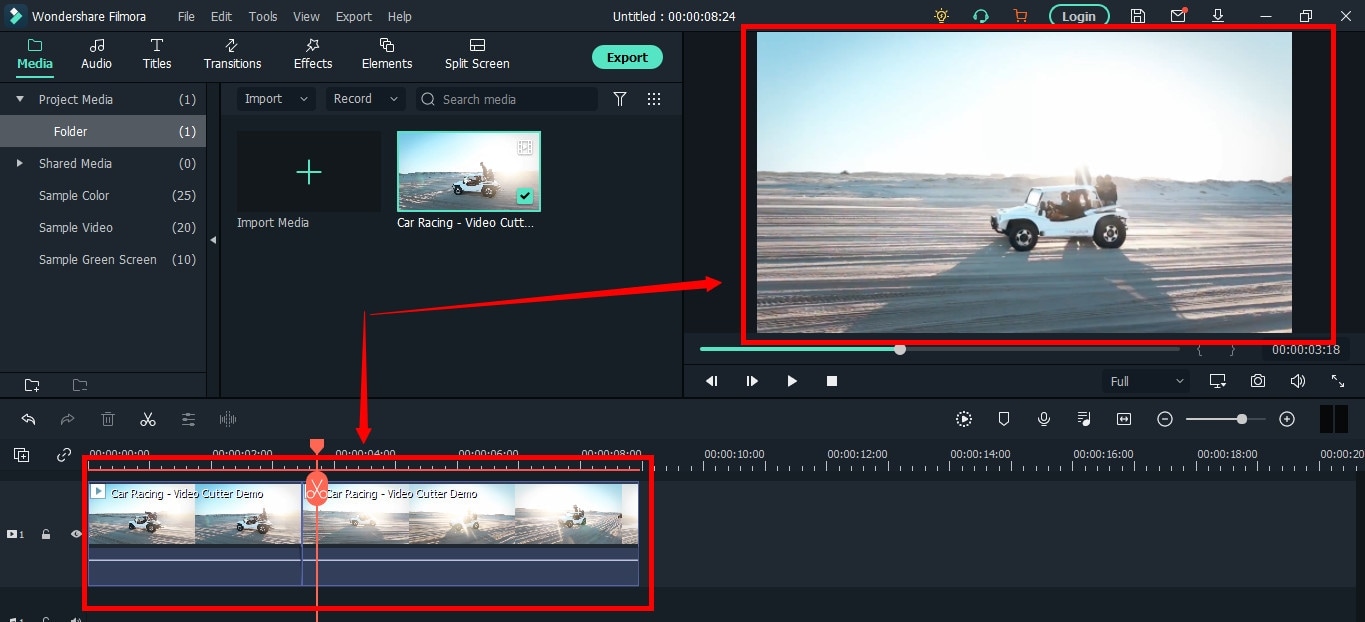
You can see that the video has been cut significantly.
Note: Here it is worth mentioning that you can also achieve cutting, trimming, and merging goals with an instant cutter tool that allows you to proceed with trimming and merging immediately without being lost in other editing options.
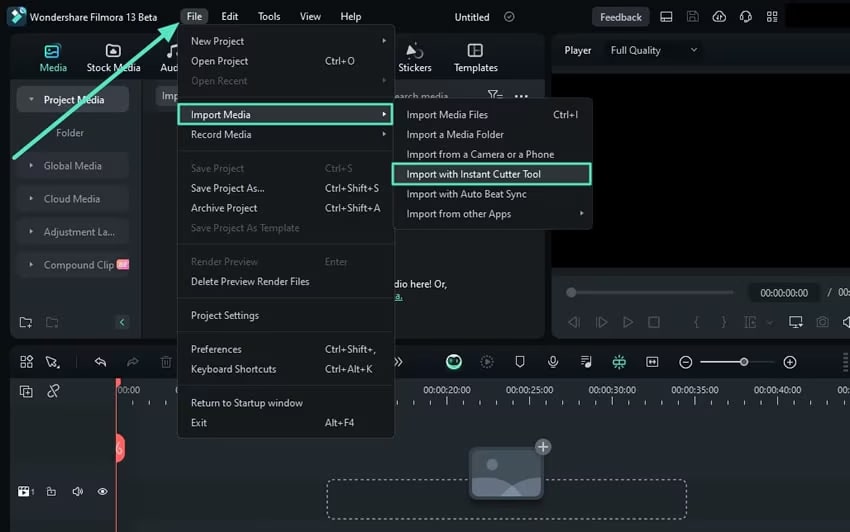
Step4Save the Project and Export Your Cut AVI Video
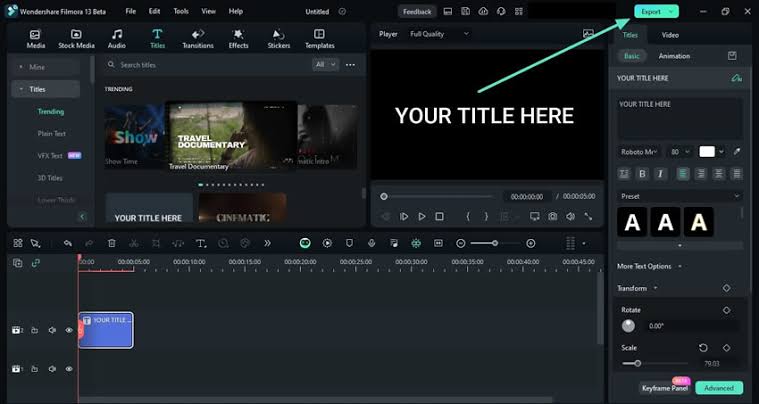
Once you are done with all cutting, editing, and merging, it is time to choose the "Export" option on the top right of the editor.
How to Trim AVI videos on Filmora for Mac? (Step-by-Step)
On Filmora, the whole process is simple and you can easily learn it in just a matter of minutes. The quality of your videos isn't reduced because Filmora supports the option of lossless editing.
You can trim AVI videos on Filmora using a feature called Scene Detection. You can also do it manually. Let's look at both methods.
Scene Detection Feature
Here's how you trim videos on Mac using Filmora's Scene Detection:
Step 1. Start the video editor application and select New Project.
Step 2. Import your video by either clicking on Import Media Files or by dragging and dropping your video into the import area.

Step 3. Right-click on a video and click on Scene Detection in the drop-down menu.
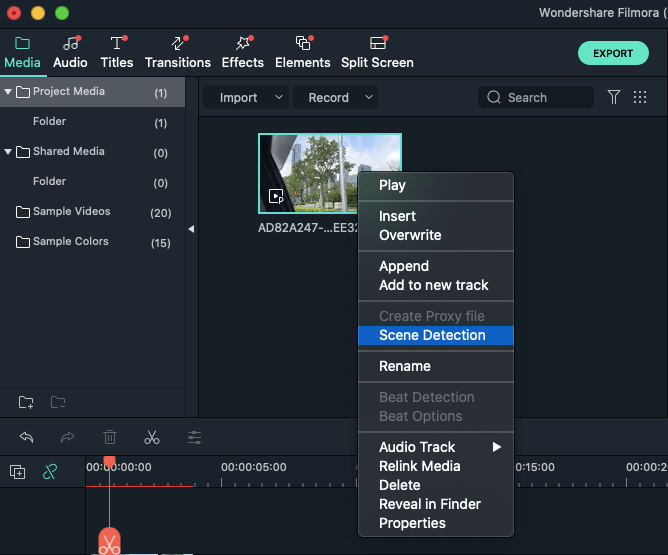
Step 4. In the new window, click on Detect and your video will get broken down into different scenes. If you see any clip you don't want, click on the Delete button next to it.
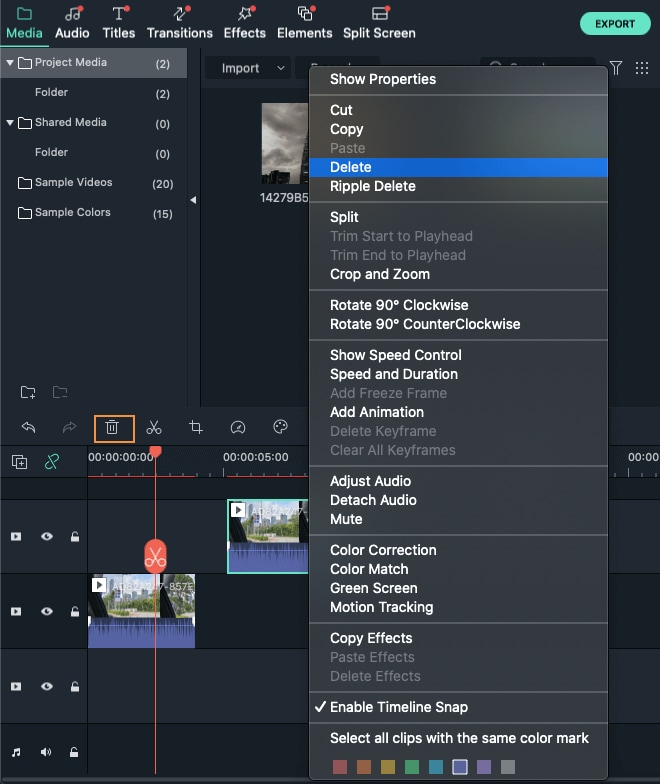
Step 5. Click on Add to Timeline and you'll see the rest of the scenes in the timeline where you can make further changes to them.
Step 6. Once you've made changes to your video, click on the Export button and select the Local tab. Click on AVI since that's the format you want your video in. After you've selected the location and made other changes to the export settings, click on Export and your video will be saved.
Trimming Videos Manually
Here's how you can cut AVI videos manually:
Step 1. After importing your video, drag it to the timeline.
Step 2. Stretch the video track in the timeline so you can select the frames you want to trim.
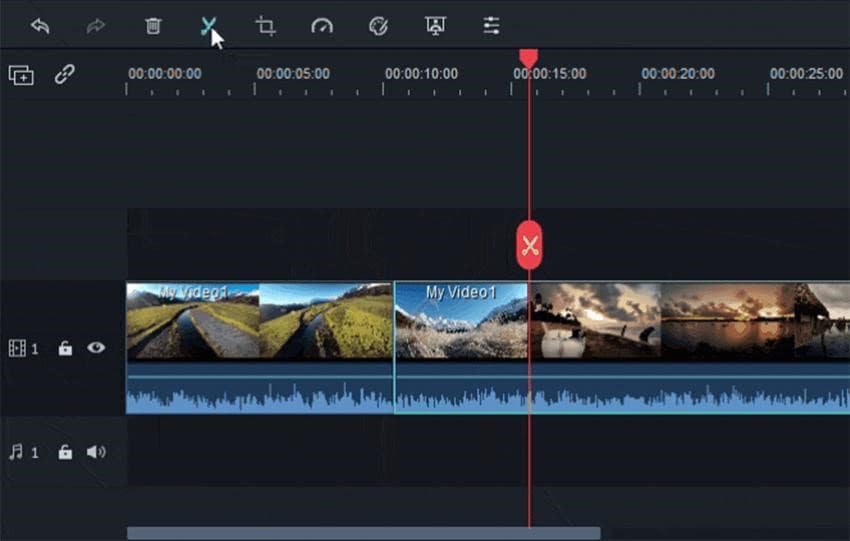
Step 3. Simply drag the video, either to the right or to the left, to cut the beginning or the ending of the video.
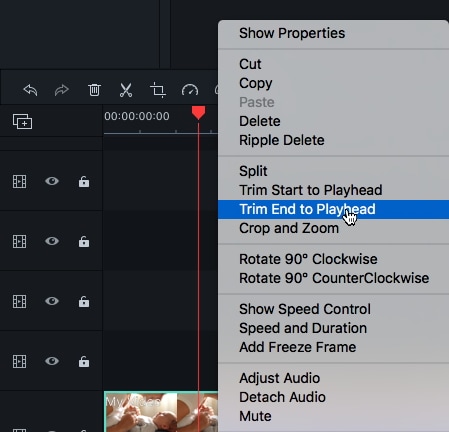
Step 4. To cut the middle section of the video, first, click on the Split button in the toolbar. It'll highlight the first frame of the clip. Drag the playhead to the part where you want the last frame of the clip to be and press the Split button again. This clip is now a separate video.
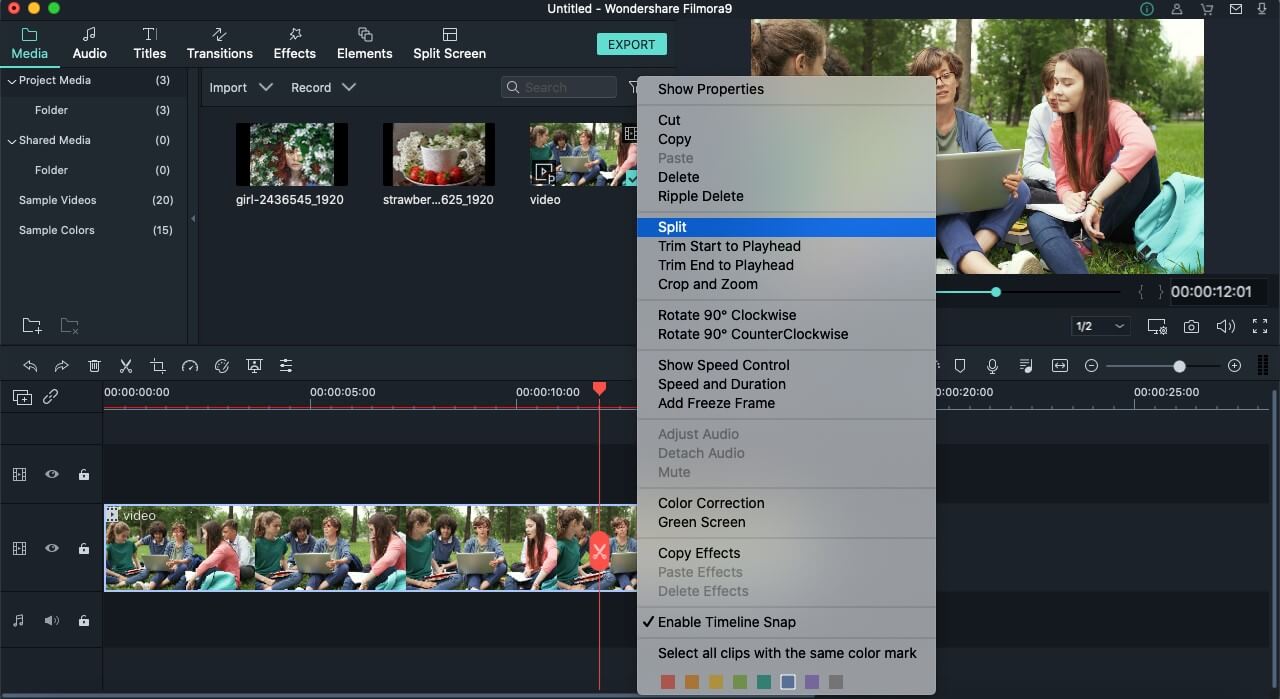
Step 5. To remove it, simply click on the Delete button in the toolbar and it'll be gone.
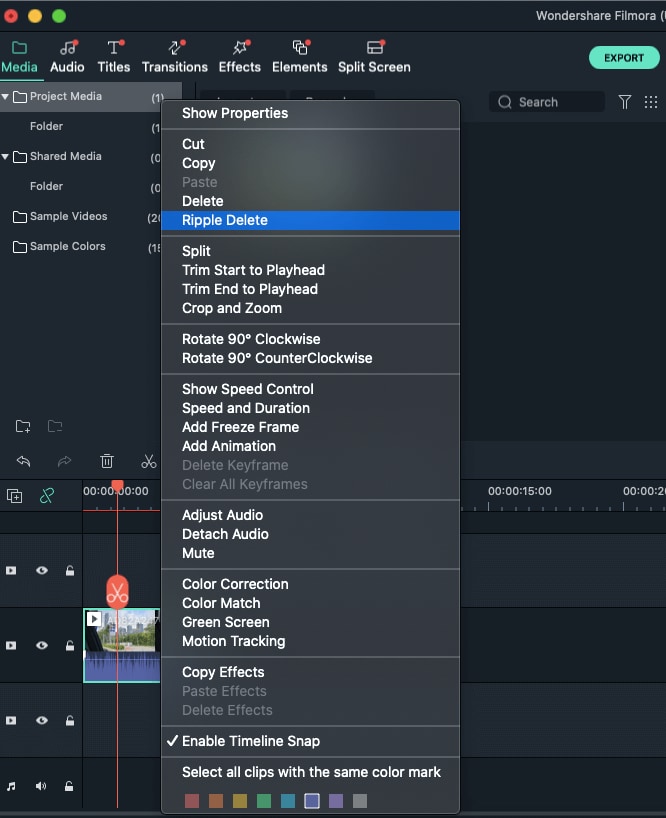
Step 6. Once you are done, you can export the video using the method described above.
iMovie
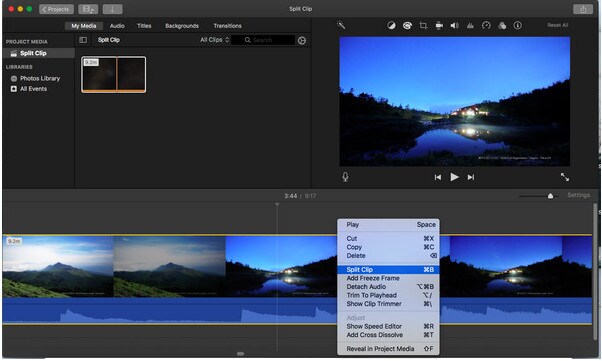
The first and foremost recommended software for free video cutting on Mac is Apple's own tool, iMovie. It is a built-in program that comes with your system, so there's no need to spend extra on a video editor. iMovie allows you to browse and import most video files, including AVI, directly from your computer. Additionally, this tool is equipped with multiple functions, such as audio editing, video quality enhancement, and much more.
This Mac video editor is ideal for beginners. Many home users and small business owners find it extremely simple to use, as they prefer to avoid being overwhelmed by complex features. So, if you want to trim your video clips, start working with iMovie. With just a few clicks, you can cut or trim your videos for free.
Key Features:
- Video cutting and trimming
- Cropping and rotation
- Effects and transitions
- Built-in themes
- HD and 4K video support
- Movie sharing
- Audio adjustments
- Chroma screen controls
- Character tracking
VideoPad by NCH
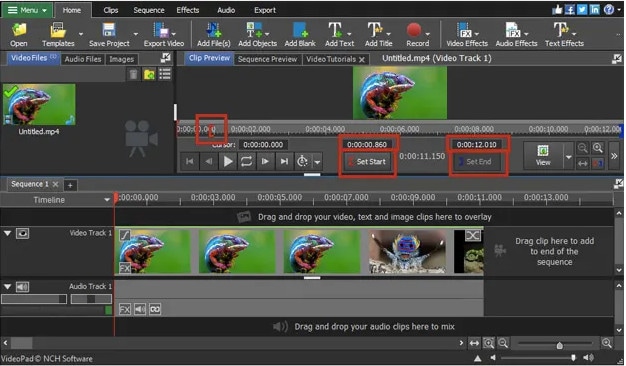
VideoPad by NCH is a beginner-level video editor with all the basic features. The software is specifically designed for home movie makers, which is why VideoPad is easy to understand and use.
VideoPad is entirely free for non-commercial purposes, but it has limited features. On the other hand, if you want to access all the features, you can purchase the full version of the tool.
VideoPad supports various video files, including AVI, WMV, MPEG, MOV, MP4, ASF, and XviD. Additionally, you can burn movies to Blu-ray, DVD, HD-DVD, or CD. Most importantly, you can easily cut or trim AVI videos on your Mac, as the software is available for both Mac and Windows systems.
Key Features:
- Visual effects
- Video transitions
- 3D Video editing
- Overlays and texts
- Direct video uploading
- Multiple video resolutions
- Video cutting and trimming
- Files exportation to various devices
- Stereoscopic conversion from 2D to 3D
Xilisoft Video Cutter
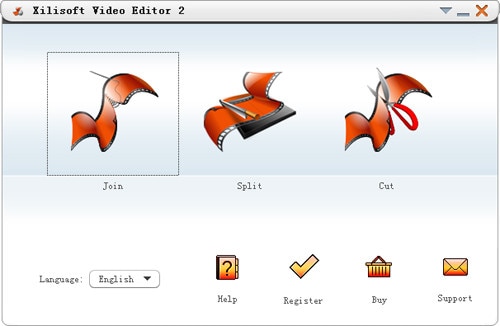
Xilisoft Video Cutter is the simplest tool to cut videos on MAC. This software has a straightforward option to cut the clip after importing it to the timeline. The program is fast and has a user-friendly interface.
Moreover, you can polish your videos by merging multiple clips or increasing the video quality once you're done with the cutting process. At the same time, this video cutter allows you to import all video formats, including XviD, DivX, MOV, FLV, MP4, MPEG-4/, MKV, MPEG, WMV, and AVI.
Key Features:
- Video joining
- Support multiple output video formats, including HD
Bandicut
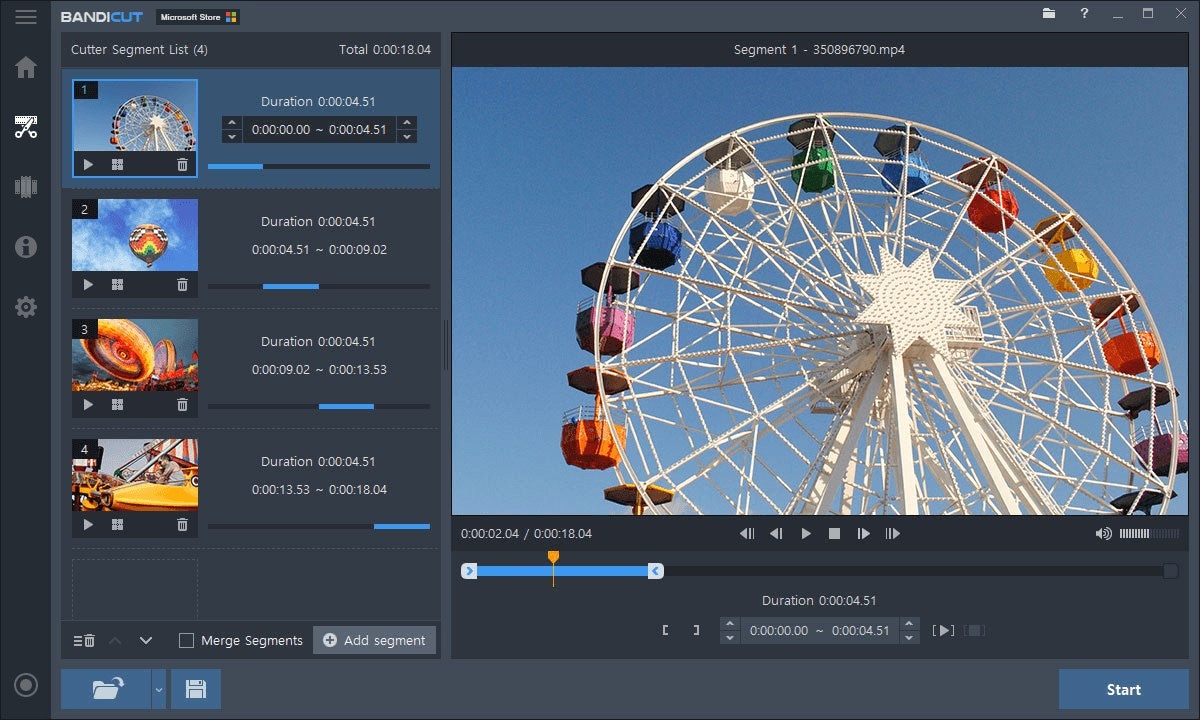
Bandicut is specifically famous for fast cutting in the aspect of lossless video processing. Users who require routine and quick editing and splitting of the content particularly in terms of video clips should find this software helpful. It has a very friendly interface that can easily be used by anyone even if he/she has little computer knowledge. Bandicut supports various video formats with functionalities like direct joining of videos and live previews. Hence, it is ideal for anyone in search of a simple but effective video-cutting application.
Key Features:
- Fast cutting speed without quality loss.
- User-friendly interface.
- Supports multiple video formats.
- Direct video merging.
- Real-time preview before saving.
Adobe Premiere Pro

Adobe Premiere Pro is a professional video editor that's used to edit all kinds of videos. It's used by professionals and amateurs alike. The problem with Adobe Premiere Pro is that it can be a bit confusing at times and it's not a free video trimmer. You have to pay a subscription fee and you need to spend some time using it to get the hang of it. Once you've mastered its tools and techniques, you'll be able to trim AVI videos easily.
Key Features:
- Fast cutting speed without quality loss.
- User-friendly interface.
- Supports multiple video formats.
- Direct video merging.
- Real-time preview before saving.
Avidemux
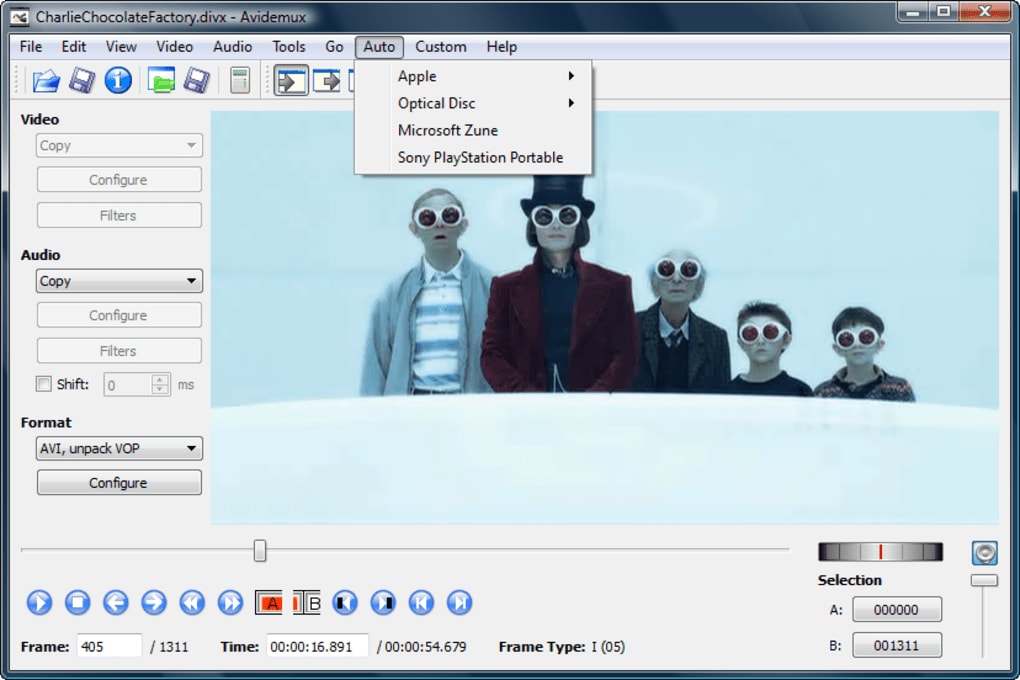
Avidemux is an example of a free and open-source video editor, it is suitable to be used for simple cutting operations. It has a simple graphical User Interface through which the ordinary user performs simple editing on his videos. Avidemux can join and cut most of the current popular video files recognizing numerous video formats, while free software is cross-platform. It is a very easy-to-use tool designed for those who need light video editing software for simple cutting and general manipulation. It is especially useful for users who would like to stick with open-source software only.
Key Features:
- Free and open-source.
- Straightforward interface.
- Supports various video formats.
- Basic editing functionalities.
- Cross-platform compatibility.
VirtualDub

VirtualDub is another free software that is useful for fast video cutting and basic functions of the video editor. It is a versatile tool that is relatively easy to use, for this reason, it is considered fitting for newbies. Using VirtualDub, users are capable of batch-processing videos meaning one can work on several videos simultaneously. Its cutting tools and fundamental services can meet the needs for quick video editing and thus it is popular.
Key Features:
- Free to use.
- Batch processing capabilities.
- Efficient video cutting.
- Basic video editing tools.
- Lightweight software.
Movavi Video Editor
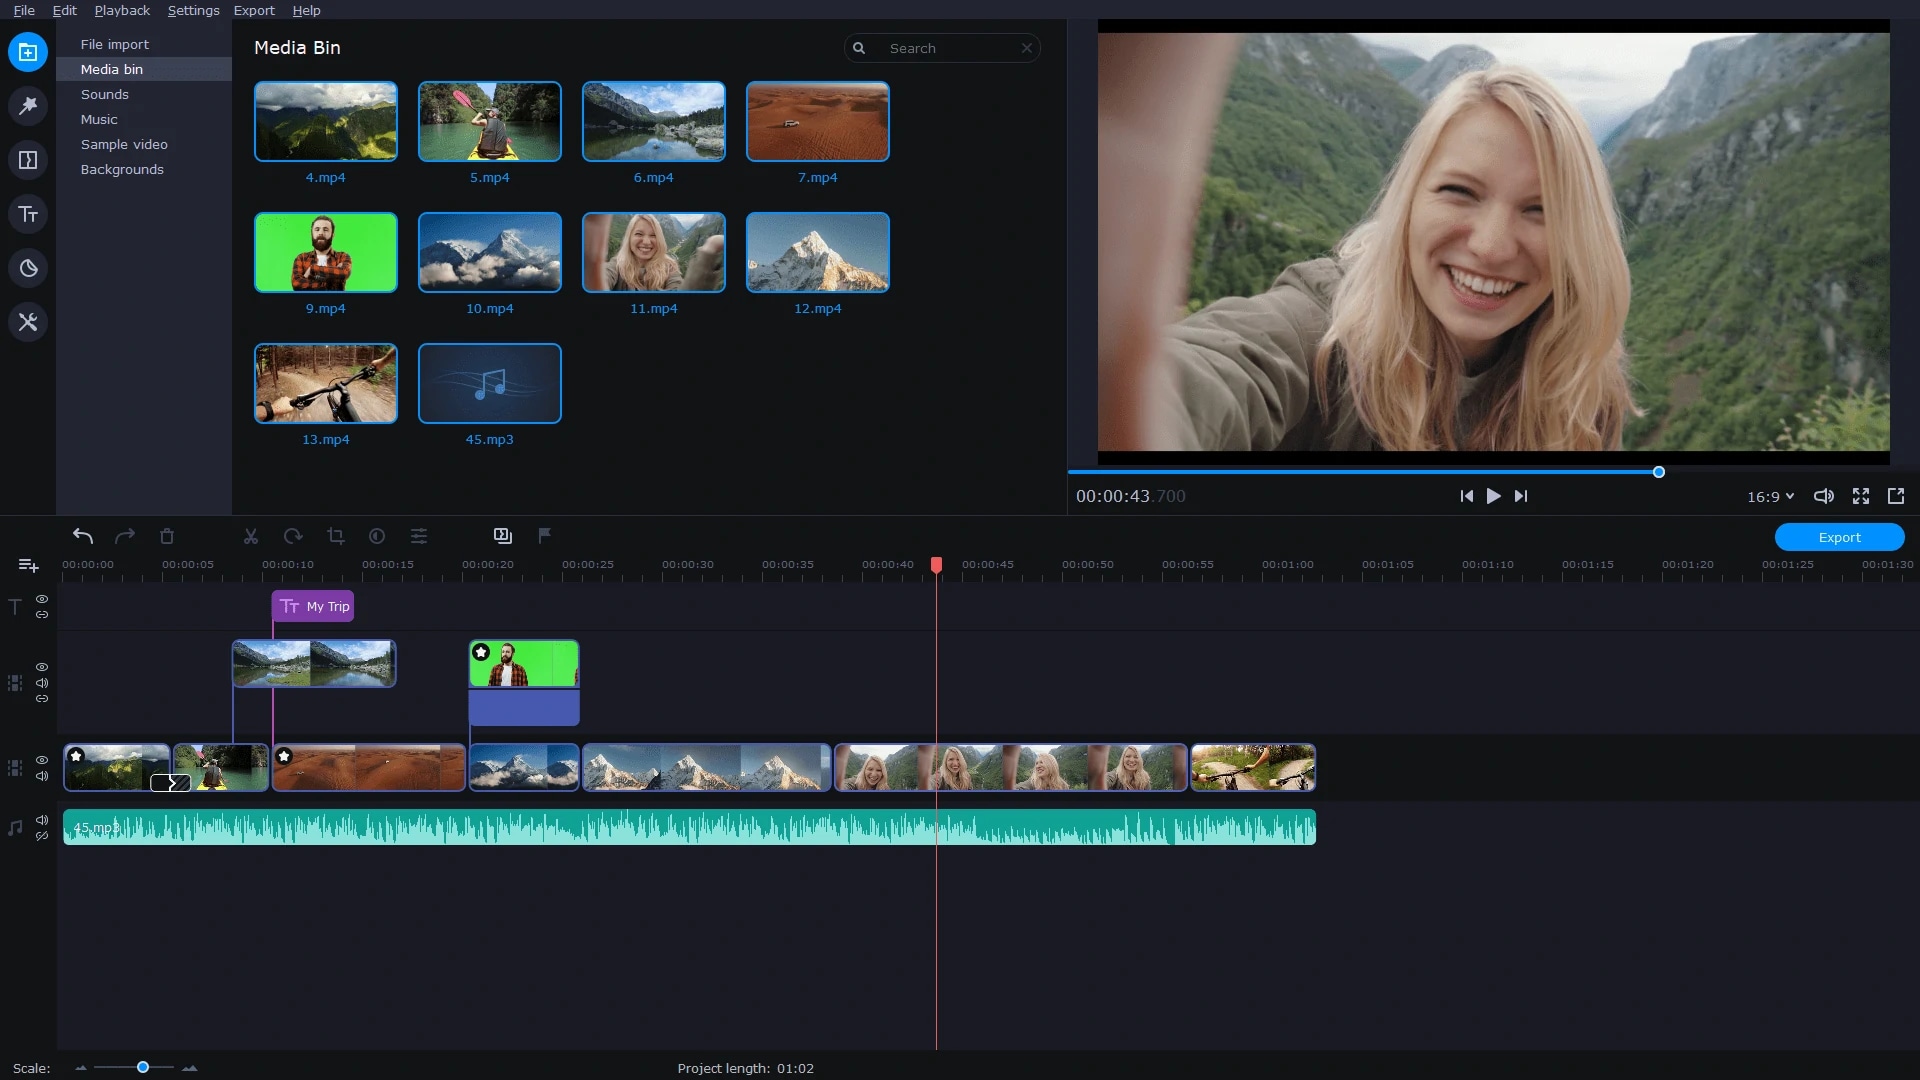
Movavi Video Editor is a powerful tool that provides advanced editing tools along with straightforward cutting options. It's designed to cater to both novice and experienced video editors. The software supports various video formats and includes special effects and transitions to enhance your videos. Movavi's user-friendly interface and high-quality output make it a favorite among users who need more than just basic video-cutting capabilities.
Key Features:
- Advanced editing tools.
- Easy-to-use cutting features.
- Supports various video formats.
- Special effects and transitions.
- User-friendly interface.
Best AVI Video Cutters for Mobile Devices
After capturing nice videos with your mobile phone, you may need to cut unnecessary scenes to make your clips look professional. While there are numerous Android cutters, not all support the AVI format. So below, you will find the best AVI video cutters for mobile phones.
Cut, Trim, Split Video Editor

Download Cut, Trim, Split Video Editor on your iPhone to delete/cut unwanted portions of your video clips. The tool is also best for trimming iPhone-recorded clips without messing with the frames. Or, if you just want to split the video into multiple parts for your next WhatsApp status, this iPhone app can do that job for you.
The app supports multiple video file types, including MOV, MP4, AVI, MPEG, MPEG-2, and 3GPP
Key Features:
- Easy trimming and cutting video clips
- Splitting big-sized videos into two smaller clips
- Import video from file-sharing platforms, like iCloud, using Wi-Fi
Splice - Video Editor & Maker

Splice is an extraordinary video editor that makes it easy to make fully customized and professional videos from your iPhone. The app is also best for video cutting. Besides, it has many interesting features, which you can use from your device.
Key Features:
- Cutting, trimming, and cropping your videos
- Exposure, saturation, and exposure adjustment
- Slow and fast motion with speed ramping option
- Video masking and overlay
- Color correction and text overlays
Quick – Video Editor & Maker

Quick – Video Editor & Maker is a free video editor with PRO results. Many photographers and vloggers love using this app to cut clips immediately. Furthermore, the application offers a wide range of options to assure you don't have to look to any other tool to rotate or compress video. Quick – Video Editor & Maker lets you import videos in all major formats, including AVI, MPEG, WMA, and more.
Key Features:
- Video cutting, fading, and rotation
- Speed control tools
- Conversion from video to GIF
Funimate Video Editor & Maker
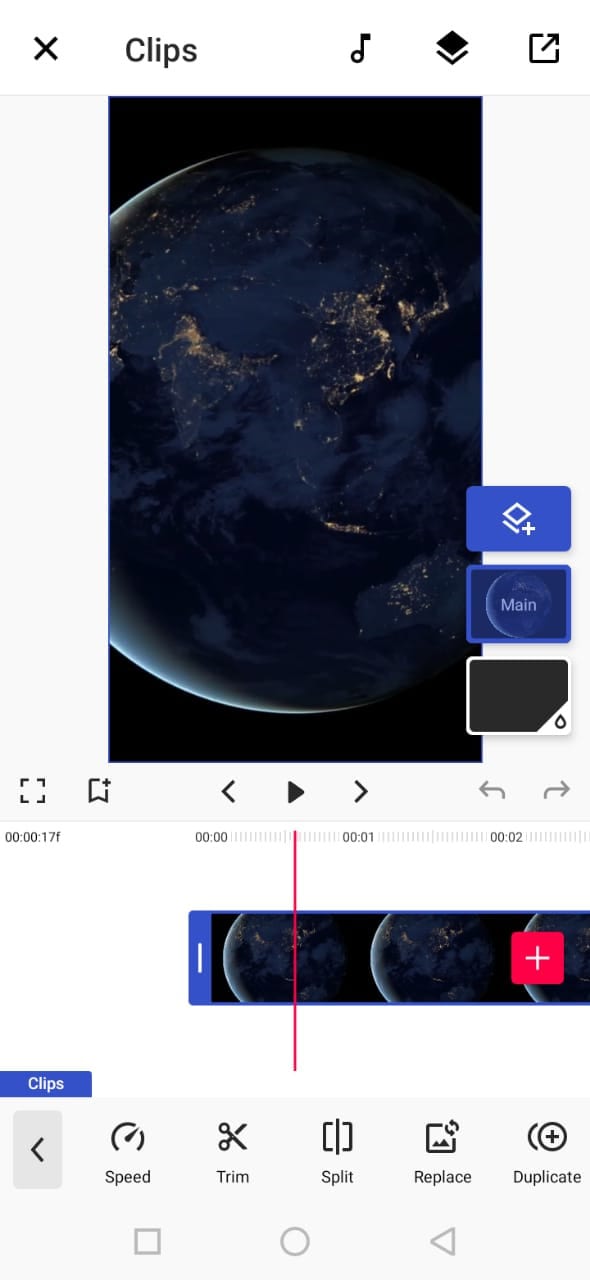
If you want to make some professional-grade video edits quickly, you are welcome to download and use Funimate Video Editor & Maker on your Android device. It's a free tool to cut videos. It has an easy procedure, and you can cut AVI videos in a few seconds.
Plus, you can use the app to add custom animations, effects, and many other exciting elements. You can share your makes on social media like TikTok, Instagram, and other platforms. Contrarily, the app itself is a community with millions of Funimate-users who share their creations daily. You can also join or watch videos from other creators to learn more about new techniques and trends in video editing.
Key Features:
- Video trimming and splitting
- Animation and cropping
- Filters and AI effects
- Speed adjustment
- Keyframing and video merging
Top Online AVI Video Cutters
Don't want to install video cutters on your MAC, Windows, smartphone, or any other device? No problem! You can use online video cutters and trimmers to split, cut, or trim your clips for free.
However, the problem still exists in online tools, as not all web-based editors allow importing AVI files. So to save your time and energy, you can directly go to the following online AVI cutters to complete your tasks.
Kapwing
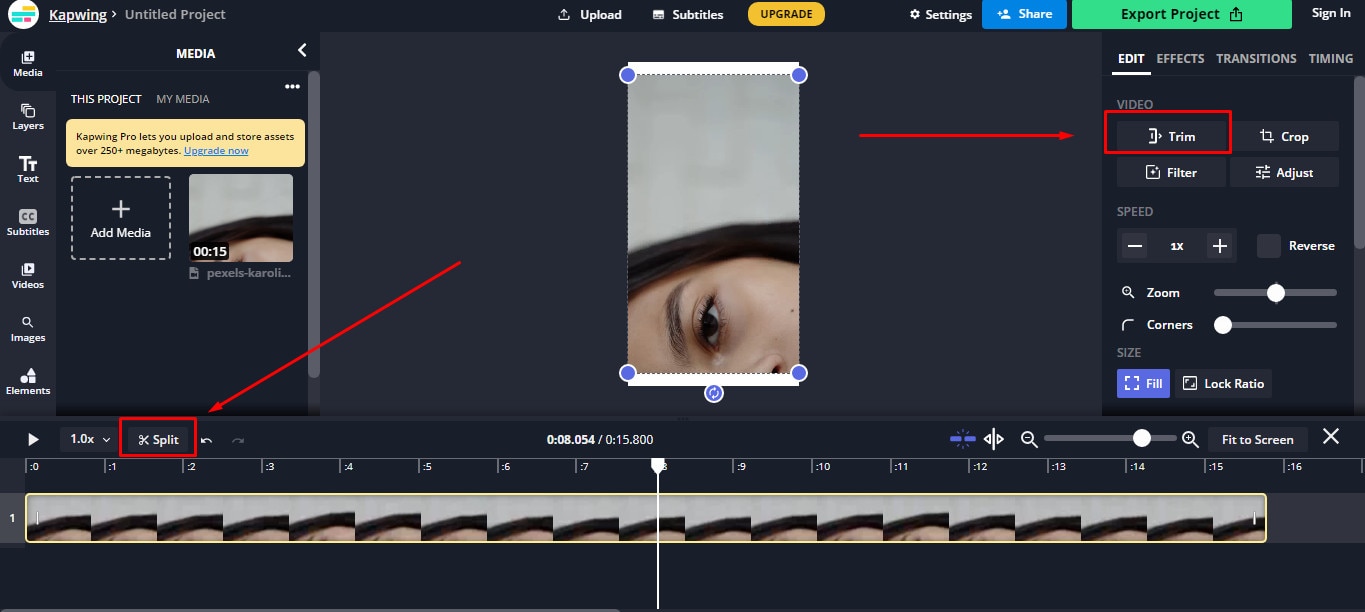
Kapwing is an online video editor best for casual creatives, such as Vloggers and YouTubers. You can use this web-based platform to cut your videos. Gladly, Kapwing supports all AVI incomings. You can upload your AVI video files to this platform and use its trim or split feature. To do that, you need to upload your AVI video and choose the “Trim” or “Split” tool to see the magic. Once done with the trimming process, you can explore Kapwing's other incredible traits and apply them to your project.
Key Features:
- Video splitting, trimming, and merging
- Audio capturing
- Image and video library
- Text editing and overlay
- Auto-generated subtitles
- Several collaboration tools
- Video creation from scratch
- Simple drag-and-drop interface
- Video transitions, plugins, and elements
Clideo
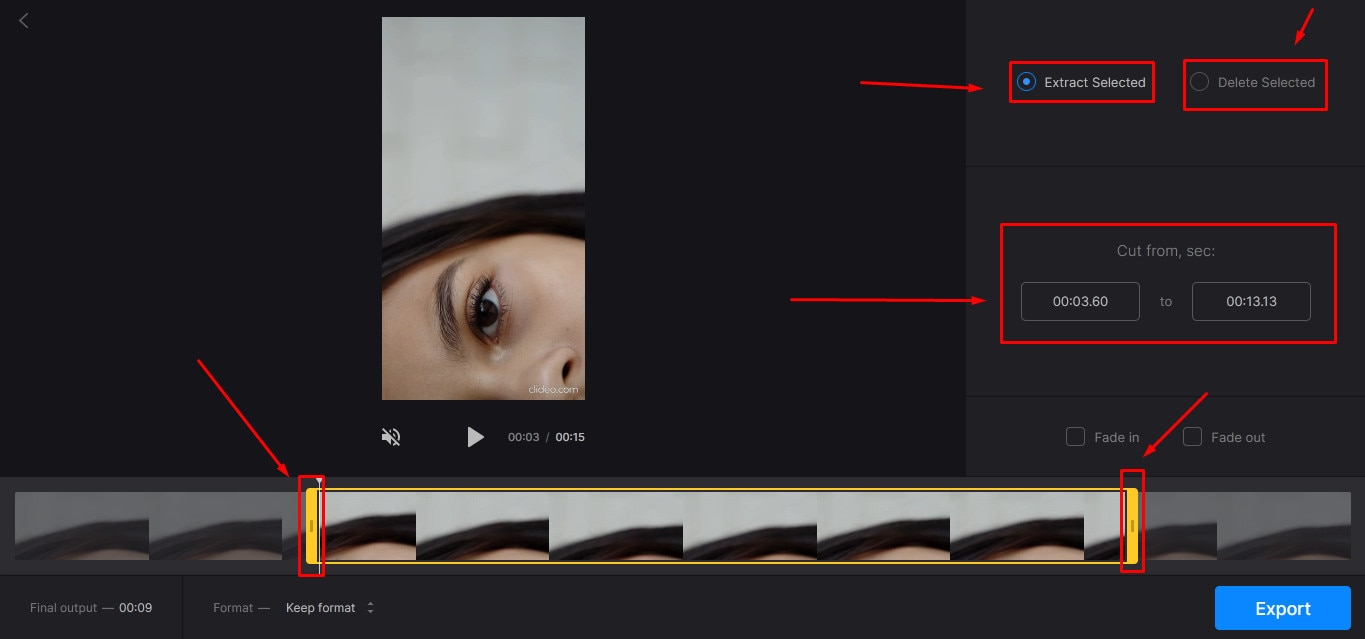
Clideo is not just a video cutter but an online solution to all your video editing problems. The tool is super popular, with 4 million+ users a month. And why not? This is one of those web-based platforms that allow AVI video files to be imported and exported without converting them into any other formats.
Nevertheless, if you're only looking for video cutting options, this tool makes your life easy. Simply upload your video, and select the portion of it by setting start and end times. Choose whether you want to delete or extract the selected part from the clip, and hit the “Export” button.
And within a few moments, you can enjoy a trimmed video clip. And if you plan to be more creative, you can look for other Clideo features to make videos more fascinating.
Key Features:
- Video combining and cutting
- Resize and crop clips
- Compress your videos
- Add text and subtitles
- Add music to your video files
- Filters and color correction tools
- Audio mute, cutting, and muting
- Video rotation, flipping, and speed adjustment
Aspose
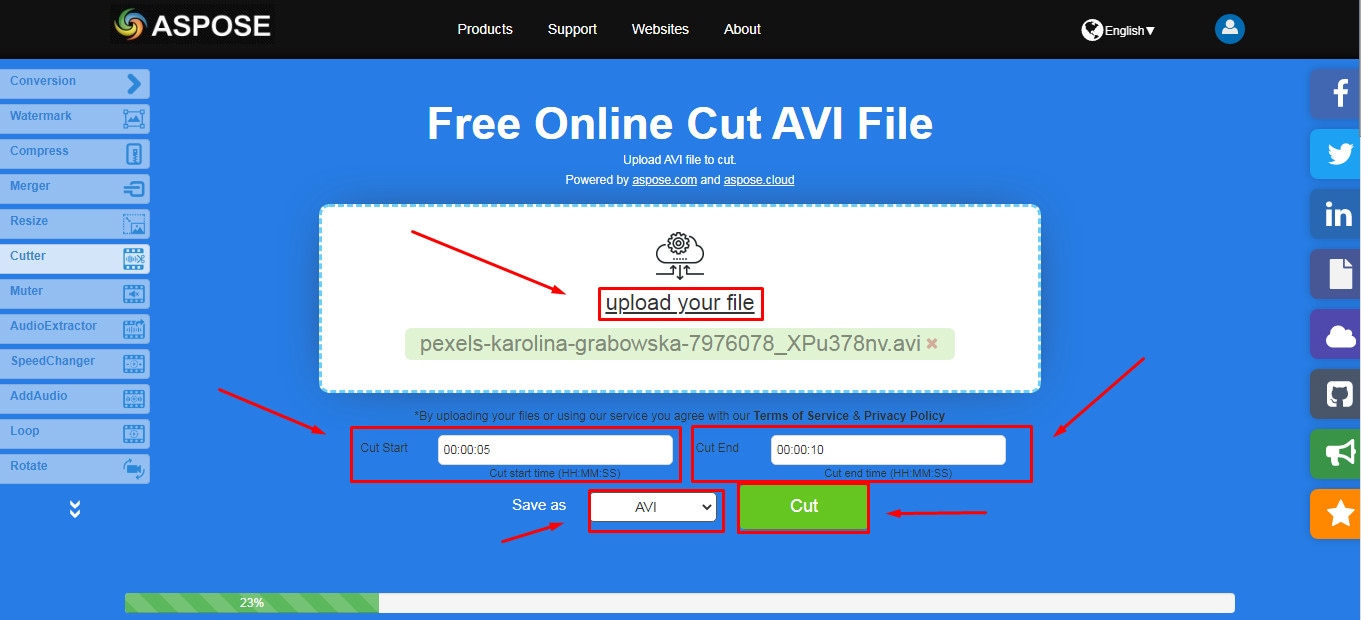
Aspose is a free web-based application to cut clips. You can use this tool on any operating system. It supports all major video file formats, including AVI, MKV, MOV, MP4, FLV, WMV, WEBM, and GIF. Additionally, you can use Aspose for various other reasons, such as audio extraction, video resizing, and more.
Key Features:
- Video cutting and compressing
- Looping, rotation, and video merging
- Adding watermarks on videos
- Sound muting
- Speed change and audio addition
Conclusion
Cutting AVI files is essential for optimizing video content for personal or professional use. With tools like Filmora, you can efficiently edit your videos to meet your needs. While all the above-mentioned AVI cutters offer simplicity and ease of use, Filmora provides a more comprehensive editing experience with advanced features. Explore different options to determine which AVI cutter suits your unique needs.


