Note: This video tutorial is compatible with Filmora V11, V12 and V13 versions.
Beat Detection
Filmora is editing software that brings your creativity to a whole new level. It offers its users several editing options for both audio and video. If you want to have an outstanding video with perfect effects, you must know when to make a cut and how to switch from one shot to another swiftly. It cannot be learned in just a few days and needs years to master. Even seasoned video editing professionals may find themselves in trouble finding the perfect pace for their video.
If you want to make your video more dynamic and give it a touch of rhythm, you need to sync the cuts in your video to the beat of the music.
But, manually detecting each beat of the soundtrack you are using for your project can be time-consuming and frustrating. Filmora’s Beat Detection feature saves you from this trouble and syncs your videos to the song's beats.
What is Beat Detection?
Beat Detection was initially used in music visualization software. But with the evolving trends in technology, several video editing software has included this feature in their video editing tools. It is an algorithm that detects beats for your selected song at the frequency of your choice. The majority of the audio tracks have four quarter-note beats meaning that each measure has four hits. Hence, the Beat Detection algorithms add a marker after every four beats.
Here is a step-by-step tutorial for beat detection using Filmora Wondershare.
After you finish installing Wondershare Filmora from the official website on your computer, launch it.
Import the music of your choice that you want to use for beat detection.
 Importing the Audio File
Select the Audio Tab. The music is categorized so you can use something suitable for your video. All kinds of music are available, from rock and electronic to travel and vlog.
 Navigating the Audio Tab
Download the music of your choice and then drag it to the timeline.
 Adding Audio file to the Timeline
You can import your music to the timeline by selecting the Music option at the end of the list.
 beat
beatSelect a sample video and add it to the timeline by using the drag and drop feature.
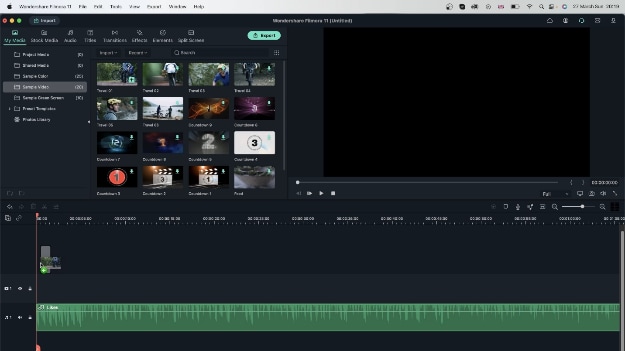 Adding Video to the Timeline
Since we do not know where the beats are where we want our transitions to occur, you may use the zoom-in option on the lower right side.
 Understanding the Beats
Whenever the sound waves go up, the volume is brought up, so that is where the Beat is.
 Higher Sound Wave Denoting High Beat
You can trim the video according to the beats. But that would be time-consuming.
Another way of finding the Beat is to listen to the Audio. Then, pause where the Beat is and hit M on the keyboard. But this method is also time-consuming if the duration of the video is longer.
It is where the beat detection comes in. It detects the Beat for you, the high points or the low points, depending upon which one you choose.
Select the audio file of your choice. Instead of bringing it to the timeline, right-click on the music file and select Beat Detection.
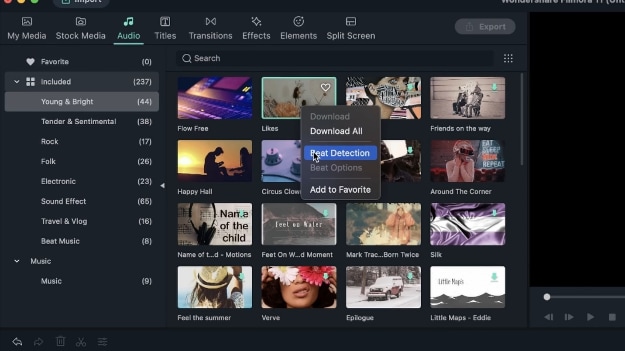 Using the Beat Detection Feature
Filmora has detected the Beat, and now it is ready for you to use it. You can see that the other audios don't have the icon of beat detection. It is because the option of Beat Detection is not selected for them.
Drag it as it is onto the timeline. Notice the red markers all over the Audio.
 Beat Detection Audio-track on the Timeline
These markers are at the start of the Beat that Filmora quickly finds.
 Markers of Beat Detection
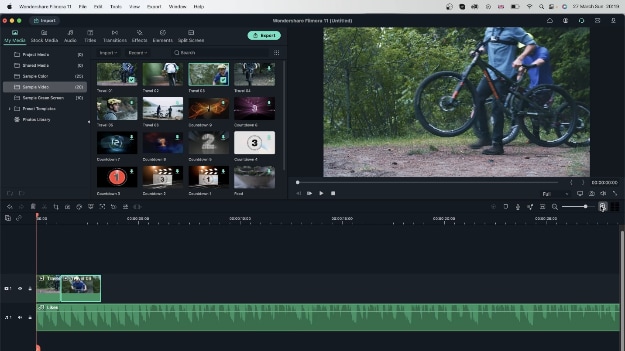
Now, you can add the video by selecting the My media tab and choosing the video of your choice.
 Syncing the Video to the Beats
Line it up with the marker after the video is added to the timeline.
 Lining the Markers with the VIdeo
Click on the scissors and split the video.
 Splitting the Video
In this way, you can edit your videos and sync them to the beats. You have to select the video, then split the video and get rid of the other half. You can go on like this and create a fantastic output video.
 Video with Beat Detection Feature
Upon playing, you'll see that you have the other video precisely on the Beat.
What to do if some Beats are missed?
But, some beats don't have a marker. Filmora misses some beats, but the regular interval shows that we are getting the moments at a consistent rate.
 When some Beats are missed by the Algorithm
If you want to match your video with every Beat in the song, look for more markers.
Select the Audio tab and delete the videos. Add another audio track by clicking on the + sign on the timeline to compare.
 Exploring the Beat Options
Go to the music that you had and right-click and select Beat Options.
Note: You cannot select Beat Options unless you detect the Beat first.
A dialogue box will appear. You can select the number of beats that you want to be highlighted.
 Highlighting Beats
With four beats, Filmora is going for every four beats rather than every single Beat.
 Highlighting Beats (4)
In case you want to detect every single Beat. Repeat the same process, and you can see that it catches every single Beat.
If you change the offset value, it will skip that number of beats in the beginning.
 Changing the Offset Value
Suppose we have music that starts off slow. You can use the highlight offset to ask Filmora not to put any markers on that slow segment.
For Syncing the video to the low points of Audio
If you want the low points, uncheck the Mark highlight beats only.
 Uncheck Highlight Beats
The blue markers will show the beats that are not the highest. These blue beats could be pretty low or medium-sized.
 Low Beats
You can experiment and see which one works better for you.
You can also adjust the markers by dragging them on the timeline if Filmora misses the Beat.
If you accidentally delete your Audio, you can always drag it back to the timeline through the Audio tab. As Beat detection has already been done, so it will be there.
