Note: This video tutorial is compatible with Filmora V11, V12 and V13 versions.
Crop, Pan, And Zoom in Filmora
Editing a video is a fun, creative process that allows you to express your thoughts and feelings through images and sound.
Filmora is one of the best video editing software on the market today. It's easy to use, but powerful enough to give you total control over your videos.
In this guide, we'll show you some of our favorite features in Filmora so you can get started editing your videos!
We need to get started by firstly importing your footage. We can import video from your storage, or we can use one from the stock media. We can choose some high-quality videos using "Pixaby".
Select the video of your choice. Click the download option. Hit the "plus" icon and then choose the "match to media" option to keep the quality of the video intact.
 Click the add button to add a video
Let us start by cropping our video. Choose the crop option, as shown below. When we choose the crop option, the crop and zoom panel opens up.
 Select the crop button from the tools given below
The crop panel helps us resize the frame of the video according to our preference. We can remove the parts of the frame we don't want to show. We get to choose our preference frame using the crop tool. We can either freely create a box or choose a predetermined ratio like 1:1, 9:16, etc.
 Select the ratio from the drop-down menu
We can select a ratio and choose the segment of the screen we want to use by placing the box on the frame to be selected. 21:9 is good for cinematic effects, while 9:16 works well for Instagram reels or TikTok.
Any ratio we choose, we can grab the corner of the box and adjust it according to our frame needs. Choosing the ratio gives us the height and width of the frame, and we can increase or decrease the size of the box, keeping the ratio of the selected frame intact.
We can choose the custom option to create a frame freehand, according to our preference. Filmora also gives us the option to type our preferred frame size that needs to be created. We just need to type the height and width of the required frame and hit enter.
 Prefill the value of the box dimension
Clicking on the "OK" button will resize/ crop our original video. If we are not satisfied with our selected frame, we can always go back to the crop option and resize our frame according to our preference.
Filmora also has the feature of zoom and pan. We can use the zoom and pan effect on our video using the following steps-
We will start by right-clicking the video and then clicking the "pan and zoom" option. When we select the option, the zoom and pan panel pops up on the screen.
 Resize the crop box using preset
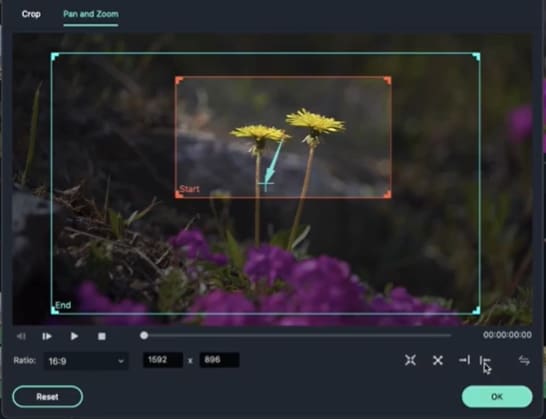
Unlike the crop option, when we select the zoom and pan option, we get to see 2 boxes in the frame, one is the "start frame" box and the other is the "end frame" box. So the pan and zoom option not only allows us to crop but also allows us to zoom in from one frame and zoom out of the other.
Of the 2 boxes that we get, the red box is the "start frame" box, and the blue box is the "end frame" box. These boxes signify the frames where the video will start and to which frame it will move at its end.
Similar to the crop panel, under the zoom and pan panel, we can adjust the frame ratio according to our needs. For doing the same, we just need to grab the end of the boxes to change the size of the box and fit the box in our required frame.
 Select the ratio from the drop-down menu
 Just like the crop panel, we can choose a defined ratio and resize the dimensions of the frame by selecting the edge of the box and making it as big as is good enough to fit in our required frame. The frame inside the box is what is going to stay in the video and the greyed part outside the box is the area that is not going to be visible in our video. Filmora is going to erase it for us.
 Left arrow option
 Filmora facilitates us with other presets as well that can make our panning and zooming experience easy. There is an inbuilt flip option that makes it easy to switch between the selected start frame box and the end frame box. This means when we select this option, the start frame box becomes our end frame box and our end frame box becomes your start frame box. Clicking this option is going to ultimately give you the reverse of your selected effect. If we were zooming in on an object, clicking this option will exchange our frames and hence zoom out on our object.
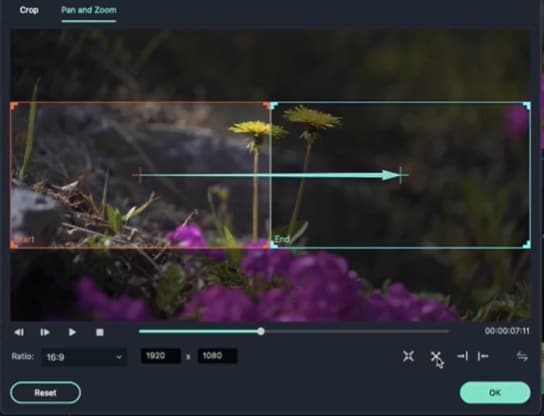
The left arrow option automatically builds in the 2 start frame box and end frame box placed adjacent to each other such that the video starts from the right part of the screen and ends on the left part of the screen. This preset offers us this transition with just one click.
Similar to this, the left arrow option builds the start frame box on the left part of the frame and the end frame box on the right part of the frame, such that the video starts on the left and ends at the right part of the selected frame.
 Zoom out preset
Filmora offers another preset for zooming out. Clicking on this preset by default builds the smaller start frame box in the middle of the video and an end frame box using the whole frame. This preset zooms out on the frame, starting from the center of the frame. Similar to zoom out preset, we have the zoom in preset which does the opposite of the zoom out effect.
The length of the video is what Filmora picks as the duration of the video. For example, if we choose a video 30 seconds long, and put on the zoom-out effect on it. Filmora is going to take 30 seconds to zoom out of that video. To accelerate the zooming-out effect, we will have to shorten the video length below and use the shortened video to put the zoom-out effect.
 Original video size
 Time shortened video size
We hope this tutorial makes your experience using Filmora, a great one!
