Note: This video tutorial is compatible with Filmora V11, V12 and V13 versions.
Users Guide to Record Desktop Screen in Filmora
Navigate to the official Wondershare website and download the Filmora graphic editor program on any of your preferred devices.
When successfully downloaded and installed, proceed to launch the software application in your system and wait for the welcome screen to appear, where you need to select the Screen Recorder tool to initiate the recording process.
1. Dimension Adjustment
As you finish Step 2, the Screen Recorder Settings tab pops up. You can work with adjusting the different recording parameters in this tab to get fine recorded footage of your device screen.
 Dimension Adjustment
2. Microphone Settings
The following tool in the Screen Recorder Settings tab is the Microphone which you can choose to keep on or off as per your requirement. If you wish to record audio or voiceover along with the device screen, click on the microphone icon to turn it on. If you are interested in solely recording the screen display, prefer keeping the microphone off. The green bar beside it moves up and down as the voice recording progresses if your microphone is on.
3. Speaker Audio and Webcam
If you want to record your device's audio and its screen, let the Speaker Audio Recorder icon remain in its default ON position. Then, click on the same icon to turn the speaker audio off in an otherwise case. As for the Webcam option, click on the icon to allow a live recording of the screen, or keep it disabled if you are not undertaking a live screen recording process.
4. Parameter Settings
Navigate to the extreme left of the Screen Recorder Settings tab and hit Settings to open the Recorder Settings Panel. You can proceed to select the destination folder of your recording. Set the frame rate, output quality, and screen record timer (to a maximum of 10 minutes) while adjusting the mouse controls and adding the Start/Stop and Pause/Resume hotkeys.
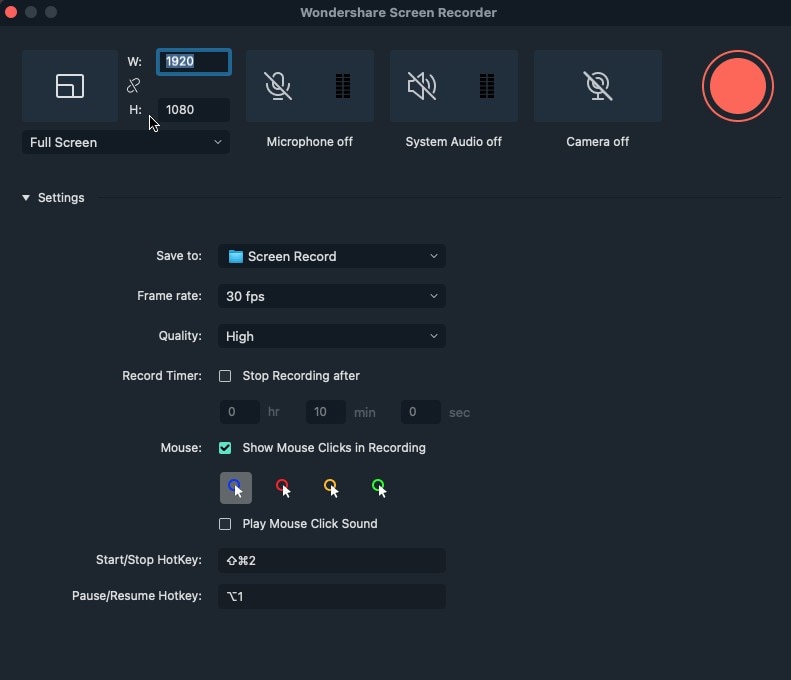 Filmora Recorder Settings
When you are happy with all the adjustments, navigate to the right side of the Screen Recorder Settings tab and click on the red Record button to allow the screen recording process to begin.
