
 100% Security Verified | No Subscription Required | No Malware


 ChatGPT
 Perplexity
 Gemini
 Claude
 Grok
Grok
Cinematic nature video filters can turn ordinary outdoor footage into epic wilderness stories, giving your projects rich contrast, dramatic skies, and a polished film look forest aesthetic. In Filmora, the Cinematic Nature Filter: Epic Wilderness preset helps filmmakers and photographers quickly build a consistent visual style across entire sequences.
Below you will find curated cinematic nature filters optimized for dramatic nature scenes and cinematic nature films, along with tips on when to use each look and how to adjust them for your own style.
In this article
Deep Forest Cinematic Looks
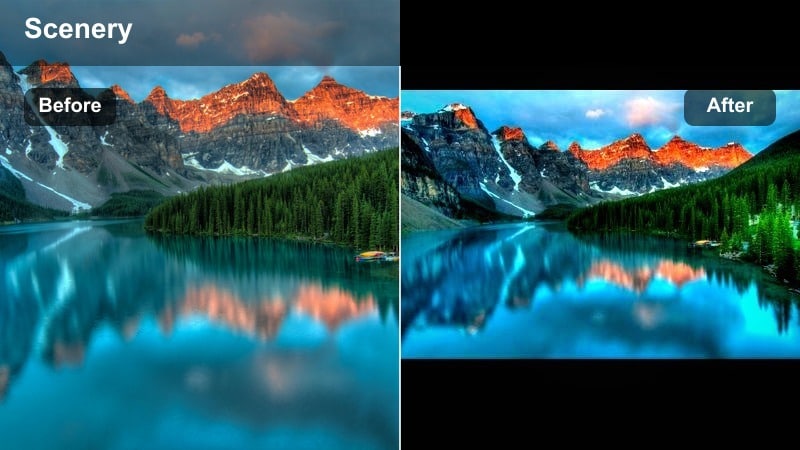
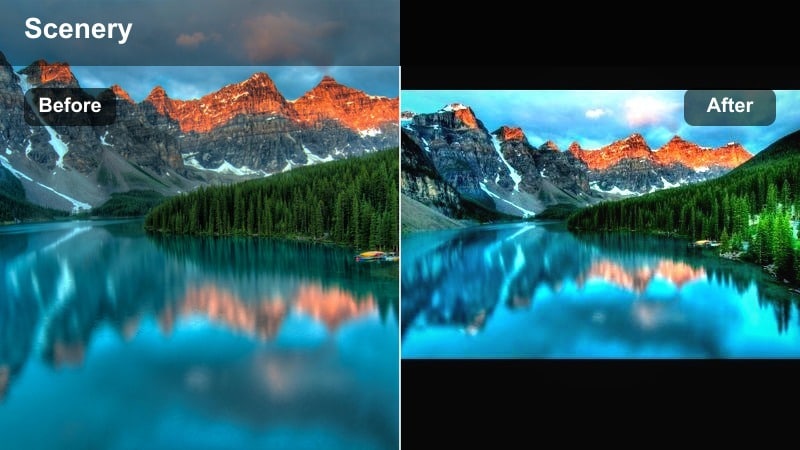
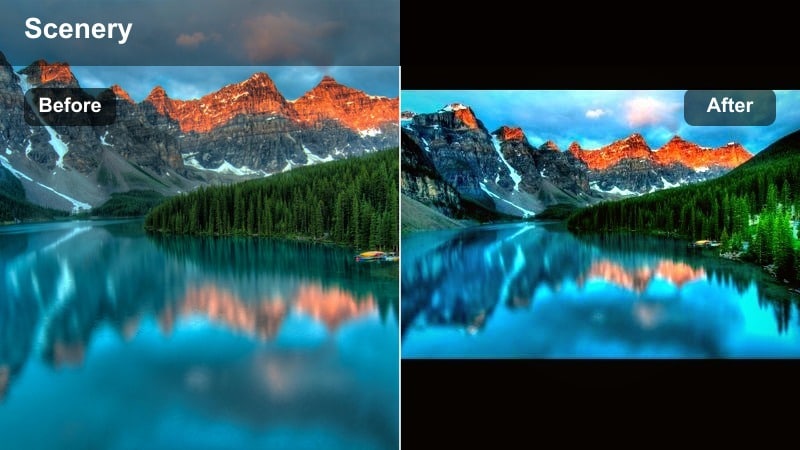
Cinematic Nature Filter: Epic Wilderness
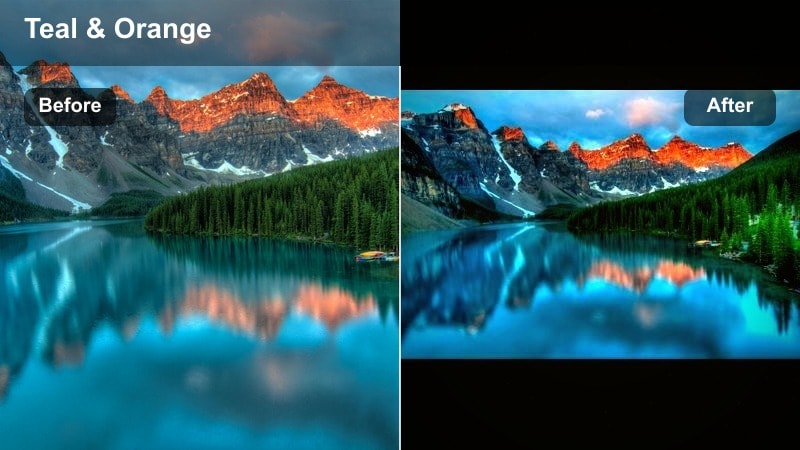
- Effect look: High contrast with rich greens, subtle teal shadows, and warm highlights for sun-kissed leaves and rocks.
- Best for: Wide forest establishing shots, hiking sequences, and slow-motion drone passes over tree canopies.
- Editing tip: Lower the intensity slightly for close-ups of faces to keep skin tones natural while preserving the epic wilderness mood.
This signature cinematic nature filter delivers a bold, epic wilderness aesthetic with a modern film look forest finish. Rich greens and warm highlights help tree canopies, moss, and rocky textures pop, while the gentle teal in the shadows adds a contemporary, big-screen polish to your nature cinematic scenes.
In Filmora, apply Cinematic Nature Filter: Epic Wilderness to your main establishing shots first, then adjust the strength per clip to keep a cohesive tone across your entire sequence. Use the Color tools to fine-tune contrast and saturation, and slightly dial back the filter on close-ups so faces stay natural while the environment still feels dramatic.
Match exposure before applying Epic Wilderness
Balance your exposure and white balance in Filmora before enabling the Cinematic Nature Filter: Epic Wilderness preset for more consistent results. Correcting basic brightness and color temperature first ensures that the greens and warm highlights grade smoothly across different shots.
Once the base is clean, fine-tune shadows and highlights with Filmora s Color tools to keep foliage texture and sky detail intact. This way, you can push the epic wilderness contrast without crushing dark areas or blowing out sunlit leaves and clouds.
 secure download

Preview Cinematic Nature Filters in Real Time
In Filmora, you can hover over filters to preview their effect on your cinematic nature films before committing them to a clip. This helps you quickly test Epic Wilderness against other nature cinematic styles without adding unnecessary keyframes or adjustments.
Use real time previews on a short section of your forest timeline to compare dramatic nature looks, check how different filters handle foliage and sky, and decide which combination best supports your story arc from shot to shot.
secure downloadCombine Filters with LUTs for a Complete Film Look
Cinematic nature video filters can be layered with LUTs in Filmora to craft a complete film look forest treatment. Start with a nature friendly LUT that matches your camera profile, then use filters like Epic Wilderness to fine tune contrast, greens, and highlight color.
This approach lets the LUT handle overall color direction while the filter shapes mood for specific locations like forests, mountains, or misty lakes. Keeping filter intensity lower when stacked with a LUT helps avoid over processing and preserves a natural, cinematic finish.
secure downloadEmerald Forest Film Look
- Effect look: Cool emerald greens with soft faded blacks, giving woodland scenes a classic film-inspired atmosphere.
- Best for: Moody walks through dense woods, narrative scenes with characters under tree cover, and overcast forest days.
- Editing tip: Lift the blacks slightly to enhance the film look forest vibe, then add gentle vignette to keep eyes on your subject.
Emerald Forest Film Look introduces a cooler, more nostalgic palette to your forest footage, turning bright greens into controlled emerald tones and softening contrast for a slightly faded, analog feel. This is ideal for narrative projects where the forest should feel poetic and timeless rather than ultra realistic.
In Filmora, combine this filter with shallow depth of field and gentle vignettes so characters stand out against busy backgrounds. If the scene feels too dark, slightly raise exposure and blacks rather than cranking saturation, preserving the cinematic nature subtlety and avoiding a video like look.
Use depth of field with cool tones
Pair this filter with shallow depth of field shots to create separation between subject and the busy forest background. The cool emerald tones in the out of focus areas reinforce mood while your subject remains clearly defined.
In Filmora, combine Emerald Forest Film Look with slight blur or bokeh overlays to enhance the dreamy, cinematic nature atmosphere. This works especially well for slow walking shots, reflective moments, and scenes where you want the forest to feel like a soft, enveloping backdrop.
Sunlit Canopy Glow

- Effect look: Warm golden highlights with slightly desaturated greens, mimicking late-afternoon forest sunlight.
- Best for: Backlit foliage, lens-flare moments, and gentle tracking shots beneath tree canopies.
- Editing tip: Reduce saturation on yellows if skin tones look too warm, and lower the filter strength for midday shots to avoid overglow.
Sunlit Canopy Glow adds a golden, backlit feeling to forest scenes, perfect for afternoon walks and dreamy overhead canopy shots. Greens become a bit softer and less saturated so that warm highlights on leaves and branches naturally draw the eye.
Inside Filmora, use this filter on clips where the sun hits from behind or to the side, then fine tune HSL sliders if skin tones or highlights appear too intense. You can also blend it at lower opacity on overcast shots to fake a gentle warmth without making the scene look unrealistic.
Chase edge light for maximum glow
Shoot with the sun just out of frame to create natural rim light that this filter can exaggerate beautifully. Leaves, hair, and tree trunks will catch the glow, giving your footage a cinematic shimmer.
In Filmora, combine Sunlit Canopy Glow with a gentle bloom or glow effect to accentuate bright leaves and highlight details. Keep additional effects subtle so the overall look stays organic and grounded in real forest light.
Epic Mountain and Wilderness Views
Granite Ridge Cinema
- Effect look: Crisp contrast with cool blues and neutral greens, delivering a rugged, high-altitude cinematic tone.
- Best for: Mountain ridgelines, rocky hikes, and time-lapse sequences of clouds rolling over peaks.
- Editing tip: Use Filmora s curves to soften highlights if your snow or clouds clip, keeping detail while preserving cinematic punch.
Granite Ridge Cinema is designed to emphasize hard edges, rock texture, and crisp skylines with a cool cinematic touch. Blues deepen, greens neutralize, and contrast increases so ridges, cliffs, and clouds all feel bold and dramatic.
Apply this filter in Filmora to wide shots first, then check histograms for highlight clipping on snow or clouds. Adjust curves to protect detail, especially when working with drones or time lapses, and keep saturation slightly restrained so the look feels grounded and professional.
Stabilize for cinematic vistas
Enable Filmora s stabilization before applying this filter so textures stay sharp instead of jittery. Stable footage will make the increased contrast and detail in rocks and clouds look more intentional and cinematic.
Combine Granite Ridge Cinema with slow, deliberate camera moves or drone shots to fully showcase the granite detail and sky drama. Let the filter carry the mood while your pacing and framing tell the story of scale and isolation.
Wilderness Travel Journal
- Effect look: Soft contrast with slightly warm mids and gently muted colors for documentary-style travel films.
- Best for: Narrated hikes, nature travel vlogs, and handheld explorations through mixed landscapes.
- Editing tip: Lean on Filmora s color wheel to cool shadows slightly if your footage leans too warm from sunset or golden hour.
Wilderness Travel Journal keeps the focus on story and journey rather than heavy stylization. Colors are gently muted, midtones run warm, and contrast is softened so your voiceover or on camera narrative feels intimate and authentic.
Use this filter in Filmora for sequences that mix forests, rivers, and town transitions, giving everything a cohesive travel diary aesthetic. If you shoot at golden hour, cool the shadows slightly with Color Wheels to avoid an overly orange image while preserving the inviting warmth of the mids.
Use consistent framing for story flow
Shoot repeating motifs like boots on the trail or hands brushing foliage so this filter can tie shots into a visual chapter. The consistent grading will make these recurring details feel like part of a planned narrative structure.
In Filmora, group similar clips on your timeline and apply the same filter strength to maintain a cohesive travel narrative. Minor adjustments in exposure and white balance per clip are often enough to keep your sequence visually unified.
Stormfront Drama Lands
- Effect look: Darkened skies, boosted local contrast, and cool, desaturated tones for intense wilderness storms.
- Best for: Approaching storm clouds, windy ridges, and dramatic nature establishing shots before bad weather hits.
- Editing tip: Push the shadows just enough to keep detail in dark foliage, and add a subtle film grain for extra tension.
Stormfront Drama Lands turns changing weather into a central character, deepening clouds and cooling the entire palette for high tension wilderness scenes. Greens and blues become desaturated, while local contrast adds bite to clouds, rocks, and distant hills.
Within Filmora, apply this filter when you want to signal danger or emotional weight, especially before or during storms. Carefully raise shadow detail to avoid losing foreground interest, and consider adding a light film grain overlay to enhance the gritty, cinematic nature mood.
Time transitions with weather changes
Cut from calmer graded shots to this filter as clouds roll in to visually signal rising tension in your story. Audiences will feel the mood shift even before dialogue or music changes.
In Filmora, cross dissolve between a neutral look and Stormfront Drama Lands to create a gradual on screen transformation. This approach works well in travel films, nature documentaries, and narrative projects that rely on weather as a storytelling device.
Rivers, Lakes, and Gentle Nature Moments
Silverstream Calm

- Effect look: Cool, slightly desaturated blues with softened highlights for peaceful water and shoreline scenes.
- Best for: Slow pans across lakes, macro shots of water droplets, and reflective early-morning river footage.
- Editing tip: Reduce clarity and add a hint of Filmora blur to the background for an impressionistic, meditative water feel.
Silverstream Calm is crafted for tranquil, reflective water shots, cooling blues and easing highlight contrast so ripples and reflections feel gentle and soothing. The look supports meditative nature cinematic sequences and ASMR style visuals where movement is slow and deliberate.
In Filmora, add this filter to long, lingering shots and pair it with reduced sharpness or a subtle blur on background elements. This combination removes distractions at the edges of the frame, letting the viewer focus on water texture, reflections, and small details like floating leaves.
Capture subtle motion for calm energy
Record long takes of subtle ripples and slow currents so this filter can highlight the movement without distractions. The cool, desaturated palette will keep the mood consistent as the water flows.
Use Filmora s speed ramping to create slow, fluid motion that complements the calm color grading. Gentle slow motion and soft music can turn simple river shots into atmospheric, cinematic interludes.
Misty Lake Cinema
- Effect look: Low contrast with lifted blacks and muted blues, creating soft, mist-filled lake atmospheres.
- Best for: Foggy mornings, paddle boarding scenes, and quiet narrative moments at the water s edge.
- Editing tip: Add a subtle Filmora vignette and lower saturation in the greens to keep focus on subjects emerging from the mist.
Misty Lake Cinema embraces low contrast and gentle, muted tones to emphasize fog, distance, and quiet. Blacks sit higher, details fade softly into the background, and the overall scene feels dreamy and introspective.
Apply this filter in Filmora for sunrise or foggy morning shots, especially when your subject is small against wide expanses of water. Keep sharpening low, reduce green saturation around the edges, and let the natural softness of the environment sell the mood.
Use negative space in fog
Frame your subject small against lots of fog or open water so this filter can highlight the emptiness around them. The lifted blacks and muted blues will make that negative space feel intentional and cinematic.
In Filmora, avoid over sharpening foggy footage; let the natural blur and low contrast carry the dramatic nature mood. A light vignette can guide the viewer s eye without breaking the soft, ethereal atmosphere.
Golden Shoreline Journal
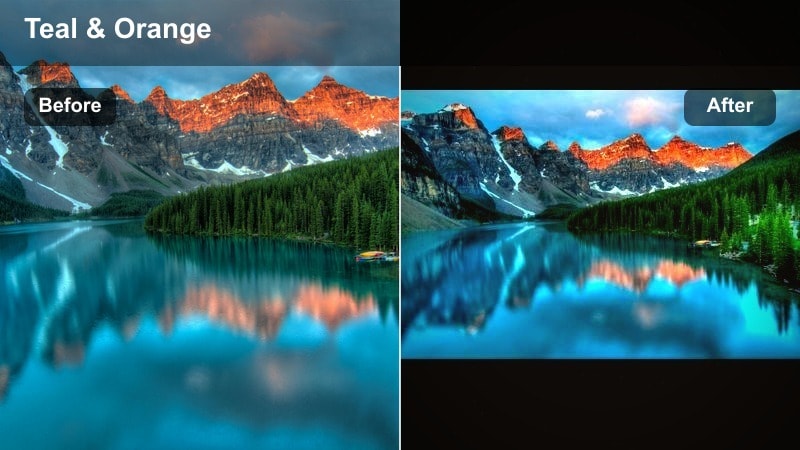
- Effect look: Warm highlights with gentle teal shadows, giving shores and riverbanks a cinematic travel postcard feel.
- Best for: Sunset beaches, riverbank picnics, and character-driven stories near water.
- Editing tip: Protect skin tones by slightly reducing orange saturation in Filmora while keeping the golden glow in the background.
Golden Shoreline Journal brings a postcard like warmth to riversides and beaches, balancing sunlit highlights with tasteful teal in the shadows. This creates the familiar teal and orange inspired travel look without pushing colors into an artificial range.
In Filmora, use this filter during golden hour and gently trim orange saturation or use skin tone protection to keep faces natural. The background can stay rich and glowing while people remain flattering and true to life, making this filter ideal for vlogs and narrative scenes by the water.
Let the sky tell the time of day
Shoot close to sunset or sunrise so the warm sky works naturally with this filter s golden emphasis. The graded highlights will feel authentic, and reflections in the water will take on a cinematic sheen.
Adjust Filmora s HSL panel to keep blues in water from turning too cyan while preserving the cinematic teal shadows. This fine tuning keeps your shoreline sequences balanced, vibrant, and professional.
Moody Nature Filters for Storytelling
Nature Moody Filter: Embers
- Effect look: Deep shadows, warm highlights, and a slight red-brown tint for campfire and dusk forest scenes.
- Best for: Campfire storytelling, twilight walks, and emotional moments in dramatic nature narratives.
- Editing tip: Use Filmora s color mask to keep faces slightly brighter than the background so expressions stay clear in the dark.
Nature Moody Filter: Embers is tailored for campfires, dusk, and intimate evening scenes in the wild. It deepens shadows, enhances firelight, and adds a subtle red brown tint, turning simple campsites into rich, cinematic storytelling environments.
Inside Filmora, apply this filter selectively to low light clips and use color masks or adjustment layers to gently lift faces. This keeps eyes and expressions readable while the surrounding forest falls into a warm, moody darkness that supports emotional dialogue or voiceover.
Expose for the flame, grade for the story
Underexpose slightly in camera to avoid blown out flames, then let this filter recover warmth in the mids. The preserved detail in the fire will make sparks, embers, and wood texture more cinematic.
In Filmora, add gentle camera shake or handheld overlays to increase immersion around the fire. Combined with the Embers filter, these details make your camp scenes feel more present and documentary like.
Overcast Forest Noir

- Effect look: Cool, desaturated greens with strong micro-contrast, channeling a natural thriller or noir atmosphere.
- Best for: Cloudy forest days, suspenseful tracking shots, and wildlife sequences with a serious tone.
- Editing tip: Cut saturation on greens and yellows to maintain the noir feel, and use Filmora s sharpen slider very lightly for texture.
Overcast Forest Noir strips out bright greens, replacing them with cool, controlled tones and added micro contrast for texture. The result is a grounded, thriller like forest look that works well for suspense, mystery, and serious wildlife moments.
Use this filter in Filmora when your story leans dark or introspective. Lower overall saturation slightly, especially in greens and yellows, and apply only a touch of sharpening so bark, leaves, and wet trails feel detailed but not brittle or noisy.
Use foreground layers for tension
Shoot through branches or foliage so this filter can turn shapes into graphic frames around your subject. The cooler tones and contrast will make those foreground elements feel like barriers or watchful eyes.
In Filmora, subtly darken the edges with vignettes to push attention deeper into the forest composition. This combination of framing and grading builds suspense without needing heavy effects.
Rain-Soaked Cinema

- Effect look: Glossy, contrasty look with slightly cooler shadows and boosted highlights on wet surfaces.
- Best for: Rainy trails, dripping leaves, and slow-motion shots of water hitting rocks or tree bark.
- Editing tip: Add a touch of Filmora motion blur or slow motion to emphasize raindrop streaks and sparkling reflections.
Rain Soaked Cinema emphasizes the sheen and detail of wet surfaces, boosting contrast and highlights while cooling shadows. The result is a polished moody filter that makes raindrops, puddles, and slick trails look almost tactile on screen.
In Filmora, pair this filter with slow motion or slight motion blur to highlight individual droplets and streaks of rain. Keep exposure under control to avoid blown highlights on wet rocks and leaves, and consider light grain or subtle sound design to complete the cinematic weather experience.
Shoot with backlit rain for sparkle
Position a light source or the sky behind the rain so this filter can catch highlights in every droplet. Backlit rain combined with the glossy grading makes even simple paths look dramatic.
In Filmora, experiment with subtle highlight roll off to avoid harsh clipping in bright, wet surfaces. Balancing the brightest areas will keep the scene intense but still pleasing to watch.
Tips for Using Nature Cinematic Filters in Filmora
- Shoot slightly flatter in camera so Filmora s cinematic nature video filters have more latitude for contrast and color shaping.
- Keep a consistent white balance across your shots before adding filters to avoid mismatched skies and foliage.
- Use keyframing in Filmora to gently ramp filter intensity during scene transitions, especially when moving from sunny to overcast conditions.
- Create a custom preset by saving your favorite nature cinematic filter, exposure tweaks, and vignettes together for fast reuse.
- Always check skin tones when using strong forest filters in character driven scenes and dial back saturation if needed.
- Test multiple cinematic nature video filters on a short sequence first so you can lock in a visual style before grading the full project.
Cinematic nature video filters in Filmora make it easy to give forests, mountains, rivers, and stormy skies a unified, dramatic look that supports your story. With the right combinations of contrast, color balance, and subtle effects, your outdoor footage can quickly take on a polished, film ready style.
Experiment with combinations of Epic Wilderness, moody nature filters, and gentle water looks until you find a visual language that matches the emotion of your cinematic nature films. Save your favorite settings as presets so every new project can start with the same cohesive, professional grade foundation.
secure downloadNext: Explore Nature Moody Filter Styles for Atmospheric Scenes
