
 100% Security Verified | No Subscription Required | No Malware


 ChatGPT
 Perplexity
 Gemini
 Claude
 Grok
Grok
Among the many different kinds of explainer videos, whiteboard explainer videos are exceptionally effective in illustrating complex ideas while engaging the viewers. Their hand-drawn, animated style mimics the experience of watching a presenter illustrate concepts in real time, making it hard not to pay attention.
If you are also interested in creating whiteboard explainer videos, but hesitate about how to start due to a lack of drawing skills or technical knowledge, this guide is for you. We'll walk you through the entire process, so you can confidently start creating right away!

In this article
Part 1. Plan Your Whiteboard Animation Video
To save you a lot of time and effort down the line, you need to start your whiteboard animation video with a bit of planning. Begin by asking yourself: What's the main message, and who is my audience? Once you have a clear idea of what you want to communicate and to whom, move on to the next stage.
1. Develop Your Concept
From the initial idea, take time to develop the concept further. Think about how you want the video to unfold. For example, if your main message is about the importance of recycling, you can tell a story that follows a single plastic bottle through the recycling process. Outline the key scenes that will make up your story. Consider using mind maps or bullet lists to organize your thoughts.

2. Write Your Script
Once your concept is in place, the next step is to script your whiteboard explainer video. Your script should outline every spoken word and describe the corresponding visual elements. If you need help when making an effective script, you can use AI Copywriting.

3. Create Storyboards
Next, it's time to create detailed storyboards to help you visualize your idea better. This step involves translating your script into visual scenes that will later be animated. You can indicate where on-screen text, interactive elements, or specific animations will occur.
Sketch out each frame of your video. It doesn't have to be perfect—just simple drawings would do. What's important is annotating each frame with notes about what is happening and any audio that will accompany the visuals.

Part 2. Gather Tools and Resources for Whiteboard Explainer Videos
Your ideas are now in place. The next step is to assemble the necessary tools and resources to execute your vision for the explainer video.
1. Essential Tools for Whiteboard Animation
Thankfully, learning how to create whiteboard videos has been simplified with the advent of various software tools that handle the animation for you. These tools often come with pre-made animated drawings and templates.
One of the best software to make and edit whiteboard explainer videos is Wondershare Filmora. Filmora is packed with everything you need to get started—from animated whiteboard clips, royalty-free music, built-in recorder, to intuitive editing tools that streamline the video creation process.

This convenience helps you create explainer videos that suit your vision without having to start from scratch each time or rely on complicated software. Some of Filmora's features that will be useful for making whiteboard animation videos with ease are:
- Keyframe Animation: Control the movement and transformation of elements over time to create dynamic video effects.
- Playback Speed Adjustment: Adjust playback speed for slow-motion or fast-forward effects.
- Stock Media: Access a library of high-quality videos, audio, and images for easy integration.
- Creative Assets: Use graphics, icons, and backgrounds to enhance video design.
- Titles and Text Overlay: Add titles and text for clarity and engagement.
- Built-in Recorder: Record audio or video directly within the software.


Before making a whiteboard animation video, you need to install the software on your computer first. Filmora is available for download on both Windows and Mac, so you can choose the version that suits your operating system.
2. Resources for Whiteboard Animation Videos (for Non-artists)
Next, creating whiteboard animation videos might seem hard if you believe you need advanced artistic skills to draw and record the content manually. However, there's an easier way for those who aren't confident in their drawing skills.
Instead of making each element by hand, you can use pre-made whiteboard animation clips for explainer videos. These clips are readily available and can significantly simplify the production process. Filmora's stock assets are a great starting point, but you can also find other resources on these sites:
Make use of the storyboard you've made to guide you through selecting the right clips that match the scenes you need.
Part 3. Animate and Edit Your Whiteboard Explainer Videos
After you've gathered all your resources—your script, explainer video software, and whiteboard animation assets—it's time to stitch everything together and start creating your whiteboard animation explainer video.
The process can be broken down into the following steps:
Record the Voiceover for Narration
Step 1. Create a new project and record a voiceover
Start by creating a new project in Filmora. Click the recorder button and set your desired parameters to record your voiceover.

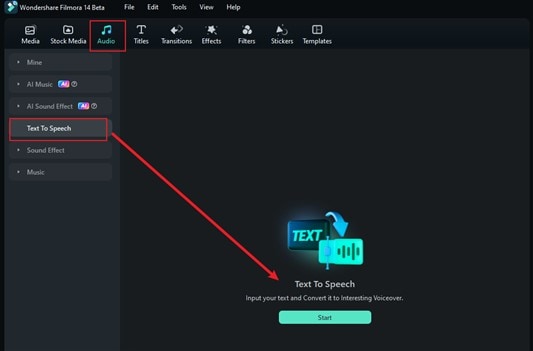
Alternatively, you can generate your voiceover using Filmora's Text to Speech. Go to the Audio menu, select Text to Speech, and click Start.
Input your script or use AI Copywriting for assistance. Choose a voice, adjust the speed and pitch, and enable "Auto Split" for smart paragraph division, then click Generate.
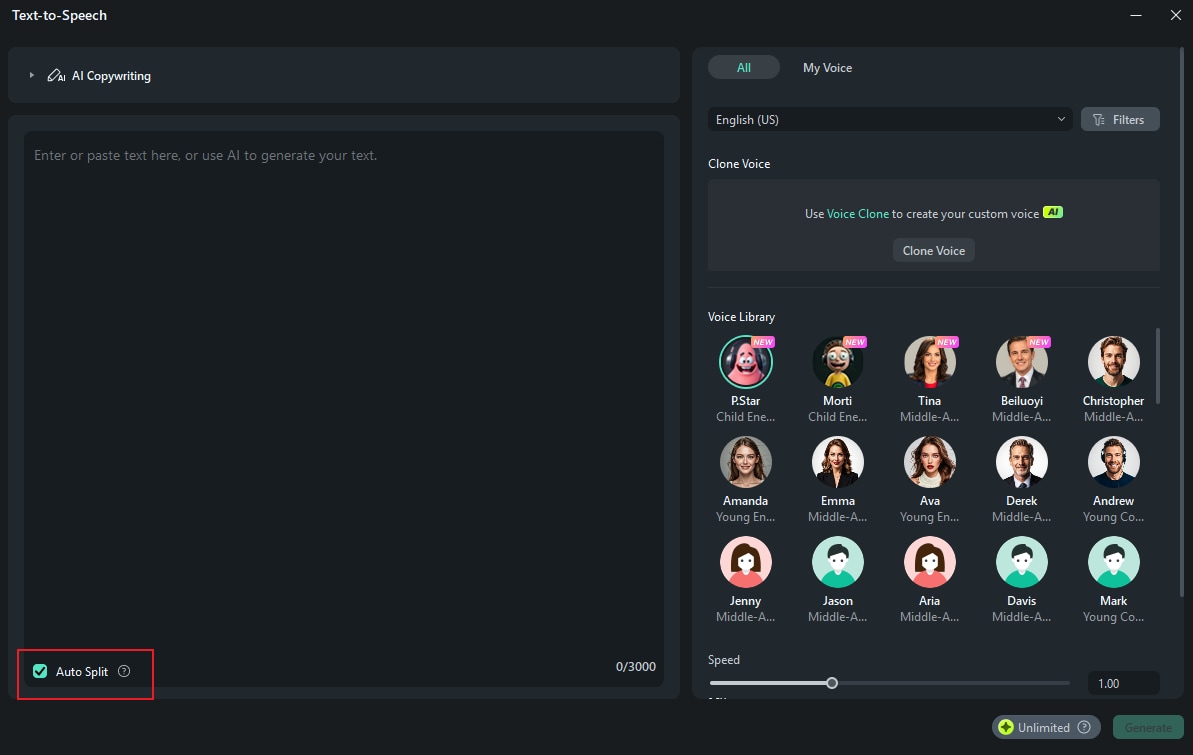
Tip: If you prefer using your own voice, try Filmora's Voice Cloning feature. Choose Clone Voice in the Text to Speech window and follow the on-screen instructions.
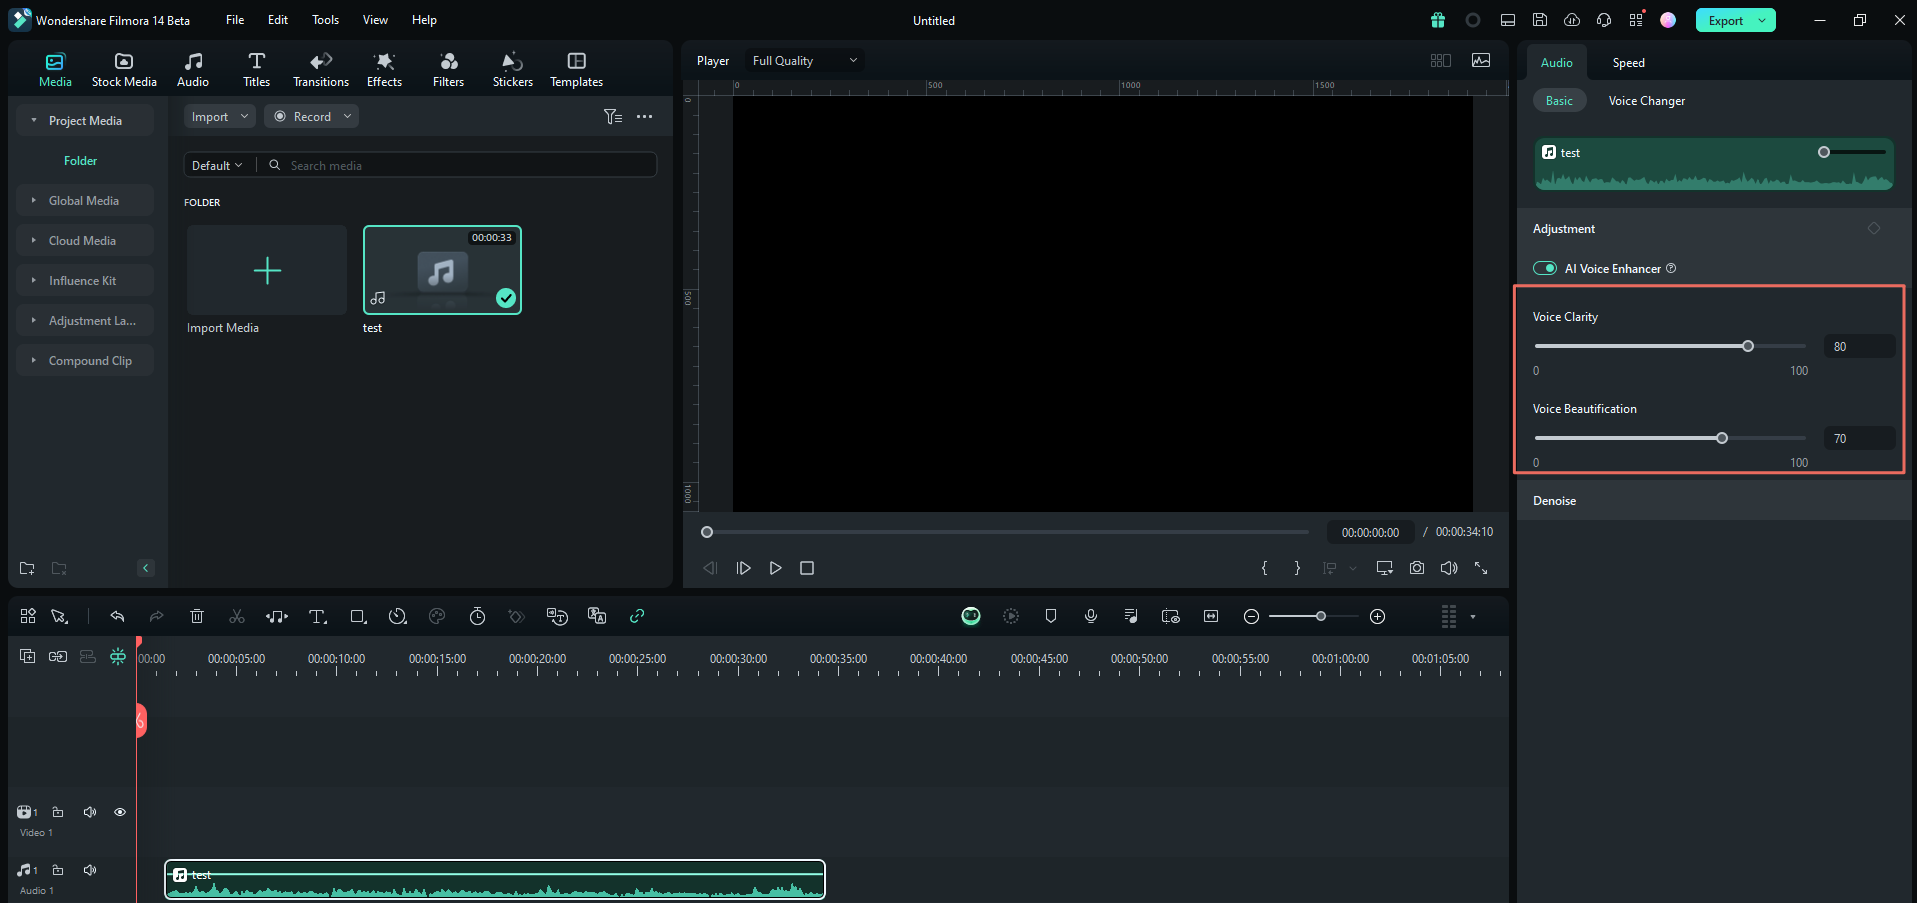
Step 2. Fine-Tune the Audio
Add the completed voiceover to your timeline if not done automatically. Trim or cut unnecessary parts and enhance the sound quality using AI Voice Enhancer from the property panel.
Import Your Assets
Once your narration and voiceover are ready, begin by integrating your whiteboard animation with your audio. In the Media menu, click ''Import' to add the animation clips stored on your computer.

Or, access Filmora's built-in library through the Stock Media menu. Search using keywords like "drawing," "hand-drawn," or "whiteboard animation." Select, download, and then drag your chosen clips directly to the timeline.

Arrange Your Timeline
Step 1. Organize Your Tracks
Filmora supports multi-track editing, so you can arrange and layer multiple video clips and audio tracks. If you need to add more tracks, click the ""+" " button on the timeline and choose "Add Video Track" or "Add Audio Track" as needed. Drag and drop the clip to organize them.

Step 2. Adjust Video Length and Playback Speed
If you noticed, most whiteboard explainer videos have a well-paced flow that keeps viewers engaged. To manage your video's pace, you can trim and adjust the playback speed. Click the clip and select Speed > Uniform Speed on the property panel.

Drag the Speed slider to the right or left to speed up or slow down the playback speed. You can also enter your preferred value in the Duration field. If certain sections feel too slow, increase the speed. If the clip is faster than the narration, slow it down. Trim the clip to refine its timing and flow.
Animate and Edit
Step 1. Add text overlays
Open the Titles tab and search for titles that match the whiteboard style. Some titles you can use are "Blackboard Doodle Text," "Retro Grunge," Hand Script Title," and "Typewritten Title 01." Drag it to the timeline and customize the text.

Step 2. Apply animation
Next, enhance your titles by adding animations. Select Text > Animation in the property panel. Choose an animation that suits the style and tone of your video. Click on it to apply the effect. Adjust the duration if needed.

Step 3. Add additional elements
Besides Filmora's stock media, you can find additional whiteboard animation elements in the Stickers menu. Use the search bar to find specific stickers or generate one using the AI Stickers Generator.

Part 4. Finalizing and Sharing Your Whiteboard Animation Explainer Video
By now, your whiteboard animation explainer videos may be almost done. Before you hit the export button, there are a few adjustments you can make to perfect the video and ensure it's ready for sharing.
Add whiteboard sound effects and background music
To make your whiteboard explainer videos realistic, consider incorporating marker or chalk writing sound effects. Go to Audio > Sound Effects. Search for "marker writing" or "chalk writing" and add it to the audio track.

In addition to sound effects, you can also add subtle background music to set the vibe. Navigate to Music and download the music that suits the video. Adjust the volume on the property panel.

Tip: If you can't find the right track, try generating it using AI Music. Select the mood, theme, and genre to generate a custom soundtrack.
Save and share your whiteboard explainer video
Once you're satisfied with how everything looks, it's time to export your video. Click "Export" and consider enabling "Advanced Compression" to optimize the file without sacrificing quality. You can adjust the compression settings based on:
- By Quality: Select a quality level, ranging from 10% to 90%, to control the size of the compressed file.
- YouTube Upload: Choose this option if you're optimizing specifically for YouTube to ensure the best balance between quality and file size.

If you want to share your video directly on social media platforms like TikTok or Instagram, select the "Social Media" option from the top menu.
Conclusion
Thanks to accessible tools like Filmora, you can create whiteboard animation explainer videos, starting from making your script to animating the visuals with ease. Filmora is equipped with advanced features essential for whiteboard animation videos, such as keyframe animation, voice-over recording, a vast library of whiteboard animation clips, royalty-free music, and sound effects.
So, take the first step today: sketch your idea, download Filmora, and follow our guide on how to create a animated explainer video above. Every video you make is a chance to get better, reach more people, and maybe even surprise yourself with your creativity.
