Want to reach more people with short videos? Instagram Reels ads allow businesses to promote their content within the Reels feed. These ads appear between organic Reels, blending seamlessly into users' feeds on Facebook and Instagram.
Reels ads on Facebook and Instagram share a similar format but differ slightly in placement and audience engagement. Facebook Reels ads appear in the Reels, Feed, and Watch tab. Meanwhile, Instagram Reels ads are shown in the Reels feed and Explore page.
This guide covers everything you need to know about Reel advertising. Starting from ad specifications to setting up and running Reels ads on Facebook and Instagram. Let's get started!

In this article
Part 1. Facebook and Instagram Reels Ads Specifications
Reel advertising is full-screen, vertical video ads that appear between organic Reel content on Facebook and Instagram. Facebook Reels ads are shown in the Reels section, Feed, and Video tab. While Instagram Reels ads appear in the Reels tab, Feed, and Explore page.
These ads autoplay with sound and users can engage with these ads by liking, commenting, sharing, saving, or skipping them. Since both platforms integrate Reels ads seamlessly into their Reels experience, it's important to follow the technical guidelines to optimize your social media video ad.
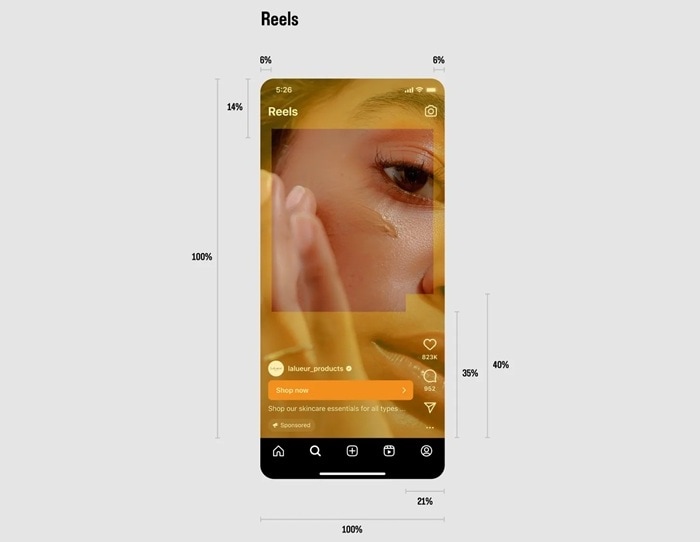
Facebook and Instagram Reels Ads Requirements
Facebook Reels ads and Instagram Reels ads have slightly different requirements. While they share many similarities, there are key differences that set them apart. Follow these Meta ads guidelines to ensure high-quality playback:| Category | Facebook Reels Ads | Instagram Reels Ads |
| File Type | MP4, MOV, GIF | MP4, MOV |
| Aspect Ratio | 9:16 (vertical) | 9:16 (vertical) |
| Resolution | 1440×2560 pixels (recommended) | 1440×2560 pixels (recommended) |
| Primary Text Limit | 40 characters | 72 characters |
| Headline Text Limit | 55 characters | Not mentioned |
| Video Duration | Not specified | 0 seconds to 15 minutes |
| Minimum Width | Not specified | 250 pixels |
| File Size | Max 4GB | Max 4GB |
| Safe Zones | Keep 14% (top), 35% (bottom), and 6% (sides) free from text/logos. | Keep key elements away from the edges. |
| Restrictions | No specific media restrictions | Cannot include: licensed music, face/camera effects, GIFs, product tags, or Reels published before Oct 15, 2021 |
Part 2. How to Create Reels Ads for Facebook and Instagram
Running Reels ads is an effective way to increase engagement and reach a larger audience. To create these ads, you can either promote an existing organic Reel or upload a new video directly as an ad.
Reels ads on Facebook and Instagram can be created directly without the need for prior organic posting. However, many marketers recommend testing content organically before investing in paid promotion to analyze engagement and optimize performance.

With Instagram's built-in editing tools, you create Reels before setting them up as ads. Here is the step-by-step guide to creating Reels using Instagram's built-in editing tools:
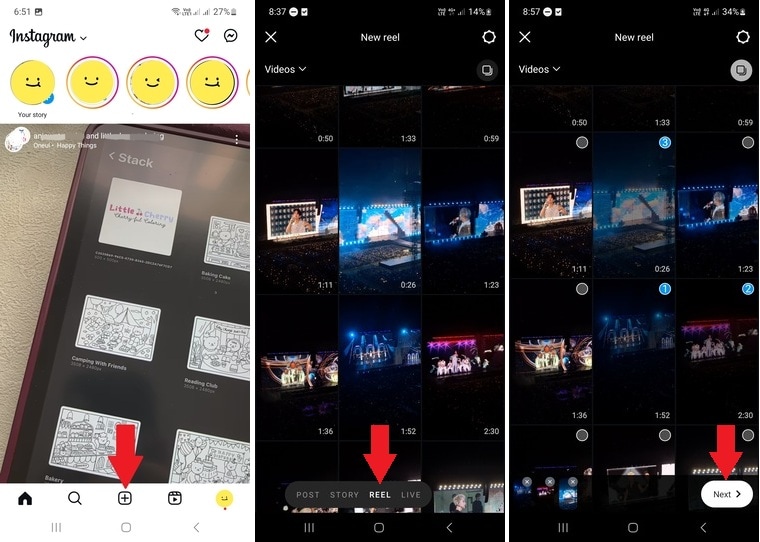
Step 1. Access the Reels Editor
- Open the Instagram app and tap the Plus (+) icon at the bottom center.
- Swipe through the toolbar at the bottom and select Reel mode to begin creating your video.
Step 2. Choose the Video Footage
- Next, pick the video you want to upload.
- If you're adding multiple clips, tap and hold one video, then select the others you'd like to include.
- Once done, tap Next to continue.
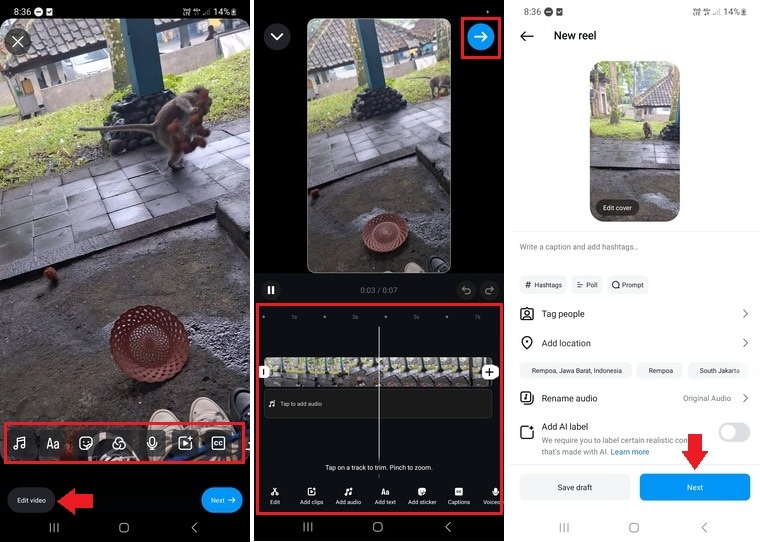
Step 3. Customize Your Reel
- Enhance your video by adding music, text, stickers, filters, voiceovers, or special effects.
- If you need more advanced editing, tap Edit Video at the bottom-left corner of your screen.
Step 4. Use Advanced Editing Tools (Optional)
- Adjust the speed of your clips, trim footage, and apply effects as needed.
- When satisfied with the edits, tap Next.
Step 5. Finalize and Share your Reel
- Before posting, you can write a caption, add hashtags, or tag friends to boost engagement.
- Once everything is set, tap Next > Share to publish your Reel.
Bonus: Transform Long Videos into Reels with Filmora
To create effective Reels ads, keep your videos short and captivating—quickly grabbing attention is key. If you have longer videos, simply trim them down into punchy, engaging clips. Instead of creating ads from scratch, try repurposing your existing content into viral-ready Reels!
Wondershare Filmora has a Smart Short Clips feature that can help you transform long videos into short-form highlights. It automatically trims content, and you can optimize it for Reels ads. Here's how to use Filmora to create attention-grabbing Reels in just a few steps.
How to Create Reels from Videos & Photos Using Filmora (Mobile)
Want to turn your existing videos and photos into high-converting Reels ads? With Filmora Mobile App, you can instantly transform existing content into scroll-stopping ads—no editing skills needed! Simply upload your clips, select the 'Business' theme (or other ad-friendly templates), and Filmora auto-generates a polished Reels ad with captions, music, and smooth transitions. Perfect for boosting engagement, promoting products, or driving sales—fast!
Want to see how easy it is? Check the step-by-step demo now!
How to Create Reels from Long Videos Using Filmora (Desktop)
Got long videos? Turn them into viral Reels instantly with Filmora (Desktop)! Simply import your footage, let Filmora auto-cut the highlights, add music/effects, and generate scroll-stopping Reels in minutes!
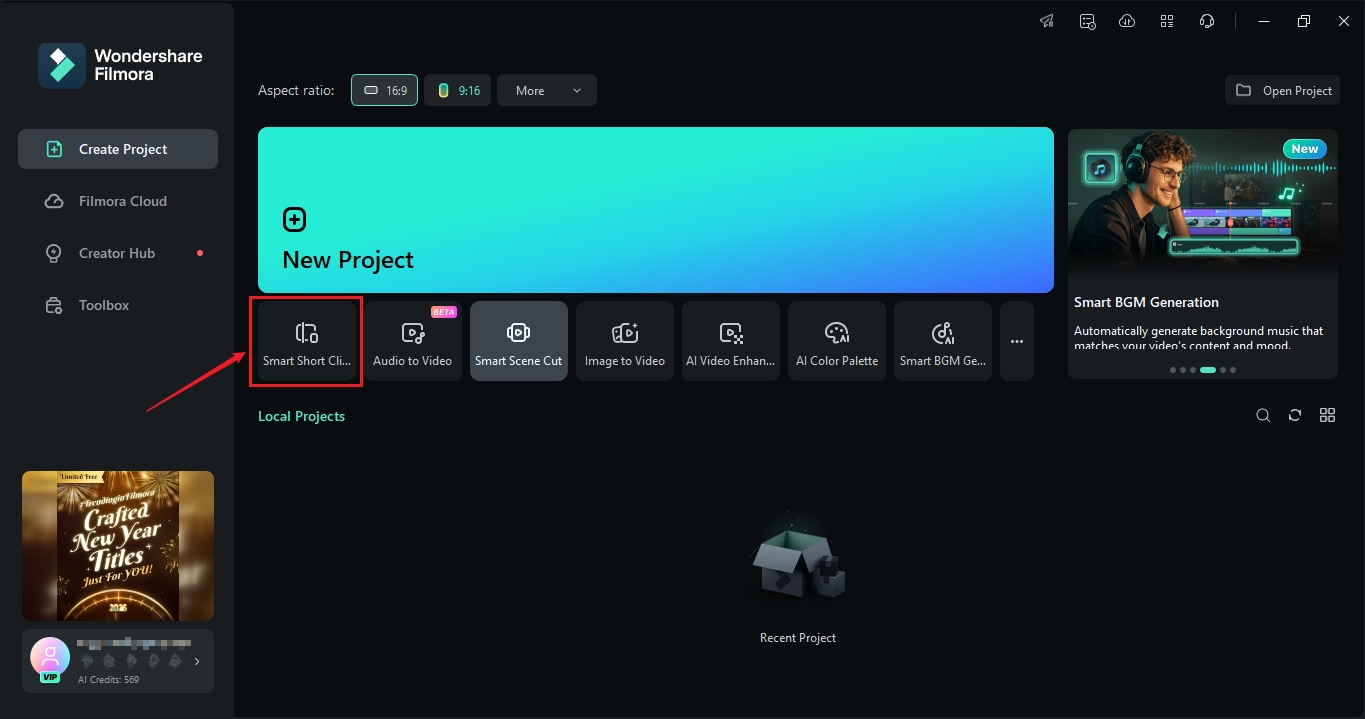
01 of 05 Open Filmora and Access Smart Short Clips
- Download and launch the latest version of Filmora on your computer.
- On the Create Project tab, select the Smart Short Clips button to start editing your video.
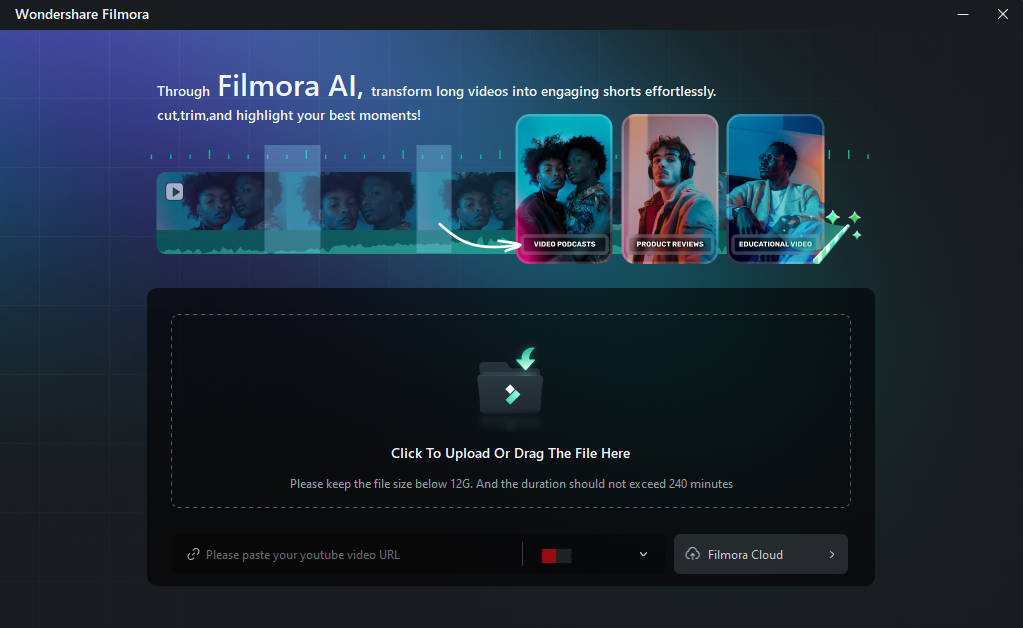
02 of 05 Import Your Video
- To upload your content, click the Folder icon or drag and drop the video file from your device.
- If you're repurposing content from YouTube, paste the YouTube link to import the video into Filmora.
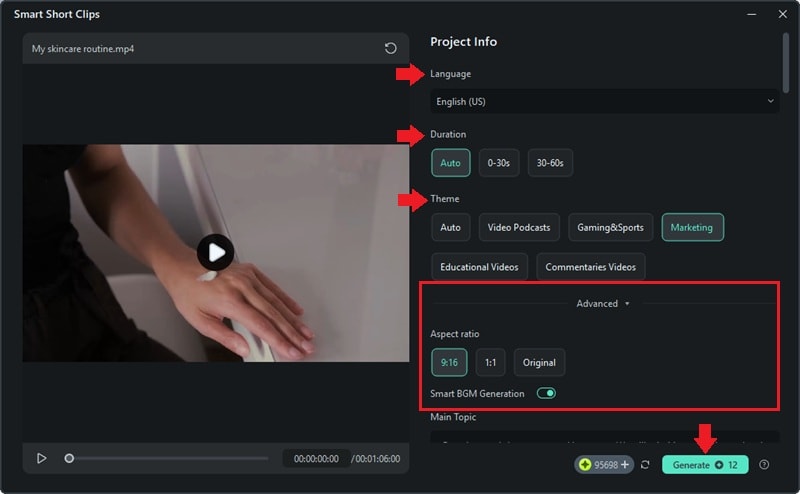
03 of 05 Customize Video Settings
- Modify the Project Info settings like Language, Duration, and Theme to match your content style.
- Access the Advanced options to set the Aspect Ratio for Reels (9:16) and enable the Smart BGM Generation tool for background music.
- Once configured, click Generate to process the video.
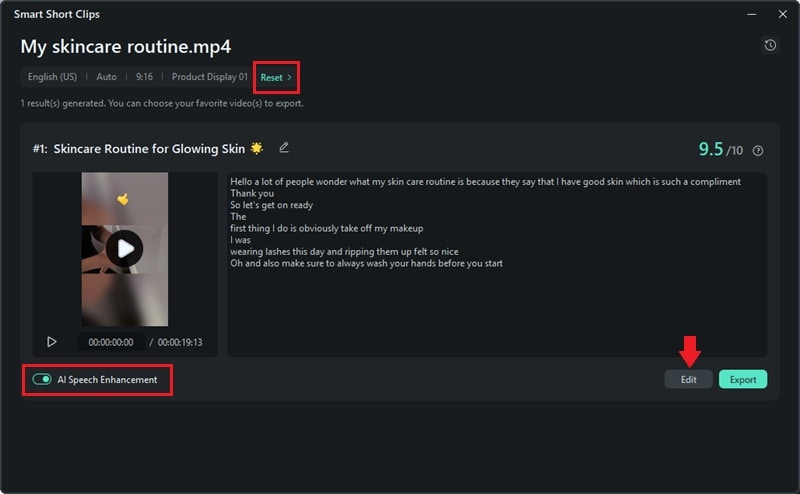
04 of 05 Edit and Enhance Your Clips
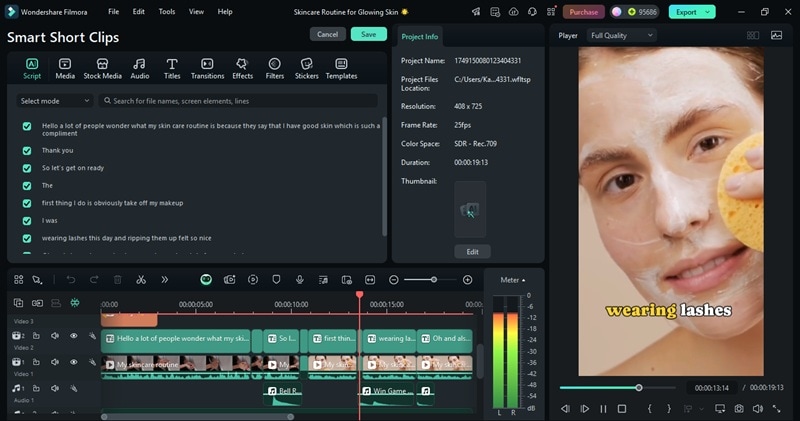
- Filmora will generate short clips from your video. Preview them to see if they align with your content. If the clips don't fit your needs, click Reset to regenerate them.
- For better audio clarity, turn on AI Speech Enhancement.
- To make additional refinements, click Edit and customize your video.
Next, you'll enter the editing workspace. Here, you make further adjustments to the text, transitions, background music, and visual effects.
05 of 05 Export and Share Your Reel
- Before finalizing your Reels ad video, preview the video to ensure it has smooth transitions.
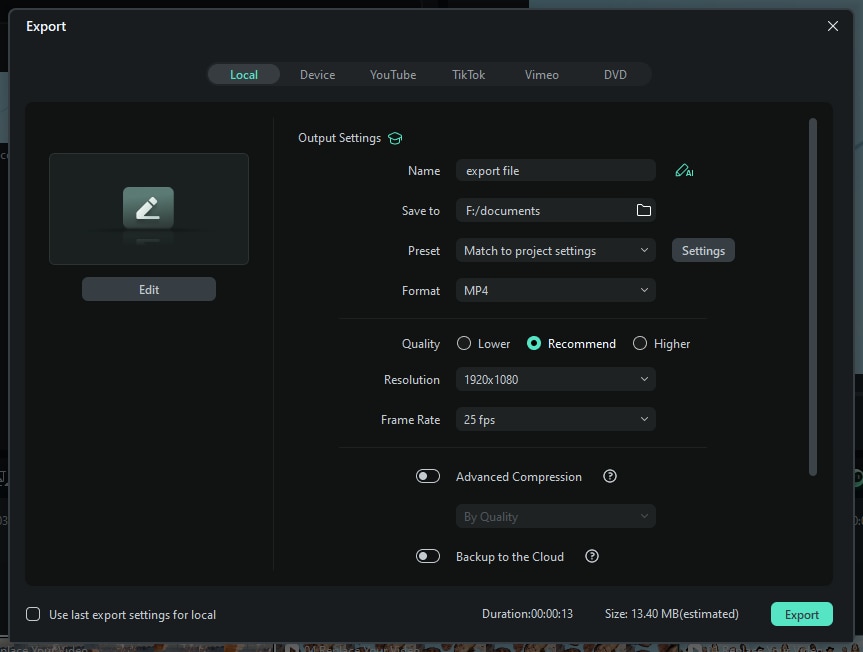
- Once you're done editing, click Export > Local and choose MP4 or MOV as the file format.
- Set the resolution to 1080×1920 pixels (recommended for Reels ads).
- Then, click Export to save the final version of your Reels ad video.
Part 4. How to Put Reels as Ads on Facebook and Instagram
Reels ads are an effective way for businesses to boost engagement and expand their reach. With Meta Ads Manager, you can run Reels ads on Instagram and Facebook to reach a targeted audience. Whether you're a business owner or a facebook Reels creator, leveraging Reels ads can help increase brand exposure and engagement.
Follow these steps to set up and promote Reels ads on Facebook and Instagram using Meta Ads Manager:
Step 1. Open Meta Ads Manager
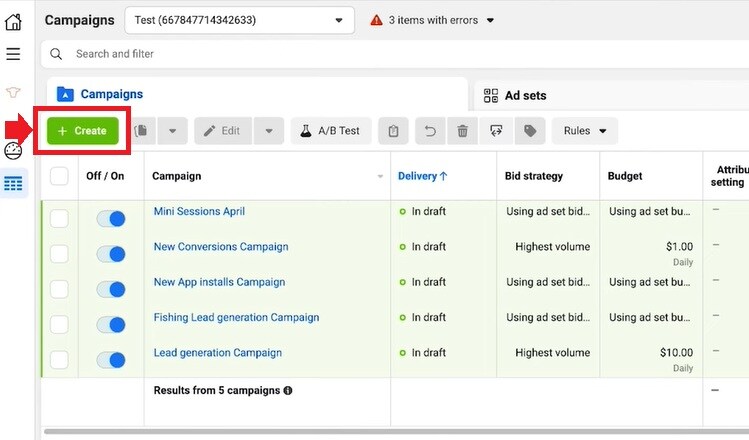
- Go to Meta Ads Manager on your desktop or open the Meta Ads Manager app.
- Click the Create button to start a new campaign.
Step 2. Select Your Campaign Objective
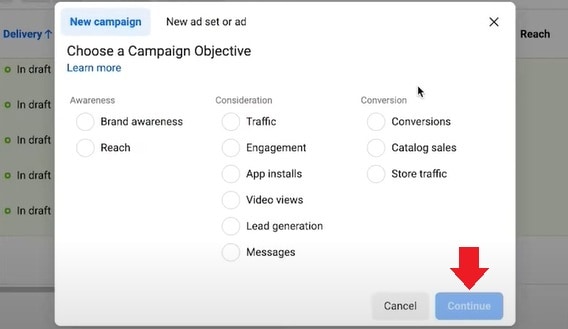
- Choose a campaign objective that aligns with your marketing goals. For Reels ads, Engagement, Traffic, or Conversions work best.
- Click Continue to move to the next step.
- Then, set the Campaign Name and Ad Set Name in their assigned boxes.
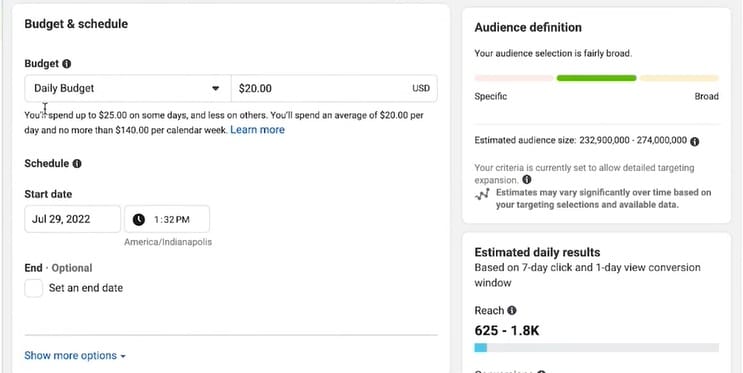
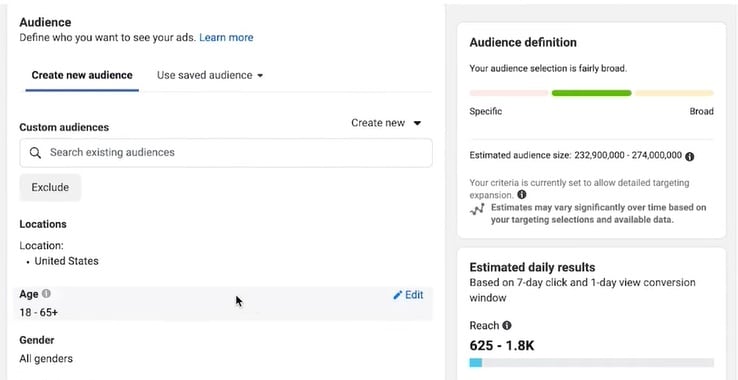
Step 3. Define Your Budget and Audience
- Choose a daily or lifetime budget and set the ad duration based on your campaign goals.
- Set your target audience by selecting demographics, interests, and behaviors.
Step 4. Select Reel Placement
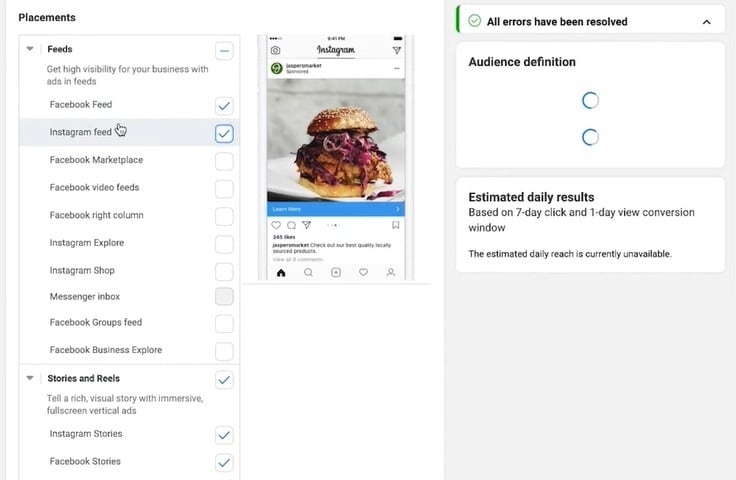
- In the Placements section, select Manual Placements.
- Under the Stories and Reels category, check the box for Facebook Reels and Instagram Reels
- You can also enable placements in Facebook Feeds and Instagram Feeds if you want broader visibility.
Step 5. Set the Ad Setup and Upload the Video
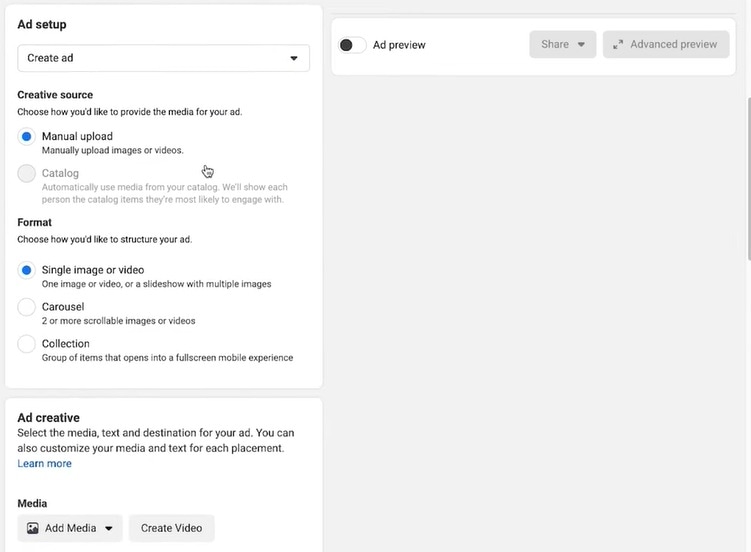
Customize the Ad Setup for the Reels ads:
- On the Ad Setup, select the category Create Ad.
- Set the Creative Source > Manual Upload.
- For the Format option > Single Image or Video.
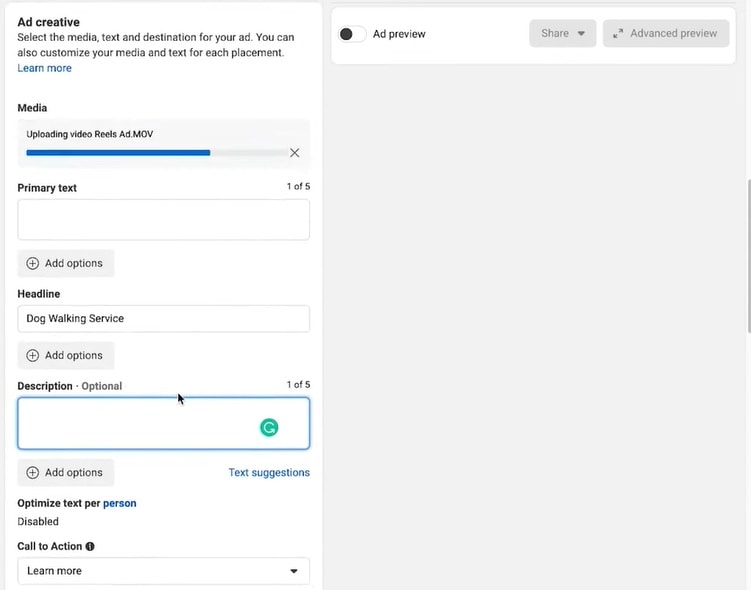
Then, upload the video files on the Ad Creative section by selecting Media > Add Media.
Step 6. Add Primary Text, Headline, Description, Call to Action, and Final Details
- Write a short and engaging caption (max 40 characters for Facebook, 72 for Instagram).
- Select a Call-to-Action (CTA) like Shop Now, Learn More, or Sign Up.
- Click Next and review all campaign details.
Step 7. Publish Your Reels Ad
Once you've reviewed all settings, click Publish to launch your ad. Meta will review your ad before it goes live. Once approved, your Reels ad will start running on Facebook and Instagram.
Conclusion
Running Facebook and Instagram Reels ads is a great way to reach more people with engaging short-form videos. These ads blend naturally into users' feeds, making them an effective way to connect with potential customers.
With the right strategy, Reels ads help brands target specific audiences, track performance, and improve campaign results. You can also use Wondershare Filmora's Smart Short Clips feature to transform long videos into short-form Reels content.
Start promoting an existing Reel or creating a new one and grow your brand on Facebook and Instagram with Reel advertising!


 100% Security Verified | No Subscription Required | No Malware


