
 100% Security Verified | No Subscription Required | No Malware


 ChatGPT
 Perplexity
 Gemini
 Claude
 Grok
Grok
Green screen Christmas backgrounds have become a holiday essential for creators who want festive videos without decorating entire spaces. With a little setup, any Christmas background for green screen can transform bland shots into warm, cinematic imagery alight with the glow of holiday lights, snow, and other alluring winter elements.
To help you get started, this guide shows beginners and creators how to use chroma key techniques to make beautiful, professional holiday videos using green screen backgrounds, step by step.

In this article
Part 1: What Green Screen Christmas Backgrounds Are
Green screen is a common video technique that uses chroma key to replace a plain colored backdrop with another image or video. A green screen Christmas background works the same way. The only difference is that the replaced visuals usually feature elements that fit the holiday theme, such as decorated trees, glowing lights, and falling snow.

When you’re short on space or time, these backgrounds can help transform any simple recording space into a more festive scene. Instead of building sets, hanging lights, or arranging props, they can be a quick shortcut to making your video look ready for Christmas.
Digital Christmas backgrounds are popular because they:
- Avoid the cost of real decorations
- Remove lighting challenges from reflective ornaments
- Allow instant theme changes
- Keep recordings clean, controlled, and flexible
Green Screen Christmas Backgrounds to Use for Your Video
Below are a few popular options you can download and use later, depending on the style of Christmas video you want to create.
1. Christmas Tree Green Screen
2. Green Screen Santa Claus Overlays
3. Animated “Merry Christmas” Text
4. Merry Christmas Green Screen
5. Green Screen Christmas Leaves with String Lights
Part 2: Preparing Your Footage for Chroma Key Success
Understanding green screen Christmas assets is only half the work. To make green screen Christmas backgrounds work, you can pay attention to the lighting and the overall setup of your shot so everything blends well once you add the background later.
Lighting & Recording Tips
- When planning to use a Christmas background for green screen, the lighting needs to be consistent and well-balanced. Otherwise, your subject may look “off” once placed in the scene. Make sure to set up your space properly before recording:
- Pay attention to clutter around your video. If the green screen background is already filled with Christmas elements, your original footage shouldn’t be crowded with random objects. It will make the final video feel too busy and lose its focus.

Besides the basic setup, you can always refine and adjust the look during the editing process. Now, let’s start working with your footage.
Part 3: Step-by-Step Guide: Create a Merry Christmas Green Screen Video
Your footage and holiday assets are ready, so the next step is turning them into a complete scene. Working with green screen Christmas backgrounds calls for an editor that can remove the backdrop cleanly and let you build layers without slowing you down.
For this reason, Wondershare Filmora fits that need well. It keeps the workflow simple, yet gives you enough control to shape a warm and convincing Christmas composition.
 secure download

Filmora is designed for quick, polished storytelling. It supports beginners with easy controls and helps creators speed up with built-in templates, effects, and AI features. The following tools are handy for Christmas green screen editing:
- Chroma Key (Green Screen): Instantly removes the green background with adjustable controls like tolerance, edge feather, spill reduction, and alpha settings to help your Christmas scene blend naturally.
- AI Portrait Cutout: Automatically refines the outline of people in your footage, so you can create smoother composites, where your subject blends seamlessly into the background.
- Smart Cutout: Paint over the area you want to keep, and Filmora will track and cut it out for you.
- Stickers, Filters, and Holiday Effects: Browse many Christmas stickers, snow overlays, sparkles, animated ornaments, and more to add to your video.
- Color Editing and Enhancement: Adjust colors and lighting using LUTs, HSL, and color correction tools. You can also fine-tune brightness, contrast, and apply stylistic grading to give your video that Christmas glow.
- Built-in Stock Media Library: Access a wide range of royalty-free Christmas footage, music, sound effects, and even green screen assets directly inside Filmora.
How to Edit with Green Screen Christmas Backgrounds
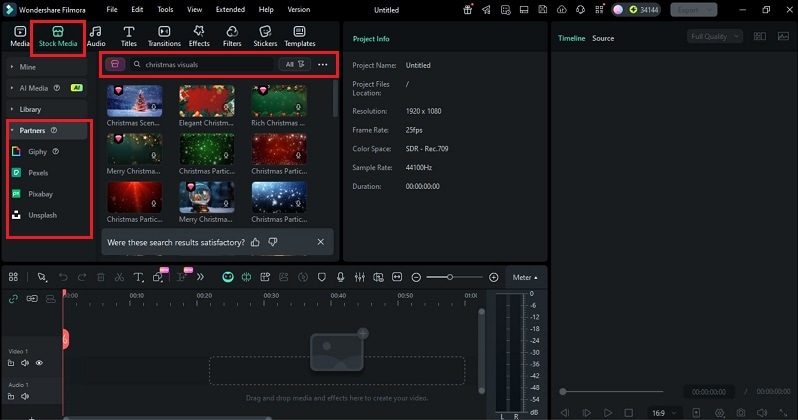
Step 1: Importing Footage & Christmas Assets
Open Filmora and start a new project. Bring in your own footage by dragging files into the media panel or clicking Import.
 secure download
Otherwise, you can also find several green screen Christmas backgrounds on the Stock Media tab. Choose a source like Pixabay, Unsplash, or Giphy, or select from Filmora’s Library. Drag it to the timeline to begin editing.
Step 2: Applying Chroma Key to Replace Green Screen
Place your green screen clip on a track above the background on the timeline.
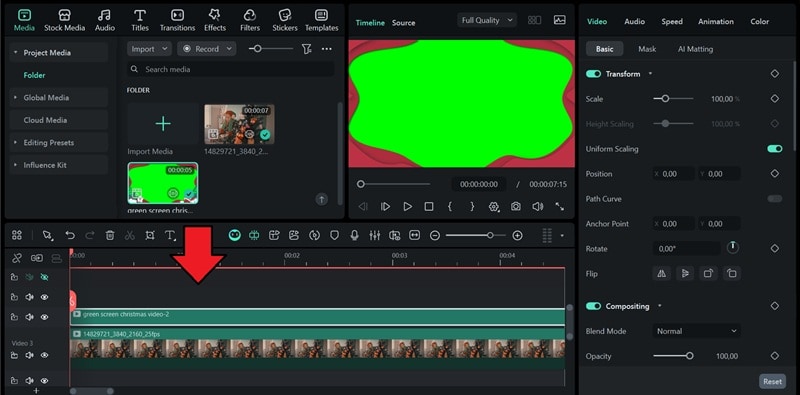
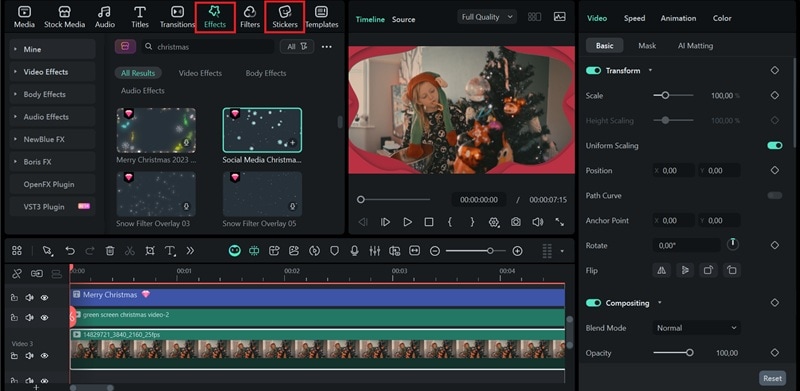
Select the green clip, and then go to Video > AI Matting. Enable Chroma Key to remove the green backdrop and adjust the settings.
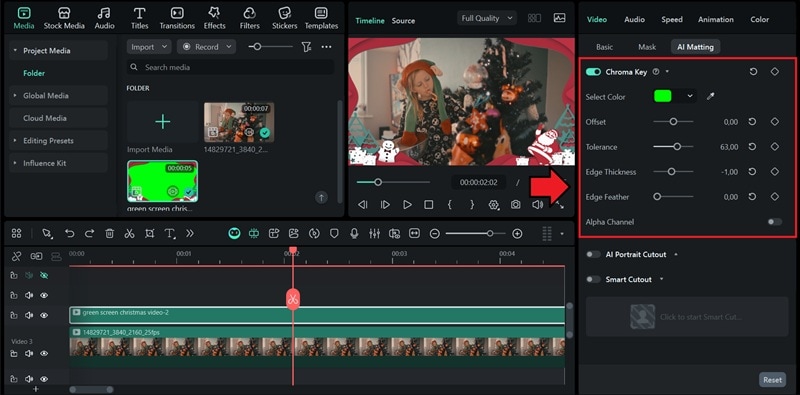
Under the same tab, you’ll also find AI Portrait Cutout and Smart Cutout if you prefer using those tools for cleaner or more detailed extractions.
Step 3: Adding Text and Effect Overlays
Enhance the video further by adding text overlays. Open the Titles tab and search for Christmas text styles. Drag a title to the timeline. Then, select it to change the message, font, and color.
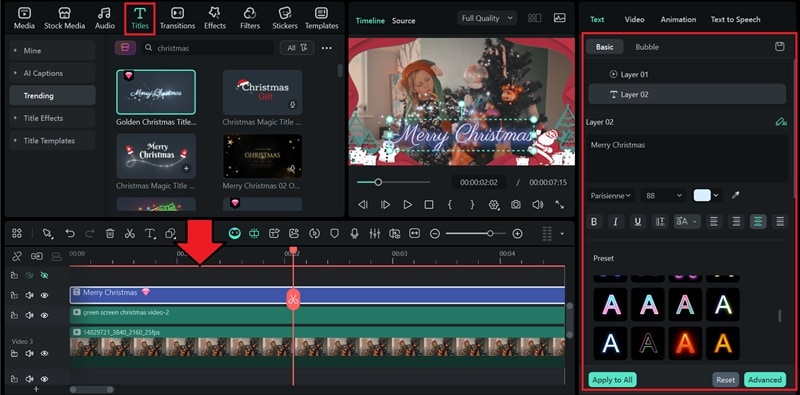
Besides adding text, you can place Christmas-themed effects or stickers onto your video. Just head to the Effects or Stickers tab to browse them. They can be a good addition in case your background still looks a little plain.
Step 4: Adding Music & Holiday Sound Design
To add music, go to the Audio panel and drag the track to the timeline. Set the volume so it complements the scene without making your voice hard to hear.
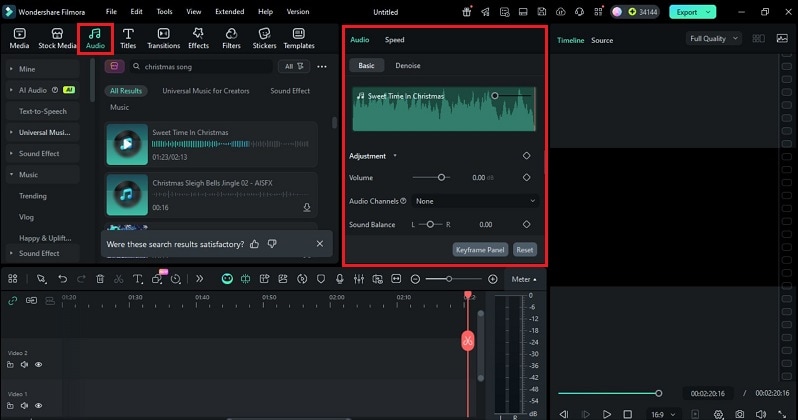
If you want a custom soundtrack, try the AI Music Generator. Type a short description to create a bell, soft piano, or orchestral holiday melody.
Step 5: Exporting & Sharing Your Christmas Video
After you’re done editing, click Export. Choose a file format and tweak the bit-rate or resolution if you want to have nicer quality.
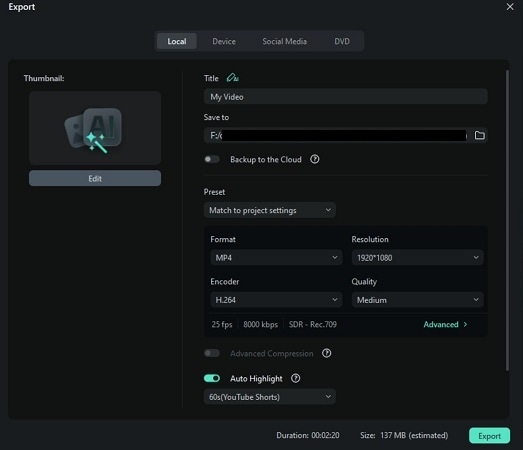
Leverage Advanced Compression to minimize file size while maintaining detail. Click Export again to save your final Christmas video and share it wherever you like.
Part 4: Creative Ways to Use Green Screen Christmas Backgrounds
After exporting your project, you can extend its value through creative reuse. The adaptable nature of green screen Christmas backgrounds lets you reshape the same footage into the following formats and ideas:
- Christmas Greeting Videos: Use green screen backgrounds to create warm family holiday cards, polished business greetings, or animated “Merry Christmas” intros. You can easily switch between cozy living rooms, snowy landscapes, or sparkling winter scenes without setting up a full holiday backdrop.
- YouTube Vlogs & Shorts: As a YouTuber or content creator, you can make video content with festive overlays or a Christmas tree green screen behind you. You don’t always need a decorated room or a full holiday setup.
- Product Promotions: If you’re promoting holiday deals or showcasing gifts, green screen backgrounds make everything easier to style. You can place your products in a cozy Christmas living room, a snowy outdoor market, or a bright holiday display without building any physical set.
- Social Media Countdown Videos: For Instagram Reels, TikTok, or YouTube Shorts, you can use green screen Christmas assets to create countdown videos that build excitement for the holidays. Add snowfall animations, Santa-style transitions, or ready-made holiday countdown templates to make your clips more attractive.
Part 5: Troubleshooting Chroma Key for Christmas Videos
Even well-prepared footage can show minor keying flaws. Addressing them early helps your green screen Christmas backgrounds blend smoothly. Most issues come from lighting, edge contrast, or incorrect chroma settings.
1. Fix Uneven Green Screens
Uneven lighting creates darker areas on the screen. Adjust the Tolerance slider on the Chroma Key settings to remove leftover green.
2. Remove Color Spill
If green light reflects onto your subject’s hair or clothing, it can leave a faint green tint in the final video. To fix this, increase the Edge Feather or lower the Alpha a bit. Adjusting these settings can soften the edges and reduce the spill.
3. Enhance Low-Light Holiday Footage
Indoor Christmas footage can appear grainy. You can clean this up by using the AI Video Enhancer in Filmora or manually adjusting the contrast, brightness, and shadows using the color correction tool.
Conclusion
Using green screen Christmas backgrounds makes holiday videos easier to create and more flexible to style. This guide showed how to pick assets, prepare clean footage, key out the screen, and build a warm, festive look. Good lighting, clear edges, and simple edits help your scene feel real.
Filmora supports this workflow with steady tools, holiday templates, and smart AI features that speed up the process. When you pair these tools with a quality Christmas background green screen, even simple clips can turn into joyful Christmas stories ready for friends, family, or any platform you want to share on.
secure download
