When people want to try new things, doing stuff properly is a challenge. To master an art, they watch tutorial videos in the absence of real-time experts. Due to a high demand for how-to videos on the internet, many people have stepped into the content creation business.
However, a major difficulty they face in the process is video refining and editing, which usually demands skills. this article outlines quick steps using an explain video maker to create a polished explainer video without needing expert editing skills.
In this article
-
- Establish the Aim
- Research and Strategy
- Craft a Script
- Develop a Storyboard
- Start By Creating a Project and Enabling a Recorder
- Record Your Explainer Video
- Add Transitions to the Explainer Video
- Invest Time into the Background Voice and Music
- Enhance Comprehension By Adding Captions Automatically
- Schedule Your Video on Different Platforms
- Access the Smart Short Clips
- Keep Track of Your Performance With Market Analysis
Part 1. The Best Animated Explainer Video Maker: Creating Professional Content
When it comes to creating top-notch explainer videos, you need a tool that offers all the useful resources one needs to generate such videos. Wondershare Filmora stands out as one of the most versatile and user-friendly platforms available for creating these videos from scratch. Users can record high-quality videos and audio using their recorder.
- Record video and voice directly in Filmora's editor.
- Use preset animations for dynamic video impact.
- A library of royalty-free media, effects, and stickers.
- Utilize AI tools for easy editing.

Some Incredible Features Filmora Offers to Generate Explainer Videos
- Extensive Creative Asset Library: Access Filmora's vast library of templates, images, and AI-powered effects to enhance your explainer videos with ease.
- Add Music to Your Videos: Effortlessly enhance your explainer videos by adding background music from Filmora's extensive library, or let the AI generate relevant music automatically.
- Adding Captions and Subtitles: Use AI to automatically generate captions and subtitles, making your explainer videos more accessible and understandable for all viewers.
- Multiple Aspect Ratio Settings: Customize your videos with adjustable aspect ratios to ensure your content looks perfect across any platform.
- Post Scheduling: Schedule your explainer videos on multiple social media platforms directly within Filmora, specifying the time and date for easy management.
- Detailed Marketing Analysis: Analyze the performance of your explainer videos, including likes, comments, and reach, across different social media platforms.
Part 2. Guide to Creating A Perfect Explainer Video Through 12 Simple Steps
Making a tutorial video sounds simple, but it has many complexities that should be taken into consideration. After learning about the best animated explainer video maker in detail, let us now have a look at how you can use this tool. The provided guide will give you a detailed tutorial on how to create explainer videos with AI in Wondershare Filmora.
Now that you have an idea of the process behind crafting an explainer video let's look at an in-depth explanation of the steps mentioned above.
Step 1. Establish the Aim
Before you start, you must understand why you are making an animated explainer video and what you want to achieve through it. After picking a niche, narrow down your targeted audience depending on the kind of content you are about to create.
Step 2. Research and Strategy
Once you have decided on the topic, the next step should be information gathering on the subject. Following that, deciding what animations land live-action is required to make the tutorial compelling. Also, you should opt for a video style, pick screencasts, and choose strategies for effective video execution.
Step 3. Craft a Script
To ensure that your explainer video is information-rich, you must formulate a script that features all the necessary details on the topic. If you are not a good writer but have a creative vision, you can use the AI Copywriting Feature of Filmora to get the ideal text.
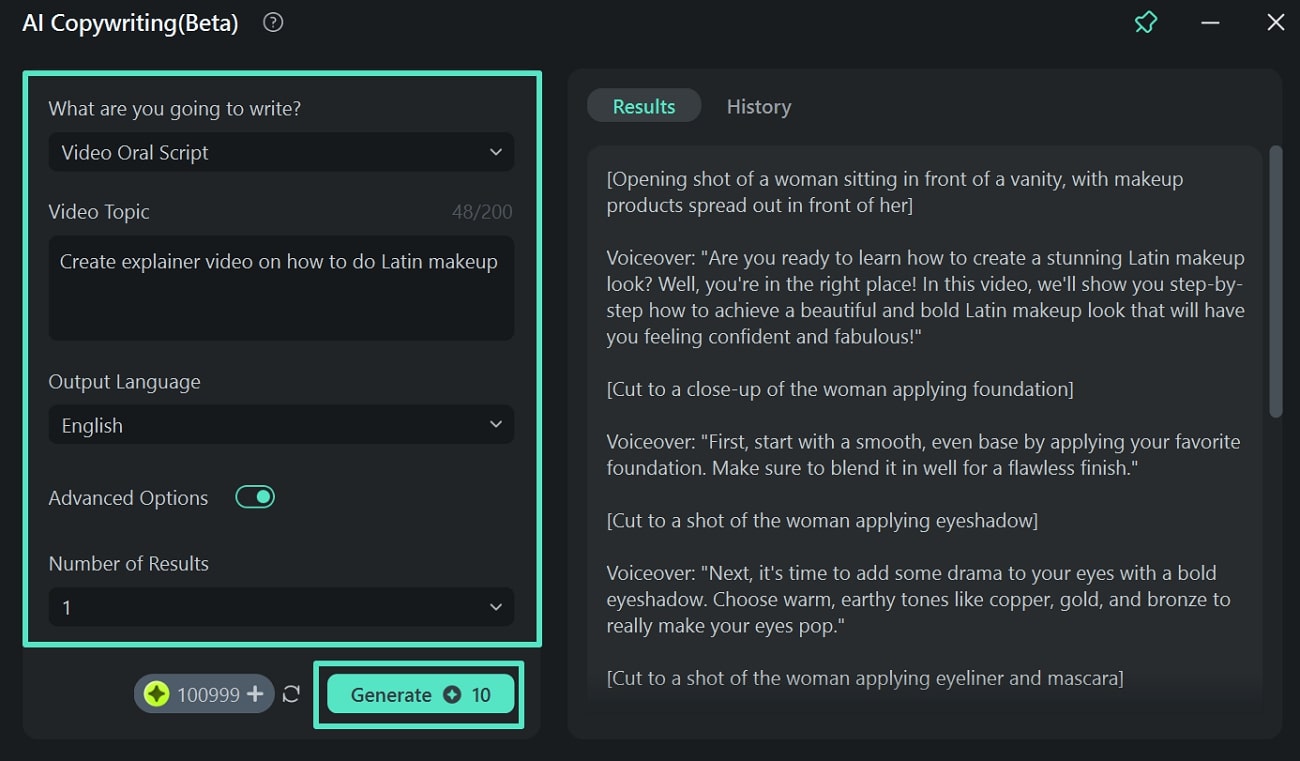
- Step 1: Open Wondershare Filmora and go to the "Toolbox" section.
- Step 2: Select "AI Copywriting" and enter your video idea, topic, and output language.
- Step 3: Adjust the "Number of Results" if needed, then click "Generate" for a script outline.
Step 4. Develop a Storyboard
After creating a script of your animated explainer video, you must focus on the visual elements that align with each part of the script. Besides, this is the part where you decide on the transitions and effects you want to use to make the message more impactful.
Step 5. Start By Creating a Project and Enabling a Recorder
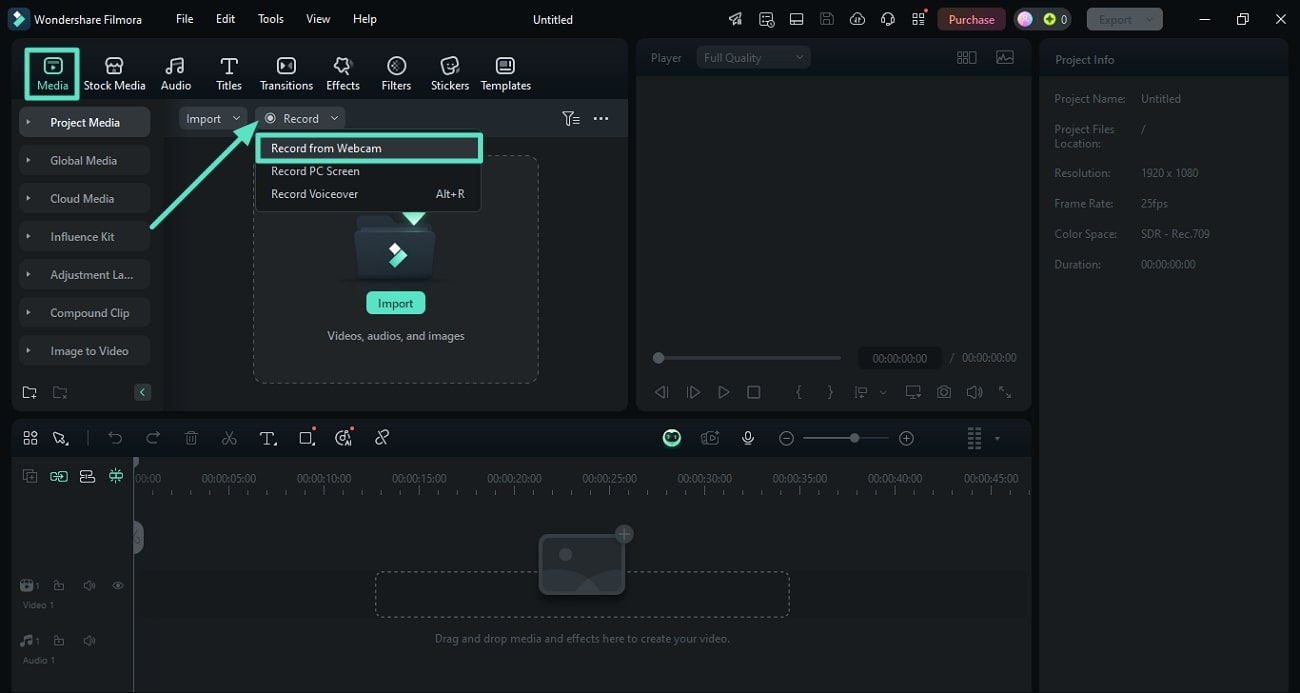
- Step 1: Set up the basic idea of your video and launch Filmora.
- Step 2: Press "New Project" to start recording, then access the "Media" section from the toolbar.
- Step 3: Click the "Record" option to expand the list and select your desired option, such as "Record from Webcam," to proceed.
Step 6. Record Your Explainer Video
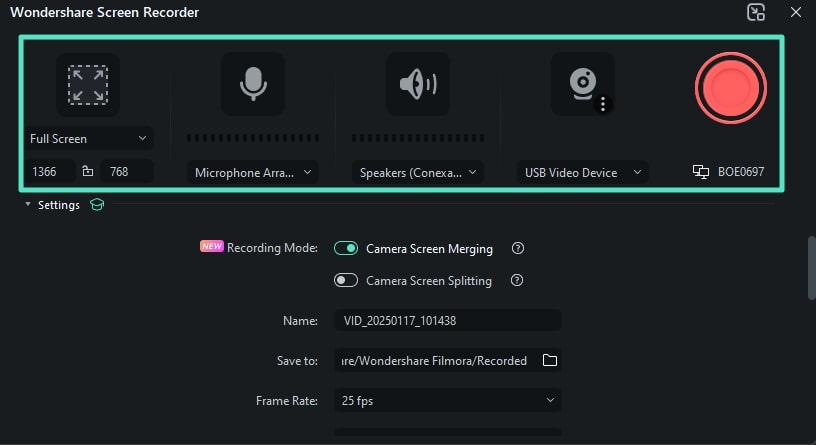
- Step 1: Once you opt for recording, a new dialog box will appear.
- Step 2: Select your desired recording settings, such as screen resolution, mic, and speakers, and choose the camera for recording.
- Step 3: Specify the destination and hit the red round button to start recording. When done, press the red button again, and the video will be automatically imported into Filmora's editing interface.
Step 7. Add Transitions to the Explainer Video
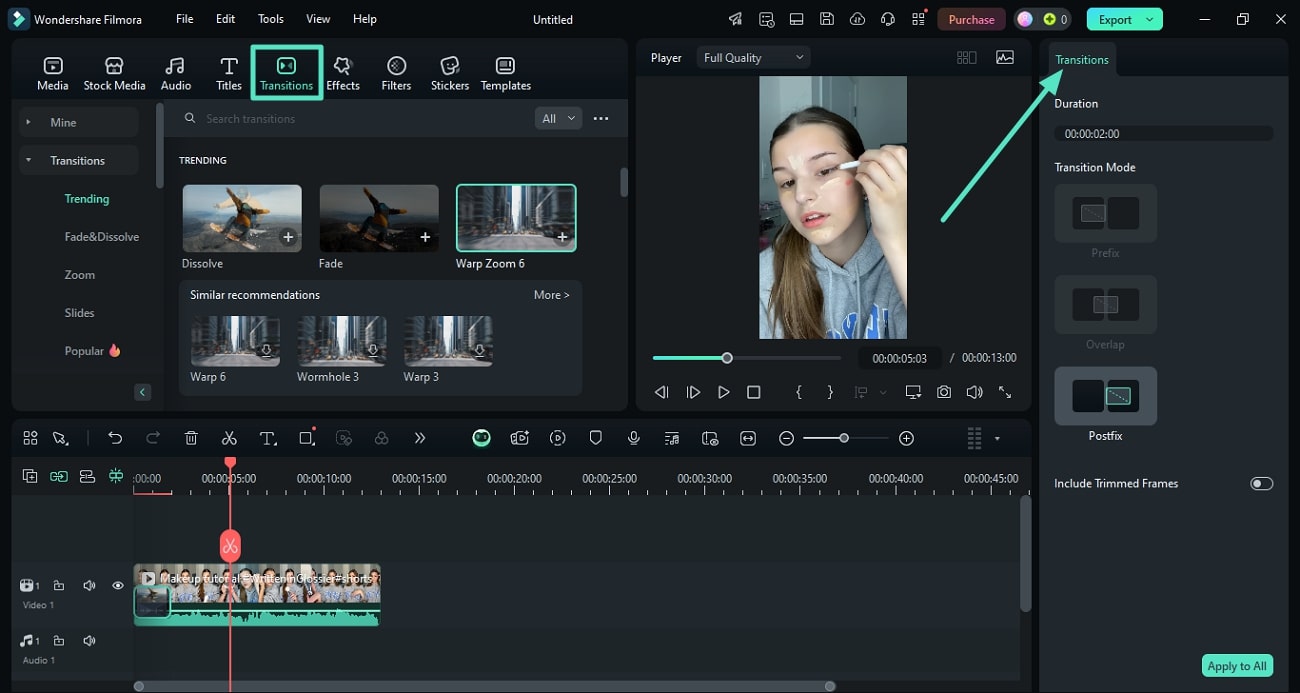
- Step 1: To add transitions, go to the toolbar and access the "Transitions" option.
- Step 2: Scroll through the library and drag a transition to the timeline that suits your explainer video.
- Step 3: You can use the search bar to find specific transitions and adjust them through the "Transitions" panel on the right.
Step 8. Invest Time into the Background Voice and Music
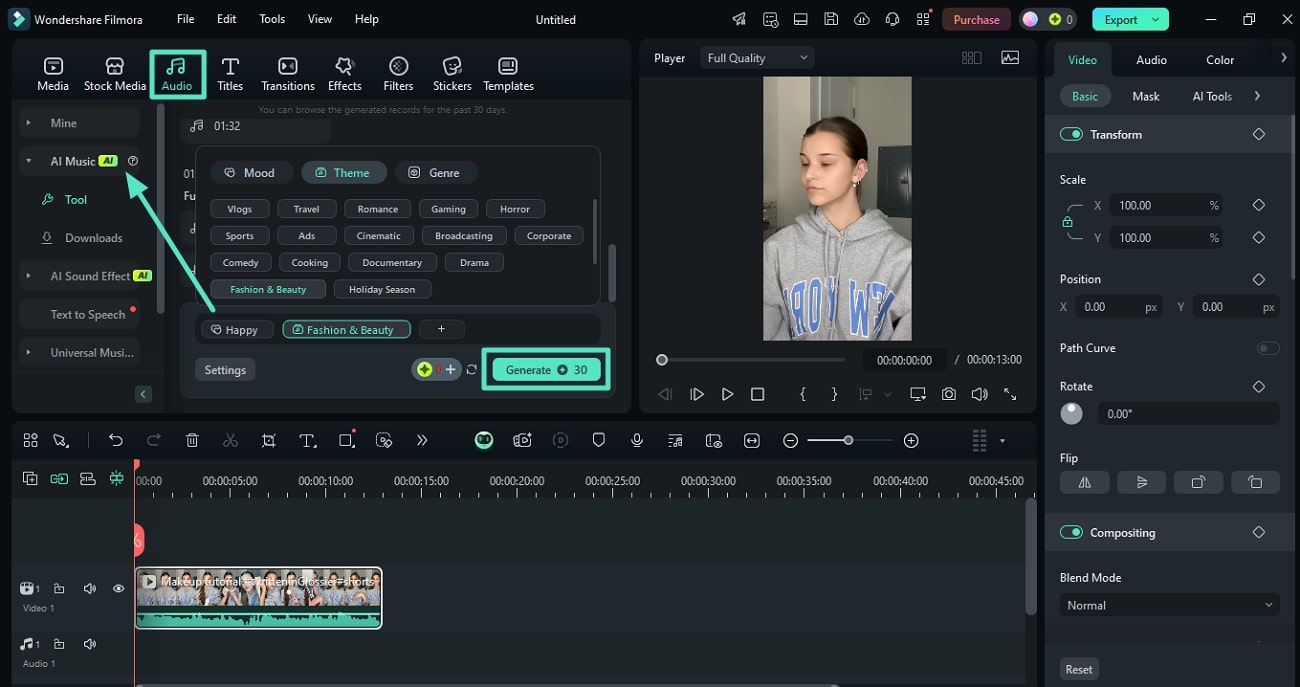
- Step 1: Access the "Audio" option from the toolbar and expand the "AI Music" section.
- Step 2: Specify the mood and theme, then press the "Generate" button to create the music.
- Step 3: After the music is created, listen to it and add it to the timeline for synchronization with your explainer video.
Step 9. Enhance Comprehension By Adding Captions Automatically
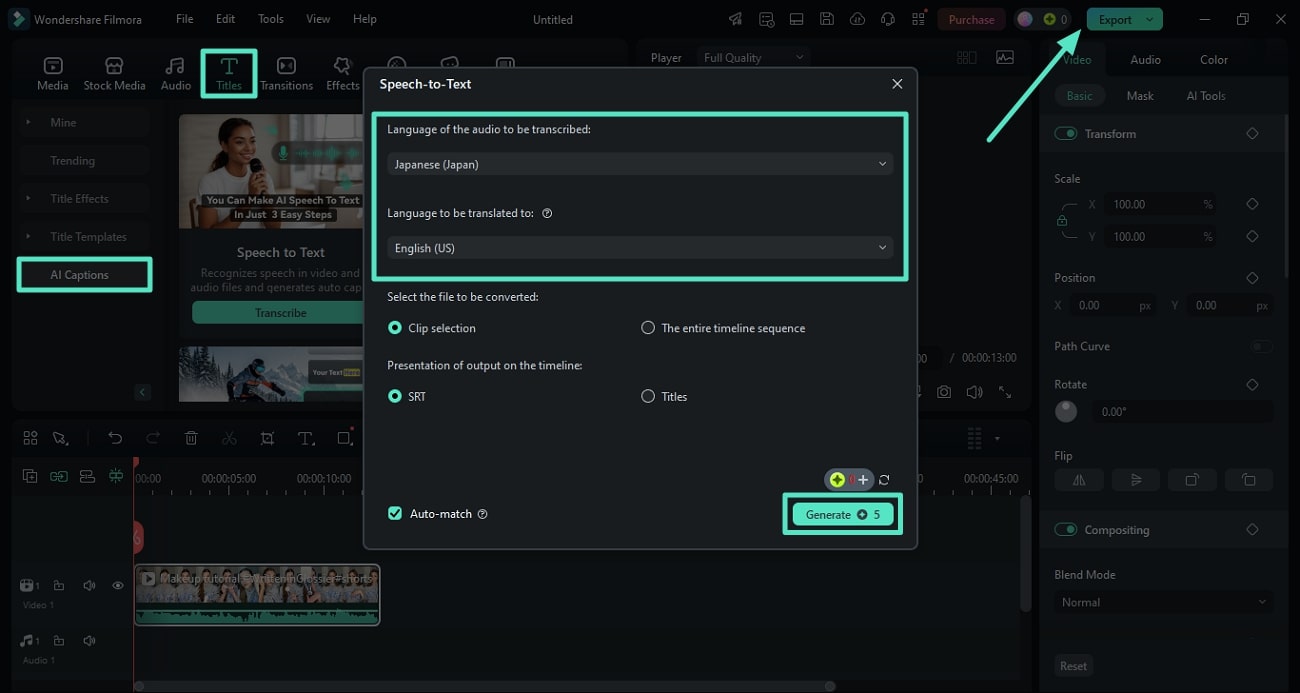
- Step 1: Access the "Titles" menu and expand the "AI Captions" section.
- Step 2: Select the language of the audio and translation, then press the "Generate" button.
- Step 3: Once the captions and translations are generated, finalize your edits and click the "Export" button in the top-right corner to complete your tutorial video.
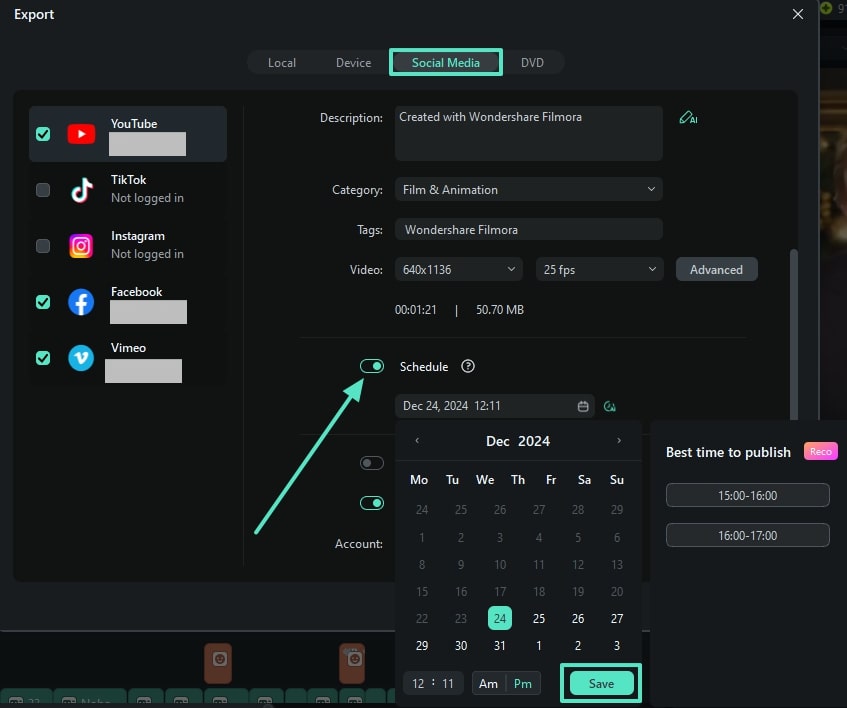
Step 10. Schedule Your Video on Different Platforms
- Step 1: Open the "Titles" menu and expand the "AI Captions" section.
- Step 2: Select the language of the audio and translation, then press the "Generate" button to create subtitles.
- Step 3: Once editing is complete, go to the top-right corner and press the "Export" button to finalize your tutorial video.
Step 11. Access the Smart Short Clips
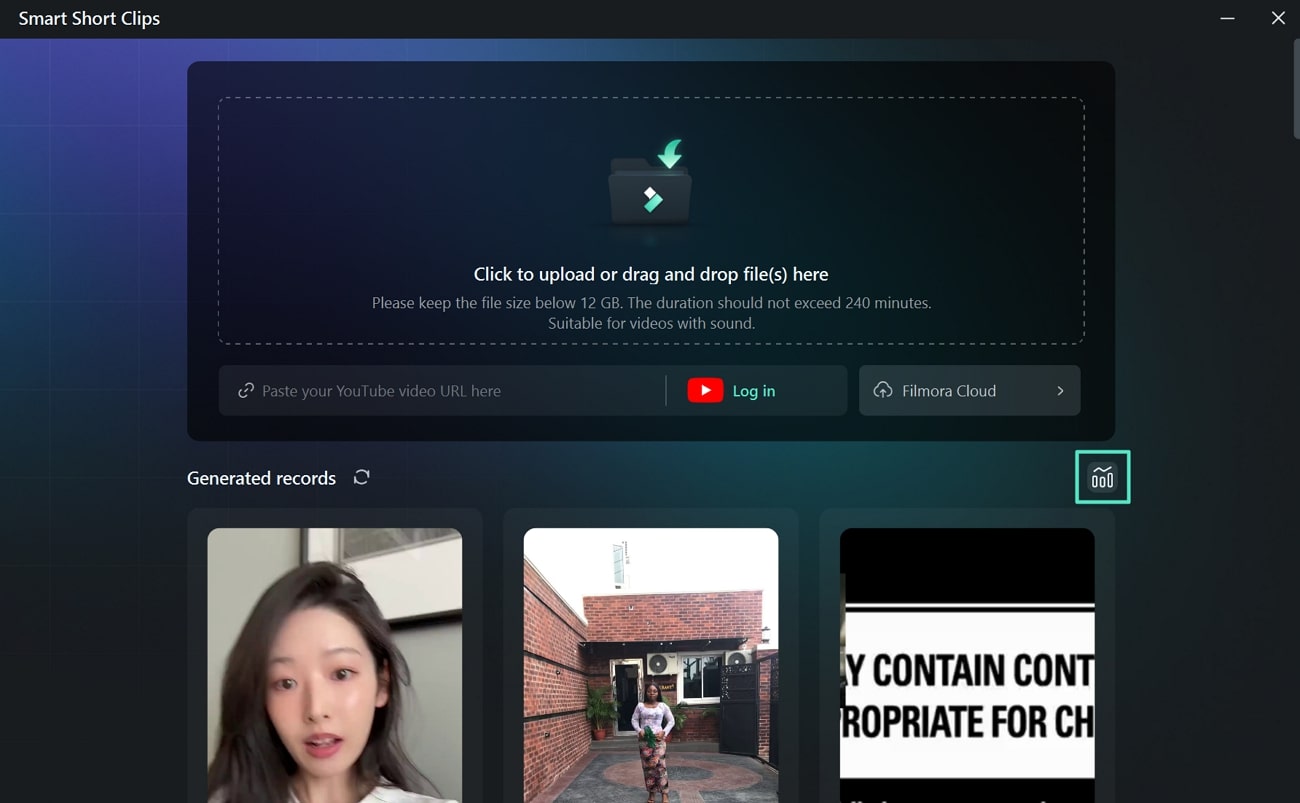
If you want to have a look at how your posted video is working on social media, launch Filmora on your device again and access the "Smart Short Clips" option. Next, paste the link to the video within the text box provided and press the "Market Analysis" icon.
Step 12. Keep Track of Your Performance With Market Analysis
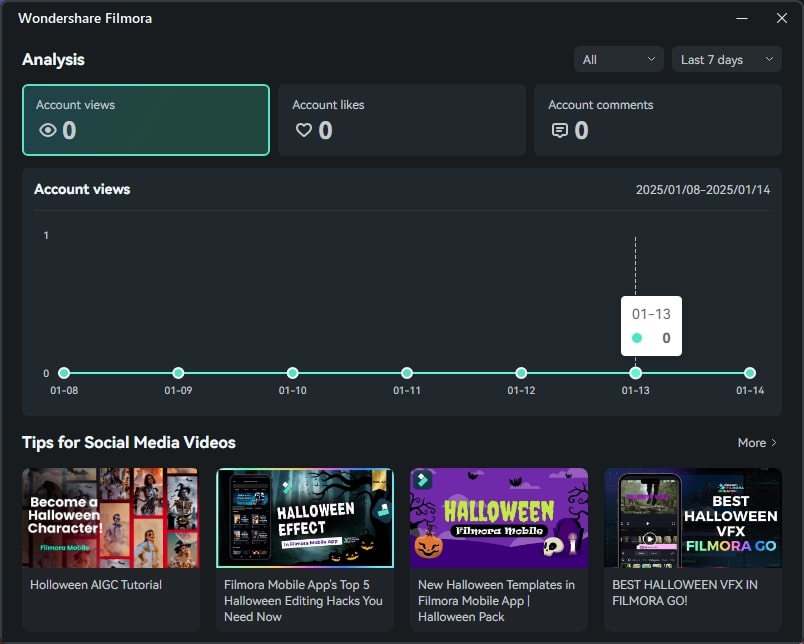
In the following window, a detailed market analysis with views, likes, and comment counts will be provided.
Part 3. [Exclusive] Explainer Video Examples For Inspiration
When you have a visual example of something, it is easier to recreate it. To help you find inspiration, we have listed the top explainer videos examples on the internet.
How to MAKE a STOP-MOTION VIDEO with a PHONE
In this video created by a designated tutorial channel, Steve explains how you can make a stop-motion video on the phone. After learning how to make an explainer videos, he explains the process step-by-step in an engaging way to help the audience know the intricacies.
Michael Jackson Moonwalk Tutorial! *1 MINUTE DANCE LESSON*
Everyone aspiring to be like Michael Jackson should watch this video and recreate his famous Moonwalk. He thoroughly explains the footwork that goes behind mastering this technique. In the end, he flaunts his mad Moonwalk skills and blows away the audience.
Ariana Greenblatt's 10-Minute Everyday Contour Routine | Allure
This original Allure video shows the famous Ariana Greenblatt sharing her everyday makeup routine. During the tutorial, she spills her beauty secrets and childhood stories. She keeps the makeup simple, teaching the viewers the art of subtle glow.
Hailey Bieber's skincare routine for a super glowy complexion | Vogue France
The model Hailey Bieber spills her skincare secrets with the audience and flaunts her radiant bare skin. She finds a way to introduce the products from her skincare line that complement her natural glow. Besides being inspirational, this explainer video is also motivating for those who want good skin.
Mariah Carey Bakes Christmas Cookies | Now Serving | Vogue
Mariah Carey can bake cookies, and she proves it in this video. In her signature hairstyle, she mixes all the ingredients and bakes the perfect Christmas snacks. At the end, she adds icing to the cookies to make them ready for the occasion.
Now that you've seen some great explainer video examples, it's time to create your own! Whether you're crafting a product demo, an educational piece, or a medical explainer video, the right tools and creativity can help you deliver a clear and engaging message. Start bringing your ideas to life today!
Conclusion
To conclude, this article provided a detailed guide on how to make an explainer video utilizing the right resources. Moreover, the article discussed how one can generate and refine visual content using Wondershare Filmora. This comprehensive explainer video maker offers an extensive library to add interactive elements to your explainer video and grab the audience's attention.


 100% Security Verified | No Subscription Required | No Malware

