Photography is like art itself. Photographers must carefully select the setting and use the right camera to capture images with lossless quality. However, you'll realize that some photos appear darker or brighter than in actual life.
In that case, use free HDRI software to change that straightway. But HDRI being a relatively new technique, beginners might struggle to edit the photos, let alone find the perfect HDRI software.
So, in this simple guidepost, we'll learn how to create an HDRI 3D picture using HDRI for Blender. But first, let's understand what an HDRI file is and the difference between HDRI and HDR.
In this article
Part 1: What is HDRI?
HDRI (High Dynamic Range Image) is simply an image created using multiple image overlays of the same background but with varying exposures. The exposures can range from the brightest highlights to the darkest shadows. So, in short, HDRI expands an image's dynamic range to brighten or darken it and make it look more natural.
Having said that, HDRI is a raster image created using color pixels. HDRI photos are generally significant in size, so they won't quickly lose quality like other raster photos such as PNG and JPG. Many formats can store HDRI images, although the most common are OpenEXR (.exr) and Radiance RGBE (.hdr).
Part 2: What's the difference between HDR and HDRI
According to Wikipedia, HDR and HDRI are the same things. But is it true? For starters, HDRI is basically a photo with High Dynamic Range qualities. So, yes, HDR and HDRI can mean the same thing in digital image editing.
However, some photo editors argue that there is a difference between these two regarding basic workflow. First, HDR technology increases brightness to show more image details. On the other hand, HDRI performs unique optimization of content and lighting to deliver crisp images. In other words, HDRI brightens the dark shadows without necessarily overexposing the bright image areas.
Some photographers can also consider HDR as images with pixel values higher than 1 or 255. That means that the pixels can be much higher than pure white. But technically speaking, HDR and HDRI can be used interchangeably.
Part 3: When to use HDRI
Now that you have all the information about HDRI, let's learn about some industries where HDRI is applicable.
1. HDRI for 3D visualization and 3D animation
HDRI 3D is commonplace these days. 3D animation creators can use programs like HDRI Blender to add HDR environments and make the content look detailed and more realistic in high lighting reflections. To put it simply, HDRI makes 3D scenes look lighter, less cartoonish, and more professional. This technology can also be used in interior visualizations in animations.
2. HDRI for architect rendering
Creating HDRI environments is a common practice in 3D architectural designs. For example, designers can create panoramic house designs with varying light tones and interior moods. HDRI helps them give a natural 3D lighting effect on scenes and objects.
3. HDRI monitors and TVs
You've probably heard of HDRI 4K when shopping for a smart TV or computer monitor. These TVs offer a lot more than just a wide color gamut, high brightness, and advanced contrast ratio. In addition, HDR TVs and monitors can recognize HDR signals, allowing viewers to watch the content with all studio quality. In short, viewers can see more color details in shadowy and lighter scenes, making them perfect for avid gamers.
Part 4: How do you open an HDRI?
Because HDRIs use low dynamic range rendering, a standard display panel won't open HDR images. So, to open an HDRI file on a non-HDR display, you'll need to convert it to a different low dynamic range format using tone mapping technology. For example, you convert HDRI to JPEG or PNG and enjoy regular bitmaps while maintaining the HDRI properties. You can also open and edit HDRI using desktop programs like EasyHDR, Photoshop, and Blender.
Part 5: How to set up an HDR environment background?
Before wrapping up this blog post, let's discuss how to use HDRI for Blender to apply HDR effects to an image's background. Blender is a 100% free program for creating jaw-dropping 3D rendering and animations on Mac and Windows computers. With Blender, you'll get an advanced modeling toolset like retopology, curves, sculpting, and more. But in this post, we'll learn how to create an HDR environment or add lighting to your image project. Let's get started!
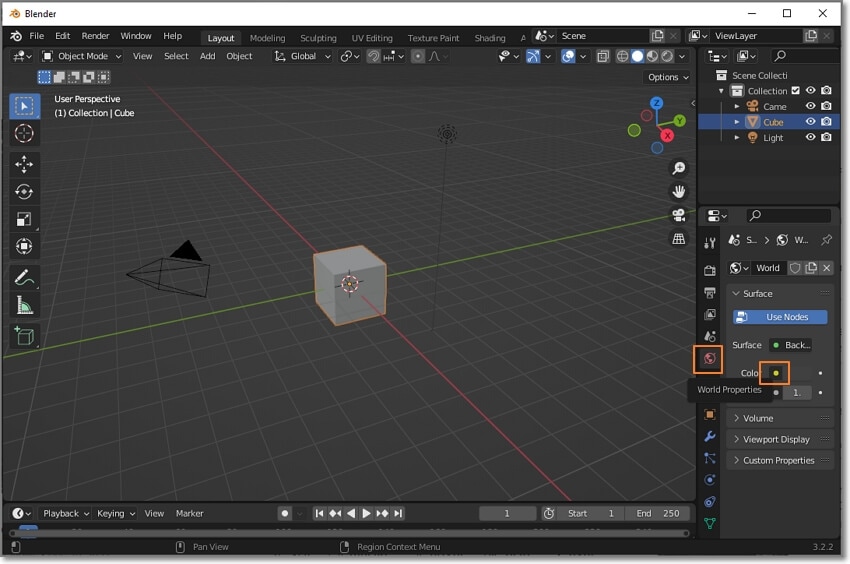
Step1Install and run Blender and then tap the World Properties tab. Then, click the Color icon and add Environment Texture.

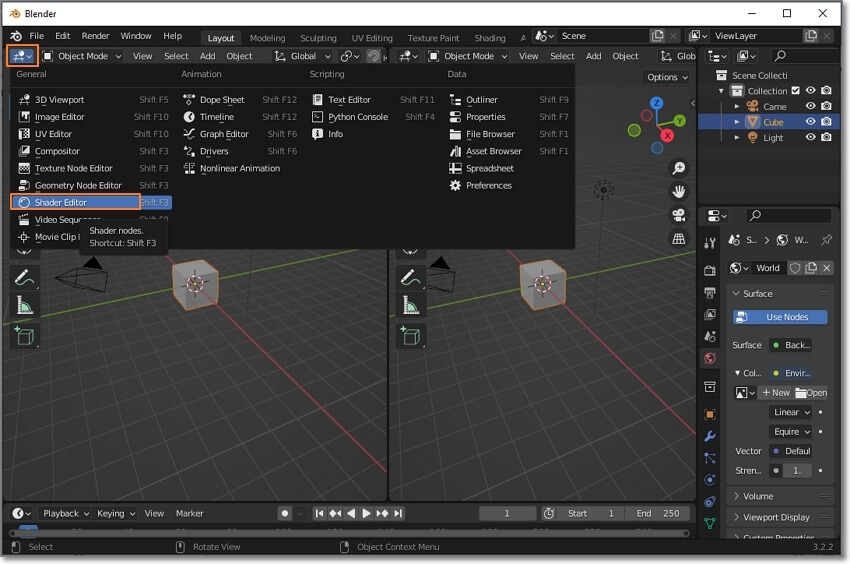
Step2Next, split the window into two and launch the Shader Editor tool. Then, open the Object drop-down menu at the top-left corner and choose World. You'll see the Environment Texture hooked into the background.

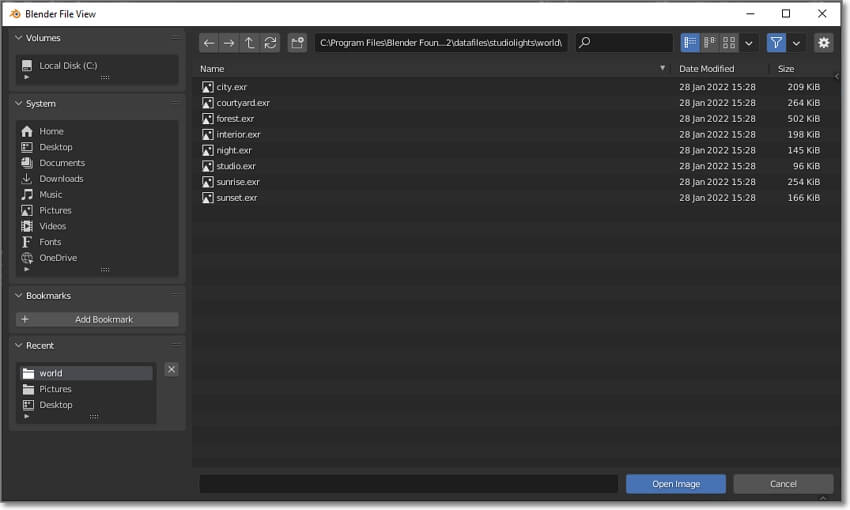
Step3On the Environment Texture, tap Open Image before opening the 3.2 folder inside the Blender Foundation folder. Then, click Data files > Studiolights > Word. Now open a .exr file. For example, open the Interior.exr image.

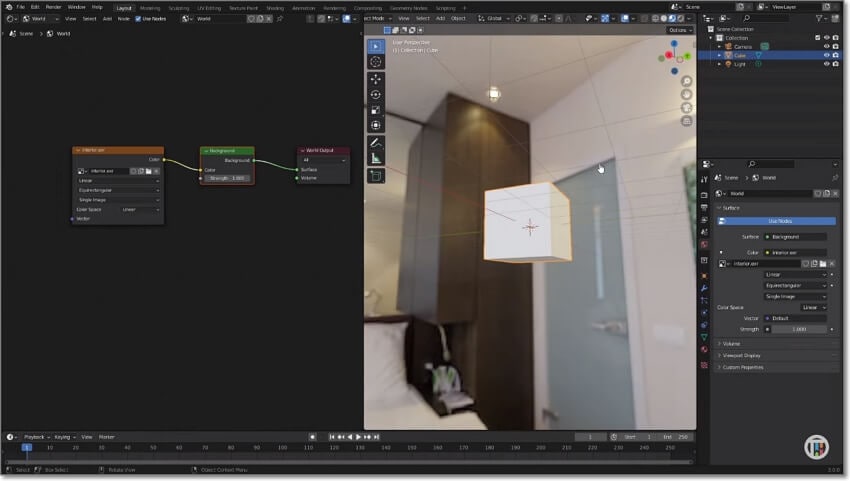
Step4Click the Viewport Shading icon and tap the drop-down button to choose Interior. You'll see all the lighting reflections inside the room and customize it as you wish. That's it!

Conclusion
Using the environment maps is the simplest and most effective way to lighten up your 3D scenes in Blender. This program lets you achieve realistic 3D scenes, mimicking natural world lighting. But note that Blender can be a little confusing for beginners. So, play around with this HDRI tool, and you'll be a pro in no time.


 100% Security Verified | No Subscription Required | No Malware

