If you're a podcaster, transforming audio-only content into engaging video for platforms like YouTube and TikTok is now a necessity. The fastest and most efficient solution is using an AI podcast visualizer tool. This technology eliminates complex editing, instantly converting your voice into dynamic sound waves, auto-captions, and even impressive AI-generated full scenes. We'll show you how powerful AI podcast visualizer software, like Filmora Veo, can make the entire podcast to video transformation quick, simple, and highly professional for every creator.
Part 1. What Is a Visual Podcast? Types, Trends, and Why You Need Them Now
Visual podcasts are podcasts presented with engaging visuals rather than just regular audio. They have become popular as more creators move their shows to platforms where video has an advantage.
On YouTube, video podcasts rank higher, attract longer viewing times, and reach audiences who prefer visual content or direct interaction. Spotify is also expanding its services to video podcasts, with visual formats becoming the main expectation rather than an additional feature.

Listeners these days want something to engage with, even during long conversations. Static cover images are no longer competitive because they fail to capture attention or help your content stand out. To meet this demand, creators are now using three main types of visual podcasts:
- Audio Plus Sound Wave Visualizer
This format is ideal for beginners. It adds animated sound waves, a simple background, and automatic text over your audio. This format is often used for YouTube uploads and social media clips because it's quick to create and keeps viewers engaged without complex visuals.
- Audio Plus Minimalist Motion Graphics
A cleaner, more polished option. This format uses moving shapes, transitions, smooth animations, and branding elements. It looks more professional than basic waves and is popular for commentary podcasts, interviews, and narration.
- AI-generated Full-Scenario Visuals (Veo 3.1)
The most advanced type. AI generates real-time scenes, camera movements, and visuals that match your dialogue. This makes your podcast feel immersive, dynamic, and story-driven, even without filming. Ideal for creators who want cinematic podcast content without recording video.
Part 2. The AI Advantage: Why Use AI for Podcast to Video Transformation
AI makes it easy to turn simple audio podcasts into visually appealing videos. With an AI podcast visualizer, you no longer need to spend hours arranging clips, animating elements, or adjusting keyframes because the tool handles most of the creative work for you. It listens to your voice, understands the rhythm, detects emotions, and automatically builds visuals that match your content.
Some of the main reasons why AI is the best choice for transforming podcasts into videos are
- It's way faster than doing everything by hand: AI builds the visuals for you, so you don't have to mess with keyframes, timelines, or any of those tiny editing details.
- Automatic visual creation based on audio: AI reads tone, rhythm, and emotion, then instantly creates sound waves, text, and elements that sync with the rhythm.
- One project, any format you need: Want it for Shorts? YouTube? Instagram? Just pick the format and export. You don't need to rebuild the whole thing from scratch.
Part 3. Top Free & Paid Podcast Visualizer Tools (Including AI Podcast Visualizer Options)
Now, which tool should you go with? Below are the most popular podcast visualizer tools, along with a quick overview of their features, who they are best suited for, and what to expect in terms of features and pricing.
1. Wondershare Filmora: The All-in-One AI Podcast Visualizer
Filmora is a video editor that gives you a few easy ways to turn your podcast into a visual video. First, you can use its built-in AI podcast visualizer to turn your audio into waveforms or spectrum bars that move with the beat of your voice.
If you want something more detailed, you can generate a full-scene video visualizer powered by Veo 3.1. This option builds scene-based visuals that match your topic, and you still get full control over the editing timeline. And if you only need text on screen, you can create automatic captions that follow your speech and help viewers follow along even with the sound off.
- Audio-driven animations that respond to pitch, beats, and volume changes
- Auto captions with multi-speaker voice separation
- Visualizer presets that match brand colors and layouts
- Seamless integration with Veo 3.1 for AI scene generation
- Layering options for images, b-roll, and AI-generated footage
- More creative freedom than template-based visualizers
- AI-powered editing reduces manual tasks
- Powerful personalization for brands and long-form episodes
- Stable desktop performance for large podcast files
- Requires installation, not browser-based
- Full AI features are available in the paid version
- Export speed depends on computer specs
Creators who want a professional yet beginner-friendly workflow with AI-driven enhancement.
Free version available; premium plans unlock access to advanced visualizers and Veo 3.1.
2. Canva Podcast Visualizer
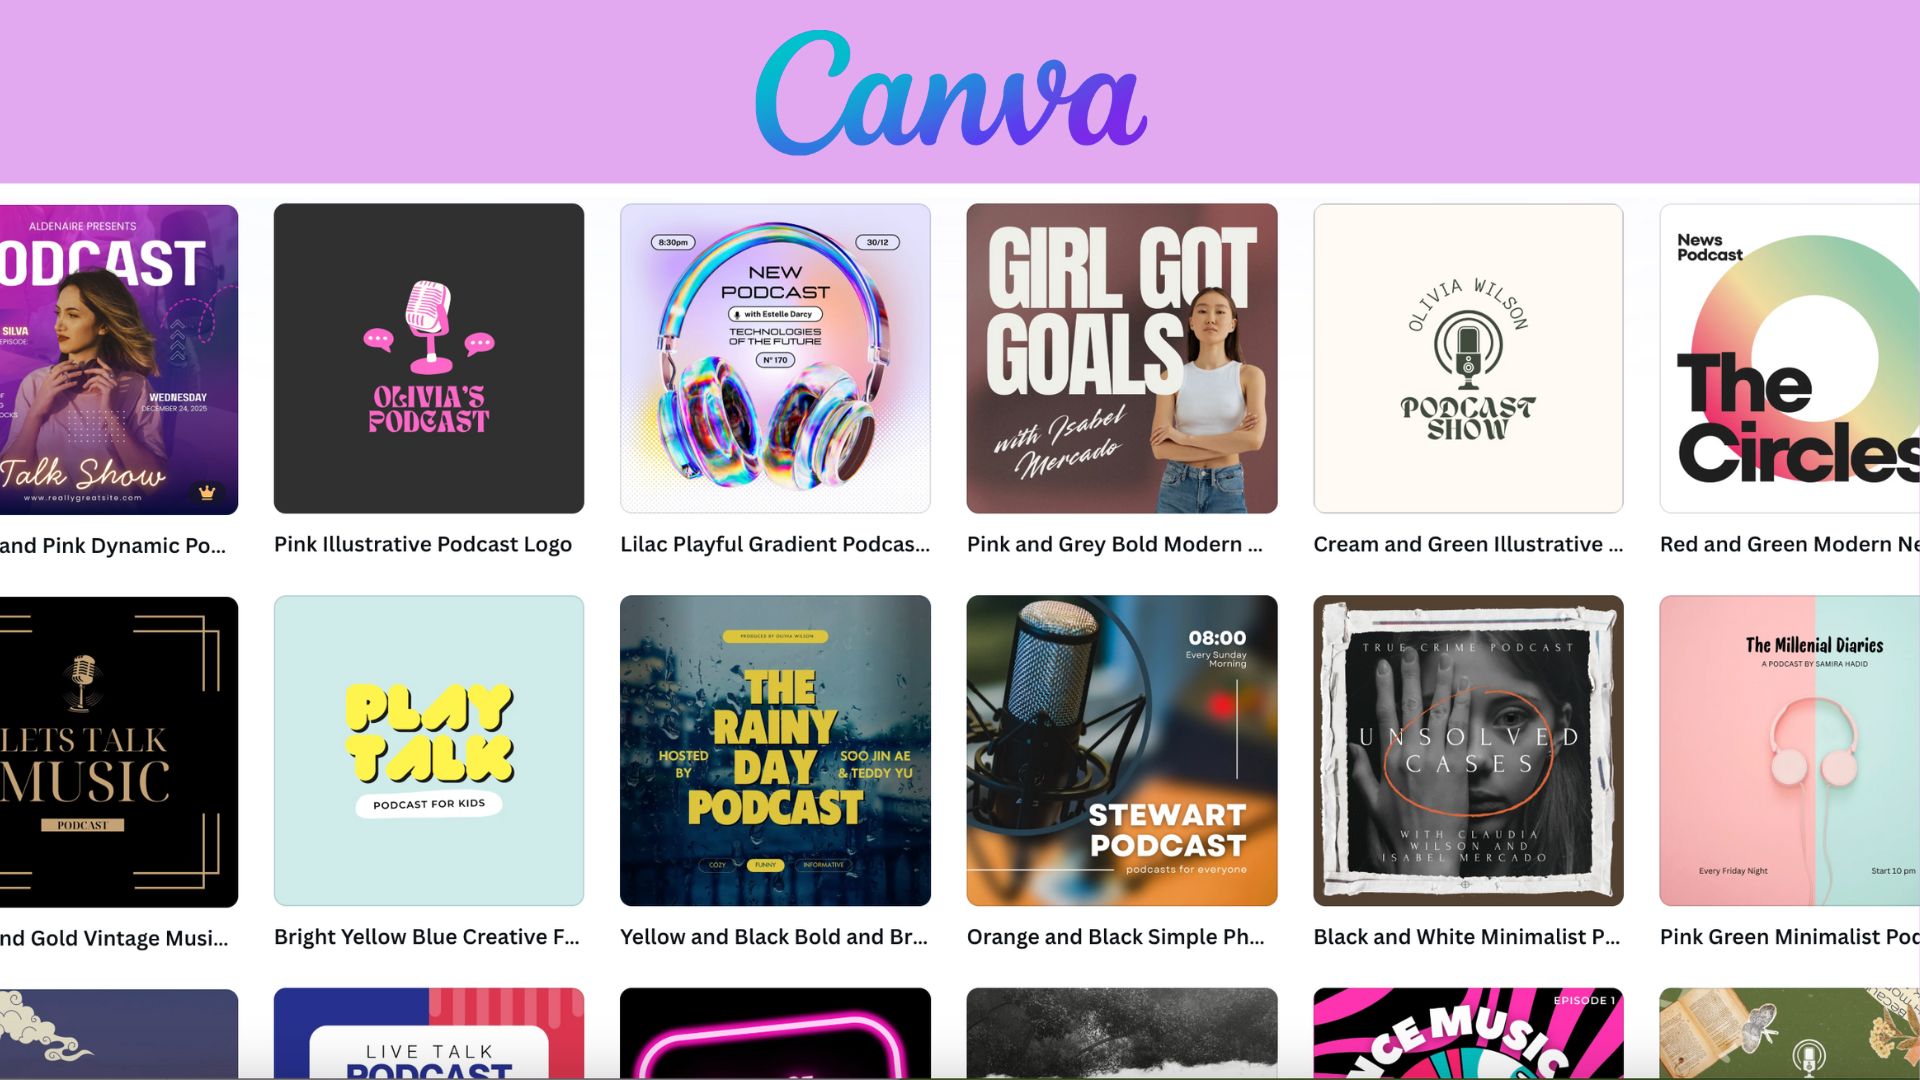
Canva provides simple, template-based podcast visualizers ideal for quick social posts. It isn't a full podcast visualizer tool, but it offers animated waveforms, branded layouts, and drag-and-drop design for short clips or cover-style visuals.
- A large library of podcast templates designed for YouTube, IG Reels, and TikTok
- Clean waveform animations with editable fonts, shapes, and graphics
- Brand Kit support for creators with a consistent identity
- Timeline editor for basic movement and transitions
- The fastest tool for non-editors
- Best for templated and branded podcast visuals
- Cloud-based collaboration for teams
- Waveforms are visually limited (not responsive to beat/emotion)
- Not built for long podcast episodes
- Premium templates and elements are only available in Canva's Pro plans
Creators who want beautiful, branded podcast snippets without video editing skills.
A free plan is available; premium elements require Canva Pro.
3. Headliner
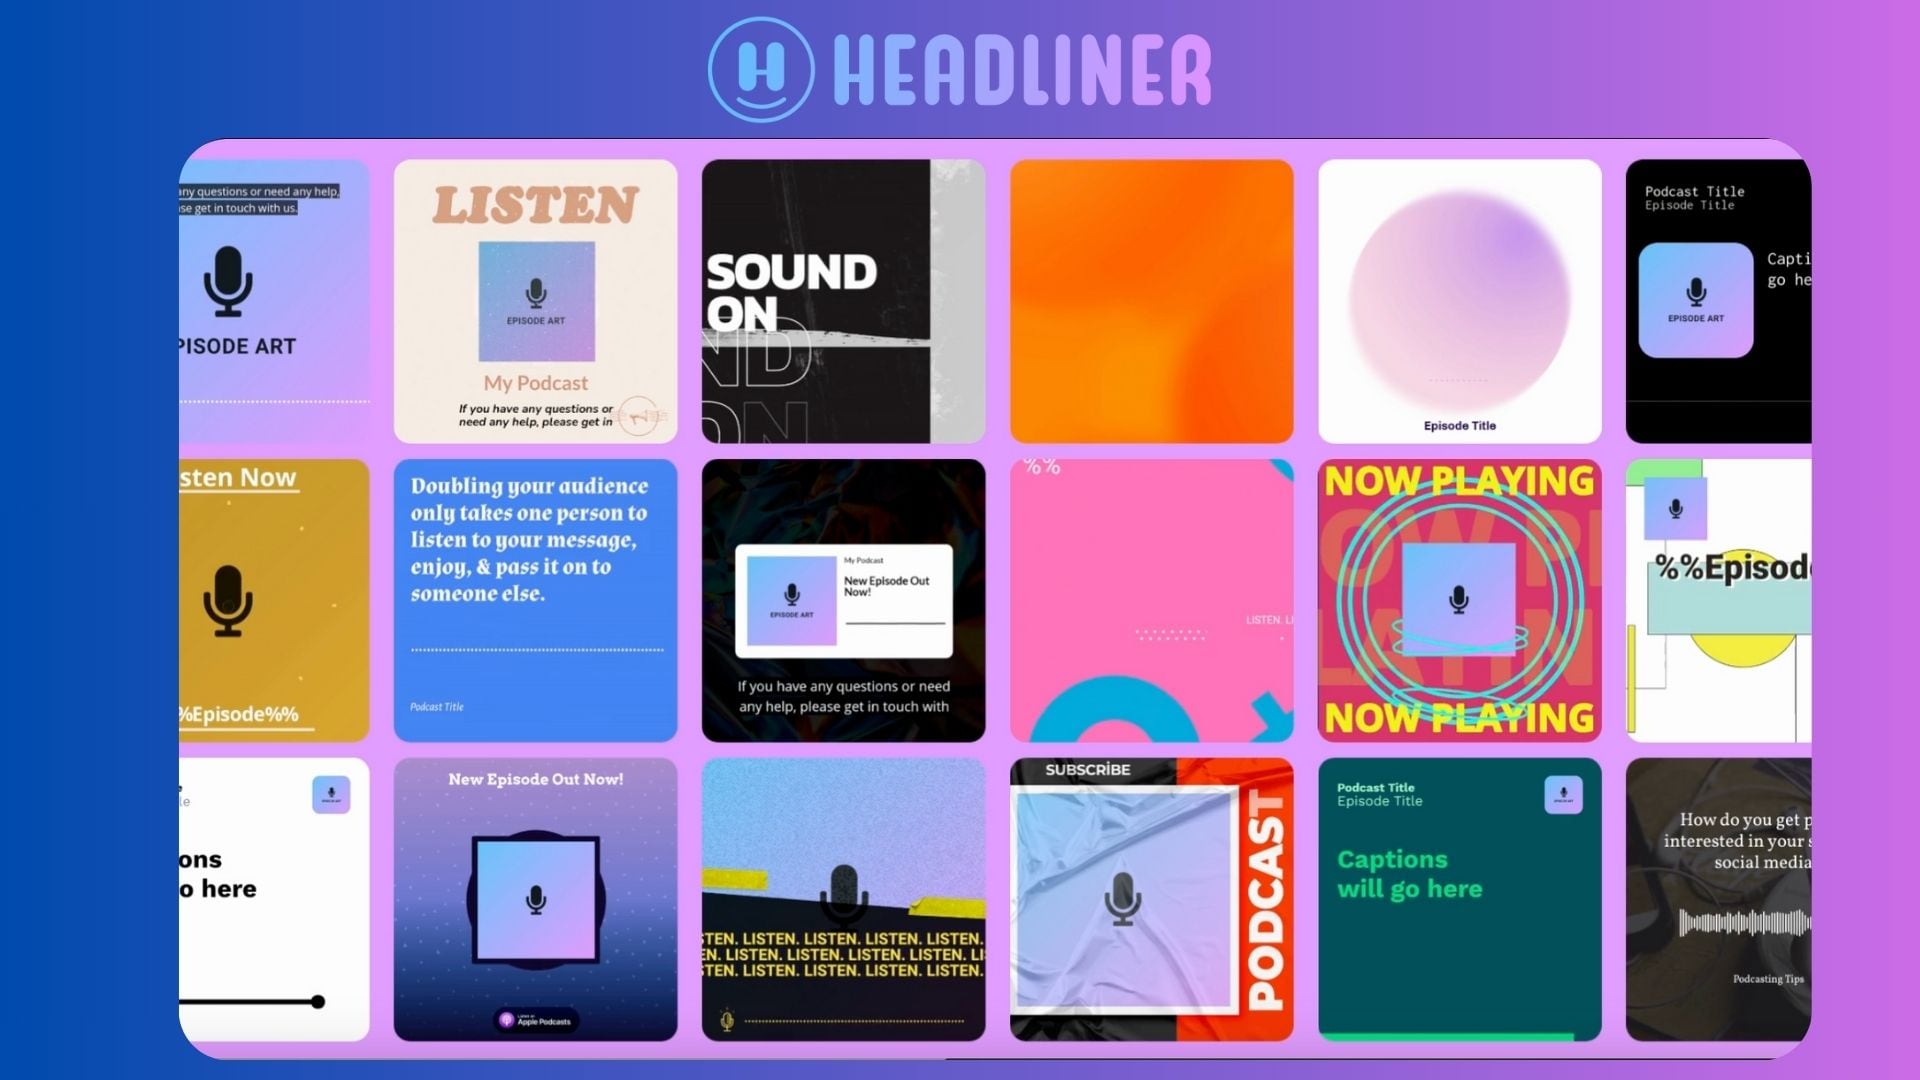
Headliner is a dedicated platform for an audio visualizer for podcasts, designed specifically for podcasters who share short clips on social media. The platform automates captioning, clipping, and episode imports, so it's ideal for quick audio-to-video conversion.
- Direct RSS feed import for automatic episode pulling
- AI-generated transcripts with editable timestamps
- Dynamic sound waveform and progress bar animations
- Customized templates for each social media platform
- Smart Clip feature for selecting shareable moments
- Designed specifically for podcast workflows
- Automation reduces repetitive editing
- Excellent translation timing accuracy
- Powerful distribution tools for social media
- Free plan limits monthly exports
- Not ideal for cinematic or long-form visual podcasts
- Design looks more functional than visually rich
Podcasters who frequently publish short promotional audiograms.
Free with export limits; paid plans unlock unlimited videos and HD.
4. Renderforest Podcast Visualizer
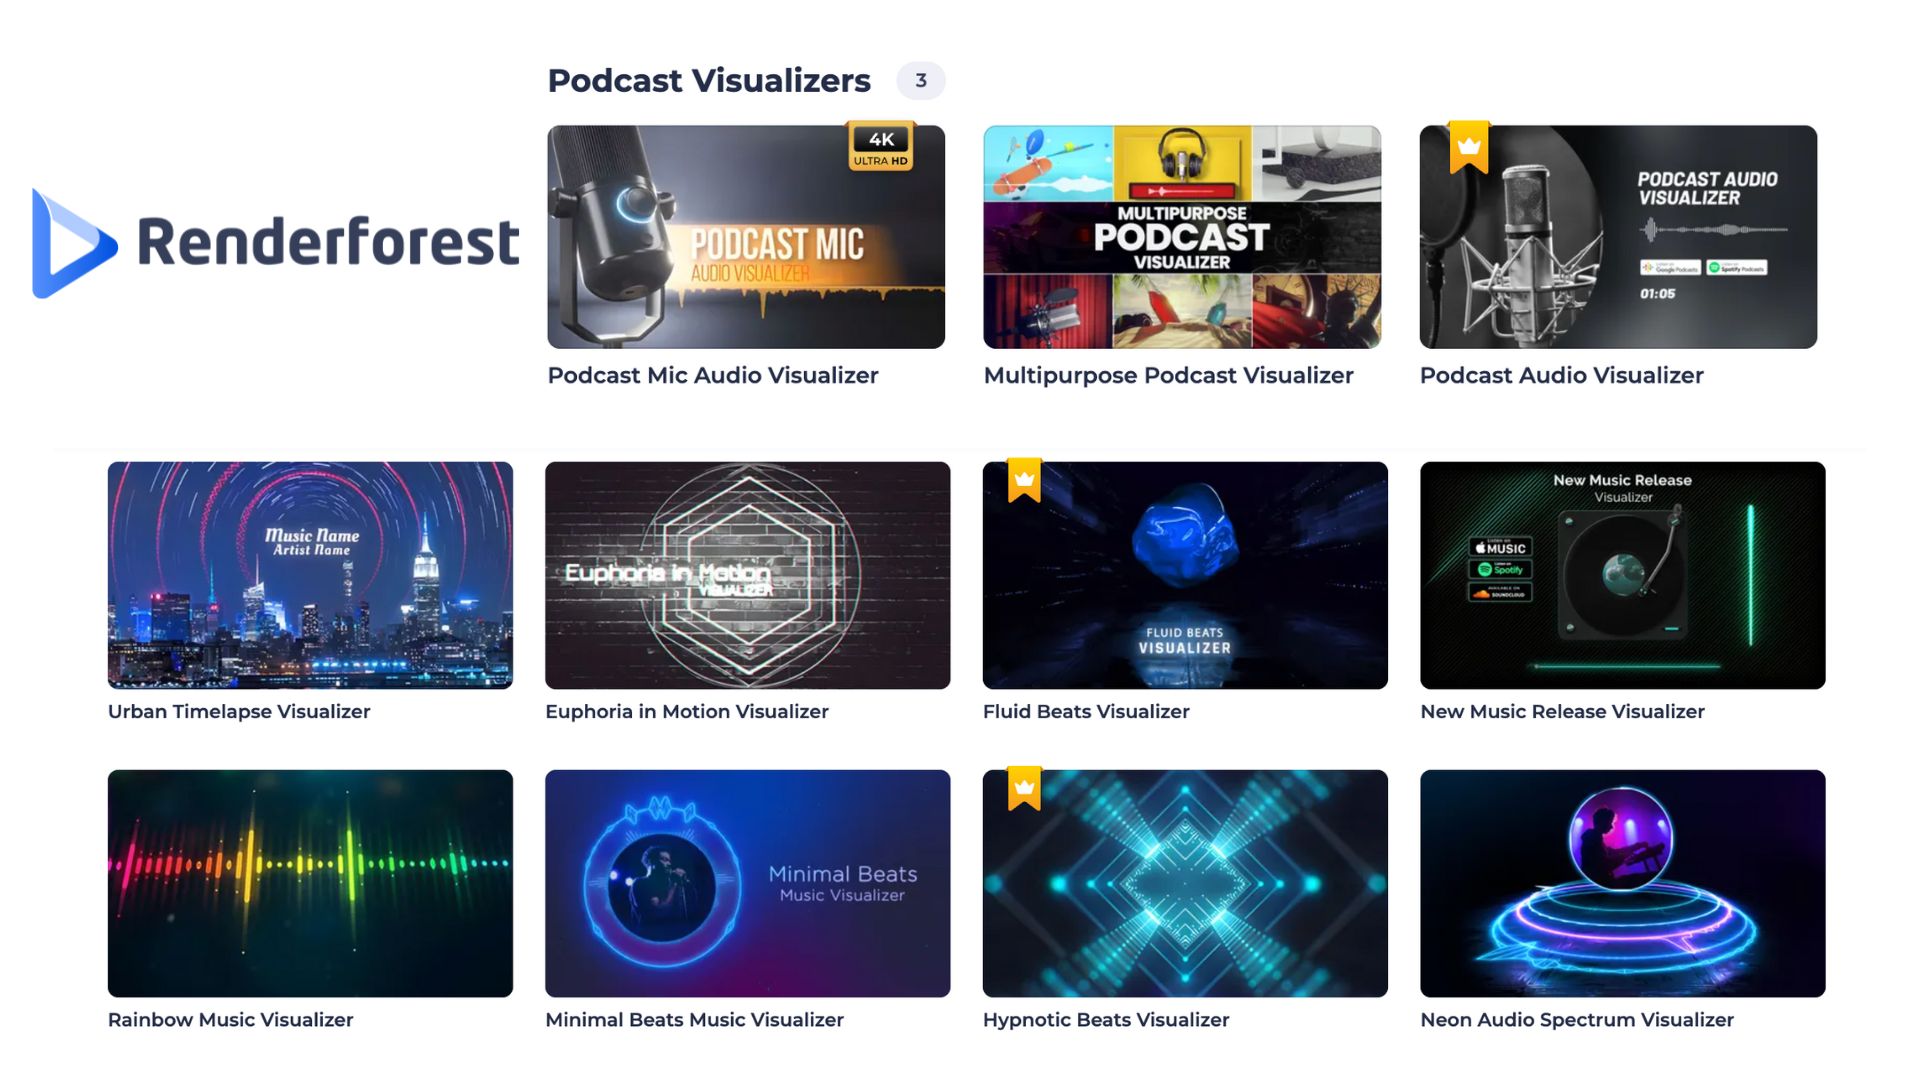
Renderforest specializes in elegant motion graphics-style podcast visualizer templates. This platform was made for creators who want to create rich visual intros, looping animations, or podcast promo visuals with minimal editing effort.
- High-quality studio-style visualizer animations
- Custom logo and branding element reveals
- Multi-scene templates for longer episodes
- Color dynamics customized to wave motion
- Fast cloud rendering for HD display
- The most visually appealing template among free tools
- Best suited for podcast channels focused on marketing
- No editing skills required
- Free exports have watermarks
- Limited template flexibility
- Rendering speed depends on the internet connection
Creators who prefer cinematic visualizers or branded podcast intros.
Free with watermark; HD exports require paid credits or subscription.
5. VEED Podcast Visualizer

VEED offers a browser-based audio podcast visualizer with waveform generators, captions, layouts, and social media presets. It is designed for quick editing without installation and is very popular for podcast content focused on social media.
- Sound waves that respond to amplitude in real time
- High-accuracy AI auto-subtitles
- Preset layouts for TikTok, Shorts, Reels, and YouTube
- Brand templates for recurring podcast episodes
- Online editor with timeline tools
- Reliable online workflow
- Ideal for quick social clips
- Efficient auto-caption editing
- Easily resizable for multiple platforms
- Free plan adds watermarks
- Not suitable for long episodes (browser memory limitations)
- Less creative depth compared to full editors
Creators who want fast cloud-based editing and regular short content uploads.
Free with watermark; paid plans remove branding and unlock HD exports.
Part 4. Filmora Veo 3.1: The Best AI Podcast Visualizer for Podcast to Video Transformation
Among the options, Filmora (powered by Veo 3.1) is the best podcast visualizer that gives podcasters an easy way to turn audio into dynamic, visually engaging videos. With its upgraded AI features, you can convert voice recordings into scenes, animations, and expressive talking characters without any complex setup.
Native Audio Driving
- Filmora automatically detects the speaker's voice and converts it into natural movements.
- Lip-syncing, head movements, and subtle expressions follow the tone and rhythm of your narration.
Dialogue Scene Generation
- This AI creates scenes based on the content of your conversation.
- It's suitable for podcasts that contain stories, discussions, or interview-style conversations.
AI Audio to Visual Conversion
Filmora analyzes your audio in depth to create the right visuals.
- Rhythm detection to adjust the scene's pacing
- Emotion detection to adjust character expressions
- Speaker separation so each person gets their own animation
Suitable for: podcasts with multiple speakers, reactions, and commentary shows.
Multi-dialogue and multi-scene support
You can generate multiple sequences in one timeline.
Suitable for:
- Interviews
- Guest episodes
- Podcasts with different segments or topics
Part 5. Step-by-Step: How to Create a Visual Podcast with Filmora Veo 3.1
Turning a podcast into a visual video is straightforward in Filmora as the platform combines three powerful AI systems: Veo 3.1, Sora 2 integration, and Nano Banana Pro. Filmora's podcast visual tools let you generate images, create animated scenes, and sync everything perfectly with your audio. Follow the steps below.
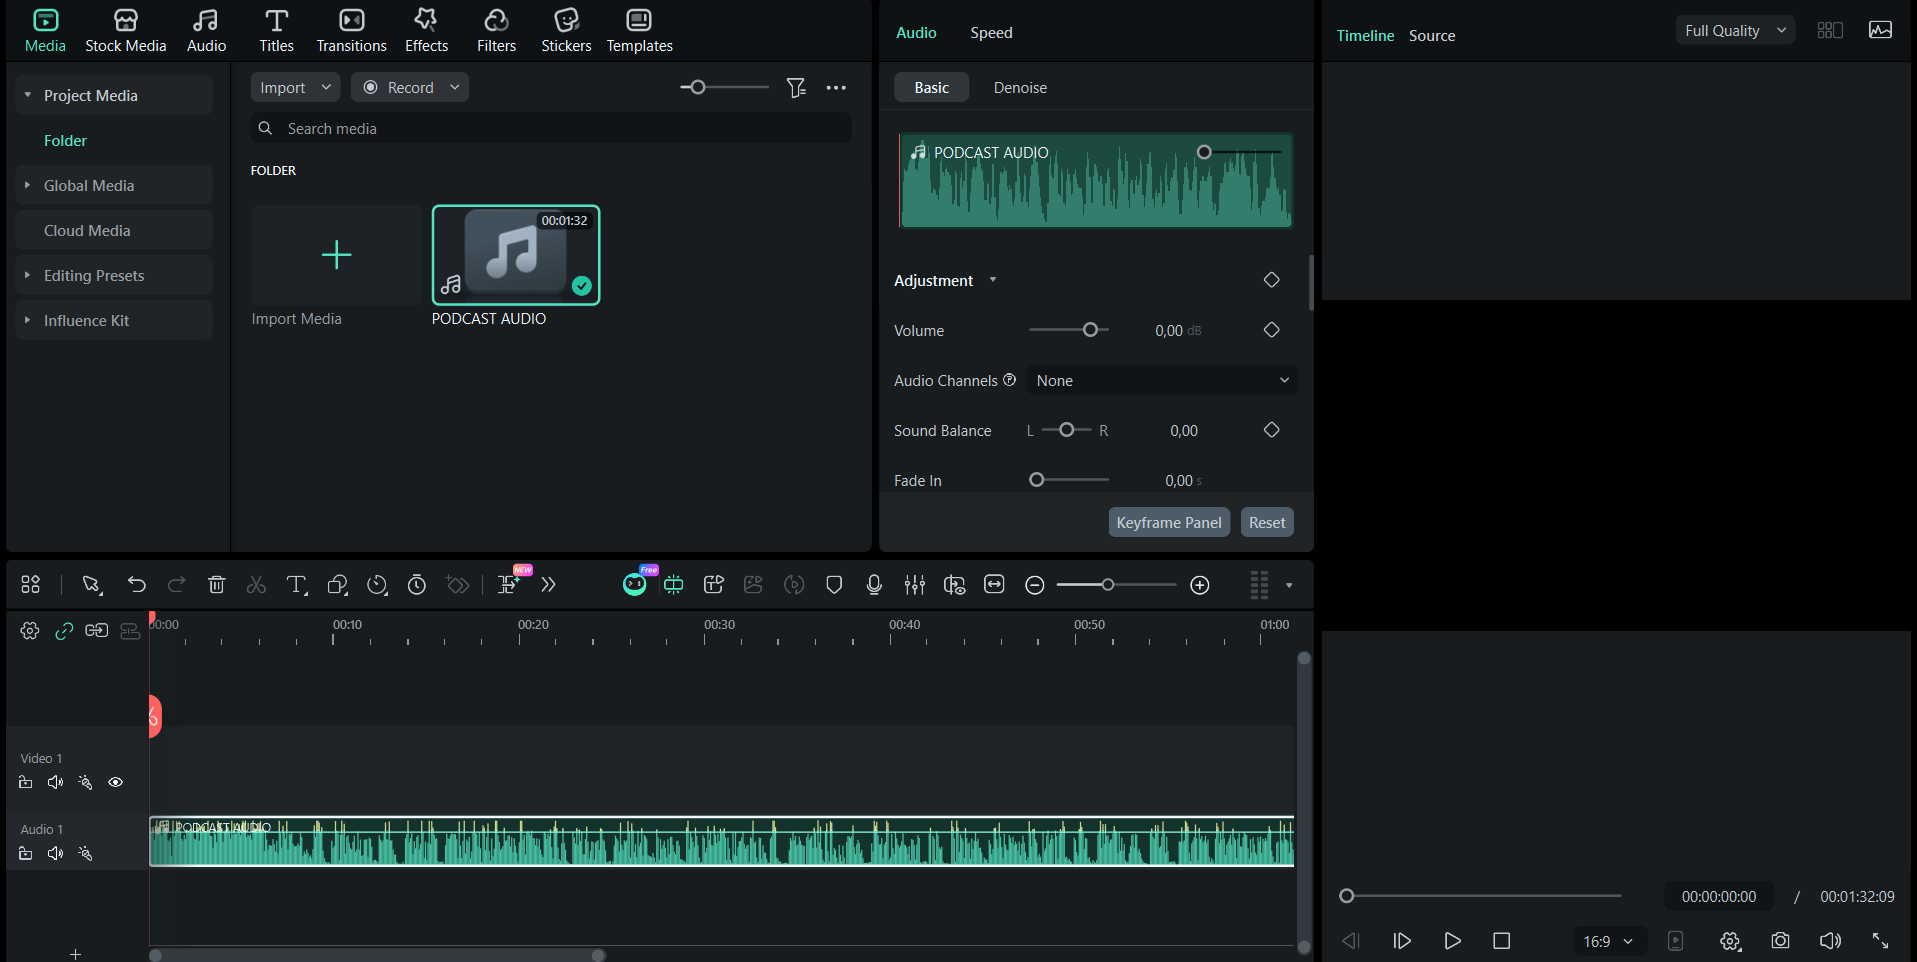
- Open Filmora
- Go to Media and upload your audio file (MP3, WAV, M4A, AAC, etc.)
- Drag it into the timeline
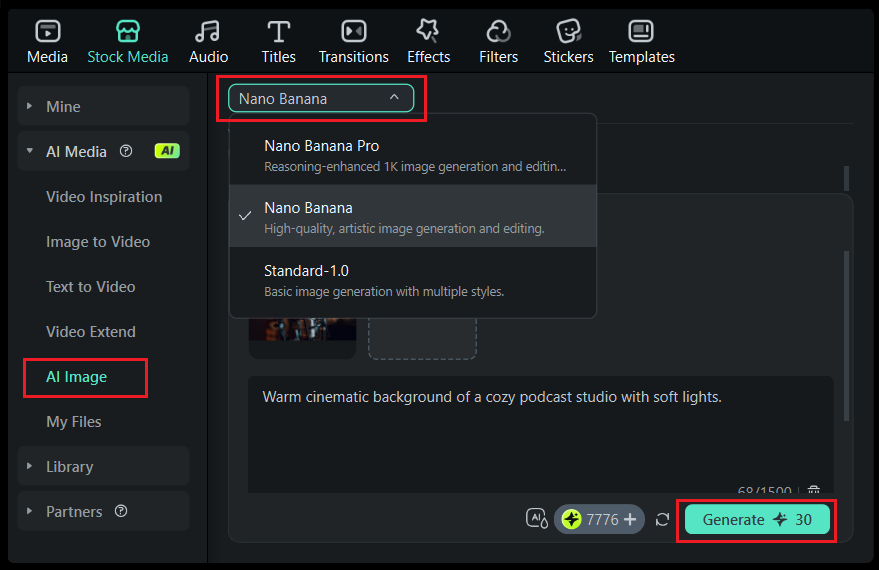
- Go to Stock Media > AI Image
- Choose Nano Banana Pro
- Enter a prompt as needed
- Generate multiple variations
Use these images later for an animated scene
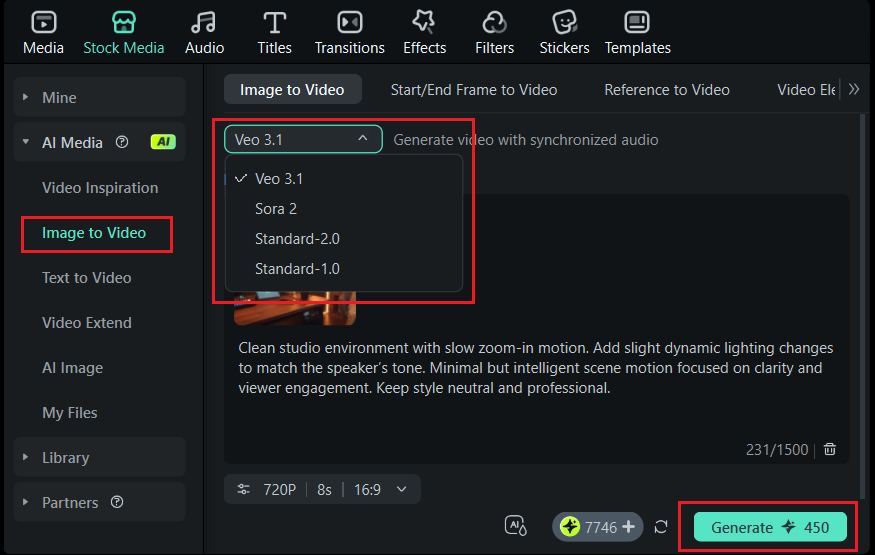
- If you already generated images (or imported your own):
- Go to AI Media > Image to Video
- Select Veo 3.1 or Sora 2
- Upload your image
- Write a prompt describing the motion style, mood, and action
- Click Generate
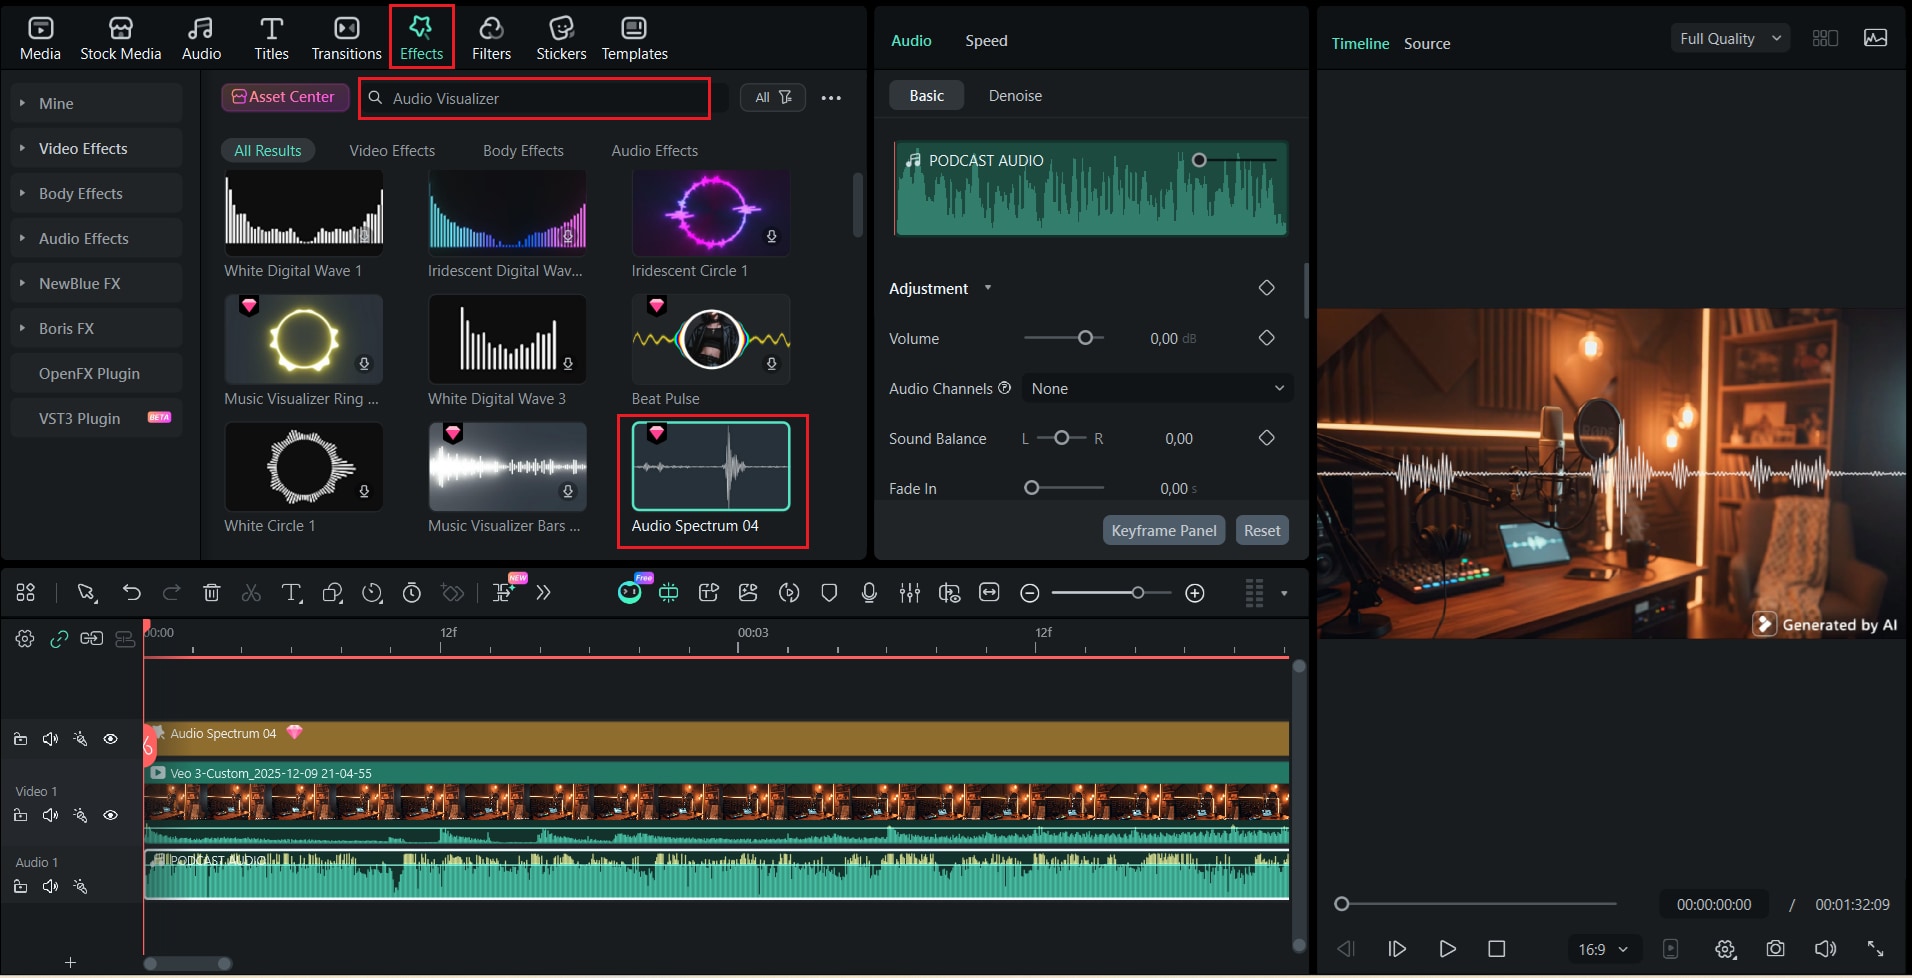
- Go to Effects → Audio Visualizer
- Choose waveforms, spectrum bars, radial pulses, or shapes
- Sync with beat detection (one-click)
- Adjust colors, shapes, opacity, and placement
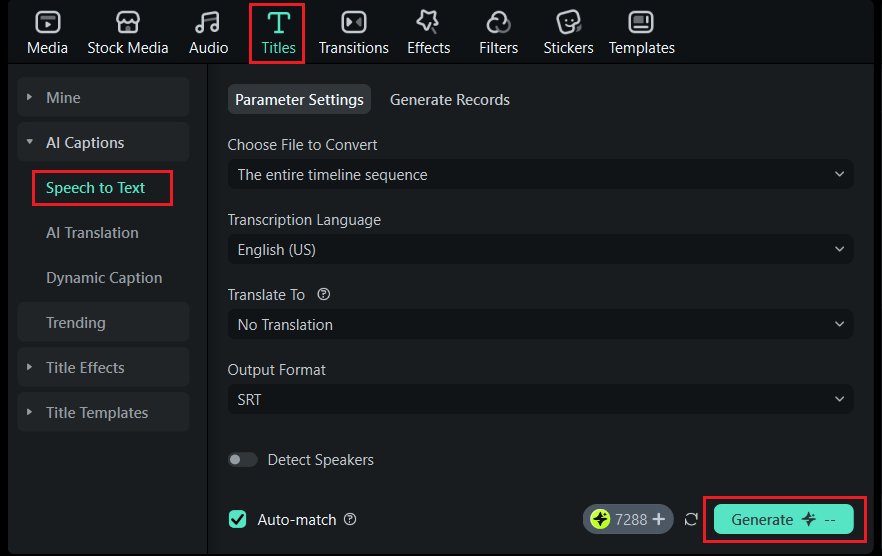
- Go to AI Captions in Audio Tab → Speech to Text
- Choose language and output format
- Filmora will generate accurate captions based on the speaker
- Customize font, background, and animation
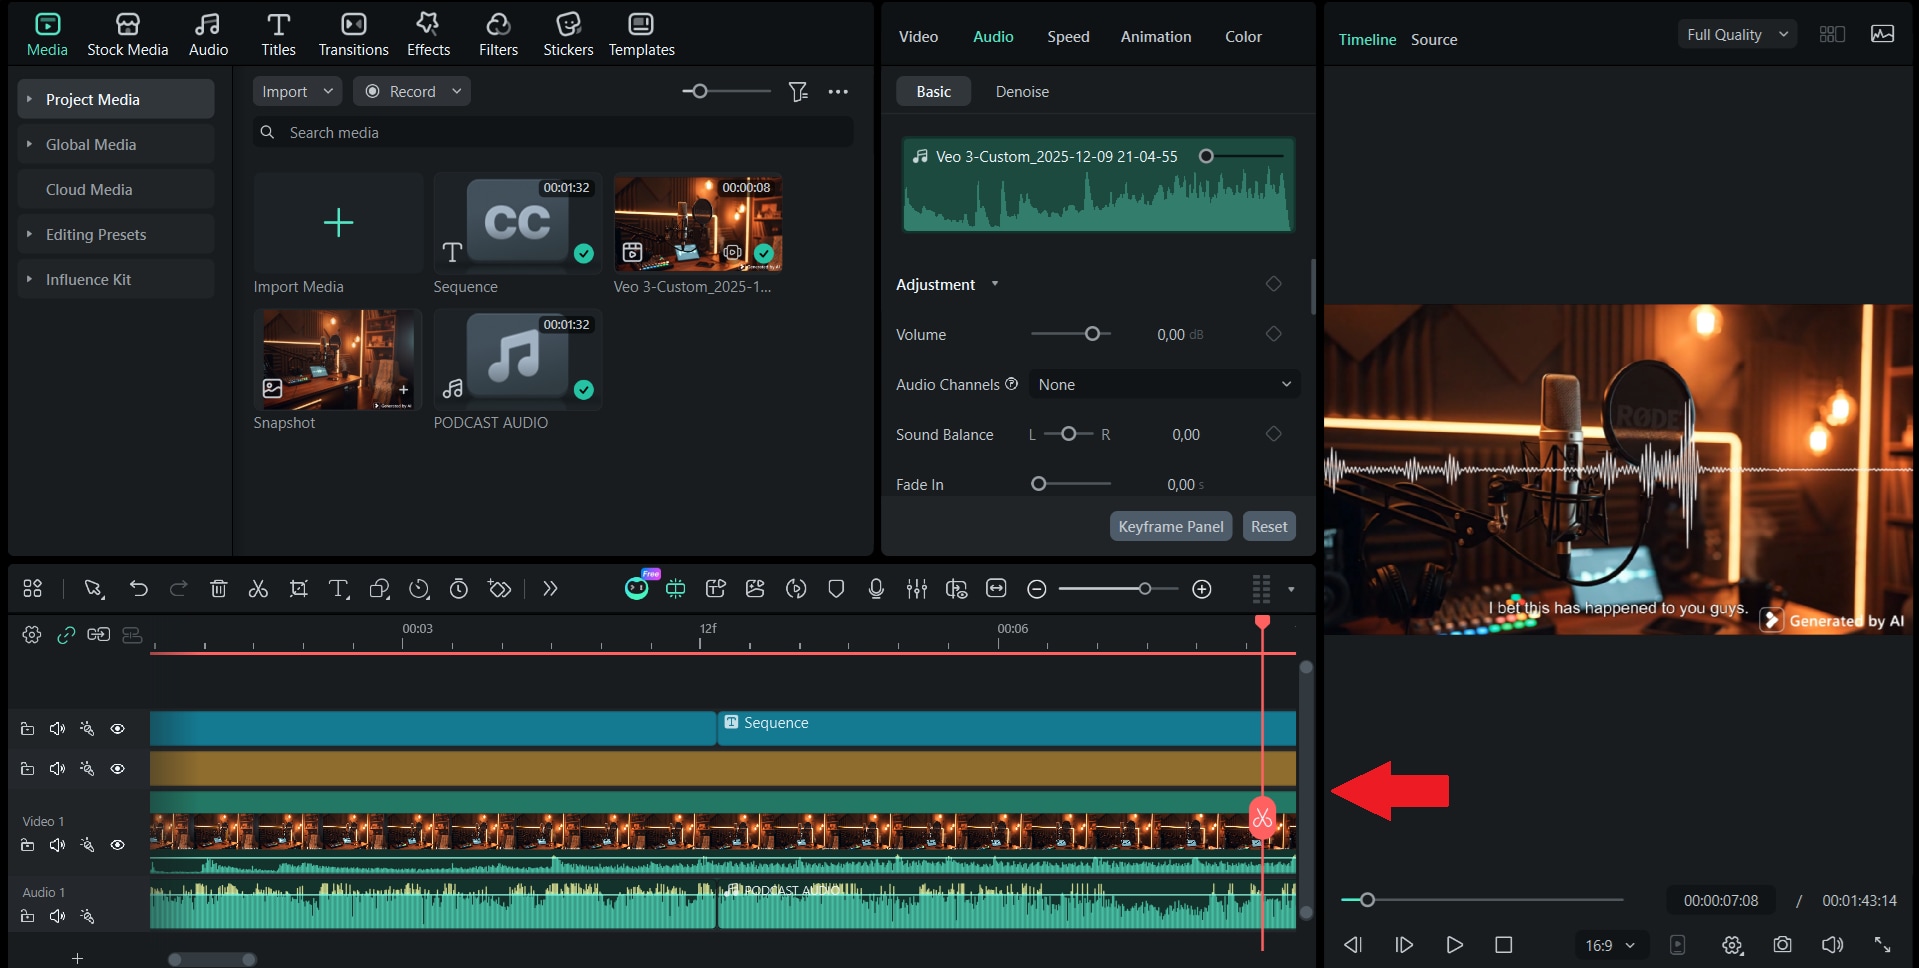
- Place generated scenes on the video track
- Add caption layers
- Add your audio visualizer
- Include transitions or filters if needed
- Reorder scenes to match the flow of your dialogue
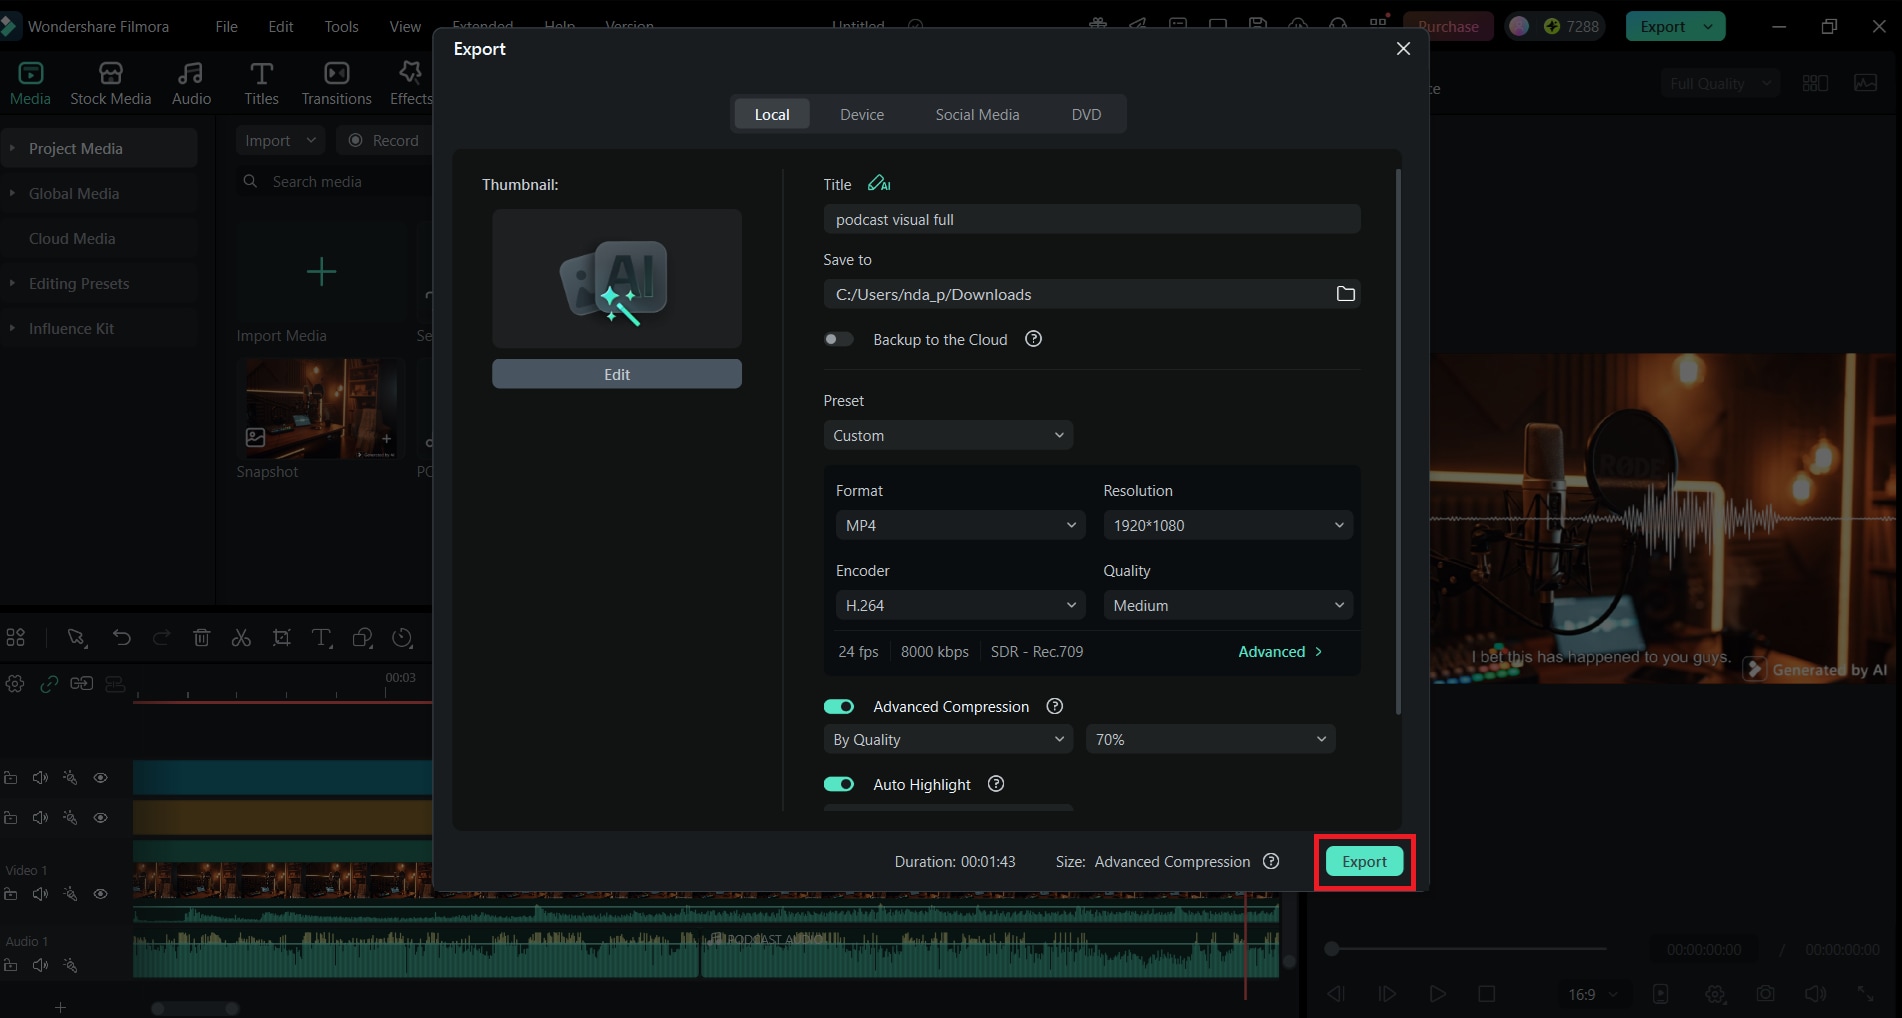
You can choose from various formats, resolutions, and qualities available in Filmora.
Part 6. Best Practices for AI Visual Podcast Production
Creating engaging visual podcasts goes beyond just producing visuals. To make your content stand out on platforms like YouTube, Spotify, TikTok, and Instagram, it's important to follow production best practices that keep your videos consistent, clear, and visually appealing.
Use the tips below to ensure that AI-generated visuals enhance the listening experience rather than distract from it.
Keep visuals consistent with your podcast brand
- Use the same color palette, typography, logo placement, and overall style
- Generate images with consistent art direction using Nano Banana Pro
- Maintain a consistent visual pacing across episodes to build recognizability
Use captions for higher retention
- Auto-generate subtitles in Filmora
- Ensure captions are clean, readable, and timed correctly
- Add emphasis for key moments to improve viewer comprehension
Maintain minimal but dynamic motion
- Avoid overly busy animations
- Use gentle camera movements from Veo 3.1 for a professional look
- Keep motion subtle to let the conversation remain the focus
Use short clips for social media distribution
- Export vertical clips (9:16) for TikTok, Reels, and Shorts
- Create short clips from your full episodes
- Ensure each clip is 10–45 seconds long for maximum retention
Optimize visuals for YouTube and Spotify requirements
For YouTube:
- Use a standout thumbnail featuring your AI visuals
- Add chapter markers
- Use 16:9 landscape for full episodes
For Spotify:
- Use clean visuals with minimal distractions
- Check size limits for video podcast uploads
- Prioritize movement that syncs with conversation
Conclusion
Producing visual podcasts no longer requires complex editing or hours of manual animation. Now, many podcast visualizer tools are available for you to choose from. One of which is the Filmora AI ecosystem, which includes Veo 3.1, Sora 2 integration, and Nano Banana Pro. With these tools, you can transform simple audio into polished and dynamic visuals with a professional look.
You can do everything in one app, from simple sound waveforms to cinematic scenes, or fully animated narratives. Filmora makes the process quick and straightforward. As visual podcasts grow on YouTube, Spotify, and social platforms, using AI tools helps your content stand out and remain consistent.
Try these features in your next episode and give your podcast a visual upgrade!


