- iMovie Complete Tutorial
Easy Ways to Trim Videos in iMovie on Mac & iPhone
Oct 09, 2024• Proven solutions
There can be an easy learning curve when sharing and creating videos with your iPhone, explicitly editing on iMovie.
You don't need fancy editing tools for basic tasks like shortening or trimming video clips and removing unnecessary sections. The most manageable video editing tasks can be a cakewalk in either the iMovie, provided certain limitations. This guide will mainly discuss how to trim video in iMovie.
iMovie is Apple's official video editing program for iOS and macOS platforms. You can use iMovie's "Split Clip" feature to split video clips and make cuts wherever you want in a video. In this post, we'll guide and let you know the detailed steps to trim a clip in iMovie using an iPhone or Mac device.
You may also like:
Part 1: How to Trim Videos in iMovie on Mac?
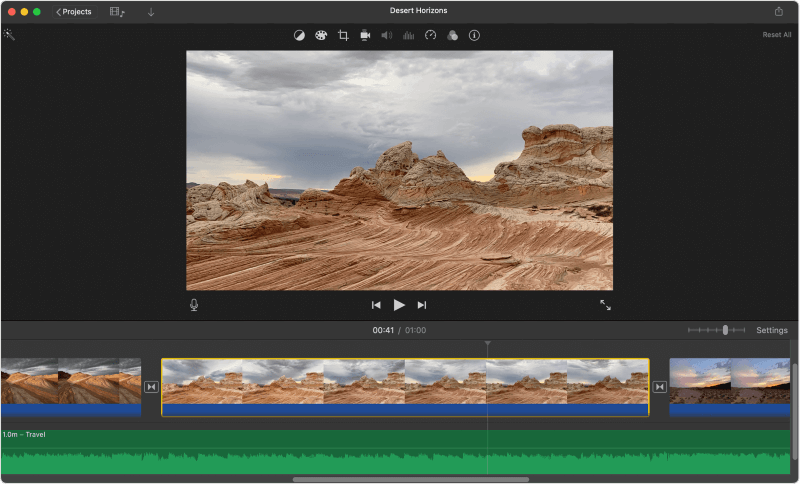
Given below is a detailed section on how to trim in iMovie using a Mac computer.

Source: Apple
Step 1: Open the iMovie app on your Mac
There is a purple-colored iMovie icon, which you can find in the Dock or your Applications folder.
Step 2: Choose the video project you wish to edit
Double-click a video or a movie project on your "Projects" tab and enter the editing panel. It is present in the bottom half of the app’s window.
Step 3: Select the exact moment you want to split or trim your video
Play the video clip in the editor at the screen’s bottom half, and pause it at the exact moment where you wish to split or trim videos.
You will find an entire video clip’s editing roll in the screen's bottom half-section.Left-click any video section on the video roll to jump here.
The vertical, white playhead bar must be at the exact moment where you wish to split or cut the video.
Long press the Space bar on your keyboard to pause and play the video and learn how to trim videos in iMovie.
You can then consider using the right and left arrow tabs to place the playhead one frame backward or forward.
Step 4: Press ⌘ Command + B on your keyboard
This key combo will automatically split the clip into two sections at the ideal portion where the vertical, white video line is.
After using this iMovie clip trimmer, you can choose one of the two portions and remove it by hitting the Delete tab on your keyboard.
Step 5: You can right-click the scene you wish to cut in the video
As a keyboard shortcut, you can hover over the video in the editor at the bottom and right-click on the exact time you want to cut.
Step 6: Choose Split Clip on the right-click menu
It will cut your video at the exact moment you choose.
Step 7: Left-click when you want to know how to trim video in iMovie (optional)
As a final step, you can skim through the video and choose the moment you wish to cut with an easy left-click.
This will automatically locate the vertical, white line at this exact moment in the video clip.
Step 8: Select the Modify tab on the menu bar
This Mac's menu bar button is at the top of your screen. It will open a drop-down menu. Click Split Clip-on on the drop-down menu to remove the clip at the exact moment you have chosen with your left click.
So, that is how to trim a clip in iMovie on Mac devices.
Part 2: Easily Trim Video Clips with iMovie Alternative - Wondershare Filmora
Removing unnecessary portions from a recorded video is a regular task in video editing. You must be familiar with situations like this: you have captured a good video, but it consists of unnecessary sections and irrelevant content, making it imperfect to share on different social media channels. That's where video trimming comes in.
To make things pretty effortless, you can cut the video into different smaller sections and delete the unwanted clips based on your video creation requirements.
Thus, we highly recommend Wondershare Filmora, an easy-to-use yet excellent video editing software, which assists you in learning how to trim a movie into different sections and offers various video editing features to make a great home movie.
Filmora offers two methods for you with regard to trimming videos:
Method 1: Timeline Split
Step 1: Choose the video clip you wish to trim in the timeline, locate the playhead exactly where you want the similarities of the iMovie clip trimmer.
Step 2: After locating the playhead on the timeline's correct spot, open the menu. Then, right-click the video clips and choose the Split option. You can also select the red scissor icon on the timeline.
Note: You can choose to hide the red scissor icon by tapping Preferences > Editing, and then uncheck the Split Button.
Method 2: Scene Detection
If your video consists of different scenes or shots, you can easily split it into diverse clips with the scene detection tool in the Filmora.
Step 1: Choose the video you wish to split within the media library and right-click on the video file and Scene Detection in the options menu.
Step 2: Click the Detect tab after a new scene detection window will display. Depending upon the video clip transitions, it will break down into different sections.
Part 3: How to Trim a Video Clip in iMovie on iPhone/iPad?

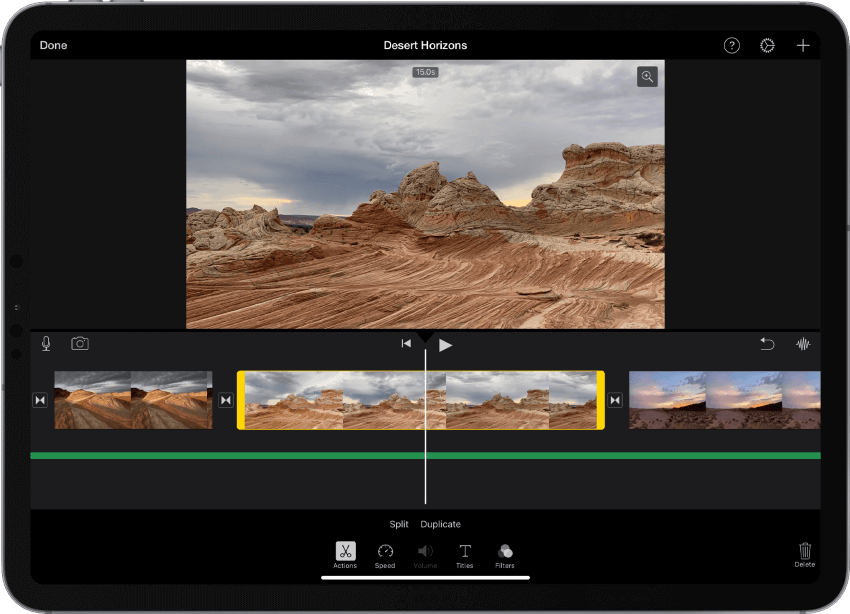
Source: Apple
Given below are the exact steps on how to trim videos in iMovie on iPhone.
Step 1: Open the iMovie app on your iPhone
There is a purple-colored iMovie icon which you can find in the app folder on your home screen.
Step 2: Choose the project you wish to edit
Choose the movie or video project you wish to edit on the "Projects" page to open its details.
Step 3: Select the Edit tab
You can find this button below the title and video thumbnail. It will open the chosen video in the editor.
Step 4: Drag and hold down the video roll at the bottom
You can drag and hold down the video roll at the screen’s bottom and drag it to the ideal place on your iPhone. You will see an entire video’s editing roll in the screen’s bottom half.
Make sure to locate the vertical, white playhead at the exact instant you want to split the clip.
Step 5: Tap the video roll in the editor’s bottom area
It will display a yellow highlight around the editor’s video roll and display your editing tools at the screen’s bottom.
Step 6: Choose Actions on the toolbar’s bottom area
This button displays like a scissor icon. It will display your video actions.
Step 7: Select the Split button above the toolbar’s bottom
It will remove the video where you see the vertical, white line.
So, that is how to trim a clip in iMovie on iPhone.
Conclusion
We shall finally close our topic on how to trim videos in iMovie using Mac, iPhone, or iPad, and its best alternative - Wondershare Filmora. We've discussed the most manageable steps to trim a clip in iMovie, even though these are pretty lengthy. Therefore, we've highly suggested Wondershare Filmora, which can be an excellent video clip trimmer.
Explore this guide to discover an easy way to convert your long videos into viral shorts on Mac.
by Marion Dubois Oct 08, 2024 14:37 PM


Marion Dubois
staff Editor