In the second lesson of this series of tutorials, we will show you how to adjust project settings, import media and save projects in Filmora9.
Creating projects and importing media

In the previous tutorial, we learned how to load an existing project or start a new project from the Filmora9’s welcome screen. We also looked into different aspect ratios you can choose before creating a project.
Filmora9 won’t let you save a project until at least one media file is imported into the project. Click on the Import Media Files Here icon to add a video clip to the Media tab.

Head over to the File menu, locate the Save Project As option and click on it. The Save As window will pop up on the screen and you can choose to save a project is Filmora9’s default destination folder or navigate to the folder in which you want to store your projects.
Adjusting the Project Settings
After saving a project, you should return to the File menu and click on the Project Settings option.
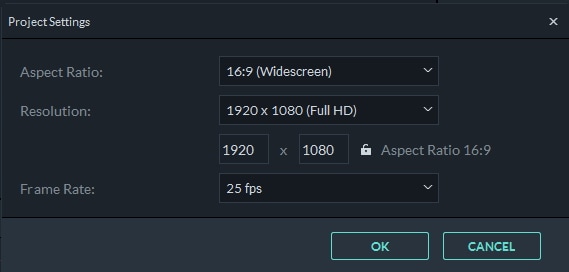
The Project Settings window that lets you change a project’s aspect ratio, resolution and frame rate will appear on the screen. You choose from 16:9, 1:1, 9:16, 4:3, 21:9 or Custom options in the Aspect Ratio drop-down menu. The 16:9 aspect ratio is going to be selected by default, and there is no reason to change it unless you want to create a square or vertical video for your Instagram account.
You can change the project’s resolution to 4096x2160p (DCi 4K), 3840x2160 (UHD 4K) or use the Custom option from the Resolution drop-down menu if you are editing footage captured in 4K resolution. However, 4K displays are still relatively rare, so it is best to opt for the default 1920x1080p Full HD resolution because most cameras record footage in this resolution.
In case you’re looking for a way to create a video file you can easily upload to the Internet, the 1280x720p HD resolution is probably your best choice, as it will reduce the size of the file you export from Filmora9. However, setting the project’s resolution to HD can decrease the picture quality.
The Frame Rate drop-down menu lets you set the frame rate of the entire project. Smartphones commonly record videos at 30fps, but standard video cameras capture footage at 23. 97fps. So, which frame rate you’re going to select depends on the project.
It is not vital to know the resolution or the frame rate of a media file in order to use it in a project. Filmora9 is going to show you a prompt message informing you that you can match the project settings to media or keep the current settings after you add a video clip to the timeline.
Uncheck the Always Ask tickbox if you don’t want Filmora9 to notify you every time you attempt to add a video clip to the timeline that doesn’t match the project settings. You should save the project before you close Filmora9, by using the Ctrl+S keyboard shortcut on Windows or Cmd+S shortcut on macOS. Optionally, you can use the Save button located in the top right corner of the window that looks like a floppy disk to save a project quickly.
