The demand for video content is rising continually for the last ten years, and this trend is expected to continue in the foreseeable future. It has never been easier to make the videos you can share on social media, even if you don’t have professional video recording equipment.
Filmora9’s screen recording feature enables you to create gaming videos, tutorials, or capture any other activity you perform on your computer’s screen from the comfort of your home. So, in this tutorial, we are going to show you how to record a desktop screen with Filmora9.
How to Record a Desktop Screen with Filmora9
Setting up a new screen recording session in Filmora9 is an intuitive process that can be mastered by anyone regardless of how much video editing experience they have. Once the Filmora9’s main window loads you should click on the Record drop-down menu, which is located next to the Import menu in the Media tab, and choose the Record PC Screen option.

The first thing you will have to do after the Wondershare Filmora Scrn window pops up on the screen is specify which area of the screen you want to record. You can do this by clicking on the Rectangular icon on the right side of the screen and then choosing either Full Screen, Custom, or Target Window option.
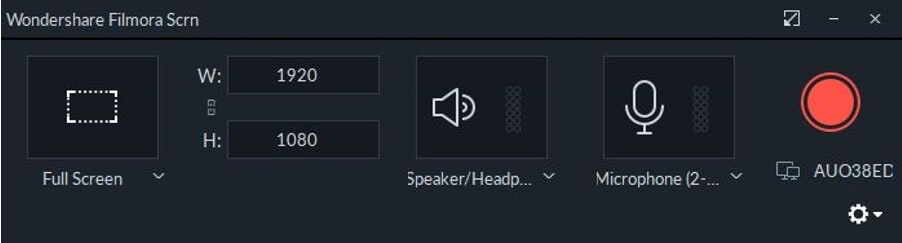
Opting for the Full Screen setting will enable you to capture the entire screen, while the Custom option allows you to define the area of the screen you would like to record. You should select the Target Window option if you just want to record a particular window on your computer.
Filmora9’s users that have a dual monitor setup can choose which screen they want to record by clicking on the icon below the Record button and picking the device they want to capture.
If you have more than one microphone connected to your computer, you can click on the Microphone icon to select the one you are going to use to record the narration for the screen recording you’re making. The Speaker icon next to it lets you decide if you want to record computer sounds during the screen capturing session.
Clicking on the Settings icon in the lower right corner of the Wondershare Screen Recorder window will grant you access to additional options.

The Save To option allows you to specify the location at which your screen recordings are going to be saved after you stop recording, while you can choose how many frames per second your screen recording is going to have in the Frame Rate menu.
The Quality menu lets you choose between Good, Better, and Best image quality options, but keep in mind that selecting Better or Best image quality options is going to impact the size of the video file you’re creating. Clicking on the Stop Recording after checkbox in the Record Timer menu will allow you to set the amount of time after which Filmora9 is going to stop capturing the screen automatically. By default, Filmora9 will stop recording after 24 hours.
Check the Show Mouse Clicks in Recording checkbox if you want to select the color in which your mouse is going to be displayed in the screen recording while checking the Play Mouse Click Sound will enable you to hear mouse clicks throughout the recording.
Even though Filmora9 lets you change the default hotkeys for Pause/Resume and Start/Stop commands, you should only do so if the new hotkeys you select make the screen capturing process more efficient. Leave the Record the Camera Stream unchecked if you don’t want to record your computer’s screen and the webcam feed simultaneously.
How to Record Desktop Screen and Webcam at the same time?
Including the webcam footage in your screen recordings can be a great way to make your tutorials or gaming videos more visually engaging by showing the viewer the video’s host.
All you have to do in order to enable the webcam stream is to click on the Record the Camera Stream checkbox that is located in the Camera menu. You should then proceed to select the camera you will be using to capture the webcam footage.
The window that displays the webcam feed is going to appear on the screen and you can change its location by simply dragging and dropping it to a new position. In case you are using the Custom option to specify the area of the screen you want to record, you should make sure that the webcam window is positioned within the recording area.
Hit the Record button when ready, and start performing the activities on your computer you want to record.
Conclusion
Customizing the settings for a screen capturing session in Filmora9 doesn’t take more than a few moments of your time, which means that you can adjust the settings to the demands of the project you’re working on. After you’ve recorded the video you can use Filmora9’s video editing tools to polish the footage before you upload it to the Internet.
