Recording a skydiving experience, kayaking expedition or any other breathtaking adventure you may embark on with a GoPro or some other action camera is not enough, as you have to put the pieces of the footage together in order to share it with your friends on social media.
Filmora9 is equipped with all the tools you are going to need to edit GoPro action cam videos effortlessly. So, in this tutorial, we are going to show you how to use these features while working on an action cam video project in Filmora9.
Part 1: What Does Action Cam Video Refer To?
Unlike professional video cameras or DSLRs, action cameras don’t require your full attention while you are recording. This means that you can easily mount them on a helmet, motorcycle, or other vehicles and gadgets you are using on your adventure. Action cams allow your hands to be free, which enables you to record videos in situations you wouldn’t be able to capture with a compact, DLSR, or professional video camera.
An action video can be any video recorded while performing an outdoor activity. Surfing, downhill biking, or mountain climbing are just a few among countless contexts in which you can capture an action cam video. In most cases, action cam videos are shot from the first person by either having the camera attached to your body or handheld.
Consequently, you won’t always be able to control what is in your shot, but this can be easily fixed in a video editing software like Filmora9.
Part 2: How to Perform Fisheye Lens Correction in Filmora9
Changing a lens on a GoPro or any other action camera is not an option, and if the camera model you have is equipped with a fisheye lens, you will only be able to take ultra-wide panoramic shots. However, fisheye lenses also distort the image, making it look hemispherical. In practice, this means that straight lines are going to be curved in your action cam video, but the Filmora9 Fisheye Lens Correction feature offers you a quick way to fix this.
After you create a new project and import the action camera footage into Filmora9, you should place a video clip that requires lens correction onto the timeline and double-click on it.
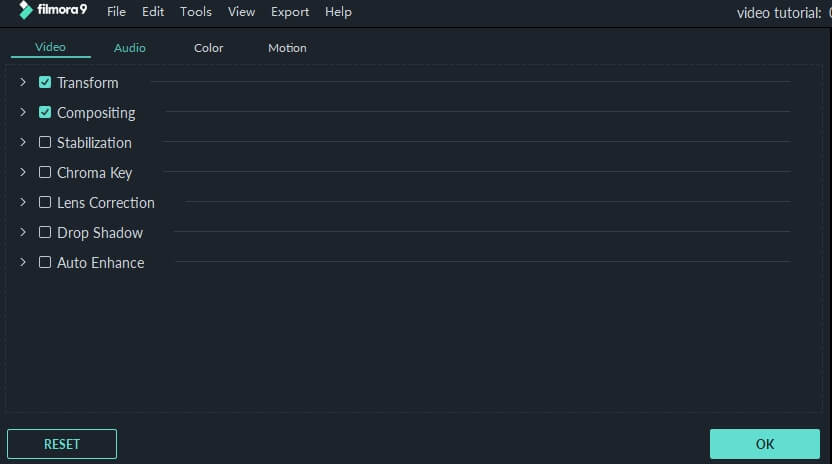
The Video Tab that contains a number of sub-menus will open in the upper left segment of the Filmora9’s window. Locate the Lens Correction submenu, and click on the checkbox next to it in order to enable this feature. Afterward, you should expand this submenu by clicking on the arrow next to it.
Proceed to choose the camera model you used to capture the video clip you are editing from the Select Model drop-down menu, and then select the resolution in which the footage was captured from the submenu directly below.
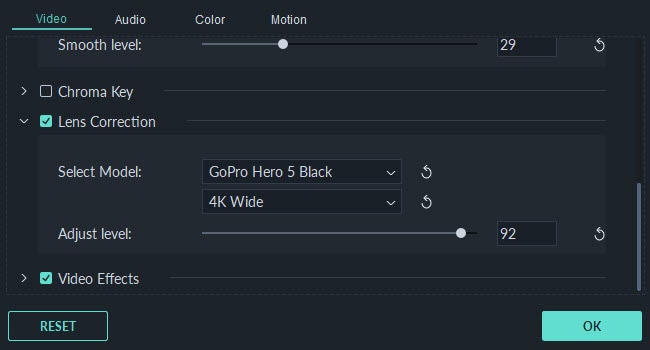
Use the Adjust Level slider to perform the fisheye lens correction and reduce the level of distortion in the shot. All changes will be visible in the Preview Window as soon as you make them so that you can easily see which Adjust Level value best suits the footage you’re editing. When done, click on the OK button to confirm the changes you’ve made.
Part 3: How to Stabilize Footage with Filmora9 Stabilization Feature?
Each shake of an action camera is going to produce uneven camera movement that can render the footage unwatchable. Filmora9’s Stabilization feature enables you to smoothen a jittery video in just a few easy steps.

Place the video clip you would like to smoothen onto the timeline and double-click on it to open the Editing panel. Expand the Stabilization menu in the Video tab, and click on the checkbox next to it to allow Filmora9 to analyze your video.
The Smooth level slider will become accessible as soon as the video editor is done analyzing the footage. Simply drag the slider to the right to stabilize the video and use the Preview Window to monitor the results. Click on the OK button once you’ve found the perfect Smooth level value for the video clip you stabilized.
Part 4: How to Change the Playback Speed of Action Cam Videos?
Changing a video’s playback speed in Filmora9 is a simple task that won’t take more than a few moments of your time. You should start by double-clicking on the video clip whose playback speed you want to change in the Media tab and then use the Mark In and Mark Out buttons to set the In and Out points for your video.
Drag the clip from the Preview Window to the video track on the timeline and repeat this process for all the video clips you want to use in your project. Right-click on the video clip you added to the timeline and choose the Speed and Duration option from the menu.

The Custom Speed window will pop up on the screen, and you can proceed to change a video clip’s playback speed using the Speed slider or alter its duration by inserting a new value into the box next to this option. Clicking on the Reverse Speed checkbox will enable you to play a video clip in reverse. Click on the OK button when done and view the results in the Preview Window.
Conclusion
Editing a GoPro action video isn’t much different than editing any other type of video, although the video editing tricks we presented in this tutorial might help you get better results. Even though using Filmora9’s Fisheye Lens Correction and Stabilization features, or altering a video’s playback speed is easy, finding creative ways to use these video editing tools might prove to be a more challenging task. However, making a dynamic action camera video in Filmora9 shouldn’t be too difficult even for inexperienced video editors.
