Are you ready to export a video? In this tutorial we’ll show you how to export media to a local hard drive, your YouTube or Vimeo channels or burn a video to a DVD directly from Filmora9.
Preparing to export a project
Exporting a video is the final step of the video editing process, and you have to be absolutely sure that you don’t want to edit the footage further before clicking on the Export button. The settings you select at the Export window will determine the size and the quality of the files you create.

To start exporting a project you just have to click on the Export button in the top center of the screen. The Export window contains the Local, Device, YouTube, Vimeo and DVD tabs, which enables you to choose if you want to export a video to a local hard drive on your computer, create a video for an iPhone, Xbox one or similar devices.

Filmora9 also lets you export a video directly to your YouTube or Vimeo channels so that you don’t have to spend extra time uploading videos to the Internet. The DVD tab allows you to change the label or the video quality of the video you’re burning to a DVD.

Adjusting the Export Settings
Unless you want to export a video directly to social media or a DVD, you should head over to the Local tab, where you can select the format of the output file, change its resolution or adjust the audio settings.
Formats
Filmora9 offers a variety of video and audio file formats, but it is best if you choose the MP4 video format because it is compatible with both macOS and Windows operating systems.
Click on the Settings button to bring up the Settings window where you can adjust the video and audio settings for the project you’re exporting.

Quality
At the top of the window you can select the quality of the output video file, but keep in mind that increasing file’s video quality also increases its size.
Encoder
The Encoder drop-down menu lets you choose between 2 options. You can select from MPEG-4 or another encoder based on your needs.
Resolution
The resolution is the number of pixels on the horizontal and vertical sides of each frame in a video. Filmora9 lets you export a video in 4K and Full HD resolutions. However, a 4K video file is four times larger than a Full HD file, which makes videos in 4K resolution more difficult to upload to the Internet.
Ultimately, which resolution you are going to choose depends on the resolution in which the original footage was recorded. Selecting the 1920x1080p resolution is recommended if you want to upload your videos to YouTube, Instagram or any other social media.
Frame Rate
The frame rate indicates how many images per second are being displayed in a video. The vast majority of videos recorded on video cameras is captured at 24fps. Videos recorded with Smartphones often have 30fps, so which frame rate you are going to select depends on the frame rate at which the video clips were captured. Opting for the 24fps frame rate is a better option if the footage was recorded with a DSLR or any other video camera, while 30fps option is recommended for videos captured with a Smartphone.
Bit Rate
The Bit Rate adjusts to the Video Quality setting. If you change video quality from Good to Better, the Bit Rate is going to jump from 6000kpbs to 8000kbps. Increasing the Bit Rate is recommended if you work with high-resolution files.
Channel
Click on the Channel drop-down menu if you want to export sound as Mono, Stereo or 5.1 Surround Sound.
Hit the OK button to confirm the changes you’ve made in the Settings window, and proceed to rename the file or choose a destination folder.
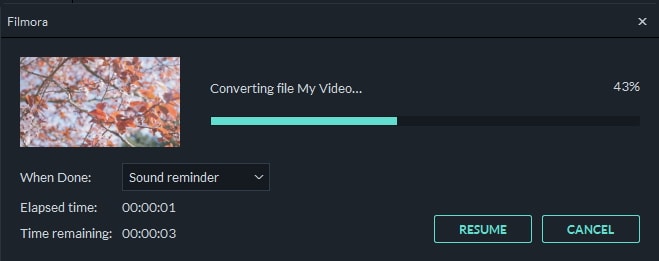
The rendering process is going to start as soon as you click on the Export button. Exporting will take a while, so you can use the When Done menu to set a sound reminder which will alert you when the rendering is completed or to shut down the computer after the video is exported.