

 100% Security Verified | No Subscription Required | No Malware

 ChatGPT
 Perplexity
 Gemini
 Claude
 Grok
Grok
The loop ping pong After Effects feature lets you create back and forth animation without making a lot of keyframes. Once the animation reaches its final frame, the tool will play it in reverse and then forward again. This cycle continues, allowing you to create an endless animation.
The problem is that most do not know about this feature or can't find it. You have to type the feature name to use it. So people tend to look for easier-to-use alternatives. You can find one right here. Continue reading to learn about Filmora's Keyframe Animation Presets.
In this article
What Is a Ping Pong Loop?
A ping pong loop is an endless animation that goes back and forth. You select a starting frame and an end frame. Then, the animation plays out. After reaching the final frame, it will loop back to the beginning frame. But instead of instantly jumping there, a ping pong loop plays the animation in reverse.
That said, the common use cases for ping pong loops include:
- Character idle animations, such as breathing, swaying, and blinking effects
- Swinging motions or pendulum animation
- Animating balloons or other floating objects
- Logo animation
- Simple dance
- Background loops
Common Tools or Workflows
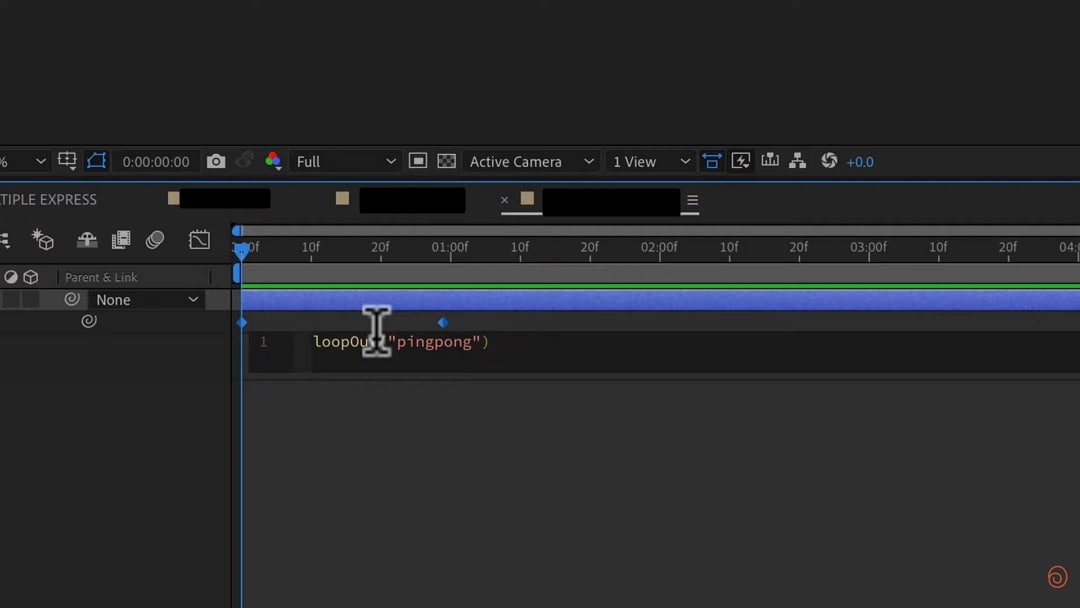
You can use Adobe After Effects to create ping pong loops. It is accessible through the loopOut expression. Then, use the pingpong loop name. Admittedly, the process could be a little more intuitive. Users may not be able to find this feature if they do not know the expressions to use. Here is a simple guide:
Step 1. Create the Initial Keyframe
Select a layer and press P. Click Position and then the Stopwatch next to it. It will create the initial keyframe.
Step 2. Move the Playhead
Drag the playhead to how long you want a sequence to be. For example, drag it to the 1-second mark.
Step 3. Set the Final Keyframe
Move the shape to where you want it to be at the end of the sequence. Adobe After Effects will automatically create the final keyframe when you let go.
Step 4. Add the Ping Pong Expression
Select the layer again and then press P. Hold the ALT or Option key and click the Stopwatch. The expression editor will open. Replace what's written there with loopOut("pingpong"). Type it exactly like that.
Challenges or Limitations
Here are the limitations or challenges users face when using the pingpong loop feature of After Effects.
Complexity
It is not easy to use. While the tool automatically makes the initial and final frames, things get complicated when you consider things like rotation. On top of that, you need to actually know the expression name and format to create a ping-pong animation. It's something you may never know of if not for guides.
Time-Consuming Setup
You need to select the starting and end frames. You also need to move the object manually to set its path. Sometimes, you may even need to adjust the object's rotation. It all adds up to a time-consuming setup.
Learning Curve
You have to learn how to set the keyframes and what keywords to use. Additionally, you have to know the keyboard shortcuts if you want to save time. It can be a steep learning curve.
Available Solution: Try Wondershare Filmora's Trim Path Feature
You can use Wondershare Filmora's Trim Path feature to animate strokes, lines, and outlines. It has a ping pong playback mode that allows you to play the animation back and forth. The tool is easy to use and takes only a few clicks.
Comparison Between After Effects and Wondershare Filmora Pingpong Loop
In Adobe After Effects, you can apply the ping-pong loop to many things. For example, you can create a pendulum or a grandfather clock.
On Wondershare Filmora, it is only for things drawn using the Pen tool. You can use the strokes to create letters or symbols, but that takes time and patience. You can also select objects from the Preset library. It automatically follows the path that you set. It even rotates by itself. However, the selection is a little limited at the moment.
However, when it comes to ease of use, Wondershare Filmora edges out. You can make ping pong loops in just a few steps. You don't need to remember keyboard shortcuts or keywords. Its intuitiveness makes it more useful to more people.
| Wondershare Filmora | Adobe After Effects | |
|---|---|---|
| Ease of Use | Beginner-friendly | Steep learning curve |
| Creative Control | High flexibility | Animating strokes only |
| Performance | Great performance | Great performance |
| Pricing | $49.99 - perpetual $29.99/year $9.99/month |
$20.99/month billed annually $31.49/month billed monthly $239.88 annually |

 secure download

Quick Tutorial
Here's how to use Filmora's ping pong loop feature:
Step 1. Import Your Media and Draw a Path
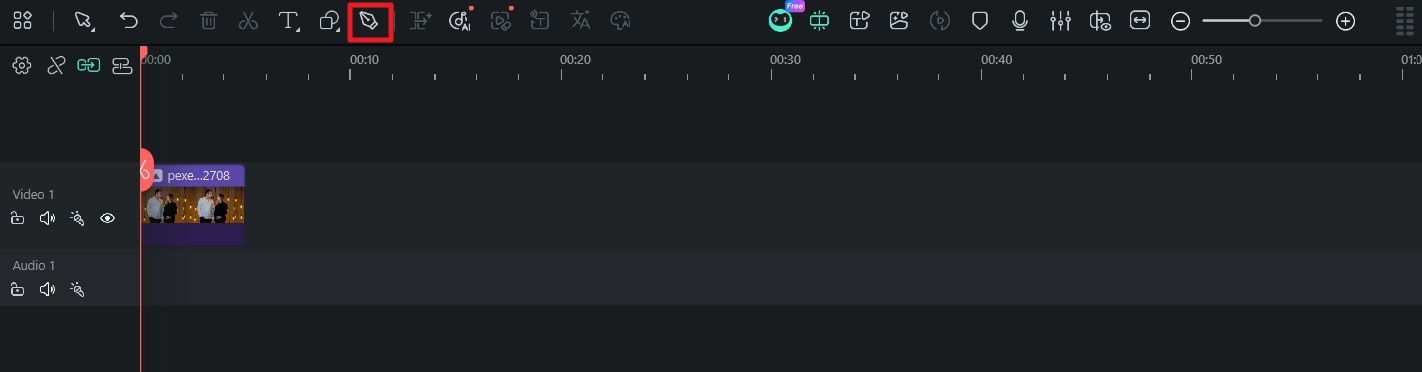
Import the media file that you want to use and add it to the timeline. Click on the Pen tool and draw on the image or video.
Step 2. Open Trim Path
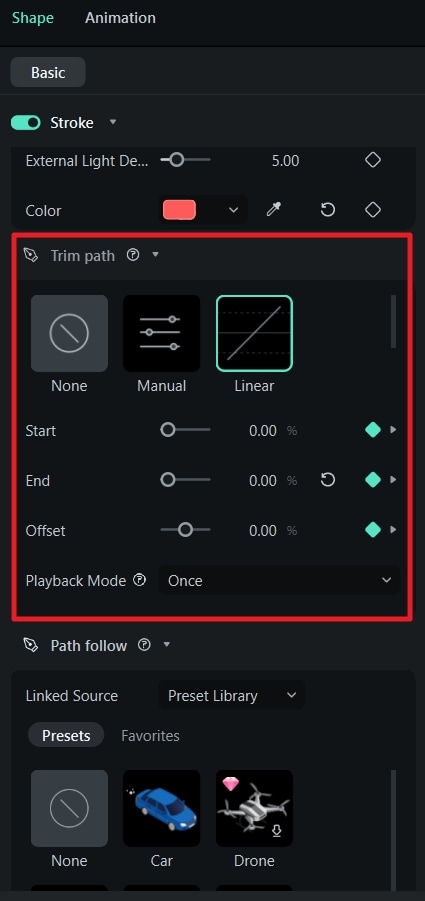
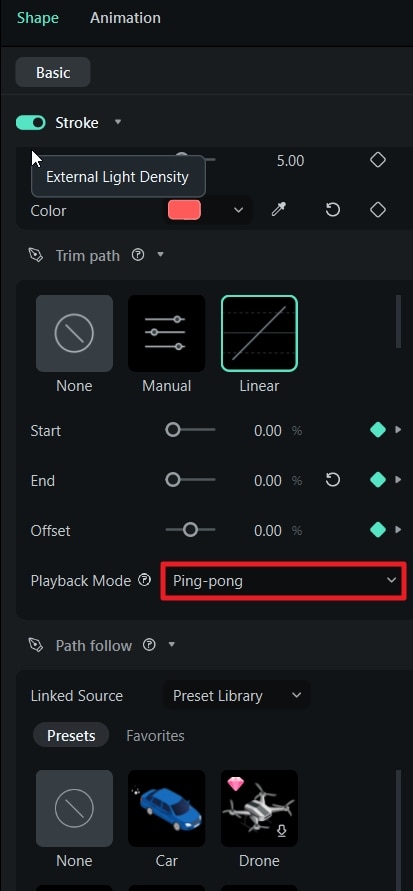
On the left toolbar, scroll down to find Trim Path. There, you can set the Starting frame, End frame, and Offset. You can also select from the presets to customize the animation.
Choose from:
- Custom
- Linear
- Ease In
- Ease Out
- Ease In & Out
Step 3. Select Ping-pong Playback Mode
Click the dropdown menu for Playback Mode and select Ping-pong.
Step 4. Extend the Animation and Export
To let the animation play, click on the Pen layer and increase its length. Export your video.
Practical Use Cases
Energy Flow and Electrical Effects
Use Trim Paths to simulate energy traveling through wires, circuits, or connected lines, then reversing direction to create a continuous back-and-forth current effect.
Light Trails and Motion Streaks
Create glowing trails that move along paths such as beams, lines, or abstract shapes, then return in the opposite direction to maintain a constant flow of motion.
Radar and Scanning Visuals
Animate sweeping arcs or circular paths that move outward and then retract, simulating radar scans, sonar pulses, or detection waves.
Abstract Background Motion
Use looping path animations on geometric shapes, lines, or patterns to create subtle, atmospheric movement in backgrounds for videos or motion posters.
Kinetic Illustration Accents
Add life to illustrated elements by animating outlines or contours that draw and retract repeatedly, making static artwork feel dynamic without changing composition.
Symbolic Emphasis Effects
Highlight important shapes, icons, or visual elements by having their outlines trace forward and backward continuously, reinforcing focus without abrupt transitions.
Flow and Direction Studies
Visualize movement paths such as wind, water currents, or directional flow by animating strokes that travel forward and backward along the same route.
Cinematic Transition Elements
Use looping line animations as transitional overlays that maintain visual continuity between scenes without relying on one-time reveals.
Organic Motion Enhancements
Combine Trim Paths with soft easing to create breathing-like or pulsing motion in illustrated objects, enhancing realism in stylized animation.
Stylized Tech and Sci-Fi Graphics
Design futuristic line systems, holographic outlines, or digital constructs that constantly trace and retrace to reinforce a sense of energy and system activity.
Conclusion
Ping pong loop in After Effects can be handy for editors. However, it may not be the right option for people looking for more beginner-friendly tools. It's a little too advanced.
Suppose you are also looking for an easy alternative that performs just as well. Check out Wondershare Filmora. The Trim Path feature allows you to animate strokes and create a ping pong loop effect. It takes only a few clicks, so it's easy to pick up and understand. Free users can access the feature, so give it a try now.
secure download FAQs About Ping-Pong Loops in Trim Paths
-
What is a Ping-Pong loop in Trim Paths?
A Ping-Pong loop in Trim Paths is an animation behavior where a stroke is revealed in one direction along a path and then automatically reverses back along the same route. Instead of restarting from the beginning after reaching the end, the motion continuously travels forward and backward, creating a seamless back-and-forth animation. This makes the movement feel continuous and fluid, especially for looping motion graphics. -
Why use a Ping-Pong loop instead of a standard loop?
A Ping-Pong loop is often preferred over a standard loop because it avoids the abrupt reset that happens when an animation jumps back to its starting point. By reversing direction instead, the motion feels smoother and more natural to the viewer. This type of loop also reduces visual interruption, making it ideal for continuous motion effects where the animation is meant to feel ongoing rather than restarting repeatedly. -
What types of motion work best with Ping-Pong loops?
Ping-Pong loops work best with animations that benefit from continuous directional movement along a path. This includes light trails that travel and return, energy lines that pulse back and forth, scanning or radar-style sweeps, and abstract strokes used in motion design. It is especially effective when the motion is meant to feel ambient, rhythmic, or visually engaging without representing a one-time action. -
What is the most common mistake in Ping-Pong Trim Path animations?
The most common mistake in Ping-Pong Trim Path animations is using overly fast or overly long movement ranges. When the stroke travels too far or moves too quickly, the back-and-forth motion can feel chaotic or distracting instead of smooth and intentional. Another issue is not controlling easing properly, which can make the direction change feel abrupt rather than fluid. Keeping motion subtle and well-paced usually produces a more polished result.
